This article includes an archive of Release Notes from calendar years 2019 and earlier. The Table of Contents shows the topics in alphabetical order, followed by the hyperlinked Release Notes version/date in parentheses. To read more about any topic, click on the hyperlink or scroll down to the applicable Release Notes version, then click on the collapsible topic headers.
- Warning: Exatouch versions 8.367 and earlier may not fully comply with recently implemented card brand requirements. Electronic Payments, Inc. strongly recommends you update to the latest version of Exatouch to meet these requirements.
- Note: Since these Release Notes are from earlier versions of Exatouch, the look, feel and functionality will differ from current releases. Contact Technical Support at (800) 966-5520, Option 3 if you’re ready to update your software.
- Access Customer Order Info Directly From the Floor Plan (see Release Notes 8.086)
- Add Taxable and Non-Taxable Miscellaneous Items With New Register Buttons (see Release Notes 8.055)
- Additional Print Options (see Release Notes 8.123)
- Address Verification at the Register (see Release Notes 8.112)
- Adjust Screen Brightness (see Release Notes 8.184)
- Age Verification Improvements (see Release Notes 8.196)
- “All Staff” Delivery Preference (see Release Notes 8.184)
- Assign Custom Colors to Custom Buttons (see Release Notes 8.123)
- Auto Decimal Preference (see Release Notes 8.123)
- Automatically Capture New Customer Info From Email Receipt Prompt (see Release Notes 8.215)
- Automatically Capture New Customer Info When Emailing Receipts (see Release Notes 8.220)
- Bank Manager Report Prints on the Receipt Printer (see Release Notes 8.137)
- Batch ID Per Machine Is Generated (see Release Notes 8.055)
- Bematech Pole Display (see Release Notes 8.137)
- Bulk Price Change for Items (see Release Notes 8.137)
- “Buy X” for “$ Off” (see Release Notes 8.191)
- Bypass Payment Device Initialization (see Release Notes 8.241)
- California CRV (see Release Notes 8.191)
- Card Receipts (see Release Notes 8.055)
- Change Due Prompt at Register (see Release Notes 8.211)
- Checkout Fee (Customer Service Fee) is Taxable (see Release Notes 8.184)
- Clearer Labeling for Inventory Field (see Release Notes 8.215)
- Color Changes to Items/Services at the Register (see Release Notes 8.112)
- Complete Auth Now Reflects Added Tips (see Release Notes 8.055)
- Course Firing Can Be Assigned by Name (see Release Notes 8.055)
- Create Mix & Match Promos – Prior Releases (see Release Notes 8.215)
- Customize Tax Names and Apply Volumetric Taxes (see Release Notes 8.055)
- Customized Order Types (see Release Notes 8.162)
- Custom Buttons at the Register (see Release Notes 8.123)
- Custom Colors for Custom Buttons (see Release Notes 8.123)
- Custom Colors in Simple Mode (see Release Notes 8.137)
- Custom Prompts (see Release Notes 8.162)
- Customize Staff Shift Report Preferences (see Release Notes 8.086)
- Date Filters in Reports (see Release Notes 8.205)
- Deleted Items Report (see Release Notes 8.055)
- Delivery Fee and Show Mileage Options (see Release Notes 8.205)
- Detailed MODS Order Preview (see Release Notes 8.184)
- Duplicate Required MODS (see Release Notes 8.205)
- Easy Activation for Liquor and CRV Module (see Release Notes 8.211)
- Easy Manual Data Entry During Age Verification (see Release Notes 8.137)
- Enhanced Address Verification (see Release Notes 8.137)
- Enhanced Delivery Function for Restaurants (see Release Notes 8.112)
- Enhanced Payout Reporting (see Release Notes 8.205)
- Enhanced Search for Reprinting Receipts (see Release Notes 8.112)
- Enhanced Tip Reporting (see Release Notes 8.097)
- Exatouch Sound Alerts (see Release Notes 8.079)
- Expanded Formatting Options for Modifiers on Remote Printers (see Release Notes 8.162)
- Expanded Membership Program (see Release Notes 8.184)
- Expanded Pay In/Payout Options (see Release Notes 8.079)
- Expanded Tax Settings (see Release Notes 8.097)
- Fresh Sheet (see Release Notes 8.261)
- Hard-Coded Email Settings for Reports (see Release Notes 8.184)
- Historical Price Report Available (see Release Notes 8.137)
- Historical Pricing for Items (see Release Notes 8.137)
- Improved Bank Swap Labels (see Release Notes 8.055)
- Improved Labeling (see Release Notes 8.241)
- Improved Labeling for Inventory Fields (see Release Notes 8.220)
- In-House Delivery Manager (see Release Notes 8.261)
- Item Count on Customer Receipt (see Release Notes 8.137)
- Keypad Update With Staff Shift Report Option (see Release Notes 8.079)
- Labeled Tabs on Tax Settings (see Release Notes 8.112)
- Labor Tracking in Reports (see Release Notes 8.191)
- Lock Screen (see Release Notes 8.261)
- Loyalty Rewards Preview (see Release Notes 8.196)
- Make an Item Non-Refundable (see Release Notes 8.055)
- Michigan Liquor Support (see Release Notes 8.211)
- Modify Quick Lock and PIN Timeout Settings (see Release Notes 8.123)
- More Customer Order Limit Reminders (see Release Notes 8.086)
- More Options for Signature Copies of Credit Card Receipts (see Release Notes 8.123)
- Offline Processing Mode (see Release Notes 8.261)
- On-Screen Keyboard (see Release Notes 8.241)
- Open Modifier Option With Special Instructions (see Release Notes 8.184)
- Options for Labeling Orders (see Release Notes 8.191)
- Override Price Preference (see Release Notes 8.220)
- Payments Report (see Release Notes 8.123)
- Pre-Discount Gratuity (see Release Notes 8.137)
- Pre-Tax and Post-Tax Options (see Release Notes 8.097)
- Preferences and Register Preferences (see Release Notes 8.261)
- Preview Option for Open Orders (see Release Notes 8.055)
- Price Override Function as a Custom Button (see Release Notes 8.137)
- Price Prompt Preference (see Release Notes 8.184)
- Print eGiftSolutions Balance Receipts (see Release Notes 8.191)
- Print Manager (see Release Notes 8.184)
- Print Options for Balance Receipts (see Release Notes 8.196)
- Print Preview Option (see Release Notes 8.137)
- Print Split Order Tickets Seamlessly (see Release Notes 8.079)
- Printing Merchant Copies of QSR Receipts (see Release Notes 8.211)
- Process Tab Authorizations Below the Minimum Amount (see Release Notes 8.137)
- Promos Apply to Updated Quantity of Items on the Register (see Release Notes 8.055)
- Quick Picks at the Register (see Release Notes 8.079)
- Receipt Prompts at the Register (see Release Notes 8.191)
- Redesigned Home Button (see Release Notes 8.086)
- Redesigned Print Settings (see Release Notes 8.123)
- Redesigned Touch Screen for Miscellaneous Items (see Release Notes 8.184)
- Quantity Column in Item Search Screen (see Release Notes 8.196)
- Quick Menus (see Release Notes 8.261)
- Quick Payout and Customer Payout Restrictions (see Release Notes 8.205)
- Quick Picks at the Register (see Release Notes 8.079)
- Receipt Prompts at the Register (see Release Notes 8.191)
- Redesigned Home Button (see Release Notes 8.086)
- Redesigned Modifiers (see Release Notes 8.261)
- Redesigned Touch Screen for Miscellaneous Items (see Release Notes 8.184)
- Sales by Location Report (see Release Notes 8.097)
- Scan Data Integration (see Release Notes 8.162)
- Screen Savers on Exatouch (see Release Notes 8.137)
- Security Preference: Print Shift Report Prompt During Clock Out (see Release Notes 8.184)
- “Sell Options” is “Stock Type” (see Release Notes 8.123)
- Service Charge Option (see Release Notes 8.123)
- Send Order Button for Restaurants (see Release Notes 8.184)
- Simple Mode (see Release Notes 8.137)
- Simplified Customer Search in Delivery Manager (see Release Notes 8.184)
- Special Instructions Manager (see Release Notes 8.184)
- Staff Shift Report Featured in Reports (see Release Notes 8.079)
- Suggested Gratuity on Receipts (see Release Notes 8.097)
- Support for Beer Distributors in PA (see Release Notes 8.220)
- Support for PA Liquor Control Board Integration (see Release Notes 8.215)
- Tab Authorization (see Release Notes 8.261)
- Tab Organization for Preferences & Register Preferences (see Release Notes 8.184)
- “Take” and “Reassign” Orders Outside of the Floor Plan (see Release Notes 8.184)
- Tax Included Option (see Release Notes 8.261)
- Third Party Delivery (see Release Notes 8.184)
- Tipping on eGiftSolutions Receipts (see Release Notes 8.155)
- “To Go Item” Order Type for Dine-In Customers Ordering Takeout (see Release Notes 8.184)
- Updated MODS Section (see Release Notes 8.184)
- Undo Checkout Fee (Customer Service Fee Button) (see Release Notes 8.184)
- Updated Formatting for Remote Printer Receipts (see Release Notes 8.155)
- Updated Formatting for Remote Printer Tickets (see Release Notes 8.162)
- Updated Label in Item Inventory: “MOQ” is now “Minimum Order Qty” (see Release Notes 8.123)
- Updated Snapshot Report Preferences (see Release Notes 8.079)
- Use of International and Non-Standard SKUs Supported (see Release Notes 8.123)
- User Access Controls (see Release Notes 8.261)
- User-Defined Reporting for Items and Services (see Release Notes 8.205)
- VCS Scanner Allows Scanning of State ID Cards With Two-Dimensional Barcodes (see Release Notes 8.137)
- Weighted Item (SBF) Override Preference (see Release Notes 8.220)
Release Notes 8.261
The “Fresh Sheet” provides restaurants with a real-time countdown of menu items and specials. Located on the newly designed lock screen, servers can quickly view what’s new on the menu, what’s about to run out, and what’s fresh out of stock. The Fresh Sheet is the ultimate tool for creating engaging conversations with patrons, upselling high-margin items, and sharing new specials.
A collection of enhancements has been made to Exatouch’s “In-house Delivery” and “Delivery Service” features, including “Whozz Calling Caller ID” integration. The Caller ID allows staff to greet customers by name and see their recent order history, ensuring fast, personalized service. Expedite orders, increase order accuracy and efficiency, and ensure customer satisfaction with Exatouch’s built-in In-house Delivery Manager!
The newly redesigned, elegant “Lock Screen” provides quick access to Exatouch’s most frequently used features and screens.
“Offline Processing” mode allows merchants to continue operations during unforeseeable events such as Internet or network outages.
Preferences and Register Preferences settings are easy to enable/disable with intuitive toggle.
The redesigned Modifiers automatically populate in an organized “waterfall” across the register, reducing the number of touches it takes to ring up required and optional modifiers. With these unlimited and intuitive modifiers, servers can enter even the most complex orders quickly and accurately.
To simplify item entry and tax calculations, a new “Tax Included” option enables merchants to automatically flag an item as “a tax included item.”
The Access Control function enables merchants to customize staff level permissions, providing greater control over which employees have access to certain modules, features, functions, and information throughout Exatouch.
Release Notes 8.241
This new account setting preference enables merchants to bypass the initialization of payment devices during start up, expediting the boot process.
The Bypass Initialization preference is enabled within Account Settings. Contact Technical Support at 800-966-5520 – Option 3 to enable setting.
- Note: Payments can still be ran on the register, even when bypassing initialization.
Improvements to language and labels throughout the software enhance use and diminish the time it takes to locate information.
The term “ounces fluid” has been changed to “fluid ounces” or “fl. oz” in Item Details.
Within Customer details, the label “Balance” has been changed to “Rewards Points Balance” to indicate the total number of loyalty points earned by the customer.
Revised module titles better describe their functions and simplify navigation.
Within the Items module, “Items Details” has been changed to “Item Details”.
On the Home page, the label “Schedule” has been changed to “Services Schedule”.
Within the Staff module, the label “Schedule” has been changed to “Work Schedules”.
The Exatouch on-screen keyboard is a fast and intuitive alternative to the hardware keyboard, especially during high-traffic hours, and is another great tool for streamlining and simplifying use.
Keyboard Preferences
The on-screen keyboard is enabled from within the Preferences module, with the option of one-tap or two-tap access.
- Note: The on-screen keyboard can be used in conjunction with its hardware keyboard counterpart.
On-Screen Keyboard Placement
In addition to intuitive layout and functionality, the on-screen keyboard will always appear at the bottom of the monitor for ease of use and quick access. Please note the standardized placement across different screens.
Maximum Screen Visibility
The new on-screen keyboard offers maximum screen visibility. When selecting entry fields, the screen will shift upwards as necessary, ensuring the input field is always visible. For example, when selecting the “Mfg part” field within Item Details, the entire screen shifts upwards:
Enhanced Keyboard Buttons
The on-screen keyboard now includes enhanced keyboard buttons for quick data entry and navigation.
Notable Buttons
- TAB: The TAB enables users to advance to the next field, optimizing screen navigation.
- CAPS: The CAPS button is multi-functional. One tap for “Shift”, two taps for “CAPS”. When CAPS button will turn green when enabled.
- Clear: The Clear button will erase all data in the selected field.
- Close Keyboard: Select this button to close the keyboard. Select a text/number entry field to re-open the on-screen keyboard.
- Return: The Return button creates a new line within a multi-line text-entry field.
- Next/Continue: The Next/Continue button improves screen navigation, advancing to the next field.
- Quick Email Buttons: Email domain buttons (i.e., .com, @gmail.com, @hotmail.com, and @yahoo.com) speed up data entry.
Enhanced Search Functionality
When using Exatouch’s search features, a “Search” text field appears within the on-screen keyboard, improving ease and speed of use.
- Note: The on-screen keyboard will function in along with a physical keyboard.
Release Notes 8.220
A new preference “Save Customer when emailing receipt” allows merchants to automatically save new customer information from the email receipt prompt. This preference affects emailed receipts whether merchants use the “Receipt prompt” preference or the “Print default to email” preference.
- This feature is located within Register Preferences, on the Orders tab.
- Enabling this feature will save new customer information when entered to have their receipt emailed. This is what an email receipt prompt looks like:
- Merchants can capture a customer record with either a phone number or email address; data in both fields is not required.
- Both “Receipt prompt” and “Print default to email” are enabled in Print Settings.
- Note: Choose either “Receipt prompt” or “Print default to email” within Print Settings on the “Receipt option” tab. These options cannot be enabled at the same time.
Within Inventory Preferences, the label “Print labels on price change” has been changed to “Queue labels to print on price change” to clarify that labels are sent to print queue for printing (rather than immediately printing.)
‘Queue labels to print on price change’ Field
This feature is located in Settings Preferences, on the Inventory tab.
The new “Override Price” preference enables merchants to allow all users, regardless of access level, to change the price of a specific item or items at the Register.
While taking a customer’s order at the register, merchants can override an item’s price in two ways:
- Use the Price Override button at the register. A Price Override button can be placed at the register via custom buttons. Highlight an item within the customer’s order, and tap the Price Override button. When prompted, type in a new price to apply to the item.
- Within a customer’ order tap directly on an item’s price. When prompted, type in a new price to apply to the item.
By default, overriding a price requires an Admin or Power User’s PIN. When “Override Price” is enabled, any user regardless of access level can change the price of an item within an order at the Register.
Enable Override Price
The “Override Price” feature is an item-level preference; it is enabled for an individual item within Item Details.
When “Override Price” is enabled overrides can be executed by anyone regardless of their access level. When “Override Price” is disabled a Power User/Admin PIN is required to change an item’s price. This assumes that Access Controls are turned on.
Apply Override Price to Items in Bulk
The “Override Price” preference can be turned on or off for multiple items at once by using “Modify all list items.”
- See: Modify Bulk Items and Modify Bulk Services
Exatouch now serves PA malt beverage distributors! Generate PA1014 Malt Beverage Reports in the new Utilities LCB module with support throughout Exatouch.
LCB Reporting Module
Utilities now features a new LCB Reporting module where PA malt beverage distributors create and edit the PA1014 Distributors Monthly Report.
LCB Reporting Module Functions:
- Create and edit PA1014 Distributors Monthly Report.
- Define defaults for reports to be generated.
- Store historical reports, displayed by report date in “Month YYYY” format (i.e. October 2018).
- Reports can be edited until the report is marked “Finished”.
- Reports that have been generated can be emailed and printed.
- Blank reports can be printed by opening a new “blank” report and selecting “Finish”.
- Reports will generate for the previous month until the submission deadline has passed.
- After the submission deadline, only users with Admin access can edit reports.
- Reports are interactive so that an end user can fill in any necessary information. Reports can be saved and exited as needed.
Settings for PA1014 Reporting
Enter the following values within Account Settings to ensure accurate PA1014 reporting:
- Account ID
- Federal EIN
- LID Number
- LCB License Number
- Owner Information
- Title LCB Name
LCB Flag for PA LCB Items
- “Categories” has an LCB flag that must be enabled for all “PA LCB Items” to uniquely identify items that report to the PA1014 Report.
- When the LCB flag is enabled for a category, all items in that category are flagged as LCB Items.
New Pack Size Units
PA Merchants can easily report data in units represented on the PA1014 Report. These units have been added to Items Details in the “Pack Size” field:
- 1/8 Barrel
- 1/6 Barrel
- 1/4 Barrel
- 1/3 Barrel
- Barrel
New Flags in Vendor Details
PA malt liquor distributors can identify different types of vendors within state reports.
Four additional flags are available in Vendor Details:
- Non-LCB Vendor
- PA Manufacturer
- Importing Distributors
- Non-PA Manufacturer
PO Reference Field
PA Malt Distributors are required to attach a reference number to all purchase orders received. A “Reference” field has been added to PO Details to accommodate that information.
- The PO “Reference” field is located in the Purchasing module, in the “PO Details” section.
- This field is inactive for Non-PA malt distributors.
A new option has been added to Item Details for weighted Sold by Fraction (SBF) items. When enabled, the “Override qty/time” preference allows all end users to override the qty obtained from an integrated scale.
Enable Override qty/time
When the Sold by Fraction and Override qty/time checkboxes are selected for an individual item, the need for a Power User/Admin PIN is overridden. This allows all users to make changes to an item’s weight or time.
- Note: These permissions apply to merchants who have a scale attached to their system. If no scale is attached, changes to Sold by Fraction weight can be made by any user, regardless of whether Sold by Fraction and Override qty/time are enabled.
This preference is off by default. When disabled, any changes to an item’s weight or time requires a Power User/Admin PIN.
Release Notes 8.215
The new “Save customer when emailing receipt” function on Register Preferences allows merchants to automatically save new customer information from the email receipt prompt.
- The Save customer when emailing receipt setting is located within Register Preferences, on the Orders tab.
- When this feature is enabled, customer information entered when merchants are prompted to email receipts is saved as a new customer record. This is what email receipt prompts look like:
- Receipt prompts are enabled in Print Settings. See: Enable Receipt Prompts
- Merchants can capture a customer record with either a phone number or email address; data in both fields is not required.
Within inventory preferences, the label “Print labels on price change” has been changed to “Queue labels to print on price change” to clarify that labels are sent to print queue for printing (rather than immediately printing.)
“Queue labels to print on price change” field is located in Settings Preferences, on the “Inventory” tab.
Mix & Match promos are discounts on a combination of specifically chosen items from categories, subcategories, and/or individual items. Mix & Match promos can be run during specific hours during the day, for a specific time period.
Promo Examples
- Liquor Store BOGO: Buy 1 bottle of select Merlots and Moscatos, get 1 bottle 30% off. Promo runs on Saturdays between 2pm – 6pm.
- A Market Deli offers Early Week Specials: Buy 2 select Sides, get 1 Side free. Valid Mondays and Tuesdays.
- Restaurant offers Kids Treat Thursdays: Select kid-friendly specials are 50% off on Thursdays in June, July, and August.
- From Home, tap Items.
- Select Promos.
- Choose the Mix & Match tab.
- Tap New.
- Type in a promotion name.
- Tap Add Items.
- Tip! Services can be added to a Mix & Match promo by selecting Add services and choosing one or multiple services.
- Tap one or multiple items. Type into the search field to narrow your choices.
- When selection(s) are complete, press Close.
- Enable the On sale checkbox.
- Enter a value into the Buy field to define the number of items that need to be purchased for the Promo to apply.
- Choose a Promo. Fill in details as needed. For additional info about Promo options, see the”Notable Fields” section below.
- Enable days of the week. At least one day must be selected.
- Fill in a Start and End date, and/or Daily time start and End times. These fields are optional.
- Press Save.
Notable Fields
These are the Promo options associated with a Category/Subcategory of Items:
- Buy: specify the number of item units that need to be purchased for the Promo to apply. This is a required field.
- Promo: Choose a promo option from the drop-down. This is a required field.
- Get one free: Buy one/many items get one free. The purchase of at least two items is required to activate this promo.
- Get one half price: The purchase of two items is required to activate this promo.
- Get one for percentage off: In addition to the Get item(s), this promo is applied to the single item purchased.
- For dollar amount: Buy one/more items at the specified price. The purchase of only one item is required to activate this promo. If several of the featured items are purchased, the promo price is applied to all items.
- For percentage off: Buy one/more items for a percentage off the original purchase price. The purchase of only one item is required to activate this promo.
- For dollar amount off: Buy one/more items for a dollar amount off.
- Start date and End date: Specify the start and end date for the promo. Optional field.
- Daily time start and End: Promos can be active at specific times during the day, as indicated in these fields. Optional field.
- Sun through Sat: Check off all days that apply. One day must be selected to activate the Promo.
Create-a-Promo Screenshots
View these screenshots which demonstrate different applications of promo settings:
- Liquor Store BOGO: Buy 1 bottle of select Merlot or Moscato, get 1 bottle 30%, Saturdays between 2 pm – 6 pm.
- Market Deli special: Buy 2 select Sides, get 1 Side free. Valid Mondays and Tuesdays.
- Select kid-friendly items are 50% off every Thursday in June, July and August.
View Promos at the Register
Check your work by ringing up Promo Items at the register.
- Items with promos applied are featured in GREEN at the register. Regular price items are featured in BLACK.
- Promo discount amount can be viewed above the order Total.
- Promo discounts are displayed at the register by default. This setting can be modified in Register Preferences. See: Manage Promo Preferences
- Note: Promos with a set end date and/or time will expire automatically. Nevertheless, promos can be deactivated at any time. See: Deactivate Discounts and Promos
Exatouch now serves PA malt beverage distributors! Generate PA1014 Malt Beverage reports in the new Utilities LCB Module with support throughout Exatouch.
LCB Reporting Module
“Utilities” now features a new LCB Reporting module where PA malt beverage distributors create and edit the PA 1014 Distributors Monthly report.
LCB Reporting Module Functions:
- Create and edit PA 1014 Distributors Monthly Report.
- Define defaults for reports to be generated.
- Store historical reports, displayed by report date in “Month YYYY” format (i.e. October 2018).
- Reports can be edited until the report is marked “Finished”.
- Reports that have been generated can be emailed and printed.
- Blank reports can be printed by opening a new “blank” report and selecting “Finish”.
LCB Flag for PA LCB Items
- “Categories” has an LCB flag that must be enabled for all “PA LCB Items” to uniquely identify items that need to report to the PA1014 report.
- When the LCB flag is enabled for a category, all items in that category are flagged as LCB Items.
New ‘Pack Size’ Units
PA Merchants can easily report data in units represented on the PA1014 Report. These units have been added to Items Details in the “Pack Size” field:
- 1/8 Barrel
- 1/6 Barrel
- 1/4 Barrel
- 1/3 Barrel
- Barrel
New Flags in Vendor Details
PA malt liquor distributors can identify different types of vendors within state reports.
Four additional flags are available in Vendor Details:
- Non-LCB Vendor
- PA Manufacturer
- Importing Distributors
- Non-PA Manufacturer
New PO Reference Field
PA malt distributors are required to attach a reference number to all purchase orders received. A “Reference” field has been added to PO Details to accommodate that information.
- The PO “Reference” field is located in the Purchasing module, in the “PO Details” section.
- This field is inactive for Non-PA malt distributors.
Settings for PA1014 Reporting
Enter the following values within Account Settings to ensure accurate PA104 reporting:
- Account ID
- Federal EIN
- LID Number
- LCB License Number
- Owner Information
- Title LCB Name
LCB Report Requirements
- Monthly reports are due 15 days after the closing of the month. For example, a report for November 2018 is due on December 15, 2018.
- Reports will generate for the previous month until the deadline (the 15th) has passed.
- After the 15th of the month, only users with Admin access can edit reports.
- Reports are interactive so that an end user can fill in any necessary information. Reports can be saved and exited as needed.
Release Notes 8.211
Enable “Change Due” prompts at the register to help cashiers give back accurate change when cash tender is applied. “Change Due” prompts are optional and can auto-close after a defined period of time. “Change Due” options are turned on and off in Register Preferences.
Change Due Options
- This is an example of a “Change Due” prompt:
- This is an example of a “Change Due” prompt with receipt prompts enabled:
- “Change Due” options are enabled and disabled in Register Preferences under the “General” tab.
- When enabled with “Change prompt display: 0 sec(s)”, the merchant must select “Close” on prompt.
- When enabled with “Change prompt display: 3 sec(s)”, prompt will close automatically in 3 seconds.
Michigan Liquor Settings
Use these settings to enable Michigan Liquor Integration:
- State = Michigan
- Platform = Retail
- LCC Flag = True on categories
CRV Settings
Use these settings to enable CRV:
- State = California
- Platform = Retail
- CRV Items exists
- Update: CRV Redemption is more commonly referred to as DRV Redemption.
Exatouch now serves Michigan liquor establishments, saving store owners time and giving them valuable insight into their liquor sales! A standard Michigan liquor database is provided for easy reference, and historically manual processes are automated by allowing store owners to easily download and update items against state-mandated pricing. Additionally, merchants are able to track specific item details and generate focused reports on liquor sales.
Michigan Liquor Fields
These are the new Michigan liquor fields within Items Details:
- State Minimum: This is the state minimum price, as defined by the state of Michigan.
- Future Price: Stores future effective date for state minimum pricing, and automatically updates item price on the defined date.
- Price: The current retail price.
- Pack Size: Provides details on the item’s size. All Michigan liquor items are depicted in milliliters (ml).
- Proof: Records the proof of the item.
- Discontinued: Flagged automatically when new price files are downloaded, assuming the state has discontinued the item(s). Discontinued items that remain in stock can still be sold.
These are the new Michigan liquor fields on the Inventory tab:
- Case Qty: Reports the number of items that make up a case. For Michigan liquor merchants this value will populate with price updates.
Item Code Report
This report displays all liquor items sold with associated item codes.
Data Points
- Item Description
- Item Code
- Order ID
- Date
- SKU
- Pack Size
- Units
- Sell Price
- QTY
- Discount
- Extended Price
For Quick Service Restaurants and businesses who value quick turn-around, it’s all about speed! QSR receipt option preferences allow merchants to decide if they need merchant copies when credit or PIN debit transactions are processed for orders falling under the defined QSR threshold.
Merchant Examples
- QSR Example: To save paper and time spent at checkout, a coffee shop does not want to print receipts for orders under $10.00. They enable “Don’t print QSR Receipts” with a $10.00 threshold and leave the Credit and Debit options disabled to ensure that neither customer nor merchant receipts print.
- Retail Example: Convenience store customers are on the go! Their customers prefer to leave without a receipt, especially for smaller purchases. As such, the merchant chooses not to print customer receipts for purchases under $15. For reconciliation purposes, they opt to print hard copies of merchant receipts for both Credit and Debit sales.
Enable QSR Merchant Copies for Credit
Settings are located in Print Preferences, under the Receipt Options tab.
- If customer total is less than the defined amount, only the signature merchant receipt will print.
- If customer total is more than the defined amount, the signature merchant receipt and customer receipt will print.
- Both “Credit” and “Debit” options can be selected simultaneously.
Settings are located in Print Preferences, under the Receipt Options tab.
- If customer total is less than the defined amount, merchant receipts will not print.
- If customer total is more than the defined amount, the merchant receipts will print.
- Both “Credit” and “Debit” options can be selected simultaneously.
Release Notes 8.205
Date Filters are here by popular demand! Pre-set date filters make running reports a snap! Select from pre-set filters or build a custom filter.
Date Filter Options:
- Today (default): Current day 24-hour range from 12:00am thru 11:59pm
- Business Hours: Uses business hours for reporting
- Custom Date Range: Define beginning and end filters. Filters will function as they do now when selected.
- Today 12 midnight to 6am: Current day between defined times
- Today 6am to 12 noon: Current day between defined times
- Today 12 noon to 6pm: Current day between defined times
- Today 6pm to 12 midnight: Current day between defined times
- Week to date: Current week Monday 12:00am thru Sunday 11:59pm
- Month to date: The current month
- Quarter to date: Reports current quarter (QTR)
- Year to date: Sales from January 1st thru the current date and time
- Lifetime: Shows all sales in Exatouch
- Yesterday: Previous day 24-hour range from 12:00 am thru 11:59 pm
- Last week: Last week Monday at 12:00 am thru Sunday 11:59 pm
- Last month: Previous month
- Last quarter: Reports the previous quarter (QTR)
- Last year: All sales from the previous year
Report Areas Featuring Date Filters
Date filters are featured in these areas:
- Reports/Sales
- Reports/Items/Inventory Movement Report
- Reports/Customers
- Reports/Staff
- Reports/Purchasing
- Reports/Schedule
- Reports/Delivery Manager
Restaurants, pizzerias, and merchants who use the Delivery Manager can now view mileage stats when an in-house delivery order is placed. Default delivery fees can be adjusted based on mileage reported.
Mileage in the Delivery Manager
When a customer is tied to a delivery order, a delivery fee pop-up window will automatically appear. If “Show mileage” is enabled, mileage will be displayed. Delivery fees can be adjusted based on the mileage reported.
Delivery fees can be a dollar amount…
…or a percentage of the customer’s order.
Mileage and Delivery Fee Settings
Mileage and delivery fee options are enabled in Register Preferences: Navigate to Register Preferences and tap the Delivery tab. Choose In house. Then enter a Radius and select Show mileage on all orders.
- Address verification must be enabled before mileage can be shown.
- Delivery fee can be set as a percentage or dollar amount.
Now restaurants can easily duplicate required modifiers without the use of a workaround. Enabling the “Allow duplicate modifier” preference allows a user to accommodate requests for double side items within a required modifier group.
A Duplicate Modifier Scenario
A customer orders a House Burger cooked Medium Well with a double order of Fries. When the server enters the order, the MOD selector automatically pops-up. The “Meat Temperature” modifier group allows only one selection, while the “Sides” modifier group allows multiple selections.
Payout data can now be added to the Snapshot and Business Overview reporst for easy reconciliation. Payouts are separated based on the type of payout.
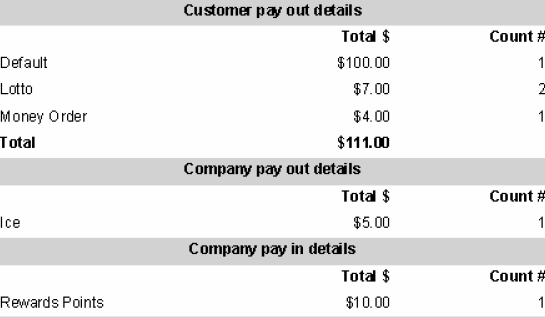
Data Points
- Payout Reason (i.e. Default, Lotto, Money Order, etc.)
- Total Amount
- Count
Quick Payout buttons are the fastest/easiest way to process customer payouts! Process customer payouts directly from the register through the use of custom buttons. New customer payout settings allow you to enable/disable employee restriction, which means that you can allow all staff to handle customer payouts regardless of their access level.
Customer Payouts at the Register
Customer Payout is available directly at the register! Payout types are defined in custom variables, and Customer Payout is assigned as a custom button.
- Select a payout type: Lotto, Scratch-Off or Money Order.
- Pre-defined payout options display for quick selection.
- See: Setup Quick Payout
Quick Payouts at the Register
Quick Payout buttons are the quickest way to process customer payouts! Choose payout types such as “Lotto” or “Scratch-off” directly at the Register. Payout types are defined in custom variables and then assigned as custom buttons.
- Pre-defined amounts display for quick selection.
Customer Payout Restrictions
By default, regular users are restricted from processing customer payouts which require an admin or power user PIN. Now merchants can disable this restriction, allowing all staff to process customer payouts regardless of access level. This speeds up customer payout processing!
Item-specific sales data can now be added to the Snapshot and/or Business Overview reports. Easily track sales, promotions and more for a specific item or service!
Control Visibility
Visibility of user-defined reporting can be controlled with new Print Settings which controls whether user-defined data is printed on the Snapshot and/or Business Overview reports.
Activate User-Defined Reporting
User-defined reporting for specific items and services is activated in “Item Details” and “Service Details”.
New ‘Modify All List’ Filter
A “User-defined Reporting” filter is now available for the “Modify All List” Search feature. This gives merchants the ability to affect multiple items or services in a group. For example, I can push user-defined reporting for all “Burger” products.
Visuals
This is a Business Overview report which features a “User-defined reporting” section:
Release Notes 8.196
Age Verification enhancements include Age Verification Indicators, Manual Override, and the Age Verification Report!
Age Verification Indicator
Liquor stores and retailers now have age verification status clearly displayed at the register and on customer receipts. An age verification indicator displays on the register status bar and age verification status will print on customer receipts. Age verification ranges are defined in Preferences.
- Example: A liquor store’s age requirement has been defined in Preferences as “21” for alcoholic beverages. Staff rings up a bottle of merlot and a six-pack of beer at the register. After swiping the customer’s valid driver’s license, an indicator on the register reads: “Age Verification: Verified 21”. The customer receipt reads the same.
Manual Override
Managers can manually override age verification prompts at the register. Power User or Administrator PIN is required to override.
- Example: A neighborhood convenience store’s age requirement has been defined in Preferences as “18” for tobacco products. A regular customer visits the store and purcha[es his “usual” brand of cigarettes. The cashier knows him (and previously verified his age) and overrides the age verification prompt. The indicator on the register reads: “Age Verification: Override”.
Age Verification Report
An Age Verification report is now available in Customer Reports. Track data relating to age verification, including who verified and/or approved each age-verified transaction. Overrides are tracked as well.
Data Points
- Date
- OrderID
- Total
- Customer
- Verified By
- Approved By
- Manual Entry
Exatouch has yet another way to promote your loyalty program and keep customers coming back! Loyalty reward points can now be printed directly from the Register on either the Pay tab or the Details tab, making it easy for customers to track their point balances and upcoming rewards. Loyalty activation is required in order to view a customer’s loyalty points.
Loyalty Rewards From the Register Pay Tab
- From the Register click the Pay tab.
- Tap Check Balance.
- Select Loyalty, and choose the Print checkbox to print the Rewards Balance.
- Note: Customers must be associated with their order to view their loyalty rewards points.
Loyalty Rewards From Register Details
- From the Register, tap the Details tab.
- View “Rewards Points” in the Customer section.
- Note: Customers must be associated with the order to view their loyalty points.
Now balance receipts can be printed for eGiftSolutions, Gift Certificates, and EBT.
Print Balances at the Register
- From the Register click the Pay tab.
- Select Check Balance.
- Choose a card and select the Print checkbox to print the Rewards Balance.
- Tip! Enable the print balance preference to keep the “Print” option checked!
Print Balance Preference
Enable the print balance preference to keep the “Print” option checked!
- From Home, tap Settings.
- Tap Print.
- Select the Receipt options tab.
- Choose Print Balance.
A QTY Column has been added to the Find Items screen, enabling retailers to better track item inventory.
New QTY Column
Release Notes 8.191
This new promo allows merchants to “Buy X” and take a dollar amount off the total purchase price.
- Example: Retailers may offer summer retail savings of $5 off the purchase of any gardening product. Foodies at your local gourmet market can enjoy $10 off the purchase of any holiday gift basket. Your “promo possibilities” are endless!
- New promo option is available for Item, Category, Service, and Mix & Match Promos.
- The promo section has been updated with drop-down menus to accommodate additional promo types.
California merchants who wish to comply with recycling regulations can now add CRV to their customer’s orders.
- CRV deposit items are assigned to other items as required adders, which are automatically bundled with an item at purchase.
- CRV values are set up in Items Details.
- CRV items can be taxed according to merchant preference.
- Receipts have been formatted to display ‘taxable’ CRV’ and ‘non-taxable CRV’ lines. Both lines are displayed regardless of amounts.
- Merchants can limit payment of CRV items when EBT tender is used. An “EBT CRV limit” can be defined on the business information screen.
- Business Overview and Snapshot reports display CRV data after the Order Summary.
- Update: CRV Redemption is more commonly referred to as DRV Redemption.
Make better staffing decisions by taking advantage of Exatouch’s labor tracking metrics! Labor tracking compares labor costs with gross and net sales. Data appears on the Business Overview Report and prints on the Snapshot Report by default; The preference may be turned off in Print Settings.
- To ensure accurate labor tracking, confirm that each employee has a defined hourly rate and clocks-in and out regularly. If a staff member does not have a defined hourly rate or clock in/out, their Labor Cost will be recorded as $0.00.
- Labor Cost: (Staff1 Total current hours*hourly rate)+(Staff2 Total current hours*hourly rate)+(StaffX Total current hours*hourly rate)…
- Gross Sales: Order summary Total, filled in against screenshot above.
- Net Sales: Order summary Sub Total, filled in against screenshot above.
- Labor Cost % (Net Sales): (Labor Cost/SubTotal)*100
- Labor Cost % (Gross Sales): (Labor Cost/Total)*100
- Historical hourly rates will be tracked for reporting purposes. Historical reporting will not change with adjustments to the hourly rate.
New register preferences have been added for labeling orders.
- “Order Label” options are located in Register Preferences on the “Order” tab.
- Label Orders: When this option is enabled, Exatouch will prompt for label entry when an order is saved/sent, or upon tender.
- Only Open Orders: When this option is enabled, Exatouch will prompt for label entry only when an order is saved or sent to the kitchen printer.
Now eGiftSolutions balance receipts will print at the time of activation and when cards are used at the Register. This makes it easier for customers to keep track of eGift balances!
Now merchants can choose what type of receipts print for each payment transaction, regardless of tender type. When Receipt Prompts are enabled as a preference, cashiers will receive a prompt with receipt options when customers pay with any tender.
- Receipt Prompts are enabled in Print Settings on the Receipt option tab.
- Receipt prompts work with all tender types.
- Prompt will display when paying from both the Register tab and the Pay tab.
Release Notes 8.184
Merchants operating in dimly lit environments can adjust their Exatouch screen brightness to maintain the ambiance of their establishment. Fine Dining establishments and Bars who maintain a low-light atmosphere will especially benefit from being able to adjust their Exatouch screen lighting to match their lighting decor.
- Screen brightness is applied on a station-by-station basis, so the hostess station can maintain dim lighting, and back offices can retain bright lighting.
- Slide controls for screen brightness are located in Settings > Preference > Station.
Now users of the Delivery Module can choose “All Staff” or select from defined delivery staff within the list to assign a staff member to deliver an order. This option makes it easier to assign staff members to a delivery order, giving merchants the flexibility to pull non-delivery staff into delivery operations when needed. This is especially helpful during busy shifts when additional delivery staff is needed.
- If a staff member has an email address or phone number in their Staff Profile, Send Location and Print and Send Location will be enabled.
- If no staff email address or phone number is listed, only Print location will be enabled.
Exatouch calculates and applies tax to Checkout Fees (Customer Service Fees). This tax setting can be turned off by the merchant, and it can be assigned to one or multiple Tax Groups as required.
- Warning: Exatouch versions 8.367 and earlier may not fully comply with recently implemented card brand requirements. Electronic Payments, Inc. strongly recommends you update to the latest version of Exatouch to meet these requirements.
Restaurants are going to love dynamic order previews in the MODS section! Both the MODS screen and the Required MODS screen now display order details, improving order accuracy for Restaurants and merchants who use MODS.
- When MODS with prices are selected, the price of the mod will display in the preview window.
- If “Modifier price rollup” is enabled on the item, the MOD price will be displayed in the MOD preview. The MOD price will also rollup into the base item price.
- Selections made on the Required MODS tab will also preview on the Regular MODS tab.
- Once Regular Mods are added, if the merchant returns to the Required MODS tab, both mods will show in the Preview
Exatouch’s Membership Program has been completely redesigned, making our Membership Program a more robust, well-rounded solution for all merchants. Create Clubs with membership perks as an incentive to keep your customers coming back!
Club Membership Highlights
- Craft dynamic membership programs by creating one Club and then various Sub-Clubs.
- Sub-Clubs allow you to define different levels of club membership.
- A new Club section is available in the Customer Module, enabling you to manage clubs from one convenient location.
- Manage customer membership information directly from a customer’s record.
- Methods of communication have been expanded so you can communicate with customers via email and text.
- Customize term lengths for club memberships, and set renewal reminders for memberships that are due to expire.
- Taxes can be applied to membership fees.
- Note: Updating your Exatouch System gives you access to the newest Membership Programs, but existing Club Memberships will NOT transfer over. Contact our 24/7 Tech Support Team if you have questions about re-establishing Club Membership Programs in the newest versions of Exatouch.
Create Exclusive Promos & Discounts for Club Members
Promos can be set up exclusively for Club and Sub-Club members. Promos are applied automatically at the register to either individual items and/or categories or subcategories of items. Exclusive Discounts for Club Members can also be created. Discounts are applied as needed to individual items or to an entire customer order. Discounts may include coupons, whole order percentage discounts, or wholesale pricing.
- Category and Subcategory Level Promos
- Mix and Match Promos
- Happy Hour for Items and Services
- Item Level Discounts
- Entire Order Discounts
Never miss an emailed report again! A designated Exatouch email address has been created for sending all scheduled and on-demand reports, so sending reports is no longer dependant on a merchant’s email account setup.
New Email Details
- Emailed reports will be received from reports@poscloud.com
- This feature is only for Reports, not for Messages. A valid email account is still required to send and receive Exatouch Messages such as reminders and birthday messages.
Great news for Restaurants and establishments who use MODS! An Open Modifier option has been added to the MODs window, allowing further customization of orders.
- When Open Modifier is selected, the merchant is prompted to enter special instructions with price as needed. For example, if a customer wants additional veggies with their order, special instructions can be added to alert the kitchen to customize their order.
- Open Modifiers will report to Sales by Category Report, Snapshot Report, and Business Overview Report under the Category of the root item associated with the MOD. Category Reports will also reflect Open Modifier data.
- If an Open Modifier with price is removed from an order, the removal will report to the Deleted Items report.
When an item with no price is selected at the Register, Exatouch will now prompt the user to fill in a price when the Price Prompt preference is turned on. This preference is turned on by default, but it can be turned off in the Item’s Details.
Print Manager Features
- The Print Manager is located in Print Settings under Manage Printers.
- Both USB-connected printers and printers on the network are listed within the Print Manager
- Status of each printer is displayed
- All order or specific orders can be cleared from the printer queue
- Print a test page from any installed printer
When Printer Errors Occur
- An error icon will appear in the status bar
- Clicking the error icon opens the Manage Printers screen for Admin or Power Users
- Printer errors can be identified and more efficiently resolved from the Manage Printers screen.
Setup
To set up the Printer Manager in your Exatouch System, contact our 24/7 Support Team team to confirm that proper hardware and software requirements are in place.
Larger, bolder touch screen design makes it easier to add Miscellaneous Items. The redesign includes larger buttons, a number pad, and the ability to add or subtract incremental quantities.
The Security Preference feature allows Admin to choose whether users are prompted to print a Shift Report when clocking out. This enables Admin to control staff access to the Shift report. By default, Shift Report will display on the Lock Screen, but this setting can be turned off in Security Settings.
Find customer records in the Delivery Manager by typing in customer phone number, last name, and/or address. Exatouch can now search for existing customers more easily by phone number – even if dashes are omitted from the search text, or only a partial phone number is available. Customer search has been simplified, making it super quick and easy to attach a customer to their delivery order when they call.
Restaurants and businesses who frequently use special instructions will be thrilled with the new Special Instructions Manager! Special Instructions can now be hard coded as Custom Modifier Options. For example, restaurants with customers who have allergies or gluten-sensitivities can add the modifiers: “Gluten-Free”, “Nut Allergy” and “Seafood Allergy” as modifier option to the MODS pop-up window.
- Open Modifiers are customized in Settings Preferences, in the Custom Variable section.
- Up to 14 Special Instructions can be created
- Displays on the MODs window.
- Custom Open MODS are displayed on the Modifier screen for every item, regardless of if the item has unique modifiers designated.
Now all the preferences you love and rely on to customize your Exatouch System have been re-organized into logical, easy-to-navigate tabs. Both “Preferences” and “Register Preferences” have not changed functionality; they’re just easier to find!
Preference Tabs
- General
- Station
- Security
- Inventory
- Screen Saver
- Custom Variables
- Save
- Close
Register Preference Tabs
- General
- Promos
- Gift
- Tips
- Refunds
- Restaurant
- Delivery
- Custom Buttons
- Quick Pick
Restaurants will enjoy the ease of reassigning or taking orders, even outside of the floor plan! With new Custom Buttons “Take” and “Reassign”, taking or reassigning orders can be accomplished directly at the Register.
- “Take” allows a user to take an order
- “Reassign” allows a user to reassign an order
- When the Open Floor Plan preference turned on, users can Take or Reassign an order.
- When the Open Floor Plan preference is turned off, users can Reassign an order.
The Delivery Module makes a giant delivery leap forward by accommodating 3rd Party Delivery services! Restaurants, Pizzerias, Quick Service Restaurants, and food delivery Markets can now incorporate Uber, GrubHub and other 3rd Party Delivery Services into their Delivery Module!
- The Delivery Module now has in-house and 3rd party delivery options
- Delivery Fees calculate as a dollar or percentage-based add-on
- Delivery Reports have been updated to help reconcile all delivery orders
- See: Delivery Manager: 3rd Party Delivery and Add 3rd Party Services to the Delivery Manager
Restaurants and merchants offering dine-in and take-out options will benefit from the “To Go Item” order type. “To Go Item” enables customers who dine in to order take-out items while they dine.
Two ‘Print To-Go’ Options
Two “Print To-Go” options allow staff to coordinate the preparation of a take-out order with a customer’s meal:
- “Print To-Go”: Allows manual coordination of dine-in orders with take-out items. When the “Print To-Go” button is selected, take-out items are sent to the remote kitchen printer.
- “Auto Print To-Go”: Allows automatical coordination of dine-in orders with take-out items. Take-out items are automatically sent to the kitchen with the customer’s first course when the “Auto Print To-Go” option is enabled in Print Settings.
Use ‘To Go Item’ With ‘Print To-Go’
Use the “To Go Item” function with a “Print To-Go” function to manually coordinate preparation of take-out items for dine-in customers.
- Create an order for a “Dine-In” customer
- Select one or multiple items that the customer would like to take-out.
- Designate these items as a “To Go Item” by selecting the “To Go Item” button.
- “To Go” Items are flagged in RED at the Register.
- When “Send Order” is selected, only the “Dine In” items are sent to the kitchen.
- When the customer is preparing to wrap-up their meal, select “Get Order” to pull up their order. Then select “Print To-Go” to send the remaining take-out items to the kitchen.
Use ‘To Go Item’ With ‘Auto Print To-Go’
Use the “To Go Item” function with “Auto Print To-Go” function to automatically coordinate preparation of take-out items for dine-in customers. When “Auto Print To-Go” is enabled, take-out items are automatically sent to the kitchen for preparation with the customer’ first course.
- Create an order for a “Dine-In” customer
- Select one or multiple items that the customer would like to take-out.
- Designate these items as a “To Go Item” by selecting the “To Go Item” button.
- “To Go” Items are flagged in RED at the Register.
- When the first course is sent to the kitchen, “To Go Items” are automatically sent as well.
The MODS screen has gotten a facelift! These changes apply to restaurants and merchants who use MODS.
- “Regular Modifiers” tab has been renamed “MODS”
- “Required Modifiers” tab is listed first in tab order
- The “MODS” tab is listed second in tab order
- Only active modifiers are displayed on the MODS screen
Release Notes 8.162
Customized order types help tailor your workflow so your customers get their orders fast. For example, Fast Food Hamburger Places create order types for customers ordering at the counter (order types: Counter 1, Counter 2…) and for customers ordering at drive thru windows (order types: Drive thru 1, Drive thru 2, …) so staff know exactly how to prepare an order in a timely manner based on the order type received. Order Types can be assigned as Custom Buttons at the register, so cashiers simply press order type “Counter 1”, “Counter 2”, or “Drive thru 1 ” to place an order.
Important reminders can now pop-up for staff before payment is received for a customer order! Remind staff to ask customers about the new NY bag fee charge. Prompt customers to submit a positive review on Yelp. Remind customers about custom gift wrap availability, or ask clients if they would like to donate to the March of Dimes or your favorite local charity. The way you can use custom prompts is truly endless!
Modifiers can now be represented in groups on printer receipts. Restaurants can group “holds” and “special instructions” in one group on the remote printer receipts, making it easy to relay special instructions to kitchen staff when placing a customer’s order.
Tobacco retailers can enjoy significant rebates and incentives by sharing their sales data via Scan Data’s Reporting Programs. Scan Data’s Reporting Programs for RJ Reynolds and Philip Morris offer rebates up to $0.15 per carton to retailers who provide tobacco sales data, which they analyze for market research, promotions, events and rebate programs. Now Exatouch easily generates the reports Scan Data requires, automatically formatting the information according to Scan Data’s specifications. The information can be loaded onto a thumb drive and sent directly to Scan Data, ensuring that you get your quarterly rebates even faster!
Improved layout for remote printer receipts will have your kitchen staff singing! More room at the top for clipping, red and black fonts for easy identification, and simplified labels make receipts easy to reference at a glance.
Release Notes 8.155
Customers can now add a tip directly to their eGiftSolutions receipt.
Improved layout for remote printer receipts will have your kitchen staff singing! More room at the top for clipping, red and black fonts for easy identification and simplified labels make receipts easy to reference at a glance.
Release Notes 8.137
The Bank Report now prints on the receipt printer, giving you a tangible summary of Bank Manager activity for the shift. Make it easier to reconcile monies at the end of a shift by keeping a copy of the Bank Report in the cash drawer when you close a shift!
Enhance your customers’ checkout experience with the new Bematech Pole Display! A 7″ LCD backlit monitor clearly displays customer pricing and order info. Decrease pricing errors by enabling customers to review their purchase as they check out. Plus, with enhanced multimedia capabilities, you can showcase promos, screen savers and more. Contact your Electronic Payments representative for details!
Bematech LV3000U Specs:
- True flat color TFT LCD Display
- Optimal display resolution 800 x 480
- Ventless design
- Adjustable tilt/turn angle
- Color: black
- Dimensions: 19in x 7.5in x 42in
- Display size: 7in
- Power consumption: 2.5W
- Weight: 2.6 lbs
- Wall mount: VESA 2.9in x 2.9in
Now you can easily apply a price increase or decrease to stock items in bulk, saving time and resources when stock prices fluctuate.
- See: Modify Bulk Items
Assigning custom colors to items makes using Simple Mode a breeze! Instead of displaying items at the register by category or subcategory, display items in Simple Mode first by color, and then alphabetically.
- See: Activate Simple Mode
A new calendar widget makes data entry during age check faster and easier.
Great news! Exatouch’s Delivery Manager and Address Verification have been so popular, we made some enhancements. Now, with Google Maps integration, Exatouch can verify customer addresses for accuracy. If an address is not recognized, additional suggestions will populate with the option to select the correct address or override the verification. The “Addresses” are also color-coded to indicate verification status.
The Historical Price Report is located in Items Reporting. Historical Price Report tracks data relative to retail price changes and works in conjunction with the historical pricing feature.
Revert to the previous price of an item, now applicable to items in bulk! Save time with bulk application of historical pricing, rather than looking up a previous price and applying a price change to each individual item.
- See: Historical Pricing
A new print setting allows you to include a total item count on customer receipts. Item count will appear under customer total on the bottom of the receipt.
Ensure that your staff is tipped before discounts are applied to customer orders. With Pre-Discount Gratuity enabled, gratuity is calculated based on a percentage of the pre-discount order amount. For example, a customer places a $100 order with a 10% coupon applied. A 20% tip is still $20.
- See: Manage Tip Settings
Now Receipt printers and remote printers have a Print Preview option. Selecting Print Preview option will display printer information on the screen, rather than sending the information to the remote or receipt printers.
Clients and staff can view your business logo or customized images as screen savers when Exatouch is inactive.
- See: Enable Screen Saver
Scale down your register for easy viewing with Simple Mode! Merchants with 50 or fewer items use Simple Mode to list items in alphabetical order and view it on screen as opposed to breaking items down by Category and Subcategory. For further customization and enhancement, items can be color-coded to quickly identify and ring up items. Ice Cream Stands, Taco Trucks, and other merchants with just a handful of items use Simple Mode to arrange their items by color on one screen. This makes using their register simple!
- See: Activate Simple Mode
Restaurants and retailers can now scan State-issued ID cards with 2D barcodes. This means quicker age checks with a wider variety of customer IDs, making age verification even easier!
Release Notes 8.123
“Print on accepted payment” option now available! Delivery restaurants will love the flexibility of printing to their remote kitchen printer after processing client payments.
Enter prices with the utmost speed! Now, you can enter fractional numbers as decimals without typing in a decimal point. Retail establishments such as delicatessens and eateries that sell prepared foods by weight, and restaurants that sell food by the pound, will benefit from this feature. Access Auto-Decimal settings from Home > Settings > Preference > in the General section.
Now you can define the length of time for both Quick Lock and Pin Timeout in Security Settings.
- Tip! Security Settings can be accessed from Home > Settings > Preference in the Security section.
Now there are more options for signature copies of credit card receipts! Location / Table Numbers will be printed automatically on credit card receipts, and merchants have the option to automatically print signature copies on customer receipts. Additionally, Admins and Power Users can now reprint credit card signature copies directly from the local menu.
Reprint signature copies of credit card receipts.
When Power Users and Admin Users use the Reprint function, both the order receipt and the merchant’s signature copy receipt will print.
- See: Reprint Receipts
Credit card receipts can now be printed with signature copies by default.
Enable this new preference to automatically print signature copies of credit card receipts.
Location/Table Number now appears on Signature Credit Card Receipts.
If a location or table number is available for a customer transaction, the Location/Table number will automatically appear the customer’s signature credit card receipt.
The Payments Report gives you detailed information about payments received by clients. This report displays payments for Open, Paid, Refunded, and Voided orders. Data points include: Order ID, Date, Staff, Type, Reference, and Amount.
- See: Sales Reports
Print settings have been organized and expanded to make print options more accessible. The redesigned interface allows for new print options. Print Settings are found in Settings, in the Print Module.
Print Settings Tabs
Tabs are located along the right-side rail of Printer Setttings:
- Receipt options
- Remote options
- Receipt message
- Snapshot and Staff Snapshot
- Printers
New! Print on accepted payment option
- Customize your workflow by choosing between Print on save (default) or Print on accepted payment.
- Print on accepted payment example: Pizza Delivery establishments who send their orders to the kitchen after payment is received.
- Print on save example: Full-service restaurants with course-seating send orders directly to the remote kitchen printer when each customer selection is recorded and saved.
New! Print delivery receipt
- Drop-down menu lets you choose a printer.
- Print delivery receipt example: Pizza delivery establishments send their delivery receipts directly to the remote printer closest to their delivery staff.
New! Print Last 3 digit order #
- Customize your receipts by choosing Full header info (default) and/or Print Last 3 digit order #
- Print Last 3 digit order # simplifies receipt content by printing only the last 3 digits of an order number.
- Print Last 3 digit order # example: Restaurants who have hundreds or thousands of previous orders simplify their receipts and save printer ink by printing only the last 3 digits of the order number.
In Items Details, “Sell options” is now referred to as “Stock type”. Drop-down options have also been modified. “Stop selling at 0” is now “Regular inventory item”. “Go negative” is now “Allow negative qty”.
- See: Modify Stock Type
- Warning: Exatouch versions 8.367 and earlier may not fully comply with recently implemented card brand requirements. Electronic Payments, Inc. strongly recommends you update to the latest version of Exatouch to meet these requirements.
Service Charges can be applied directly in the Register app. Banquet Halls can quickly add a Booking Fee at the touch of a Register button. Bistros can add a Delivery Charge directly in the Register app. Service Charges are created via the Custom Button feature.
Service Charge
Service Charges can be applied with the touch of one custom button in the Register app. Create and apply a banquet charge, delivery charge, consulting fee, or booking fee with ease. Service Charges can be customized to fit your business! For example, restaurants can apply a delivery charge with the click of a button when ringing up a customer’s order, and hotels can apply a banquet charge while booking an event.
- Service Charges are created via the Custom Button feature.
- Service Charges are applied after an Item or Service is rung up. Service Charges can’t be applied on their own.
- One Service Charge can be applied per order.
- Full refunds can be applied to a Service Charge. Partial refunds for Service Charges are not available at this time.
- The name of a Service Charge can be up to 13 characters long.
- Service Charges will not interfere with gratuity functions or Add/Mod Tip register settings.
- Service Charges are not reported as discounts, and will not be reflected as such on discount reports.
- Sales Transaction report has an added Srvc chrg column.
- Service Charges Report has been added to Sales Reporting.
- See: Sales Reports
In an Item’s Inventory section, MoQ has been re-labeled as Minimum Order Qty.
Merchants sometimes sell international items or items with non-traditional SKUs (aka Barcodes). Exatouch now accommodates the scanning of non-EAN13 compatible SKUs so you can add items with international or non-EAN13 compatible SKUs into your system. This is accomplished by scanning the non-EAN13 SKU item, and then creating an additional, locally generated SKU when adding the item to the system.
- See: Add an Item
Release Notes 8.112
Address Verification is available via the Google Maps API.
- Note: Google Maps is a free and reliable service; however, if you receive an “Address Verification” error double check that the address is correct. A simple spelling mistake, abbreviation or invalid zip code can trigger an error.
New colors help identify which Items and Services have been sent to a remote printer. Custom labels at the Register are distinguished by color as well.
Custom Labels
- Custom Labels: Saddle Brown
- Course: Sienna/Light Tan
- Seat: Pumpkin
Items
Items which have not been sent to a Remote Printer are assigned these colors:
- Regular: Black
- Promo: Green
- Modifier/Special Instruction Label: Goldenrod
- Special Instructions: Peach
Items Printed
Items which have been sent to a Remote Printer are these colors:
- Regular: Purple
- Promo: Gray
- Modifier/Special Instruction Label: Peach
- Special Instructions: Goldenrod
Services
Services which have not been sent to a Remote Printer are colored as follows:
- Regular: Black
- Promo: Green
Services Printed
Services which have been sent to a Remote Printer are colored as follows:
- Regular: Purple
- Promo: Gray
Exatouch gives your business more ways to enhance Custom Experiences with the addition of the Delivery Manager! Delivery Manager is designed to work seamlessly with your Exatouch orders. Pizzerias and establishments who provide delivery services will benefit from real-time delivery tracking and expedited service.
- Tip! To enable the Delivery Module for your business, contact our 24/7 Technical Support Team at (800) 966-5520 – Option 3 for assistance.
- Delivery Module is available on Restaurant Verticals or on any system where the “Show Order Type” register preference has been enabled.
- Access delivery functions from the Register’s local menu.
- Credit Card payments for delivery orders can now be accepted without disrupting delivery workflow.
- If a Delivery Order has been paid for by credit card, the order will show on the “Delivery Manager” screen, but not on the “Open Orders” screen.
- Address Verification is now available via Google Maps API integration.
- Note: Google Maps is a free and reliable service; however, if you receive an “Address Verification” error double check that the address is correct. A simple spelling mistake, abbreviation or invalid zip code can trigger an error.
Search capabilities have been expanded for Reprint Receipts so you can more easily find the desired order receipt.
Now tabs in Tax Settings are labeled by function: General Tax, Per Unit Tax, and Pre and Post Tax.
Release Notes 8.097
Tip reporting has been enhanced in many reports. A new Cash Summary field indicates whether an employee owes money to the restaurant, or the restaurant owes money to the employee. Tip Out Lines have been added to the Staff Shift and Staff Snapshot Reports so staff can record what they are tipping out.
Tips on Staff Shift/Staff Snapshot
- Order Summary: Tip amount does not include declared tips.
- Cash Summary: The is the cash sales minus all tips except for declared Tips. Cash Summary indicates whether the employee owes money to the restaurant, or the restaurant owes money to the employee.
- Tip Out Lines have been added to allow servers to enter amounts they have tipped out to other staff members (i.e. bartenders, bar backs, bus people). Tip Outs are not currently considered in report calculations.
Tips on Snapshot Report
- Order Summary: Tip amount does not include declared tips.
- Cash Summary: This is the cash sales minus all tips except for declared tips. Cash summary indicates whether the employee owes money to the restaurant, or the restaurant owes money to the employee.
Tips on Business Overview Report
- Order Summary: Tip amount does not include declared tips.
- Tips by Staff: Includes declared tips under the Cash column.
- Cash Summary was moved under Tips by Staff.
- In Trxs Tips include all tips except for declared tips.
Taxes have been reorganized to accommodate new tax options.
Tax Changes
Pre-tax and post-tax options have been added. Taxes have been reorganized to accommodate new tax options.
Calculate Pre-Taxes and Post-Taxes
- Pre-tax amounts are applied to an item subtotal. Once pre-tax is calculated, regular taxes are applied.
For example, calculate regular tax of 10%, after applying a 4% pre-tax on a $20 item: ($20 + 4% pre-tax = $20.80) + 10% overall tax = $22.80. The total tax for this transaction is $2.88. - Post-tax is an additional tax calculated after regular taxes are applied.
For example, on a $20 item, calculate a regular tax of 10%, and then apply a 4% post-tax: $20 (10% regular tax + 4% post-tax) = $22.80. The total tax for this transaction is $2.80.
Tax groups are split into tabs
- Tab 1: Tax Groups A, B, C, and D are grouped together.
- Tab 2: Tax Groups E, F and G are designated for liquor, tobacco, and sweet beverage taxes.
- Tab 3: Tax Groups H and I are designated for pre-taxes or post-taxes.
Calculate pre-tax on an item subtotal, or calculate an additional post-tax in addition to regularly applied taxes.
Merchants can see which staff members placed an order from a specific table location. The report displays orders that have payments attached to them. This report is used by Table Service businesses.
Now you can include tip suggestions at the bottom of a customer’s receipt! Suggested gratuity can be set up under Print Preferences in Settings.
Release Notes 8.086
On the Floor Plan, double-clicking a table icon will open the customer’s order. Single-clicking a table still opens the Floor Plan Control screen.
- See: Floor Plan Views
New Staff Snapshot preferences allow you to customize what is displayed on the Staff Shift report.
- Staff Snapshot Preferences are found in Settings within the Print section.
- Select each option you want to print on the Staff Shift report.
- Snapshot Settings has an “All” checkbox so all fields within a column can be easily selected or deselected with one click.
Additional reminders can be enabled so that reminders will surface when customer order limits have been reached. These additional reminders help merchants avoid running up a tab or sending orders to the kitchen for customers who have reached their order limit.
Release Notes 8.079
Pay In/Out Company option, and Pay Out Customer options are now available. Both options can be pre-defined within the Custom Variables section in Settings.
Increase operational speed with predefined PayIn/PayOut Out descriptions and amounts! The purpose of the payout function is to improve the flow of company and customer payouts. New PayIn/PayOut Company and PayOut Customer options give you the ability to select predefined payout descriptions and amounts.
Predefine Descriptions and Amounts for Pay In/Payout Functions
- Set up predefined descriptions and amounts for Pay In/Payout as Custom Variables.
- Home > Settings > Preference > Custom Variables
Payout Customer
- Set up predefined descriptions for Payout Customer as Custom Variables. Predefined amounts for Payout Customers are not available at this time.
- Home > Settings > Preference > Custom Variables
Pay In/Payout at the Register Pulls Up New Options
- At the Register: selecting PayIn-PayOut at the Register will pull up a new Pay In/Payout Company options
- On the Details tab: selecting Pay In-Payout will bring up new Company Payout / Company Pay In options
- Predefined Company Pay In/Payout descriptions and amounts will apply.
PayOut Customer option at the Register
- When Payout option is selected at the register, Payout Customer option will appear in a pop-up window.
- Predefined Customer Payout description will apply
- Keypad will pop-up so you can enter the PayOut amount
The Staff Shift report is more accessible! New keypad button gives users the ability to print Staff Shift reports without having to clock out.
- A Print staff shift report button has been added to the Clock in/Clock out keypad, so you can print the Staff Shift report without Clocking Out.
- Staff Shift report has been added to the Reports section.
- This report prints directly from the receipt printer.
- User must be clocked in to use the Staff Shift report.
New “Print Orders” function makes it easy to print all orders created by the Split by Item function. The new “Print Orders” feature is enabled by default so you can print all order tickets at one time.
- When you separate an order by selecting the Split by Item function, the new Print Orders checkbox will be enabled by default.
- After you’ve completed the split, all individual orders will print.
Quick Picks at the Register make it even faster to place an order!
- Quick Picks for food service establishments are added by clicking the new Quick Pick button, located above Favorites.
- See: Quick Pick Ordering
- Quick Picks for retail establishments appear at the bottom navigation menu.
- See: Ring Up Quick Picks
- Quick Picks can be items and/or services.
The Staff Shift report is now accessible directly from Reports.
- A Print staff shift report button has been added to the Clock in/Clock out keypad, so you can print the Staff Shift report without Clocking Out.
- Staff Shift report has been added to the Reports section.
- This report prints directly from the receipt printer.
- User must be clocked in to use the Staff Shift report.
New Snapshot preferences allow you to customize what to display on Snapshot and Snapshot by Station reports
- Snapshot Preferences are found in the Print section of Settings via. Home > Settings > Print > click Snapshot Settings
- Each option selected in Snapshot Settings will appear when Snapshot reports are printed
- Snapshot Settings has an “All” checkbox so all fields within a column can be easily selected or deselected with one click.
- These settings will affect both the Snapshot and Snapshot by Station reports
- These settings will NOT affect the Business Overview report
- Note: As of Exatouch version 8.79, Snapshot Shift definitions have been moved from Settings/Business to Settings/Printers.
Release Notes 8.055
Batching from each machine will now yield a Batch ID per machine.
- Note: Please note that you must void a credit card transaction from the machine it was processed on.
Now there are more options for signature copies of credit card receipts! Location / Table Numbers will be printed automatically on credit card receipts, and merchants have the option to automatically print signature copies on customer receipts. Additionally, Admins and Power Users can now reprint credit card signature copies directly from the local menu.
Reprint signature copies of credit card receipts.
When Power Users and Admin Users use the Reprint function, both the order receipt and the merchant’s signature copy receipt will print.
- See: Reprint Receipts
Credit card receipts can now be printed with signature copies by default.
Enable this new preference to automatically print signature copies of credit card receipts.
Location/Table Number now appears on Signature Credit Card Receipts.
If a location or table number is available for a customer transaction, the Location/Table number will automatically appear the customer’s signature credit card receipt.
When batching out, adjusted totals will be automatically calculated and displayed when a tip is added.
Now you can choose! Names can now be assigned to Course Firing. You can choose to assign either Name or Seat Number to a Course Firing entry.
Exatouch version 8.055 allows you to Customize Tax Names and Apply Volumetric Taxes.
- Navigate to Tax settings via Home > Settings > Taxes.
- Apply a label for a Tax Group by clicking on the Group name and typing a label name.
- Apply a label to a Tax by clicking on the Tax name and typing a label name.
- Show on receipt checkbox has been added.
- Enable Show on receipt to break down all taxes by name on the customer’s receipt.
- Leaving Show on receipt unchecked will lump all taxes together on the receipt and display a total.
- New Tax Groups E-F-G have been added to the Tax setup page to accommodate Volumetric Taxes.
- Taxes in Groups E-F-G are calculated in $ amounts; taxes in Groups A-B-C-D are calculated in percentages.
- Tax Groups E-F-G represent $ per Unit/Gallon/Liter.
- Example 1: ($ per unit) There are 20 cigarettes in a pack, so tax is charged per unit (cigarette in the pack). Select unit to apply this tax.
- Example 2: ($ per gallon) A six pack of 12 oz beer bottles has 72 oz total. This is equivalent to 0.56 gallons taxes. Select gallon to apply this tax.
- Pack size field is now available on Items Details page to accommodate new tax options.
- Pack size option is used so the taxes can be converted to tax per unit.
- Example: Six pack of beer would be 6 X 12 of . “of” is used to indicate ounces fluid. (6 pack of 12 ounces of fluid.) “oz” is used to indicate weight.
- A Type drop-down has been added to Items Details in the Tax Group section. The Type drop-down displays names defined on the Tax Setup page for Tax Groups E-F-G. If no names have been assigned, the Type drop-down will indicate None.
- Tip! Multiple taxes from Tax Groups can be applied to a single item. For example, a tax from Group A and a tax from Group E can be applied to a single item.
The Deleted Items Report displays items that were removed at the Register-level after an order has been saved.
- See: Deleted Items Report
When multiple banks (2 or more banks) are available, all banks display in the bank swap window. Banks that are in use will be labeled as such and listed at the bottom of the bank list.
Items can be made non–refundable. Non-refundable status is enabled on the Items Details page.
It’s easier to find and select your customer’s order at the Register when you preview open orders.
- See: Preview Open Orders
When you change item quantities directly on the Register, any promo already applied to the item will also be applied to the additional item quantity.
How can we improve this information for you?
Registered internal users can comment. Merchants, have a suggestion? Tell us more.