Custom variables allow you to edit multiple data fields throughout Exatouch. Details such as staff type, floor plan components, payout types, and transaction reasons can be defined as custom variables. Item details such as size, color, and style are defined for reporting purposes.
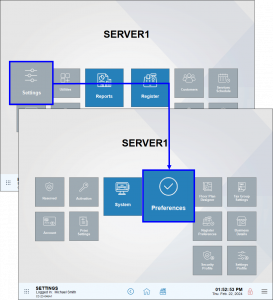
Custom variables are defined under Settings > Preferences. Each custom variable type has a unique set of requirements associated with it. The process of defining custom variables varies by type; some variables require information such as “unit” to be assigned.
This is an example of how to define variables for the Item Color group:
- From Home, navigate to Settings > Preferences.
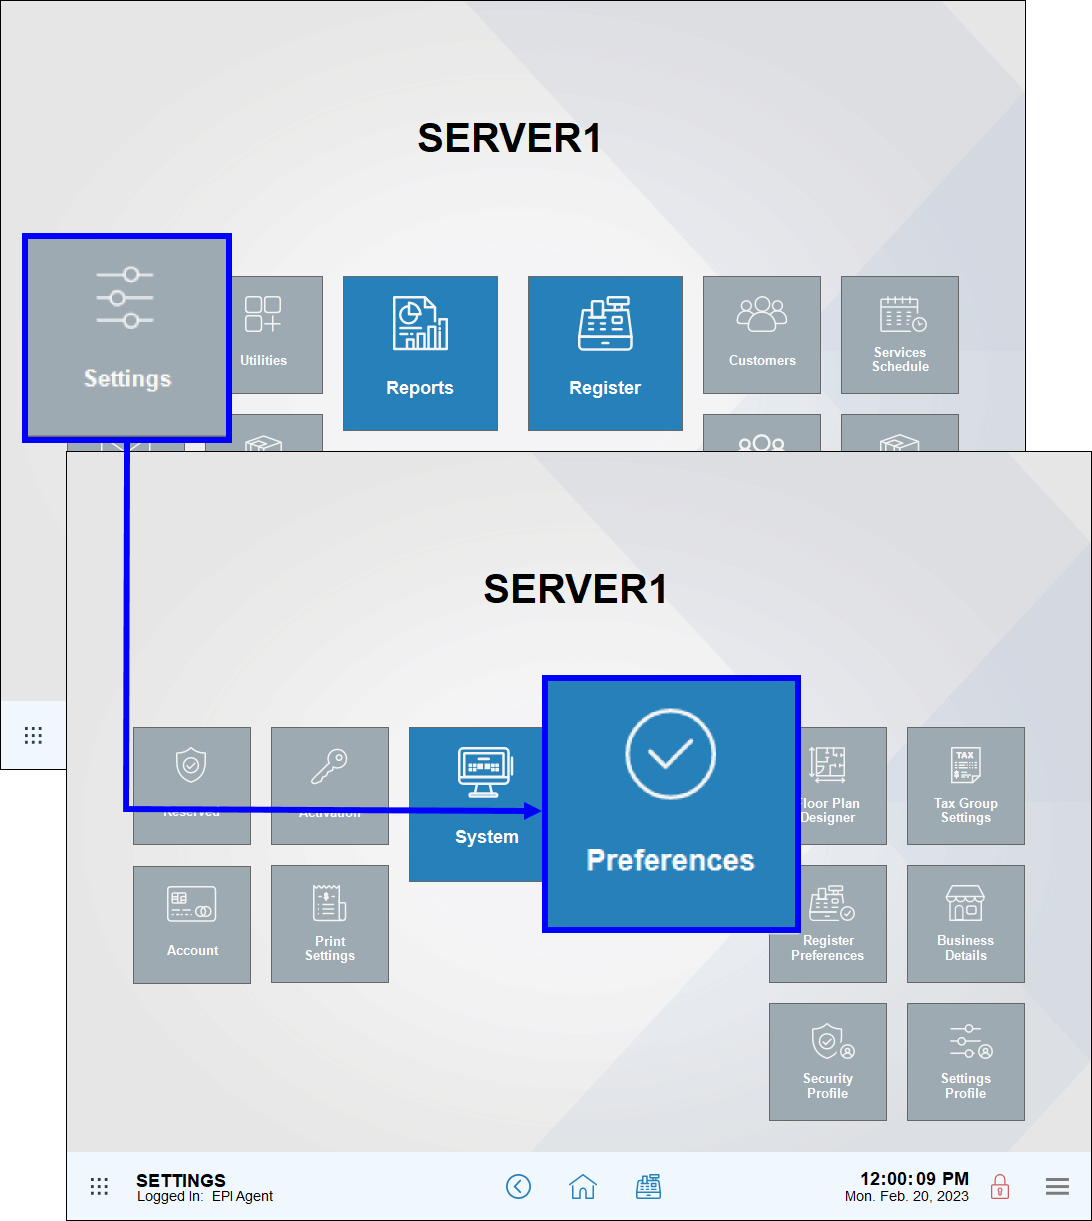
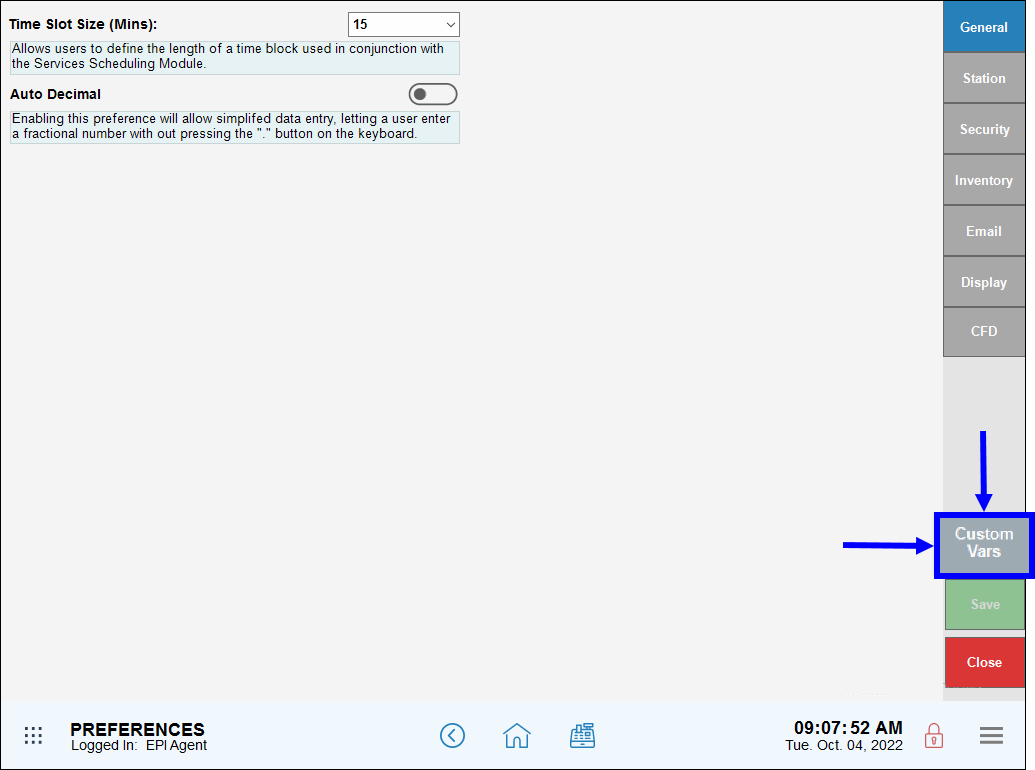
- Tap the Custom Vars (custom variables) tab.
- In the Type section, select Item Color, then tap Add Line to add colors.
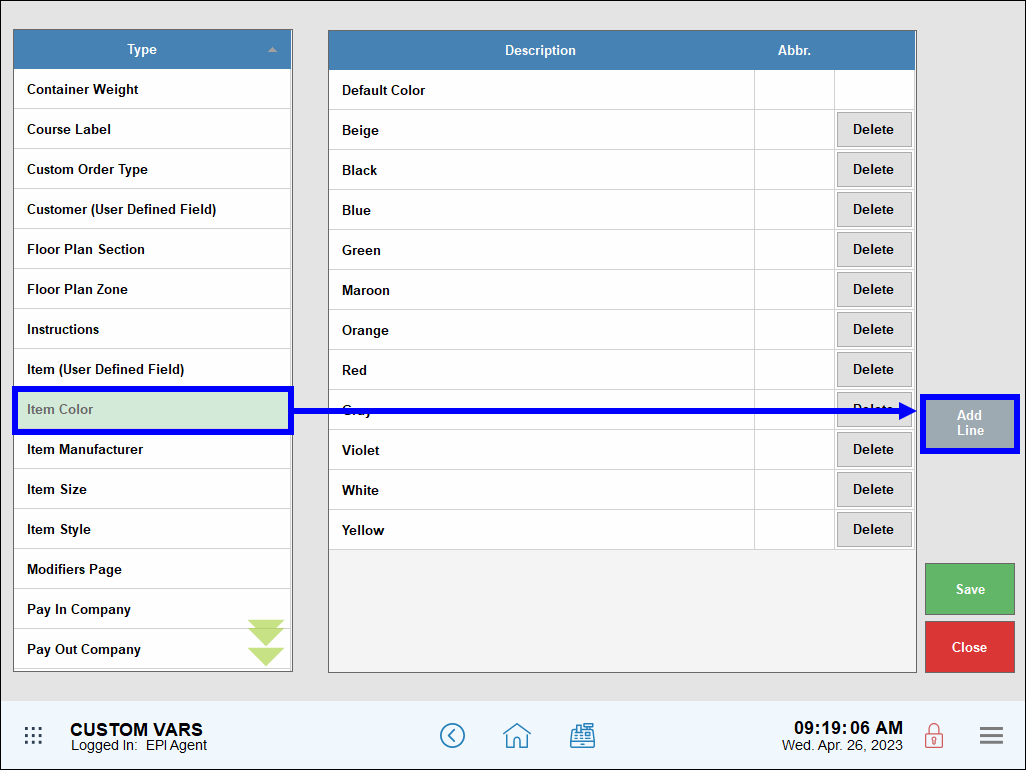
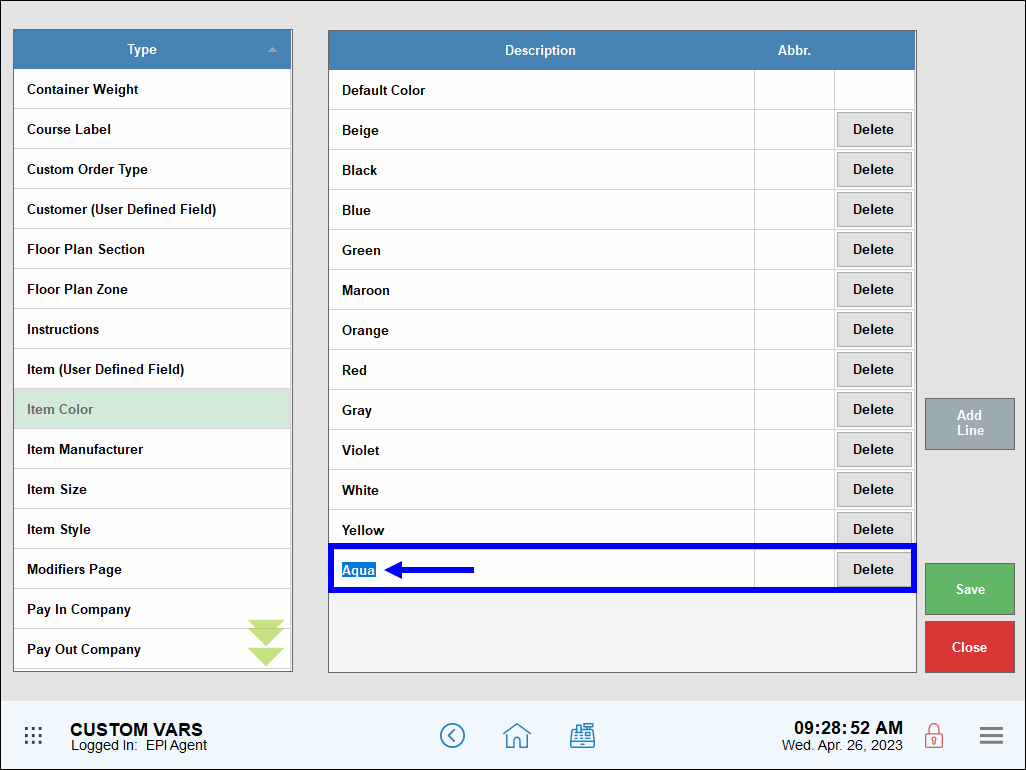
- Enter a new color.
- Delete colors by tapping Delete next to an entry.
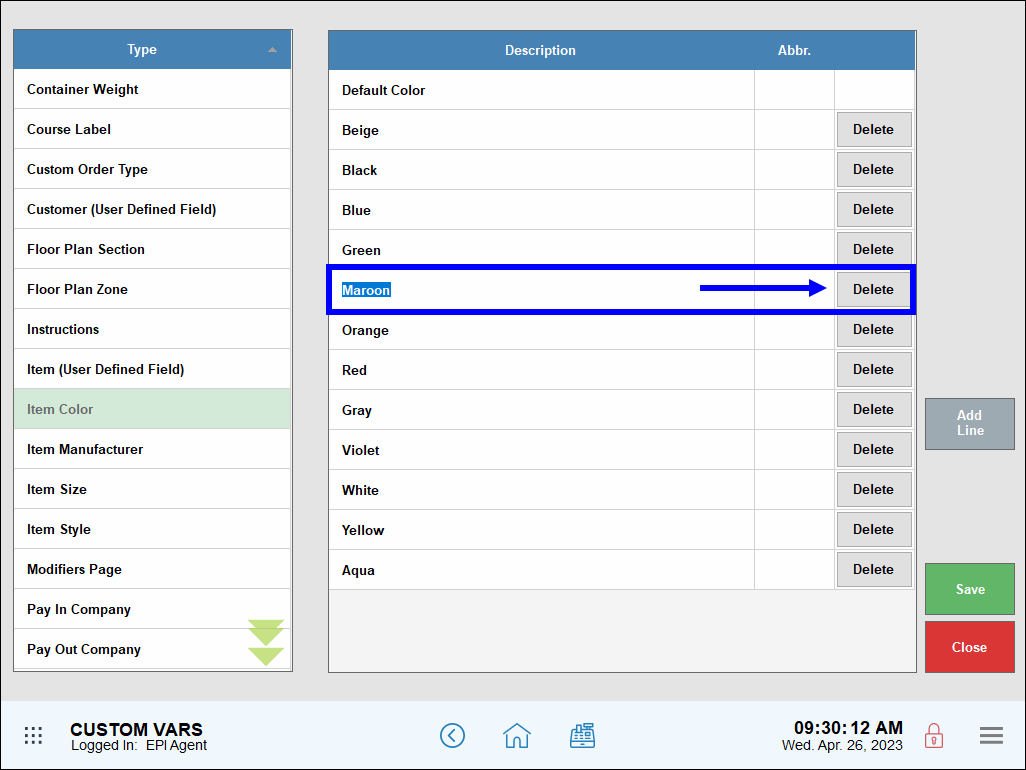
- Tap Save.

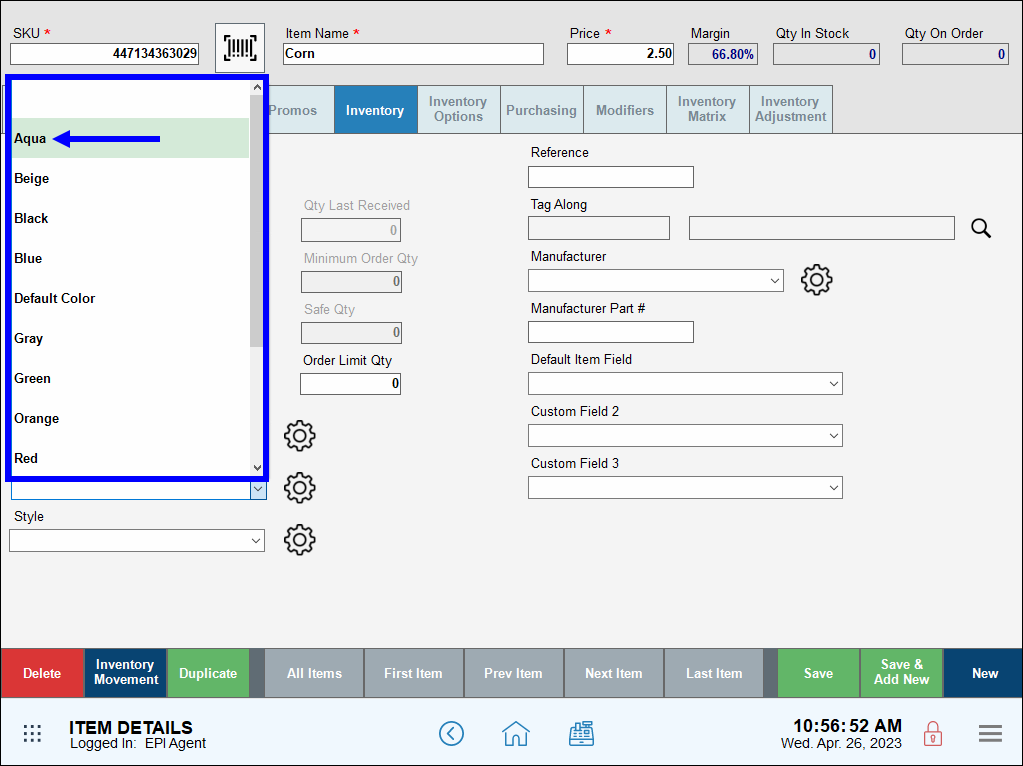
- Tip! Check your work! Navigate to the Inventory tab on the Item Details page to view choices in the Color drop-down menu.
- Note: Custom variables can work in conjunction with custom buttons by defining functions used to create custom buttons. See: Difference between Custom Buttons and Custom Variables.
Select a custom variable type to learn what custom variables can do for you:
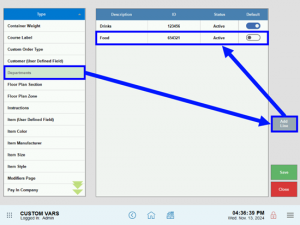
Merchants use departments to give them a higher level of insight into the profitability of their business. With departments, merchants can easily track revenue versus non-revenue sales and the success of seasonal items.
Merchants can create a new department in the Custom Vars tab in Settings > Preferences.

Tap Add Line, and then fill in the description and ID. Make sure to select a default department, and then save your changes.
- Tip! Merchants can also update Custom Variables for departments by tapping the gear icon next to any Department dropdown.

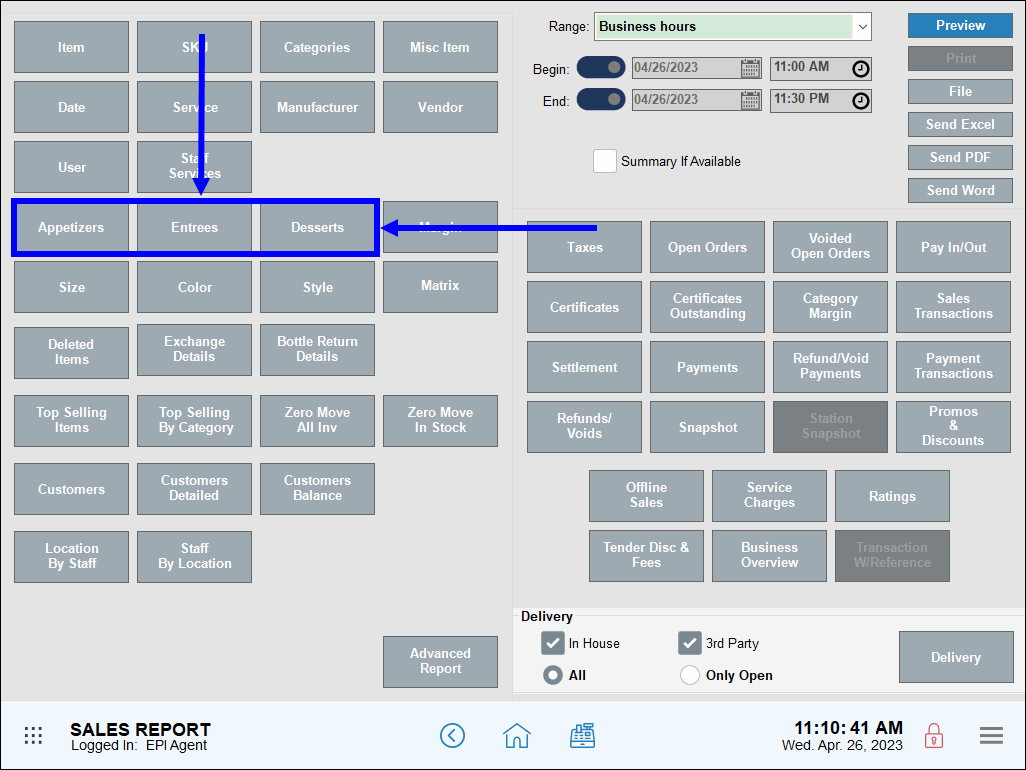
Merchants can create user-defined fields to track items on a granular level. Under Items Details, there are three user-defined fields. Labels for these fields are assigned via custom variables. Once labels are defined, each label (maximum of 3) displays as a custom report in Sales Reports and/or Advanced Sales Reports. Additional steps are needed in order for user-defined reporting to be functional.
- Example: In reviewing their menu offerings, a Mexican restaurant wants to determine which appetizers, entrees, and desserts are the most popular. User-defined fields can be Appetizers, Entrees, and Desserts.
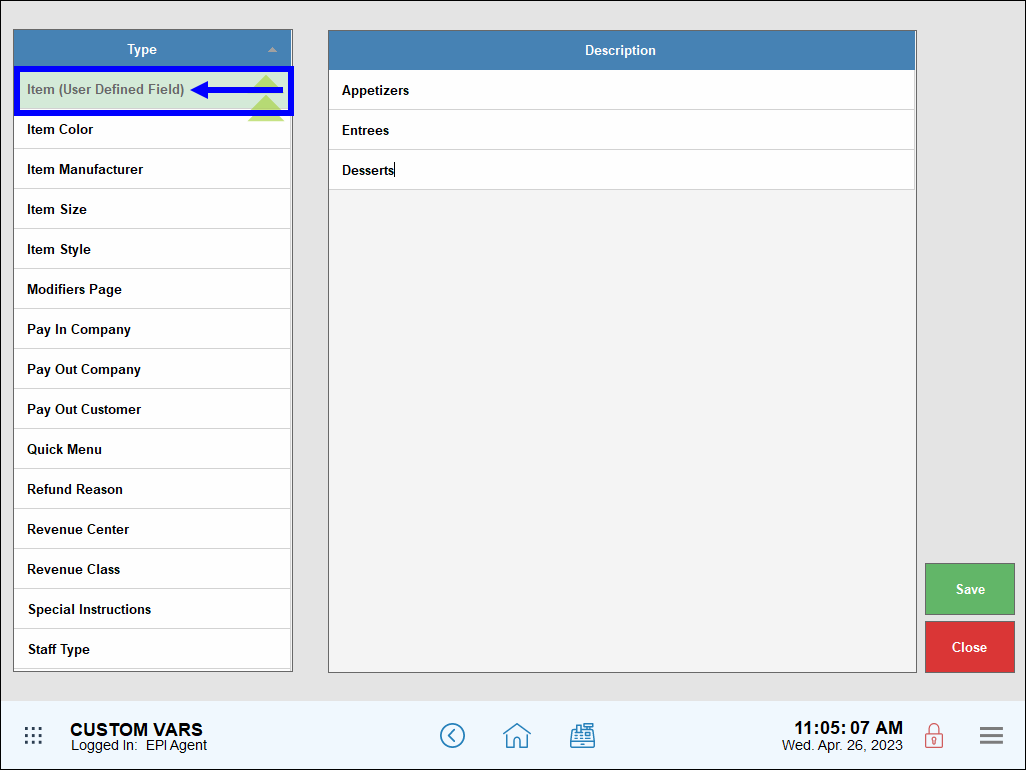
- Impact: Item Details. Look for the user-defined field drop-downs. In order for reporting to be fully functional, drop-down content must be defined, and values need to be chosen.
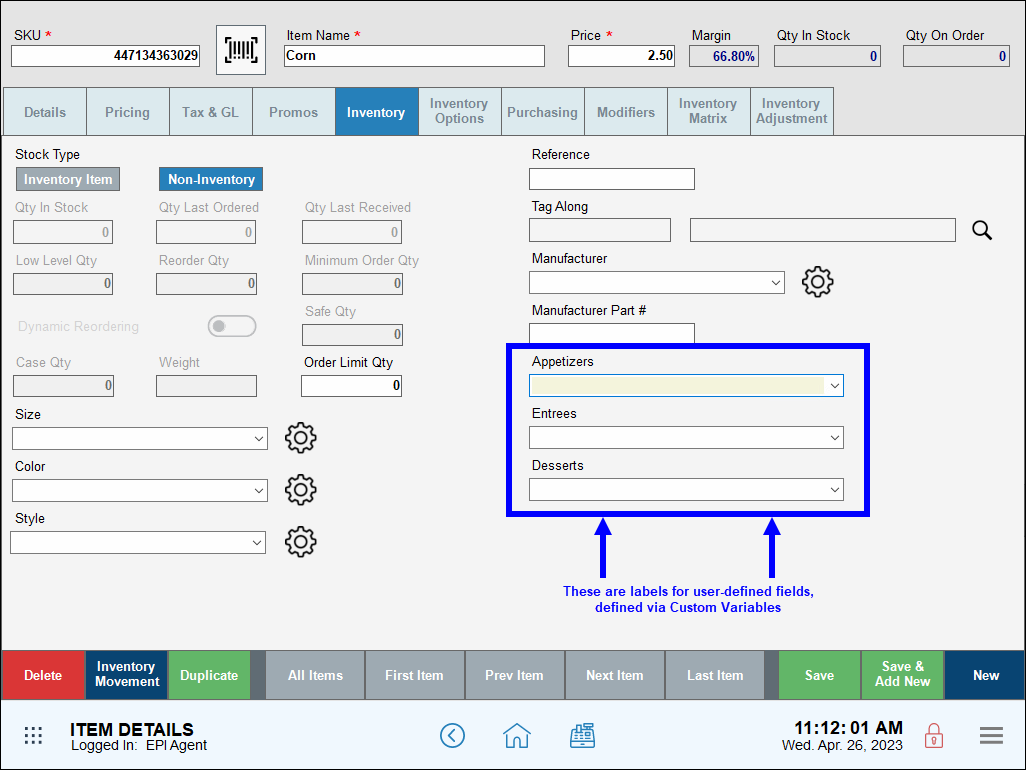
- Reports: Navigate to Reports > Sales, and find the names of reports you defined (maximum 3.)
Staff type describes an employee’s role. Create different staff roles to display on an employee profile via Custom Variables. Staff type is not related to access permissions in Exatouch.
- Example: Cashier, Cook, Dishwasher, Manager
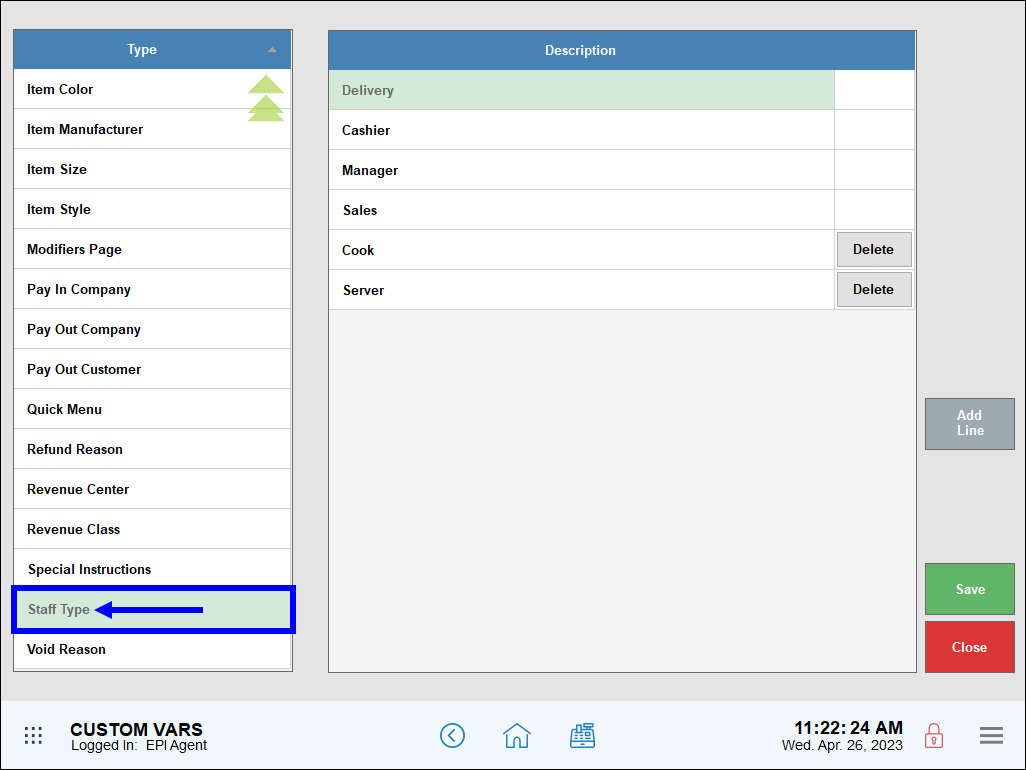
- Impact: Staff Details. Look for the “Staff type” field on an employee record.
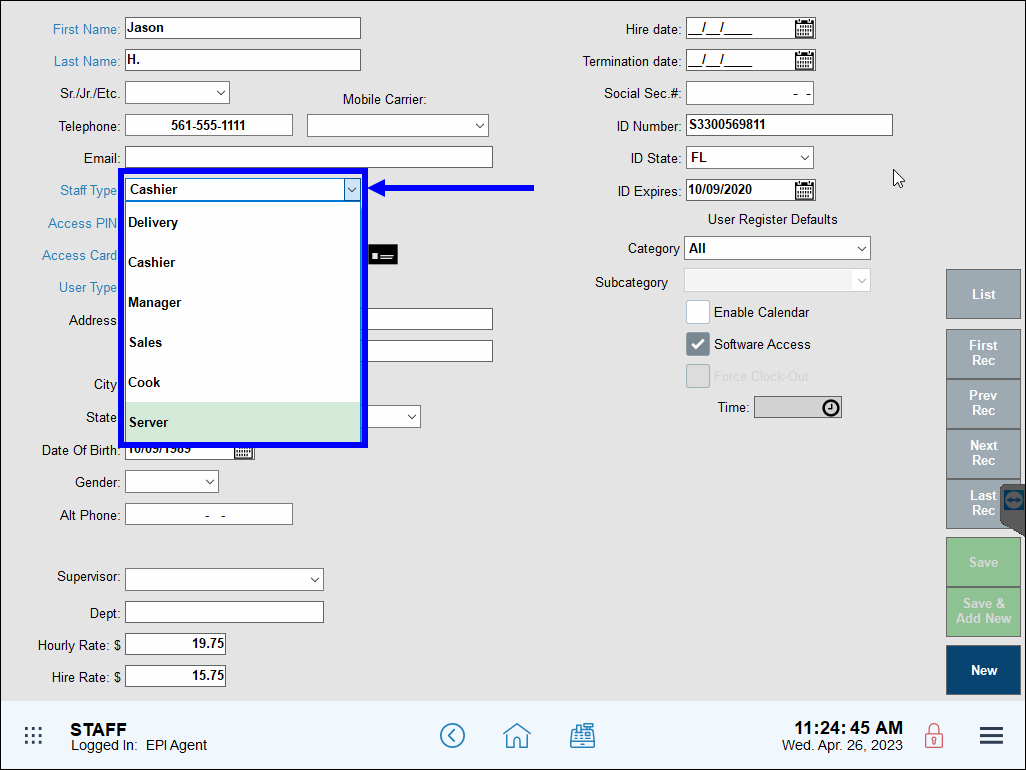
- Reports: N/A
Floor plans can be broken down into zones for organized management. Labels for “Floor Plan Zones” are defined via custom variables.
- Example: Main Dining, Bar, Patio.
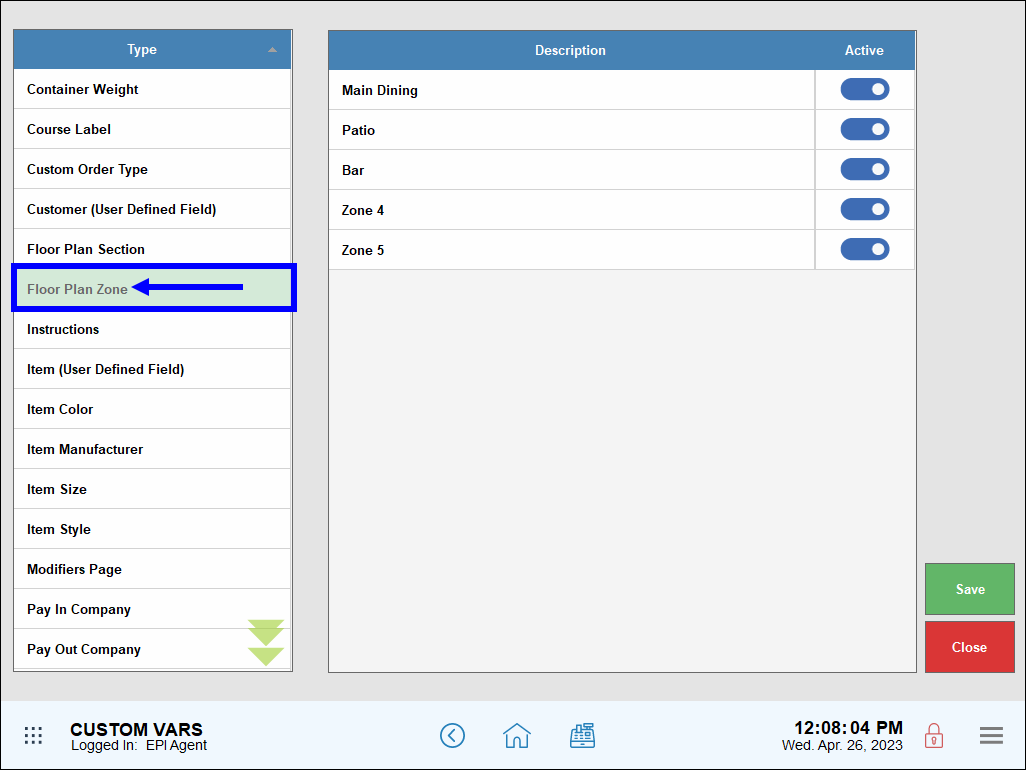
- Impact: Floor Plan Zone labels appear immediately after they are defined via custom variables.
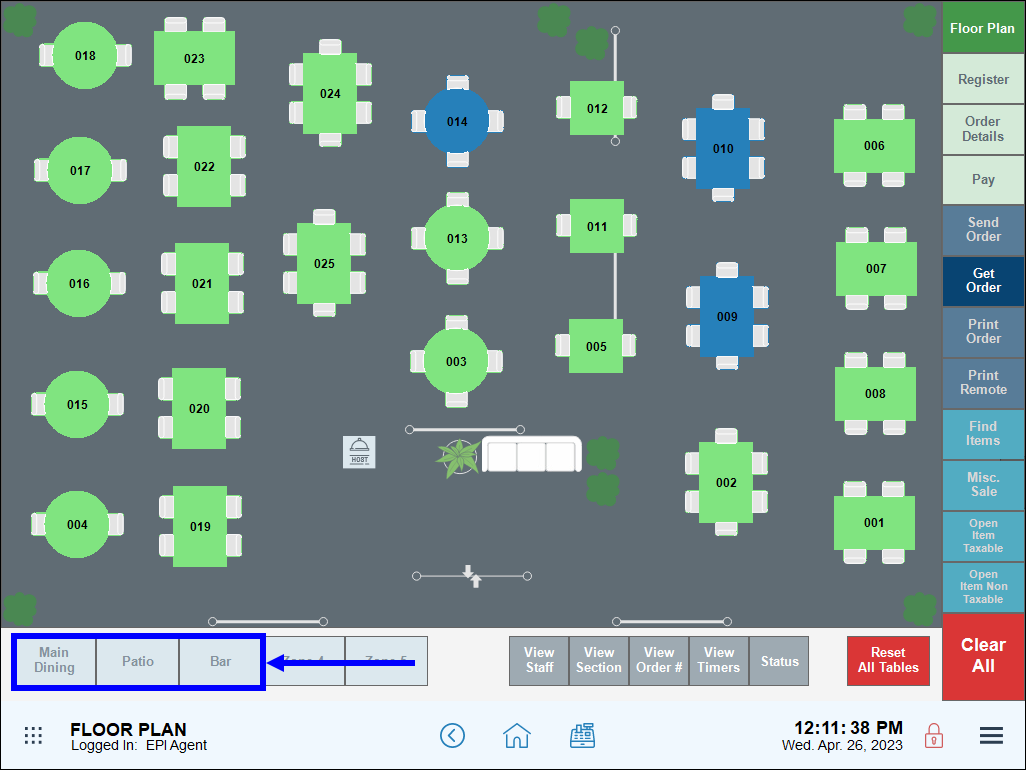
- Reports: N/A
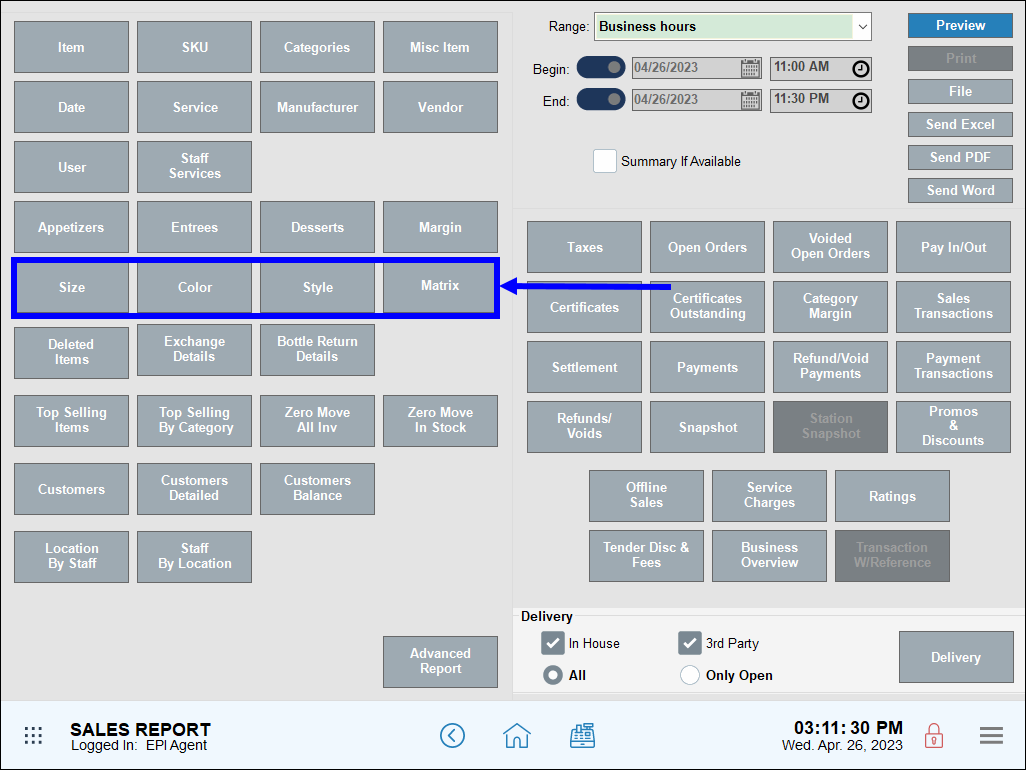
Item size, color, and style are Item-level information used for reporting purposes and/or with Matrix Inventory.
- See: Add Size Options and Add Color Options
- Example: A shoe store describes their shoes using Item colors: beige, black, blue; Item size: women’s 5, women’s 6 … women’s 11; Item style: narrow, medium, wide.
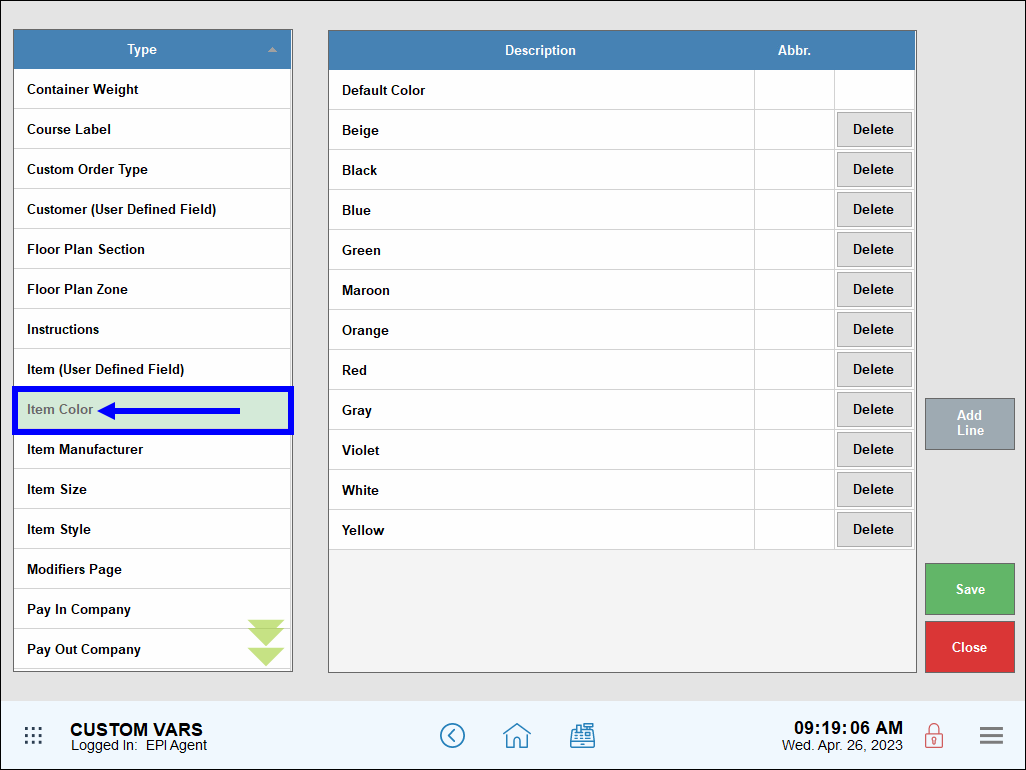
- Impact: Item Details, in the Size, Color and Style drop-downs.
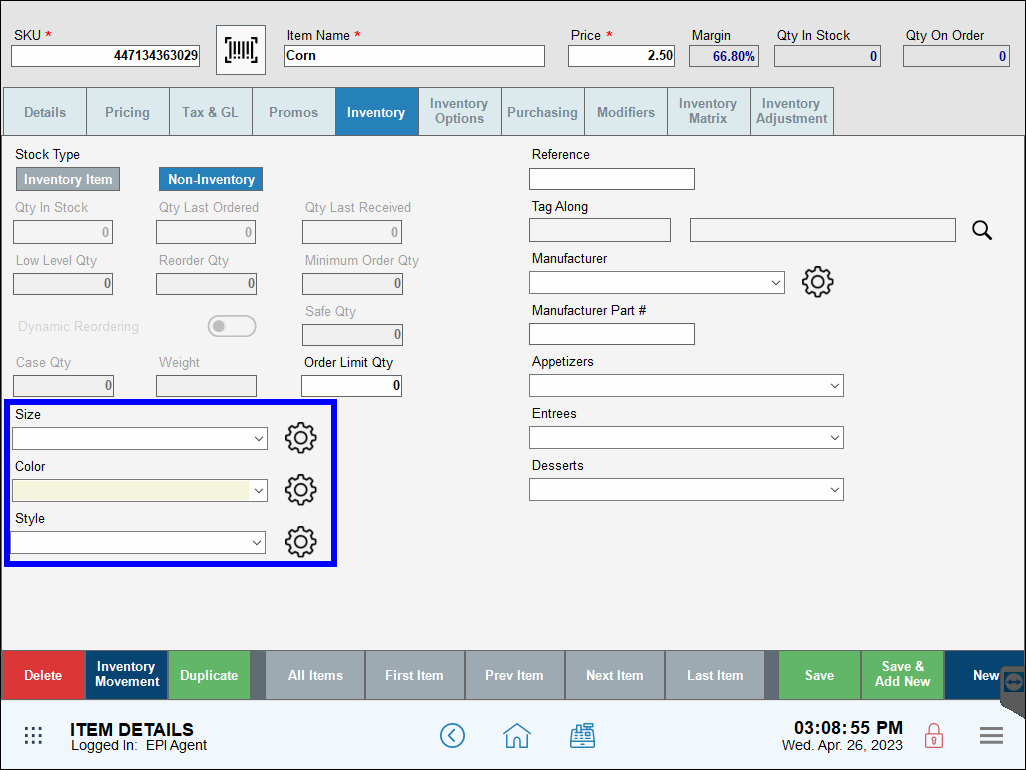
- Reports: Size, Color, and Style are included in the Sales Reports: Sales by Size, Sales by Color, Sales by Style, and Sales by Matrix. Items List has a “size” column, and “Advanced item search” can filter by size, color, and style.
- Tip! Size, Color, and Style variables can also be updated on the Items Details page by tapping the gear icon next to each field.
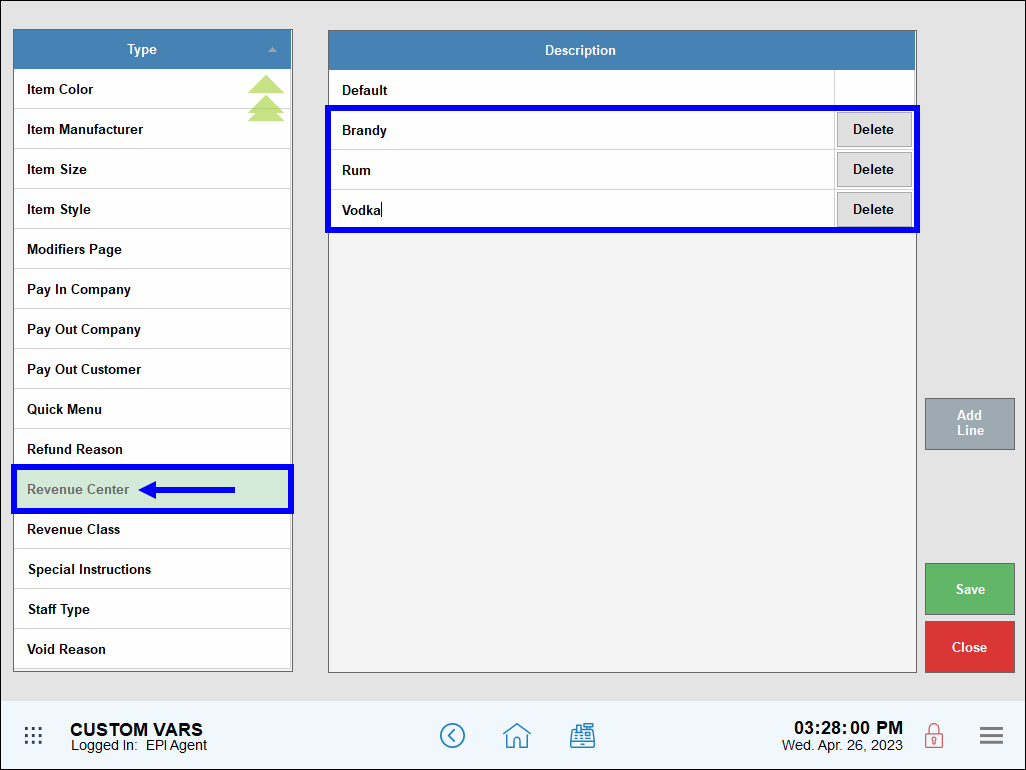
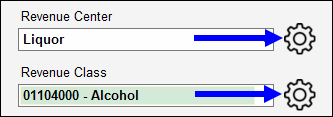
Revenue Center and Revenue Class are item-level information used for detailed reporting purposes. Data from Revenue Center and Revenue Class fields are designed to display on Business Overview and Snapshot reports. While Revenue center and Revenue class are separate criteria, they can be used together.
- Example 1: Retail store uses Revenue Center to track overall liquor sales. Revenue Center: Liquor.
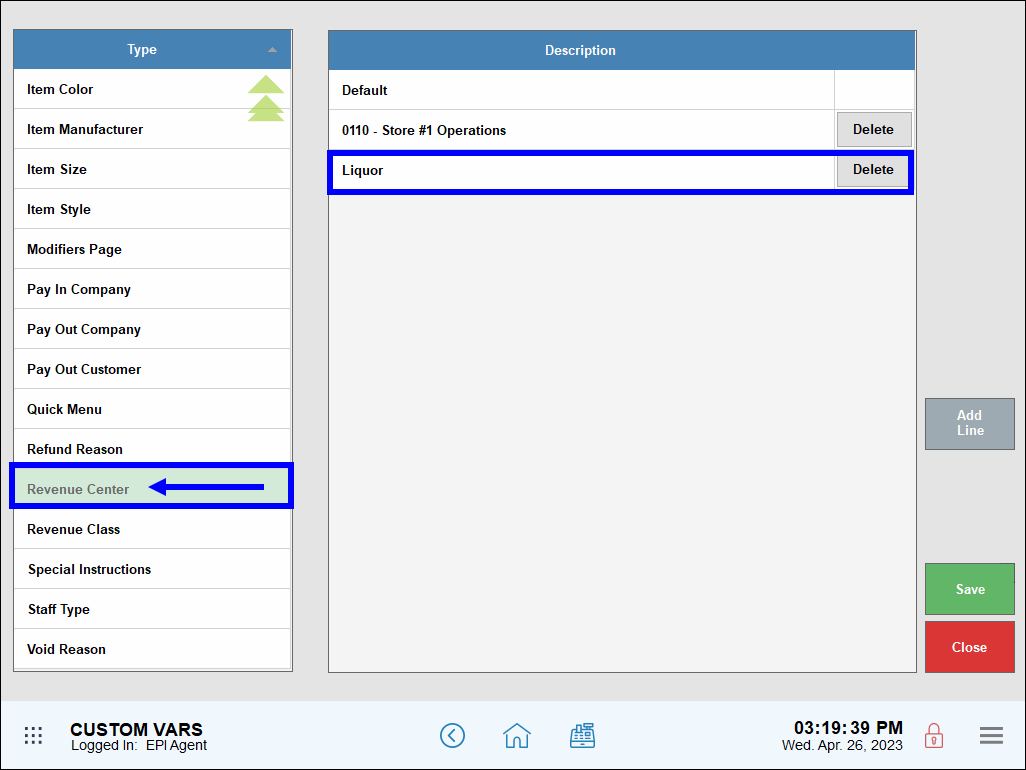
- Example 2: Retail store uses Revenue Center and Revenue Class together to track specific liquor sales. Revenue Center: Liquor; Revenue Class: Brandy, Rum, Vodka.
- Impact: Directly impacts Items Details. See Revenue Center and Revenue Class drop-downs. To fully benefit from Revenue Center and Revenue Class labels, labels need to be applied within Items Details.

- Tip! Revenue Center and Revenue Class can also be edited directly by selecting the gear icon next to the field.

- Tip! Revenue Center and Revenue Class can also be edited directly by selecting the gear icon next to the field.
- Reports: “Business Overview Report” and “Snapshot Reports”
Item manufacturer data is used for reporting purposes which are unrelated to vendors or purchase orders.
- Example 1: Retailers that deal in auto parts often use manufacturer part numbers and create manufacturer variables which correspond to part numbers.
- Example 2: Firestone, Sumitomo, Goodyear.
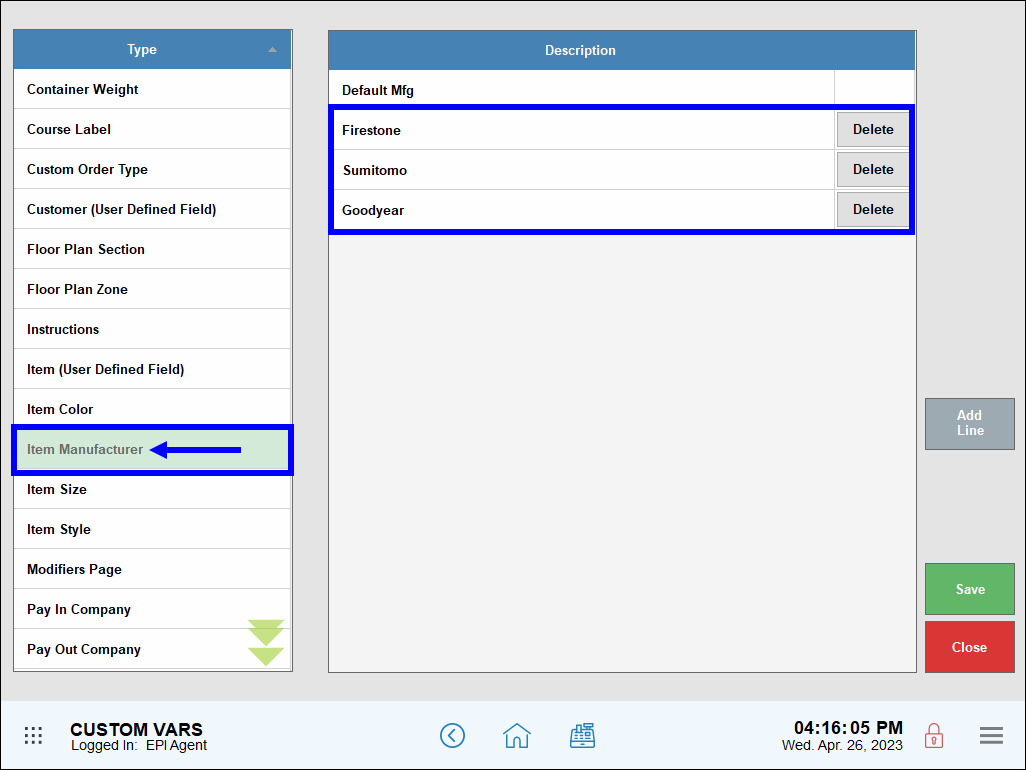
- Impact: Item Details. Look for the Manufacturer and Manufacturer Part # dropdown menus.
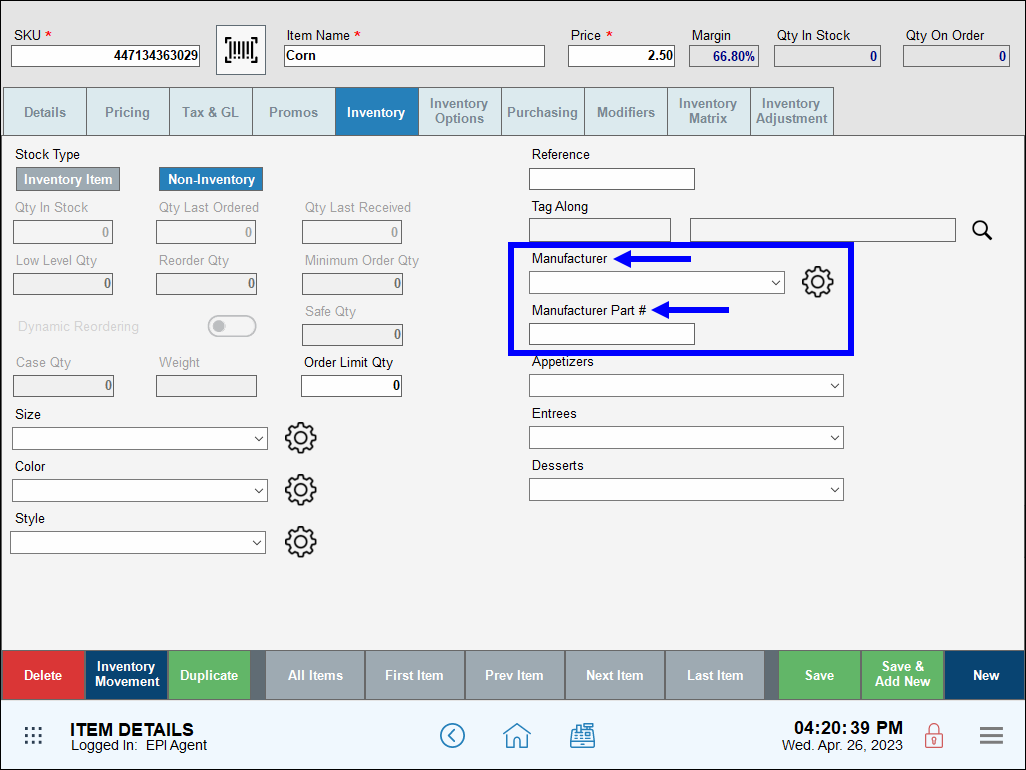
- Tip! Item manufacturer can be edited directly from Item Details by selecting the gear icon next to the field.
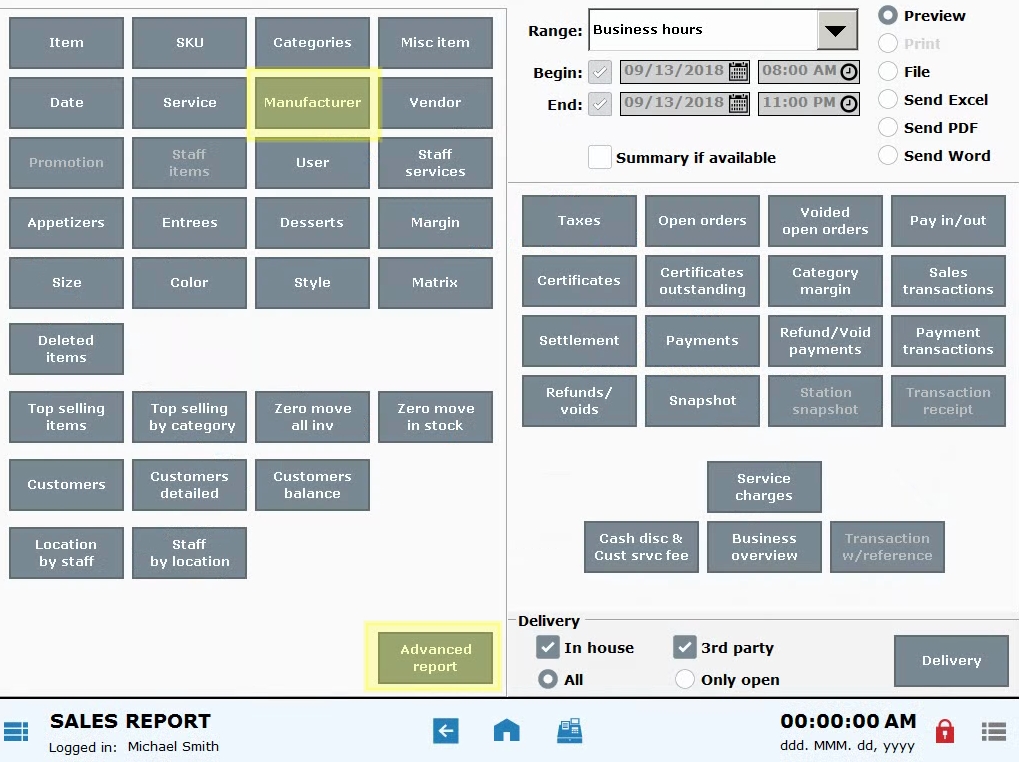
- Reports: Manufacturer details are displayed in Manufacturer Report and in Advanced Reports, located in Sales Reports.
Modifier Pages expand modifier offerings at the register. Modifier Pages are often associated with ratios. Ratios must be defined as whole numbers. Pizzerias often use Modifier Pages to describe pizza toppings.
- Example: A pizzeria defines the following Modifier Pages:
- Whole Topping – Ratio 100.00
- 1/2 Topping – Ratio 50.00
- 1/4 Topping – Ratio 25.00
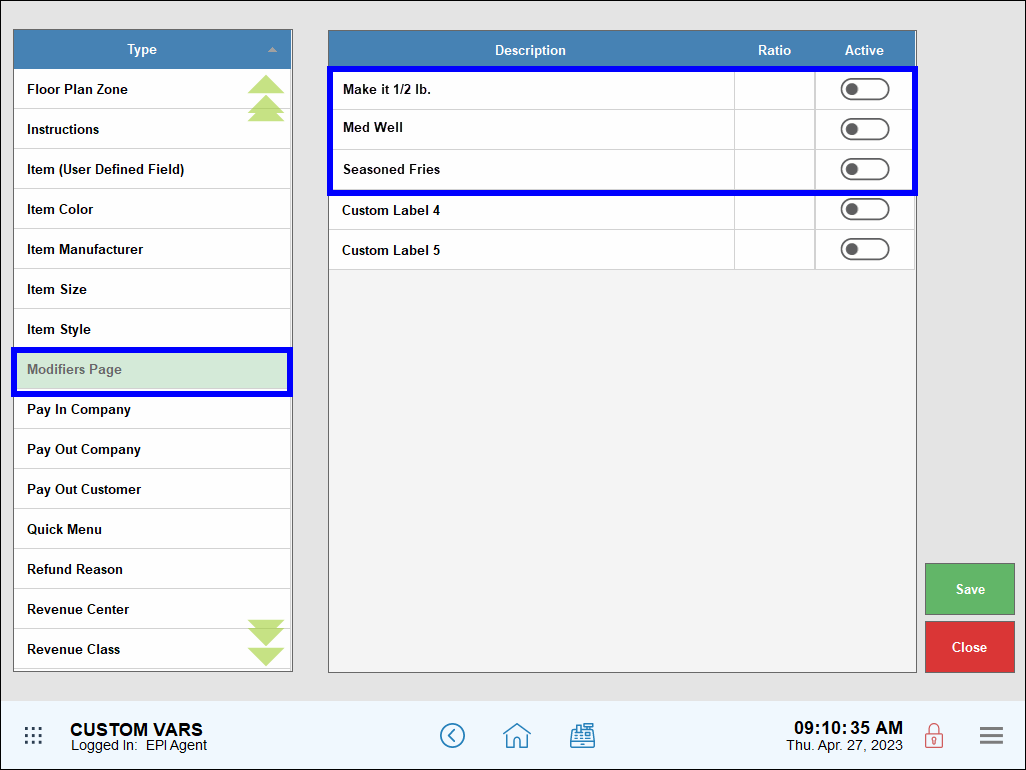
- Impact: The Register, on orders with MODS. View Modifier Pages when the MODS window pops-up at the register. While Modifers Page labels appear immediately at the register, further steps are needed for full functionality.

- Reports: N/A.
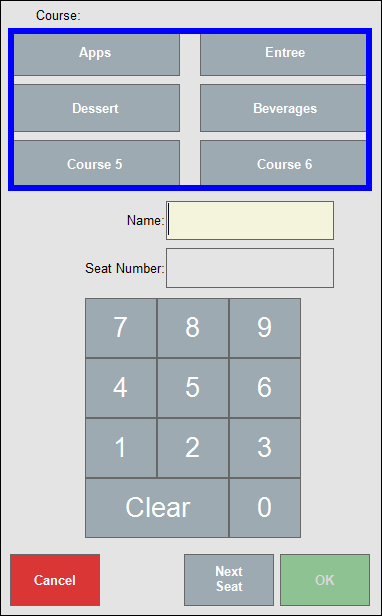
Restaurants can assign custom labels to their courses.
- Example: Beverages, Appetizers, Entree, Dessert.
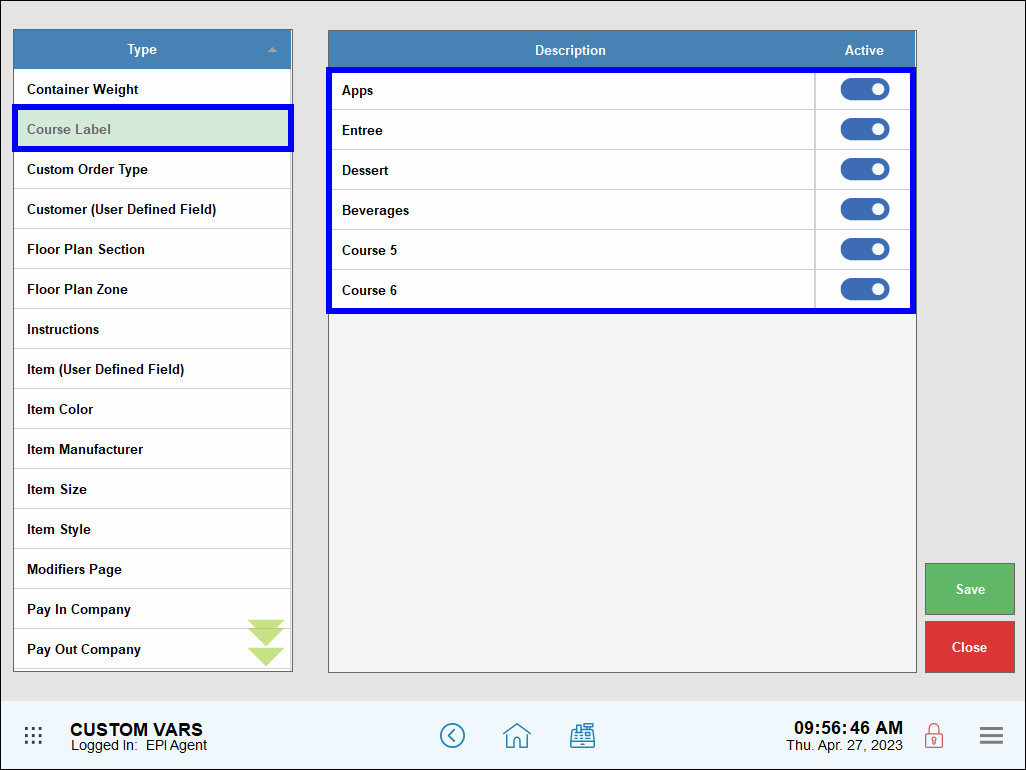
- Impact: Coursing at the register. Select Course Seats to add course entries, and view the course labels.
- Reports: N/A.
- Note: Course labels are used in conjunction with course firing. For full functionality, enable printer preferences for course firing.
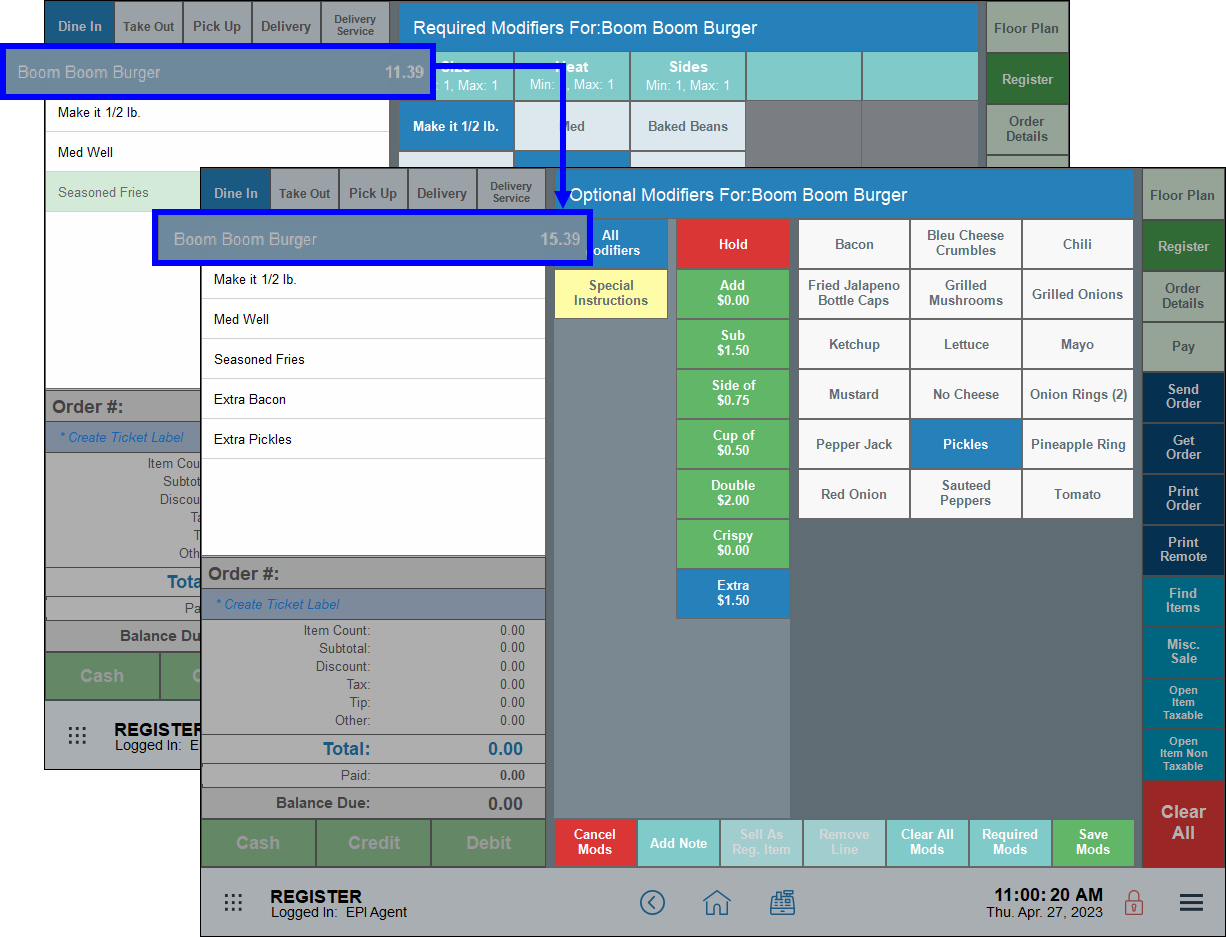
Instructions provide additional detail on applying MODS to an order. This is especially helpful to restaurants who communicate specific instructions to kitchen staff before an order is prepared. Up to 8 custom Instruction variables can be defined.
- Example: An Italian restaurant applies these instructions to clarify their modifiers: Extra $, Add $. Associated modifiers include: Olives, Onions, Peppers. A customer orders a “House Salad” with “Extra” + “Olives.” “Extra” is an instruction on how to apply “Olives.”
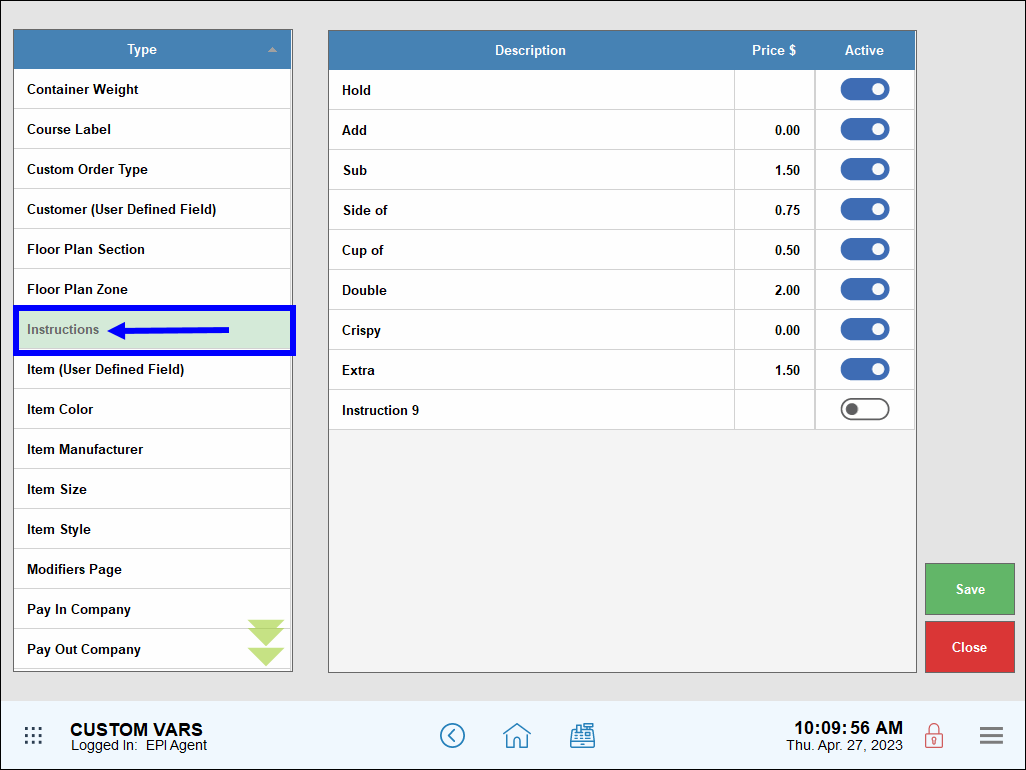
- Impact: The Register, when a MODS is added to the order. Instructions appear as GREEN buttons in the MODS section. Note the total price difference when adding Optional Modifiers, such as Extra Bacon.
- Reports: N/A.
- Tip! Don’t forget to double-tap All Modifiers to clear the instruction button after selections are complete.
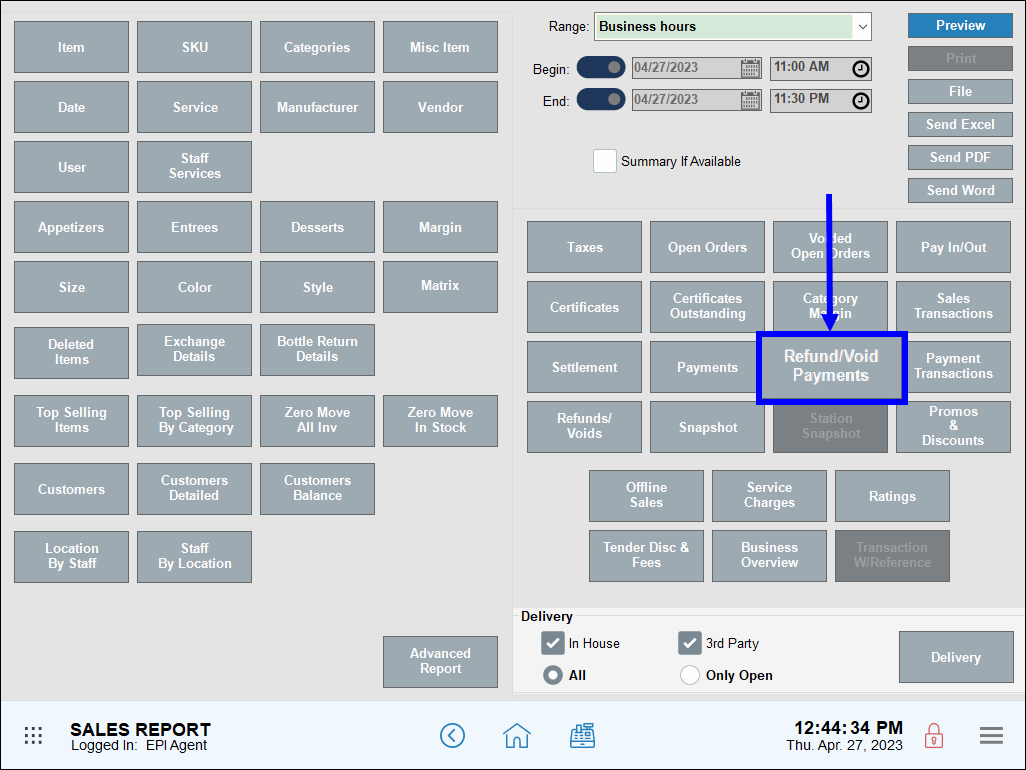
Track pre-defined reasons for voids and refunds in reports. These fields are optional but can be set to required in Settings.
- Example: Incorrect Price, Damaged Item.
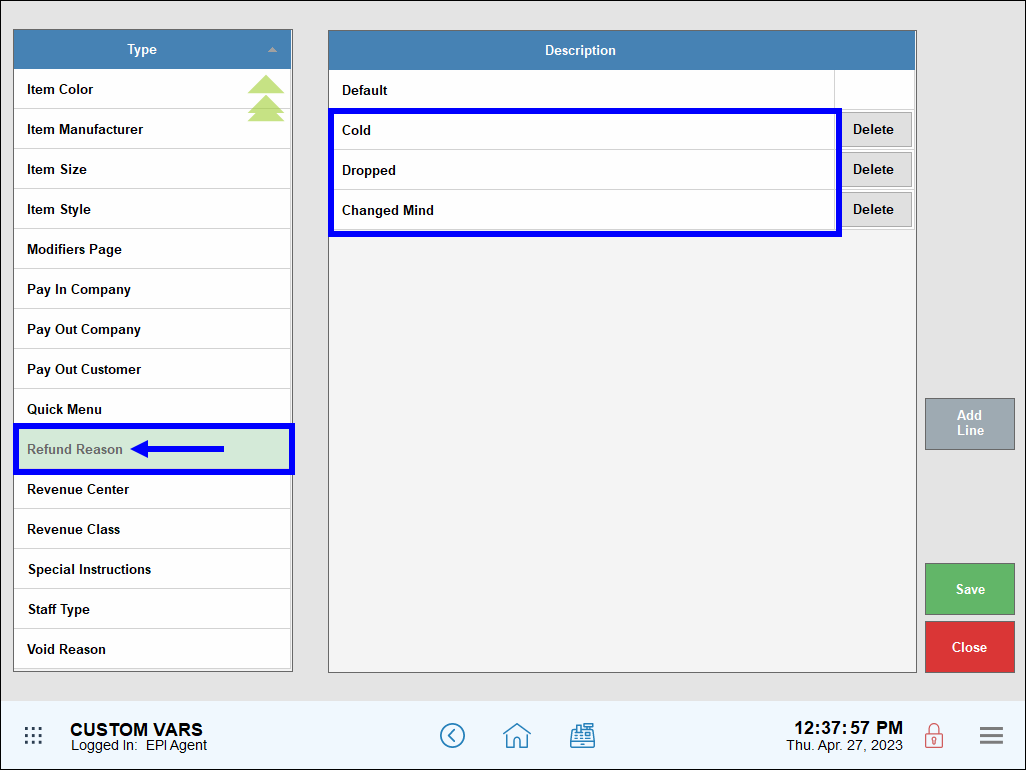
- Impact: The Register. Refund is located on the Global Menu by default. Orders can be voided from the Open orders window. When a refund is processed, the user is prompted to enter a refund reason. When a void is processed, the user is prompted to enter a reason for the void.
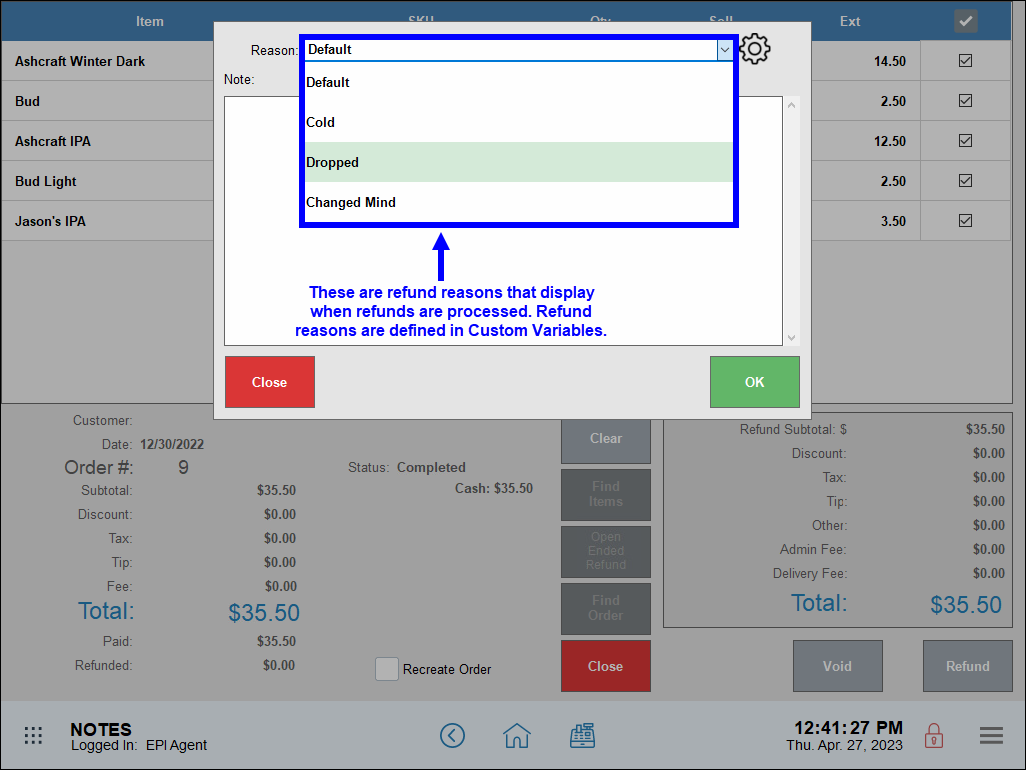
- Reports: Refund/Void Report located under Reports > Sales.
Track instances of company pay-ins for reporting purposes.
- Example 1: A convenience store returns unsold magazines to the vendor for reimbursement. Vendor Reimbursement is considered a Company Pay In.
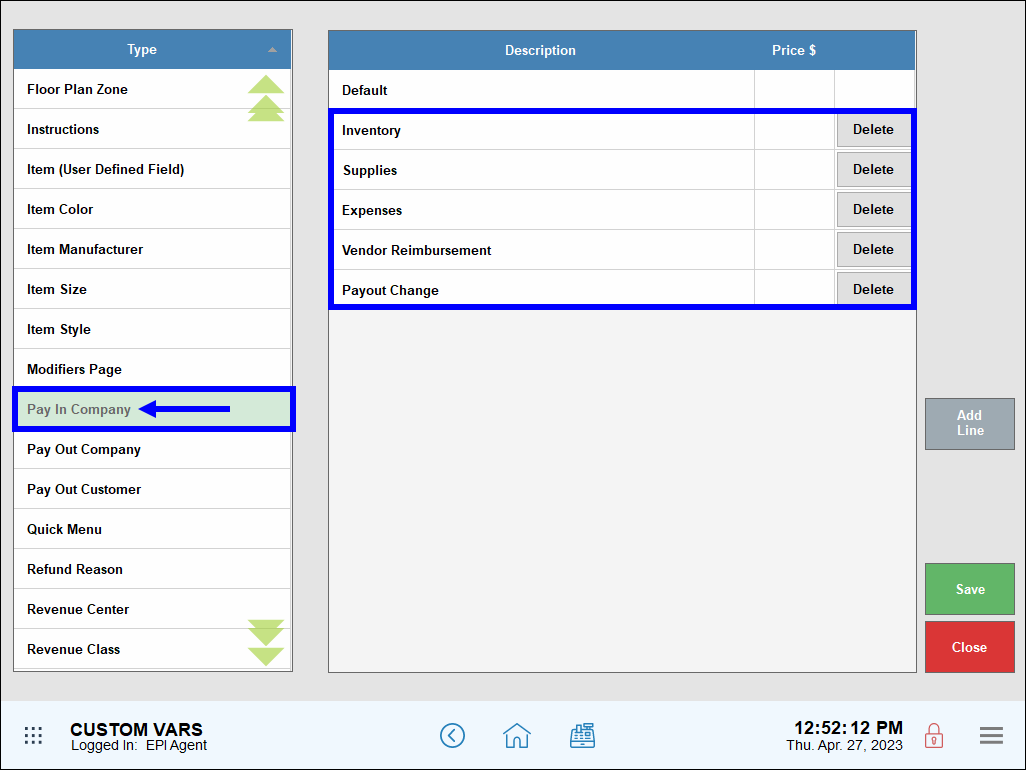
- Example 2: Change (i.e. nickels, dimes, quarters) from a company payout can be considered a company pay in – Payout Change.
- Impact: The Register. Company pay ins are processed on the Order Details tab at the Register. When pay ins are processed, merchants are prompted to select a reason for the pay in.
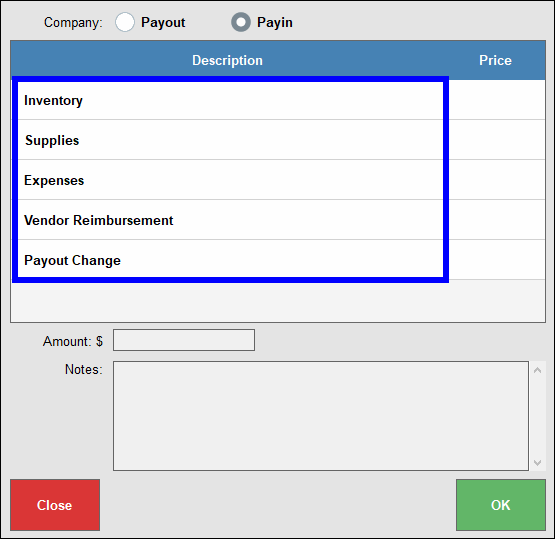
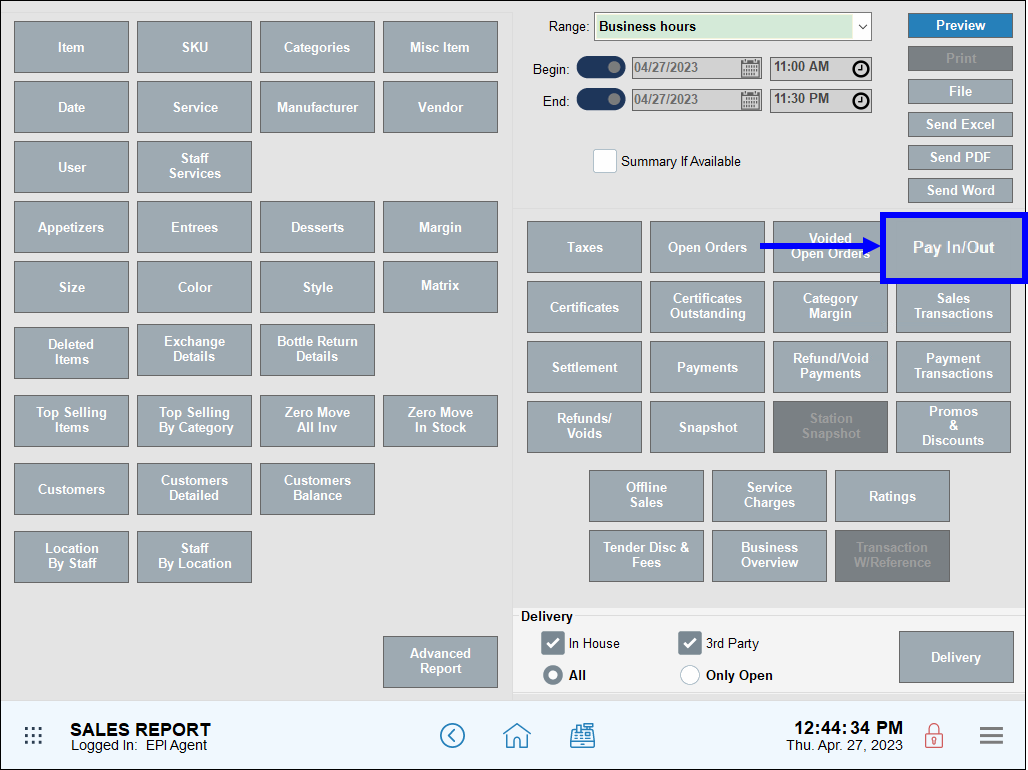
- Reports: Pay in/out Report located under Reports > Sales.
Track reasons for company payouts on reports.
- Examples: Inventory, Supplies, Expenses.
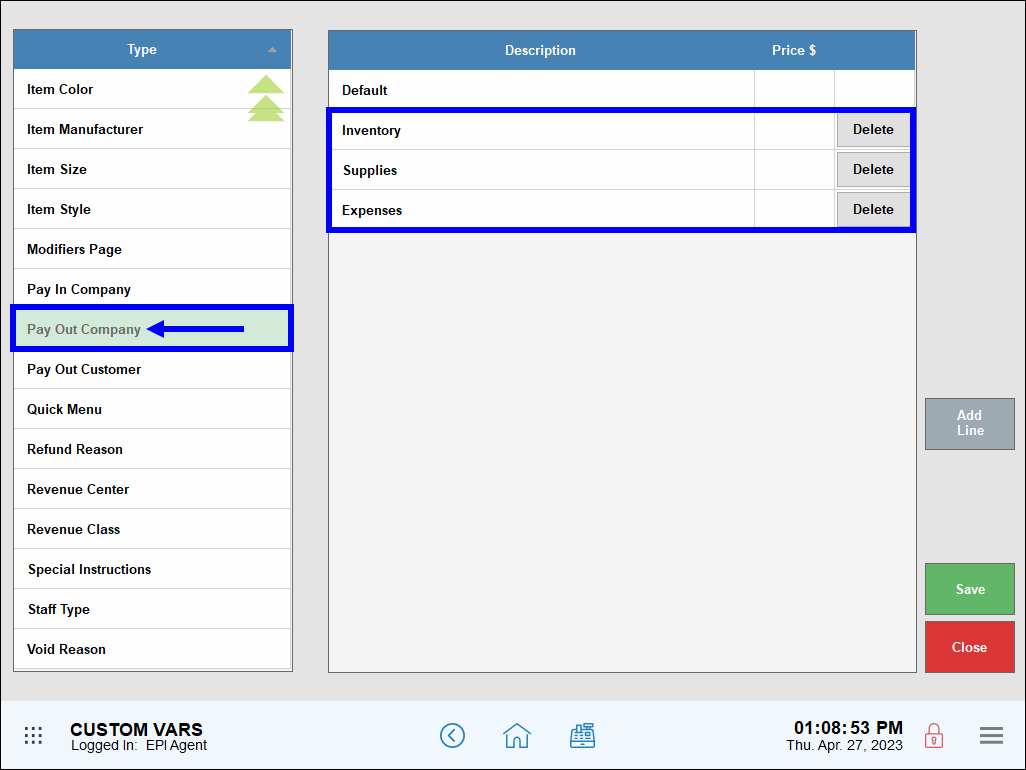
- Impact: The Register. Company payouts are processed on the Order Details tab at the Register. When payouts are processed, merchants are prompted to select a reason for the payout.
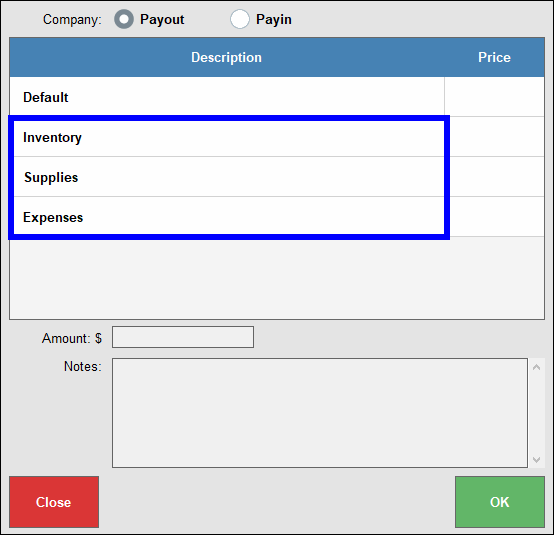
- Reports: Pay in/out Report located under Reports > Sales.
Track reasons for customer payouts on reports.
- Example: Lottery, Events, Promotions.
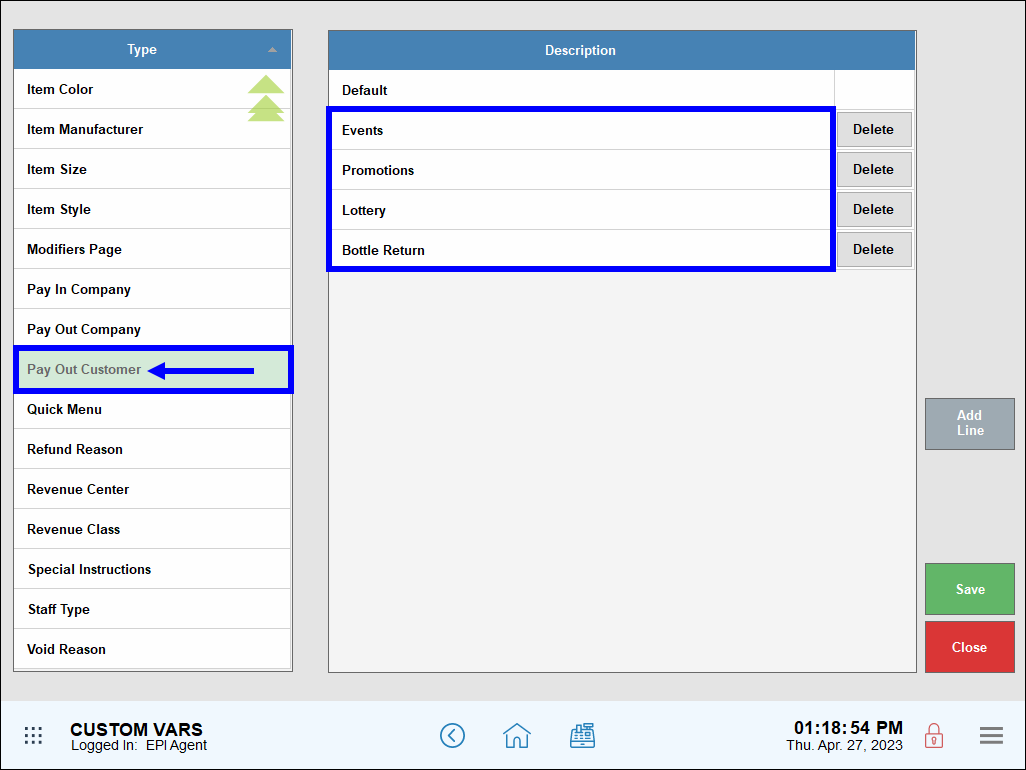
- Impact: The Register. When customer payouts are processed, merchants are prompted to select a payout reason.
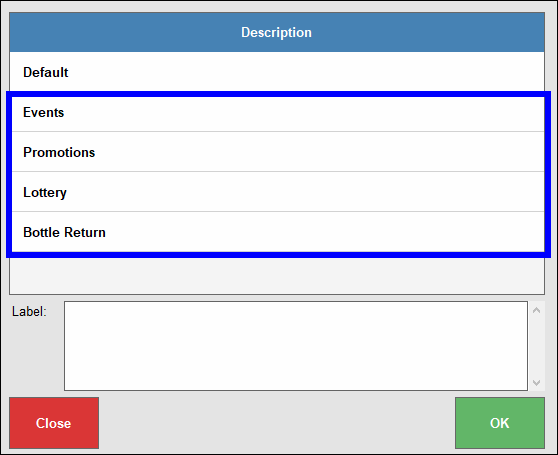
- Reports: Pay in/out Report located in Reports > Sales.
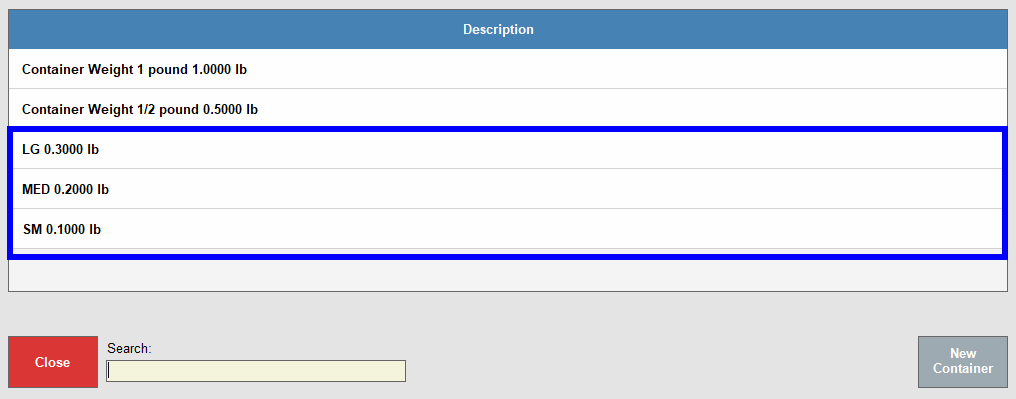
This variable helps merchants sell by-fraction items while deducting the weight of the container (AKA, tare weight). Container weight is an Item-level variable, and each container type is assigned a weight and a unit.
- Example: An ice cream store sells different size ice cream cups by weight. They don’t want to include the container weight in their sales, so Container Weight variables are created for different types of containers, each corresponding to weight and unit: SM/0.1000/lb, MED/0.2000/lb, LG/0.3000/lb.

- Impact: The Register. When a sold-by-fraction item is rung up, container weight options pop-up for selection.
- Tip! A New Container variable can be created directly from the Select Container pop-up.
- Tip! A New Container variable can be created directly from the Select Container pop-up.
- Reports: N/A.
- Note: Sold-by-fraction weight and Container Weight need to be the same for proper functionality. If these weights are different, container weight will not display at the Register.
Allows restaurants to display custom order types which are displayed on kitchen receipts, informing kitchen staff how to prepare an order. Custom order type can be set to default at the time of setup.
Each Custom Order variable is assigned an order Type. Each order type has a set of characteristics:
Dine In: Does not require customer info, no delivery address.
Take Out: Requires customer info, no delivery address.
Pick Up: Requires customer info.
Delivery: Requires customer info and a valid delivery address; Delivery orders can be used with the Delivery Manager.
- Example: Restaurants with call-in orders create these custom order types: Pick Up, Delivery, Delivery Service.
- Impact: Custom Buttons and the Register. After Custom Order Types are defined within custom variables, order types become available to assign as custom buttons. Once assigned as custom buttons, order types display at the register.
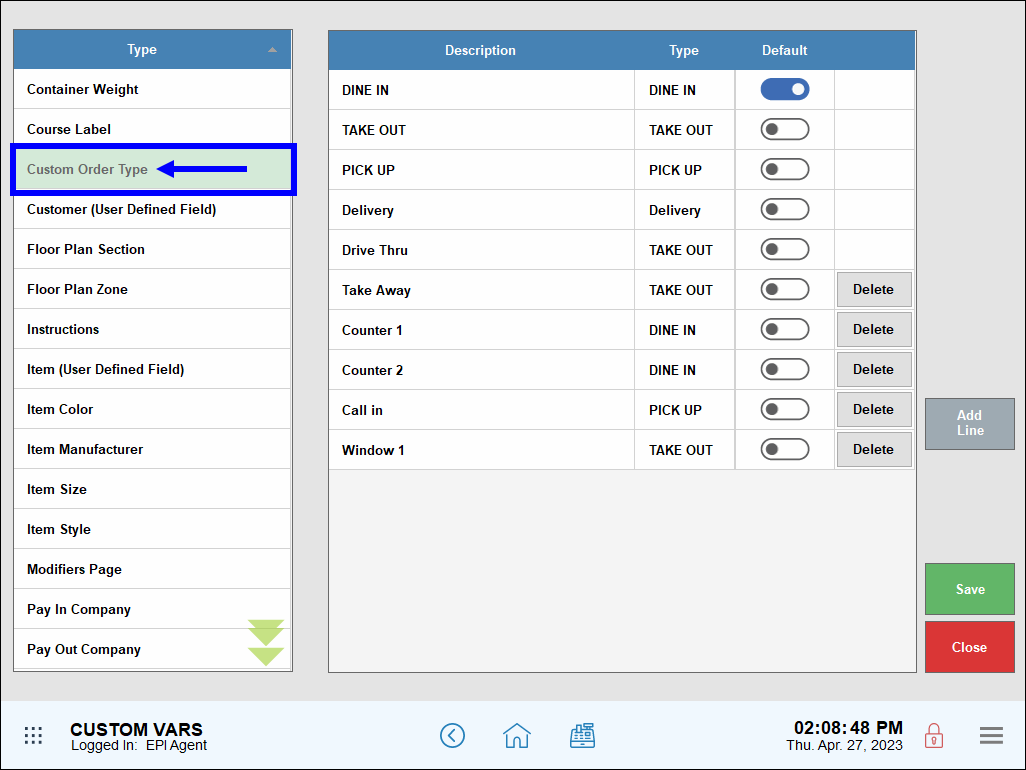
- Reports: “Business Overview” and “Snapshot Reports.”
- See: “Sales by Order type” section in each report, Business Overview Reports and Snapshot and Station Snapshot Reports
- Note: “Sold-by-fraction” weight and “Container Weight” need to be the same for proper functionality. If these weights are different, container weight will not display at the Register.
Special instructions are used with MODS at the register. This is helpful for restaurants wishing to provide additional information for the kitchen staff. Up to 14 special instruction variables can be defined.
- Tip! Special Instructions do not change the application of a MODS at the Register; they simply convey a message to kitchen staff
- Example: Gluten Allergy, Peanut Allergy, Vegan.

- Impact: The Register, when MODS are added. Special instructions appear on BLUE buttons in the Modifiers section.

- Reports: N/A.
- Note: Sold-by-fraction weight and Container Weight need to be the same for proper functionality. If these weights are different, container weight will not display at the Register.
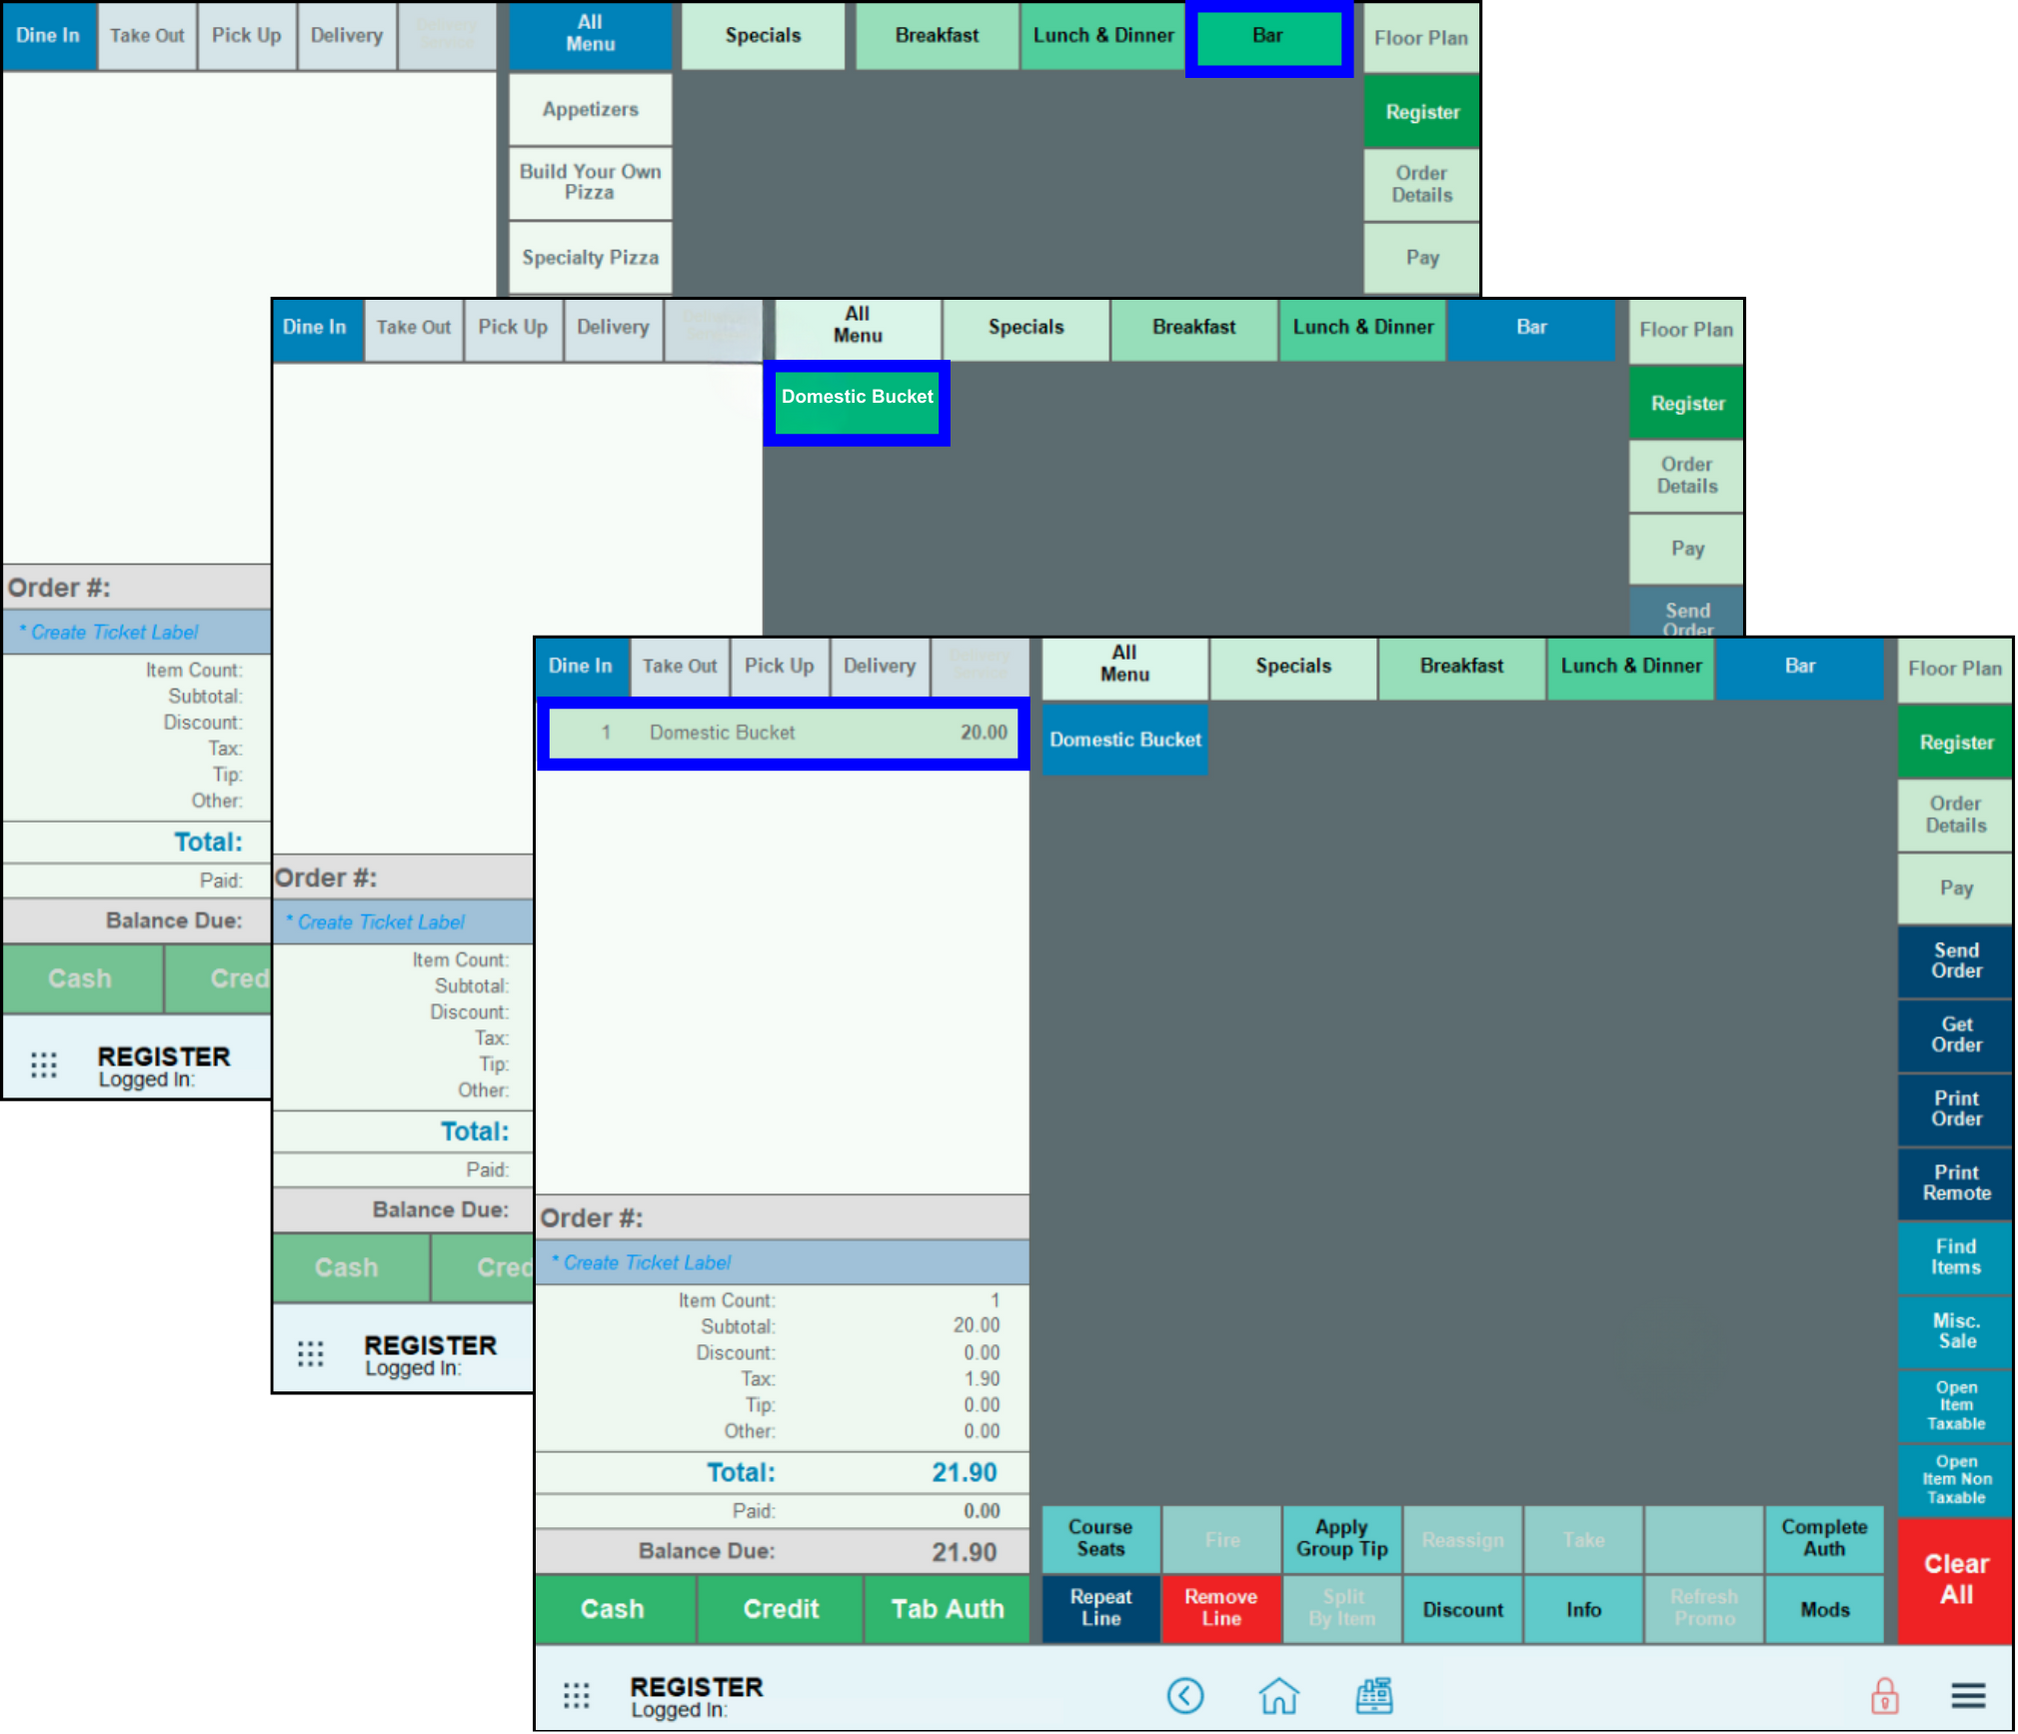
Merchants can customize their Register by setting up Quick Menus, allowing easy access to specific items. This can be particularly helpful and efficient for best-selling items.
- Example: A merchant wants to add the best-selling Domestic Bucket to the Quick Menu on the Register for faster and easier transactions.
- Impact: Adding the most popular items to the Quick Menu means fewer steps needed for the user to find the correct item.
- Reports: N/A.
- Note: See: Quick Menu.
How can we improve this information for you?
Registered internal users can comment. Merchants, have a suggestion? Tell us more.