The printers integrated with your Exatouch Point of Sale system are set up by our professional support team for ease of installation and use. Use the Printer Settings work area to manage your printers, customize receipts, tickets, labels, snapshot reports, and more. Enable and disable workflow options to meet your needs.
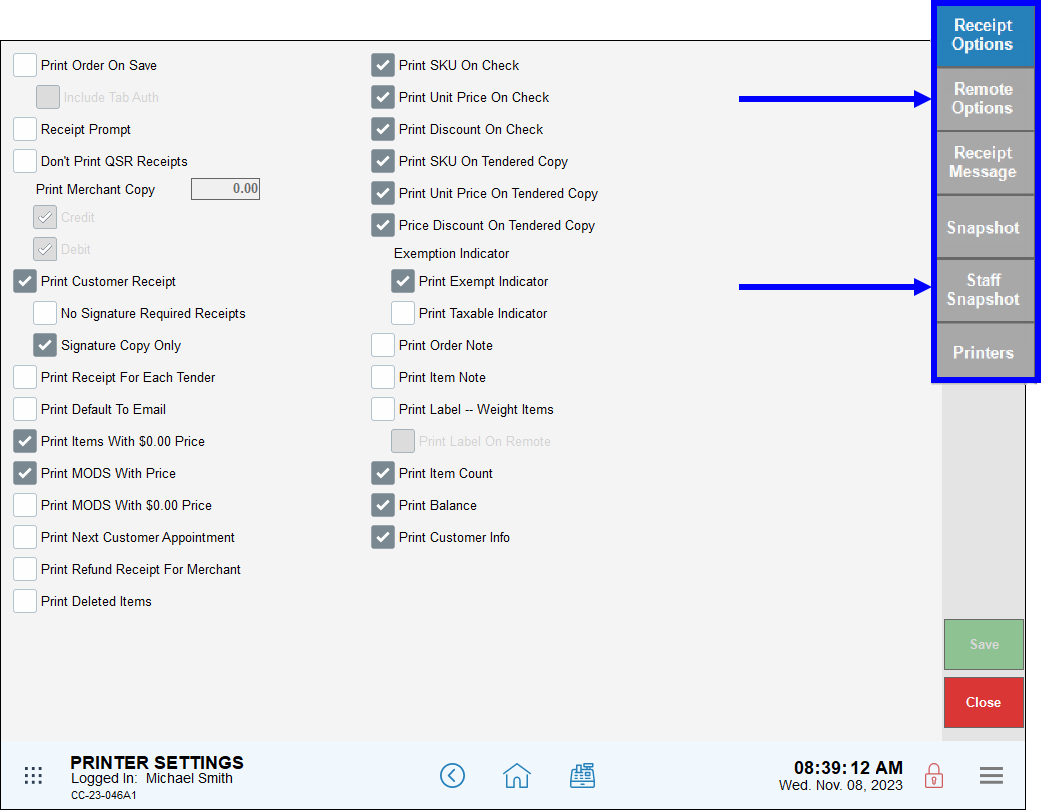
Under Print Settings, users can configure Receipt Options, Remote Options, and other settings by tapping one of the available tabs and selecting individual settings as desired.
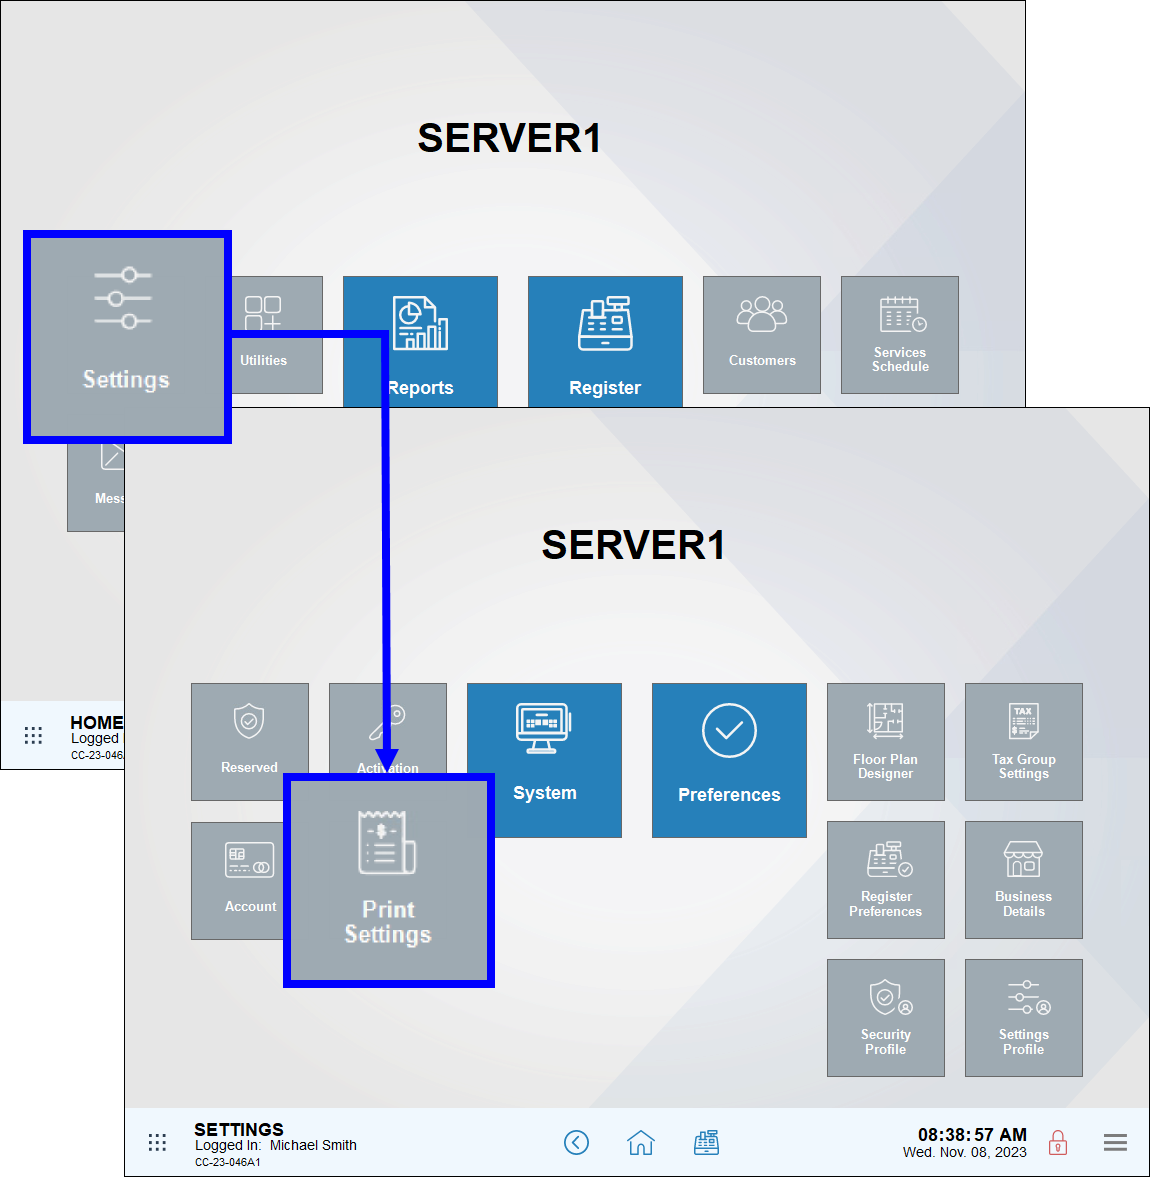
- From Home, navigate to Settings > Print Settings. The Printer Settings screen displays.
- Select the desired tab to display that tab’s work area.
- Tap Save to save your changes.
Changes made to each Printer Settings tab affect different aspects of your business.
- Receipt Options: Customize the look and field of customer receipts by including or removing detailed item information. Print or suppress printing receipts when taking specific actions.
- Remote Options: Customize the look, feel, and behavior of receipts that print at any remote printers (kitchen printers, bar printers, and more). Customize your sticky labels, too: what prints on the label, and what labels should print for an order — one label for an entire order or labels for each item.
- Receipt Message: Customize the last messages shown on customer tender receipts, including time-bound temporary messages.
- Snapshot: Customize Snapshot and Station Snapshot reports to print a quick overview of business data directly to your receipt printer.
- Staff Snapshot: Customize the Staff Shift report to print a quick overview of staff shift data directly to your receipt printer.
- Printers: Manage the printers set up for various print stations. Manage and test printers, or set up Kitchen Display Systems (KDS).
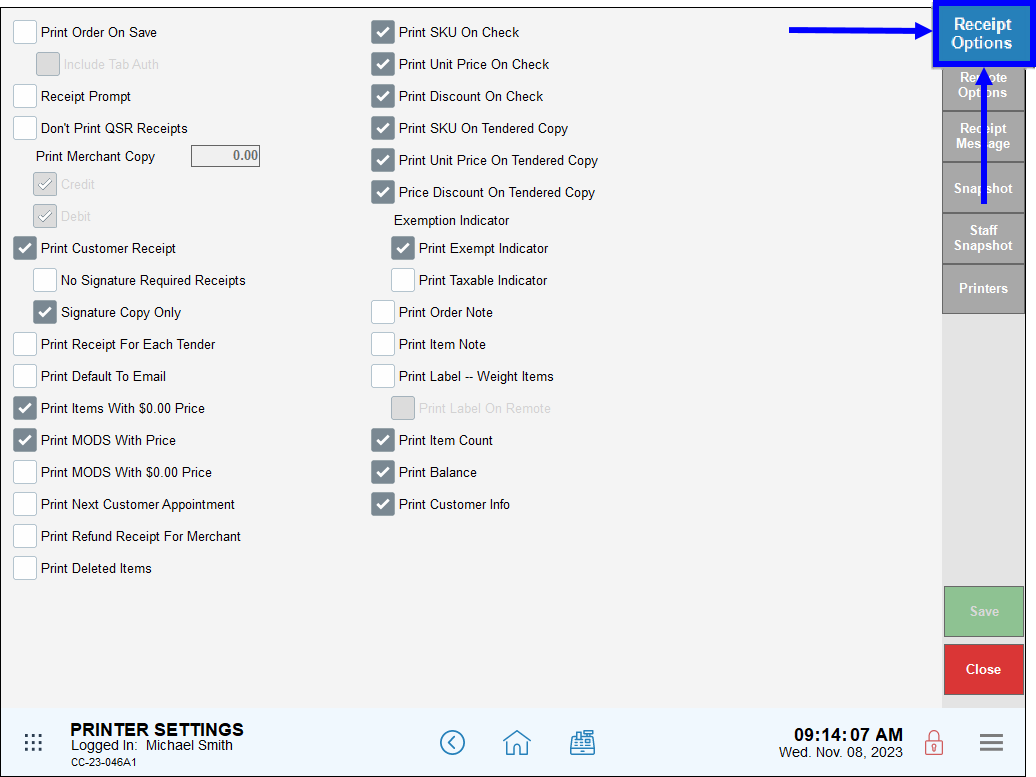
Use the Receipt Options tab to customize the look and field of customer checks, customer tender receipts, and some remote order tickets and labels. You can include or remove detailed item information, and adjust receipt printing as fits your workflow.
- Note: Enabling some options may disable other options in this work area.
-
- Print Order On Save: Enable to print customer checks when you save or send an order in the Register app.
- Include Tab Auth: Enable to reprint a customer check any time a change is made while a tab auth is open.
- Print Order On Save: Enable to print customer checks when you save or send an order in the Register app.
- Note: To enable Include Tab Auth, the register must be operating in Restaurant mode with Tab Auth enabled. See Tab Auth Set Up for more on how to enable Tab Auth.
- Receipt Prompt: Enable to display a receipt prompt in the Register app. Depending on the transaction and available options, staff can offer customers a Transaction receipt, Transaction & Signature receipt, a Signature receipt, an Email receipt, No Receipt, a Gift receipt, or a Gift Balance receipt for their payment by gift card.
- Note: If you enable Receipt Prompt, some Quick Pay options and Print Default To Email are disabled.
- Don’t Print QSR Receipts: Enable and define a threshold (such as $25) for printing quick service receipts. Any order total under this amount will not print customer receipts, saving time and print resources.
- Print Merchant Copy, Credit: Enable to print a Merchant copy receipt for a credit transaction, even if a customer receipt is not printed.
- Print Merchant Copy, Debit: Enable to print a Merchant copy receipt for a debit transaction, even if a customer receipt is not printed.
- Print Customer Receipt: Enable to print customer receipts for credit and debit transactions.
- No Signature Required Receipts: Enable to print customer receipts with no signature line for chip or NFC transactions. The message Chip Card Used, No Signature Required prints on customer receipts. Disable to print receipts that include a signature line.
- Signature Copy Only: Enable to print merchant copies of customer payment receipts. Disable to suppress.
- Note: If you enable Signature Copy Only, Print Receipt for Each Tender and Receipt Prompt are disabled.
- Print Receipt For Each Tender: Enable to print out separate customer receipts for each tender type used on a single order. Disable to print all tender types accepted on each order’s customer receipt.
- Print Default To Email: Enable to display an email receipt work area instead of printing customer receipts. Customer information is prefilled if a customer is associated with the order.
- Note: If you enable Print Default To Email, many printed customer and merchant receipt options are disabled.
- Print Items With $0.00 Price: Enable to print items that cost $0.00 on customer receipts, such as water, breadsticks, or other customary courtesy items priced at $0.00.
- Print MODS With Price: Enable to print modifiers for items broken out by price on customer receipts. Disable to remove modifiers that add to the overall price of an item from customer receipts.
- Print MODS With $0.00 Price: Enable to print modifiers for items that have $0.00 cost on customer receipts. Disable to remove $0.00 cost modifiers for an item from customer receipts.
- Print Next Customer Appointment: Enable to print a customer’s next appointment, if set up, on customer receipts.
- Print Refund Receipt For Merchant: Enable to print merchant copies of refund receipts for refunded transactions.
- Print Deleted Items: Enable to print items added to, then removed from, an order on customer receipts.
- Print SKU On Check: Enable to print the SKU number for items on customer checks.
- Print Unit Price On Check: Enable to print a per item price for items on customer checks.
- Print Discount On Check: Enable to print any applied discounts on customer checks.
- Print SKU On Tendered Copy: Enable to print the SKU number on customer tender receipts.
- Print Unit Price On Tendered Copy: Enable to print the per unit price on customer tender receipts.
- Price Discount On Tendered Copy: Enable to print the per unit price discount on customer tender receipts.
- Exemption Indicator, Print Exempt Indicator: Enable to print an exemption indicator for items on customer tender receipts.
- Exemption Indicator, Print Taxable Indicator: Enable to print a taxable indicator for items on customer tender receipts.
- Print Note: Enable to print order notes on consumer tender receipts.
- Print Label — Weight Items: Enable to print a replacement label reflecting the adjusted weight of a weighed item on an order to the printer.
- Print Label On Remote: Enable to print a replacement label reflecting the adjusted weight of a weighed item on an order to a remote label printer.
- Print Item Count: Enable to print the total number of items sold on customer checks and customer tender receipts. This is helpful for monitoring order completion if you perform spot checks on customer orders at your exit, or have separate teams assembling and releasing pickup or delivery orders.
- Print Balance: Enable to print the balance remaining on a gift card or gift certificate on customer tender receipts.
- Print Customer Info: Enable to print customer information on customer checks and customer tender receipts.
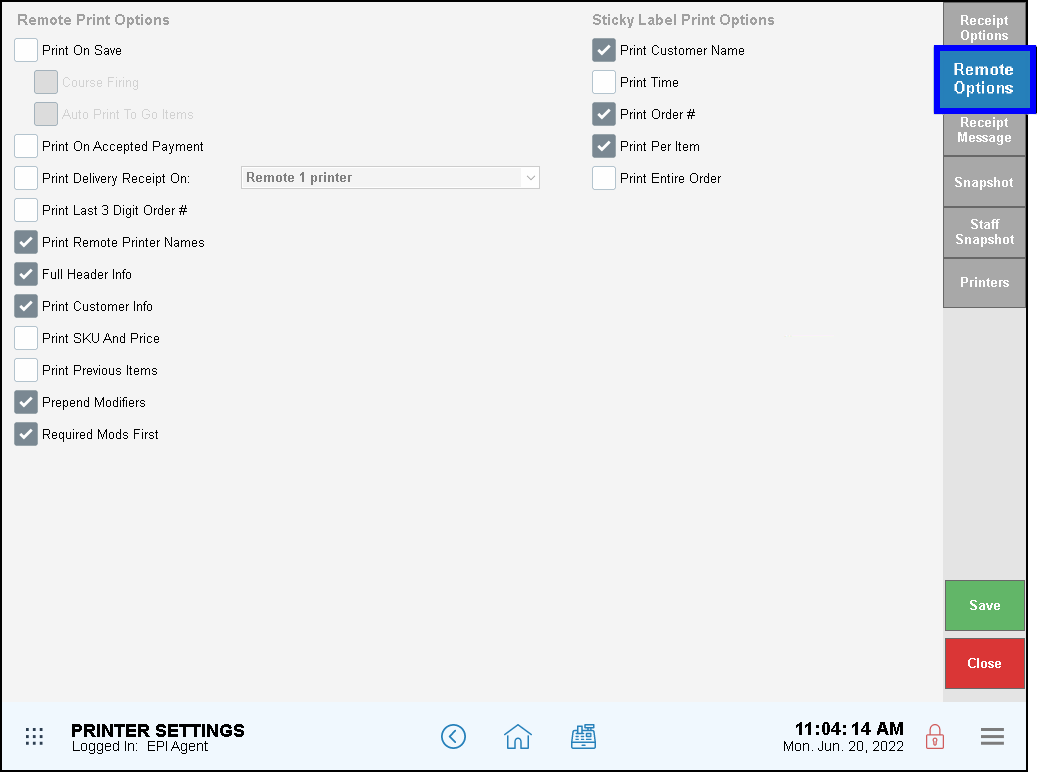
Use the Remote Print Options tab to customize the look, feel, and behavior of receipts and order tickets that print to remote printers, such as kitchen printers, bar printers, and more. Adjust ticket printing to your workflow — print order tickets when saved or sent, control course firing, or wait to fire order tickets at payment time.
Customize your sticky labels, too: what prints on the label, and what labels should print for an order — one label for an entire order or labels for each item.
Remote Print Options
- Print On Save: Enable to print remote order tickets you Save or Send order in the Register app. This disables Print On Accepted Payment.
- Course Firing: Enable to print remote order tickets for each course when fired. When disabled, all courses print to remote printers at once.
- Auto Print To Go Items: Enable to print remote order tickets for To Go items when an order is saved.
- Print On Accepted Payment: Enable to print remote order tickets after a completed payment transaction. This disables Print on Save, Course Firing, and Auto Print To Go Items.
- Print Delivery Receipt On: Enable to print Delivery Receipts to a specific printer for delivery orders. Select an available printer.
- Print Last 3 Digit Order #: Enable to print the last three digits of an order’s number at the bottom of the order ticket, instead of the full order number at the top of the ticket. When enabled, this setting will add the last three digits of an order’s number on the customer checks and customer tender receipts as well.
- Print Remote Printer Names: Enable to print the name of the printer that is printing the remote order ticket.
- Full Header Info: Enable to print the staffer’s name on remote order tickets.
- Print Customer Info: Enable to print customer information on remote order tickets.
- Print SKU and Price: Enable to print the SKU number for items on remote order tickets.
- Print Previous Items: Enable to reprint a remote order ticket that includes and indicates an item that was changed, newly added, or voided (removed) after the original print of the remote order ticket.
- *C* – This item is changed from the initial order.
- *N* – This item is newly added to the order.
- *V* – This item is voided (removed) from the initial order.
- Prepend Modifiers: Enable to prepend modifier instructions with line by line instructions, such as Hold Ketchup, Extra Pickled Ginger, Sub Paper Straws, and more. Disable to group modifiers by type, under an instruction line, such as ***HOLD***, ***EXTRA***, ***SUB***, and more.
- Required Mods First: Enable to list required modifiers before optional modifiers for items printed on remote order tickets.
Sticky Label Print Options
- Print Customer Name: Enable to print the customer name, if available, on sticky labels.
- Print Time: Enable to print the order time on sticky labels.
- Print Order #: Enable to print the order number on sticky labels.
- Print Per Item: Enable to print a sticky label for each item on an order. A coffee or deli shop might use this to label each drink and meal separately. Enabling this setting disables Print Entire Order.
- Print Entire Order: Enable to print a sticky label that lists all items on an order. A merchant might use this to print out a label listing the entire order to attach to a delivery box or bag. Enabling this setting disables Print Per Item.
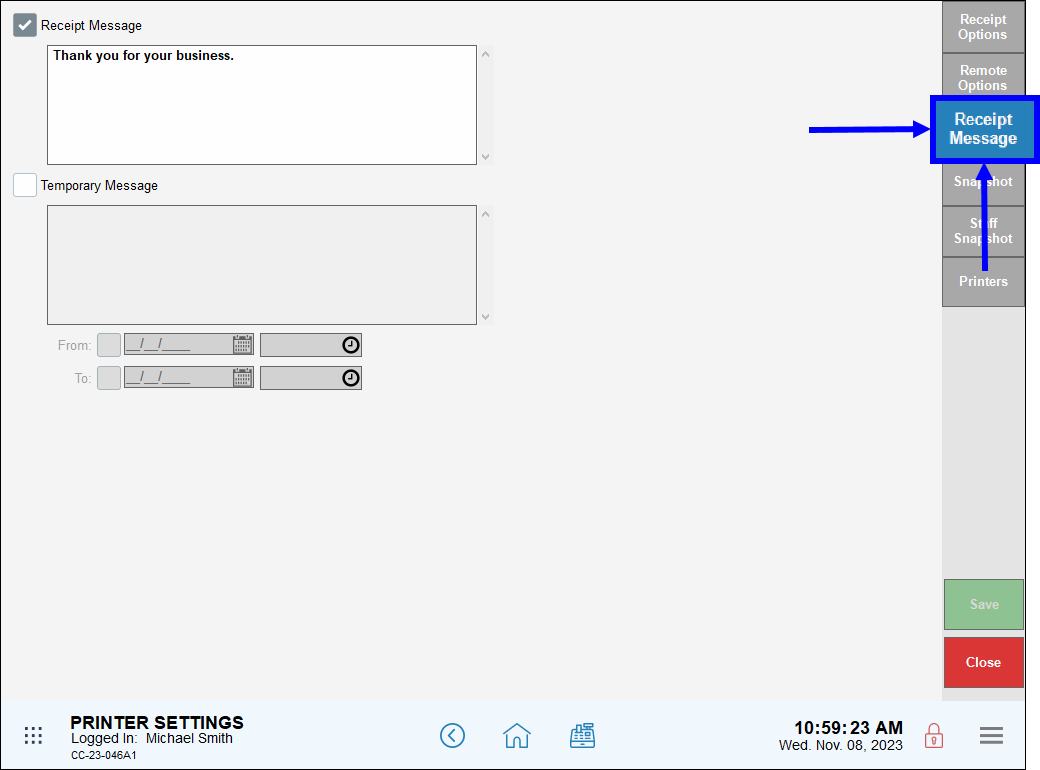
Use the Receipt Message tab to customize the last messages shown on customer tender receipts, including time-bound temporary messages.
-
- Receipt Message: Enable and define a message to print at the bottom of customer tender receipts. If Print Last 3 Digit Order # is enabled, this message prints just above the three-digit order number.
- Temporary Message: Enable, define a message, and optionally a start and stop time to include this message on customer tender receipts. When enabled, this message prints above any enabled Receipt Message.
- Tip! Temporary Messages are ideal for holiday greetings messages, special themed promos (such as Father’s Day), or other seasonal times.
-
- From: Enable this optional setting to define a date and time to start including this message on customer tender receipts. If not enabled, the enabled temporary message is included immediately until you disable Temporary Message.
- To: Enable this optional setting to define a date and time to stop including this message on customer tender receipts. If not enabled, the temporary message is included until you disable Temporary Message.
Use the Snapshot tab to customize Snapshot and Station Snapshot reports. These print a quick overview of business data directly to your receipt printer.
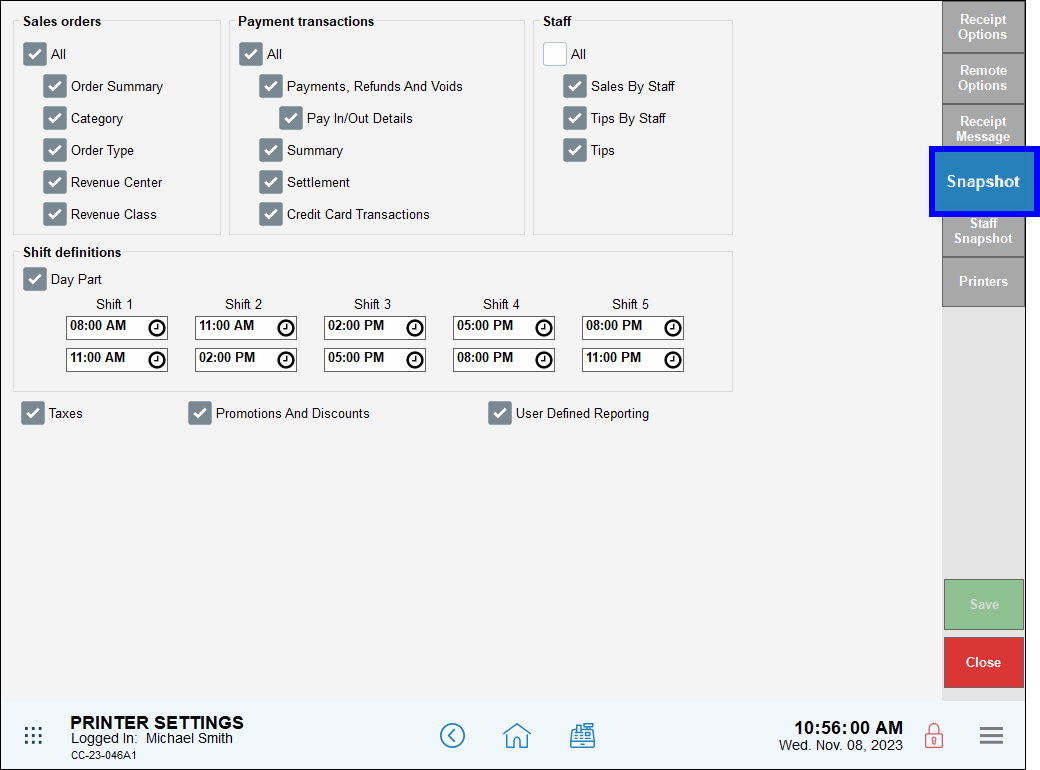
- Sales orders: Enable All or enable specific sales details to include in the report.
- Payment transactions: Enable All or enable specific transaction details to include in the report.
- Staff: Enable All or enable specific staff details to include in the report.
- Shift definitions: Enable and define time up to five Day Part periods to break up reporting among shifts for comparison and analysis.
- Taxes: Enable to include tax reporting in the report.
- Promotions And Discounts: Enable to include promotional and discount information in the report.
- User Defined Reporting: Enable to include any user defined reporting in the report.
Use the Staff Snapshot work area to customize the Staff Shift report. This prints a quick overview of staff shift data directly to your receipt printer on a per-staffer basis.
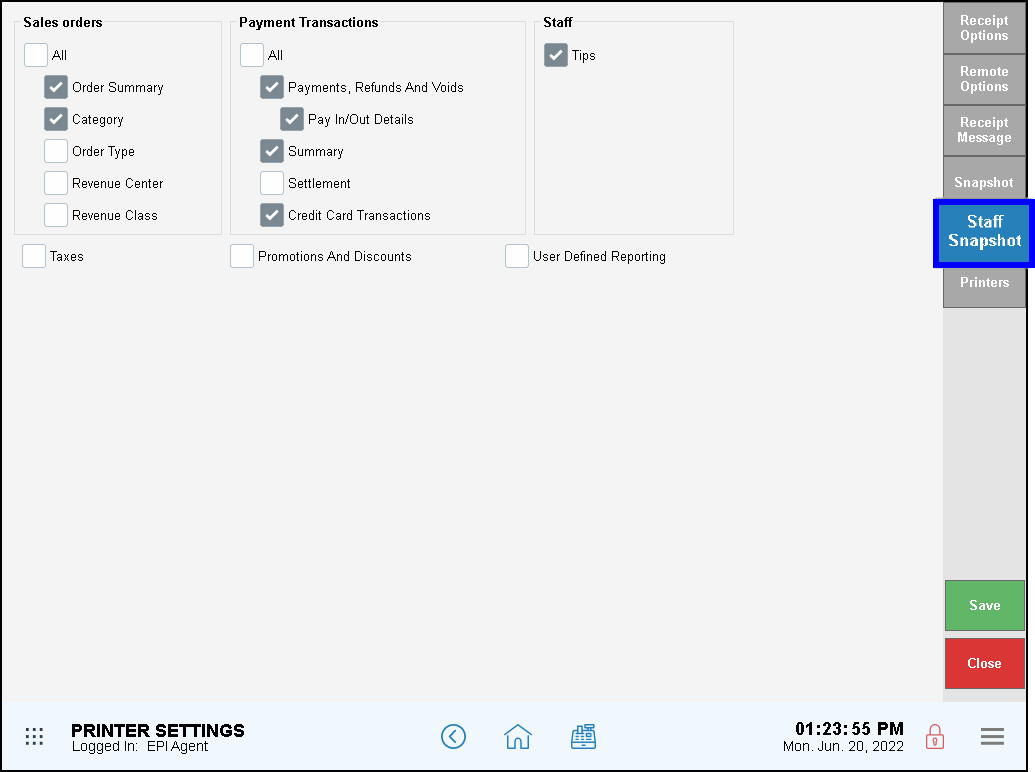
- Sales orders: Enable All or enable specific sales details to include in the report.
- Payment transactions: Enable All or enable specific transaction details to include in the report.
- Staff: Enable All or enable specific staff details to include in the report.
- Taxes: Enable to include tax reporting in the report.
- Promotions And Discounts: Enable to include promotional and discount information in the report.
- User Defined Reporting: Enable to include any user defined reporting in the report.
Use the Printers work area to manage the printers set up for various print stations. Manage and test printers, or set up Kitchen Display Systems (KDS).
- Ready to Upgrade?: Exatouch supports a diverse selection of printers. Click here to learn more about currently supported printers.
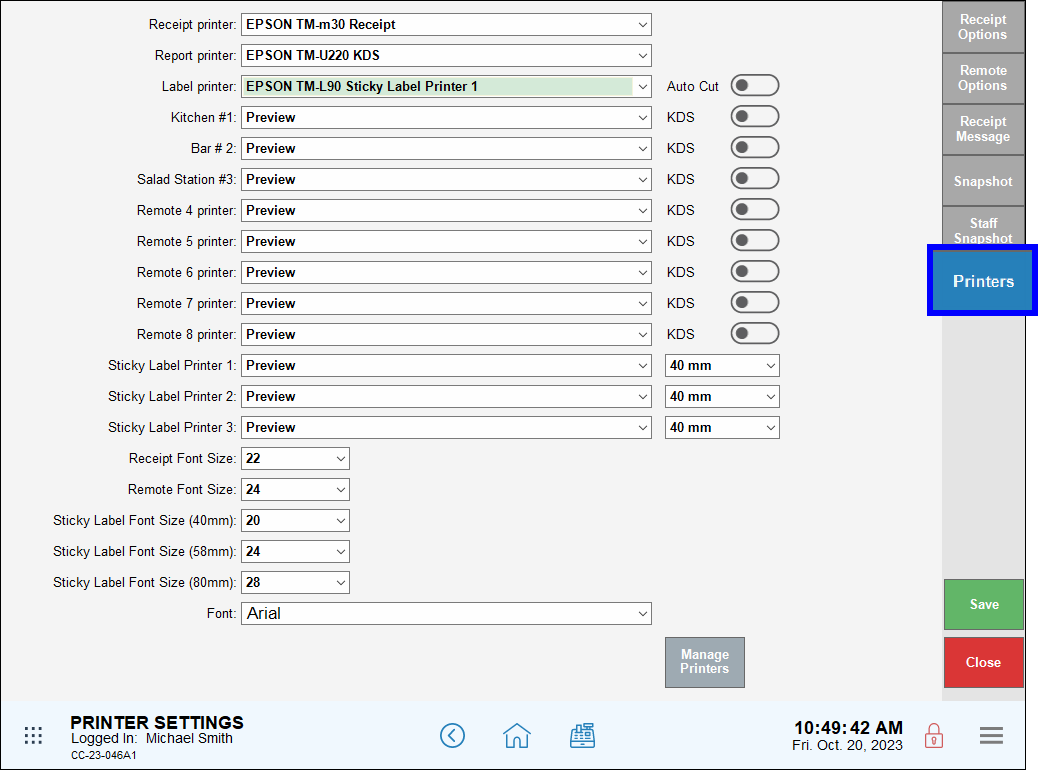
Available printers are set up as part of your site installation process. Select and assign any available printer from the drop down for each print station.
- Optional: select Preview to view receipts or order tickets printed to that print station. The document is generated and prints to a pop up in your Exatouch station.
- Optional: select None to prevent printing receipts or order tickets to that print station. No receipt is generated or printed.
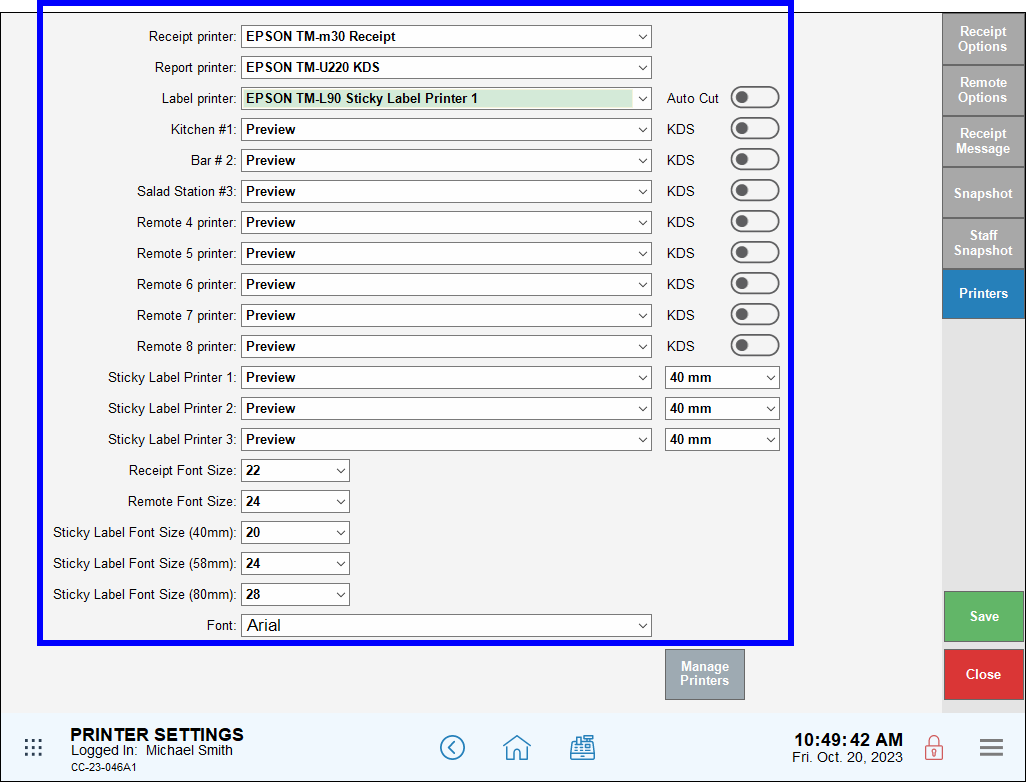
Printer Settings
Users can configure the following under the Printers tab.
- Receipt printer: Select an available printer from the drop down-menu. Customer checks and tender receipts print to this printer.
- Report printer: Select an available printer from the drop down-menu. Reports (excluding snapshot reports) print to this printer.
- Label printer: If used, select an available label printer from the drop-down menu. Labels can also print to a report printer to appropriate Avery-compatible label sheets.
- Auto Cut: Toggle to enable an automatic cut after each label prints.
- Remote Printers (1-8): Select an available printer from the drop-down menu.
- The printer name displays on remote order tickets if an order is split between multiple stations, to alert staff to pick up the balance of the order from other stations.
- KDS: Enable for appropriate remote printers outfitted with a Kitchen Display System.
- Sticky Label Printer (1-3): Select an available printer from the drop-down menu.
- Receipt Font Size: Select a font size to use for customer checks and customer tender receipts.
- Remote Font Size: Select a font size to use for remote printers. Optionally select a larger print size to accommodate the pace and workflow of your back of house staff.
- Sticky Label Font Size (40mm): Select a font size to use for 40 mm sticky label printers.
- Sticky Label Font Size (58mm): Select a font size to use for 58 mm sticky label printers.
- Sticky Label Font Size (80mm): Select a font size to use for 80 mm sticky label printers.
- Manage Printers: Tap to troubleshoot and manage your printers.
Rename Print Stations
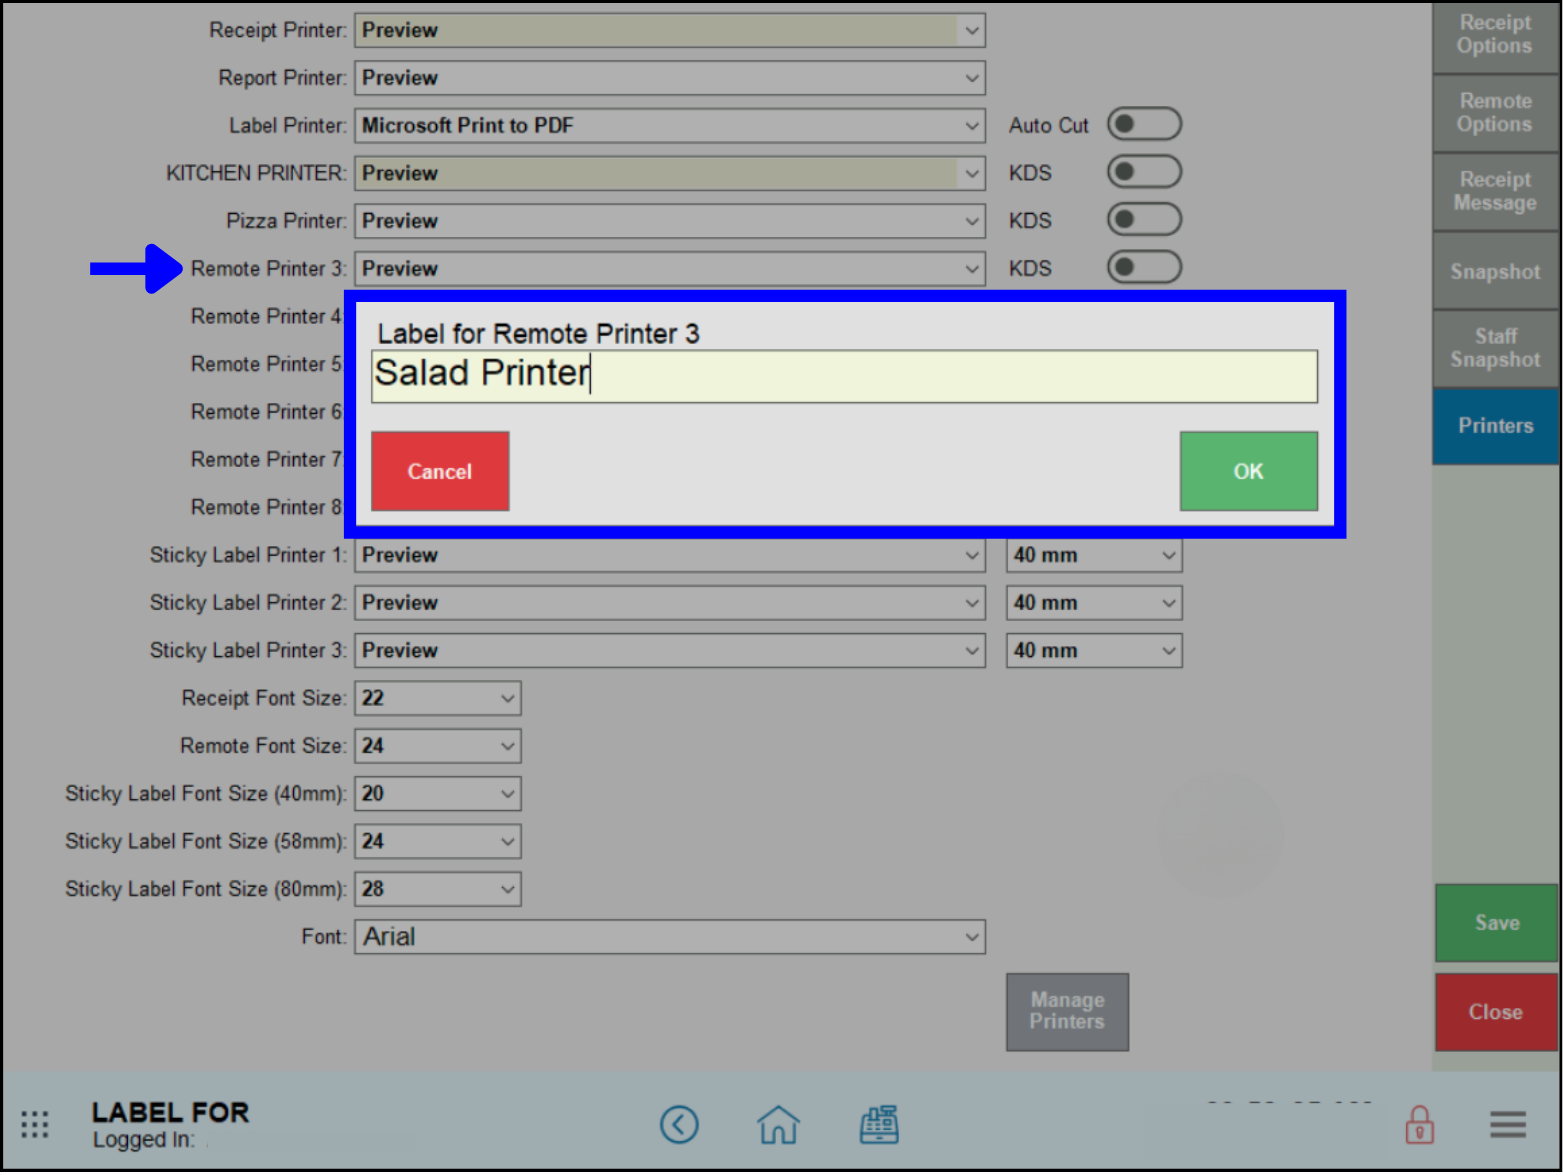
Tap a print station label name to rename it. This can help you identify where a printer is placed, or its purpose. Remote and Label printers use the edited name to help your staff identify the location of orders split between printers.
- Under the Printers tab, tap a printer to rename
- Enter a new printer name in the pop-up that displays
- Tap OK, then tap Save.
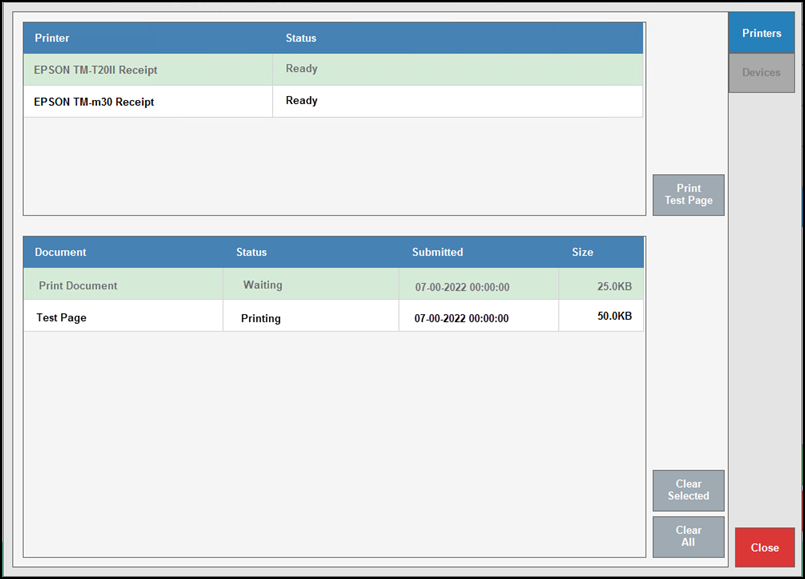
Printer and Document Management
Use the Printers work area to view and manage printers, monitor and clear queued documents, or print test pages.
- The Printer grid lists the printer model and current status of all printers connected to your Exatouch system.
- The Document grid lists the document name, status, print time, and file size of documents queued and printing in your Exatouch system.
Manage Printer Functions
- Print Test Page: Tap to print a test page to your selected printer.
- Clear Selected: Tap to cancel a selected document in queue.
- Clear All: Tap to cancel all documents in the queue.

How can we improve this information for you?
Registered internal users can comment. Merchants, have a suggestion? Tell us more.