Item Level Promos are promotions applied to a single item. Promos can be run during specific hours during the day, for a specific time period.
What Kind of Promos Can I Set Up at the Item Level?
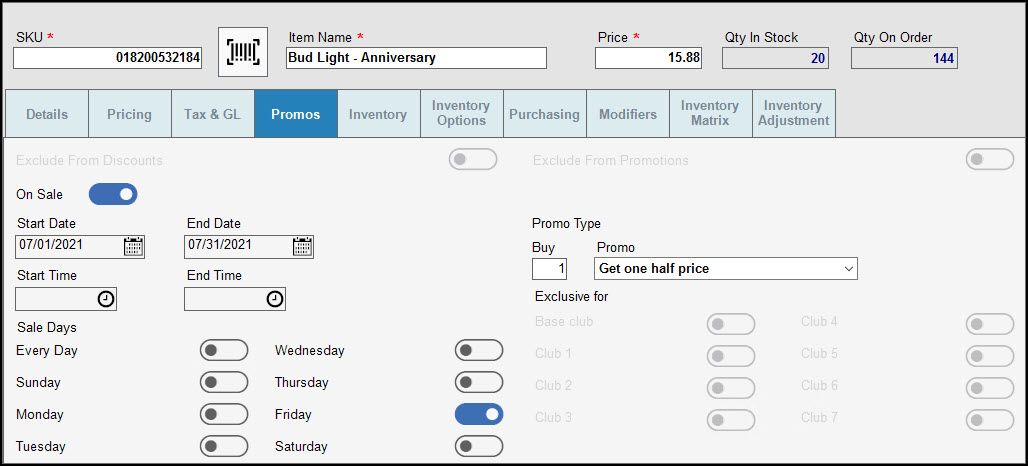
- Example: Liquor Store: offers a Buy One, Get One (BOGO) special: Buy one 18-pack of Bud Light Anniversary, get a second pack at 50% off.
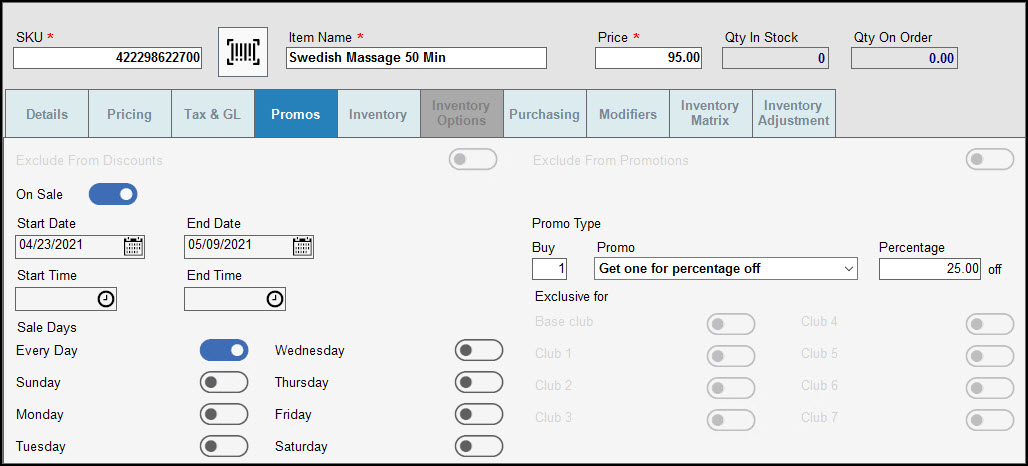
- Example: Spa: Mother’s Day Special: 25% off the purchase of a 50-minute Swedish Massage.
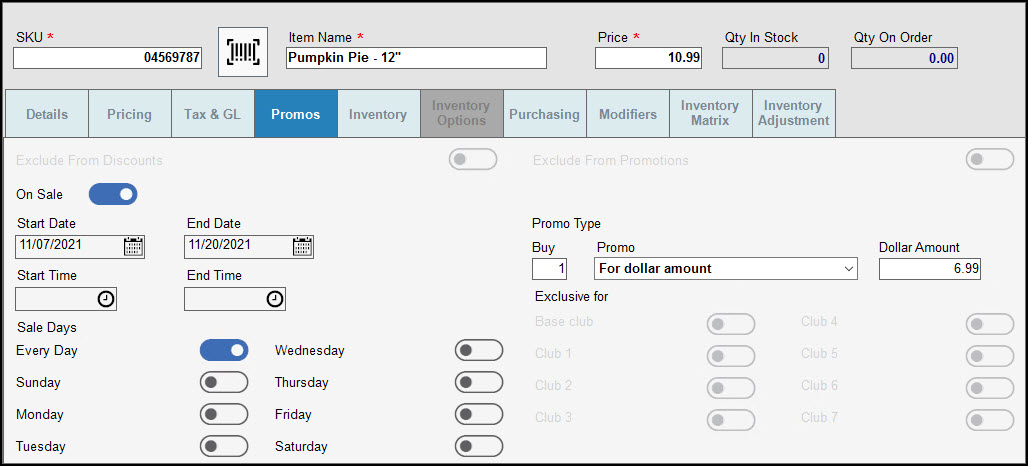
- Example: Bakery or Market Deli: Seasonal Pie Sale: Pumpkin Pie on sale at the discounted price of $6.99/pie (regular price $10.99/pie).
-
- From Home, navigate to Items > Item List.
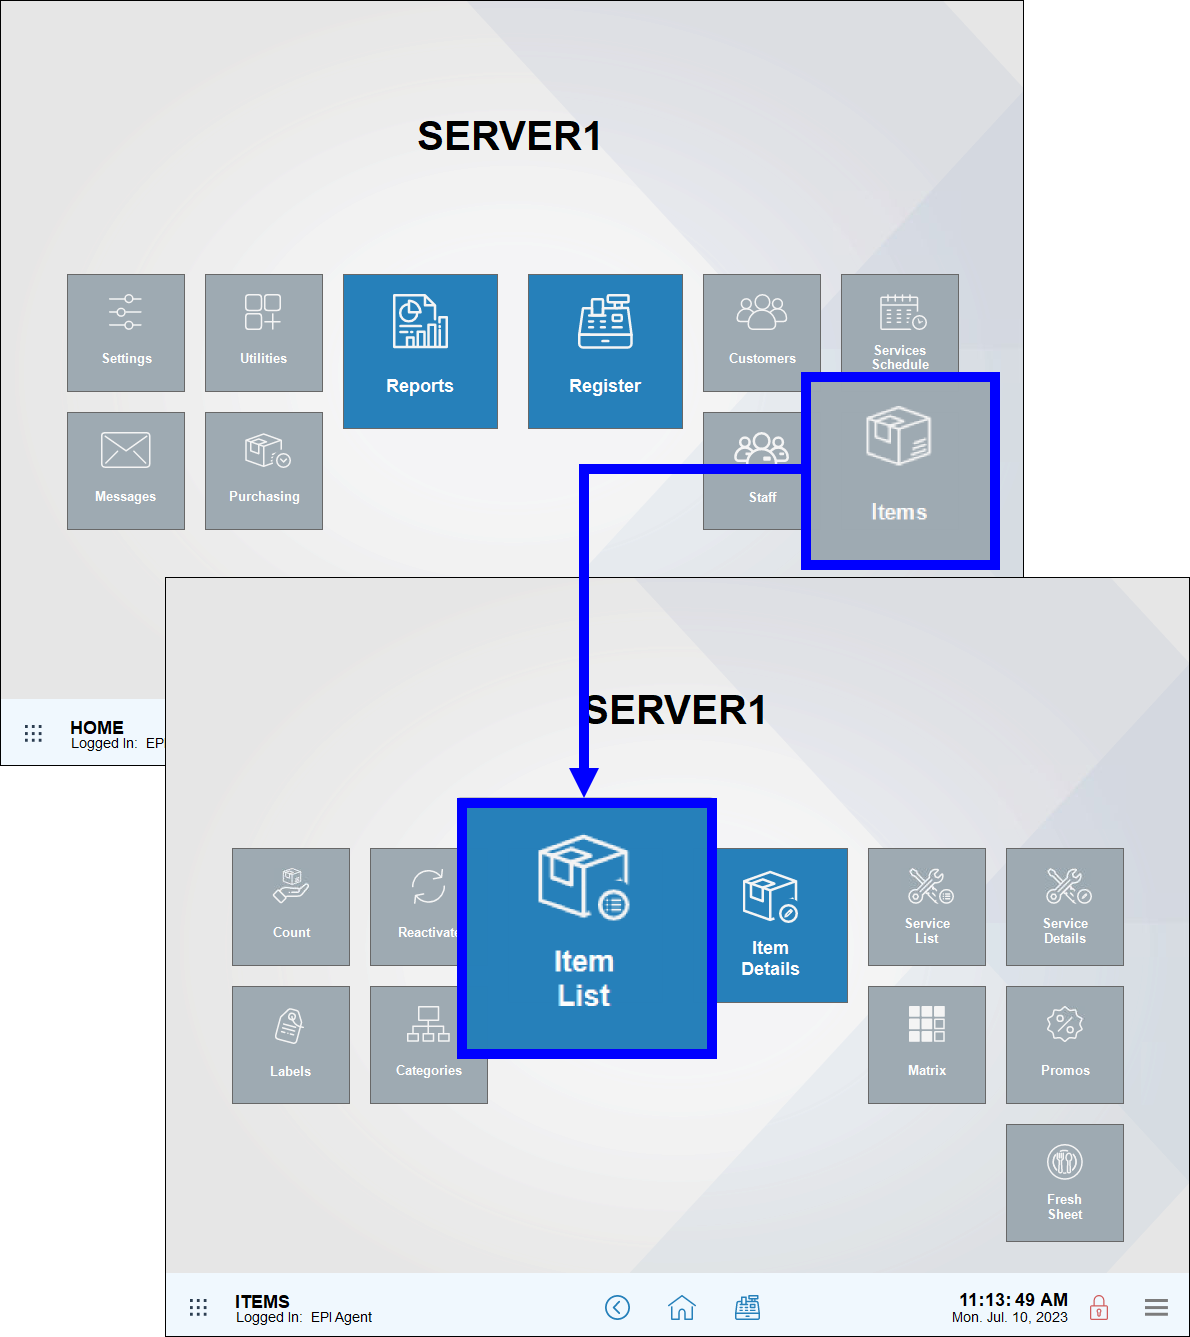
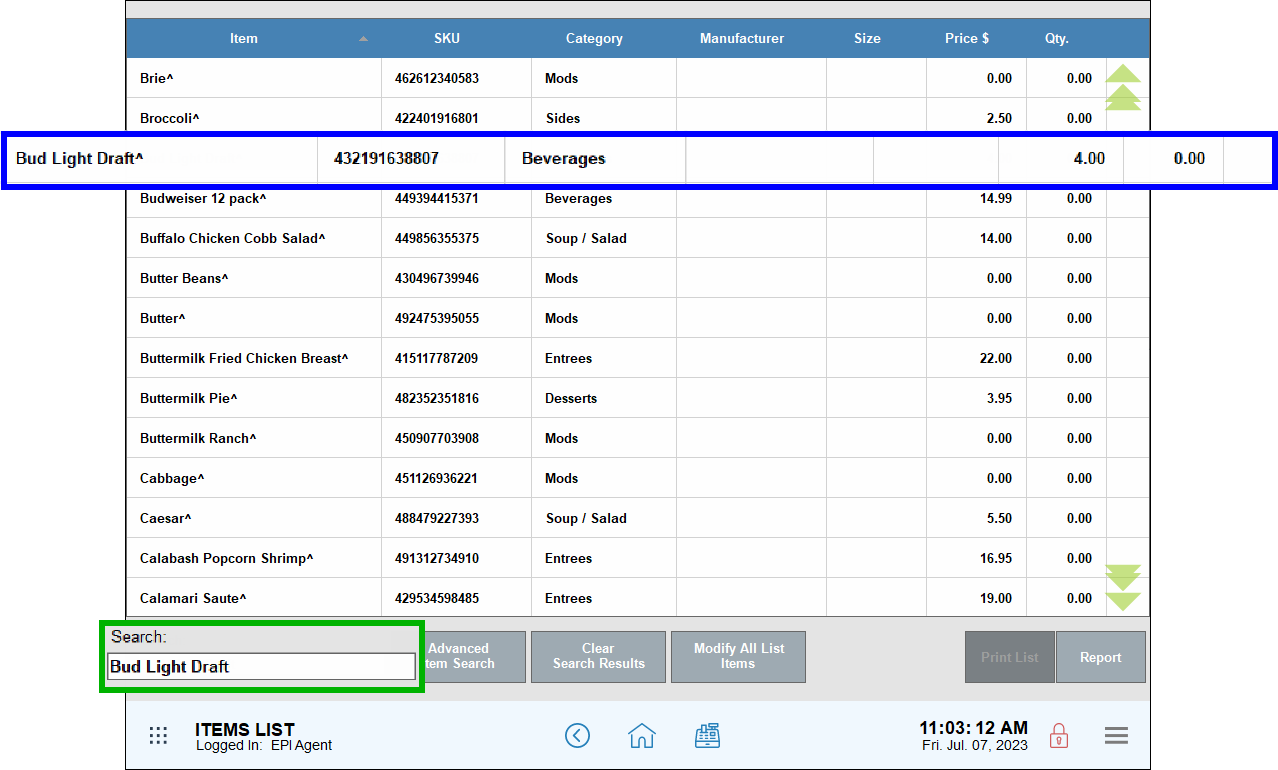
- On the Items List screen, scroll or search for a specific item.
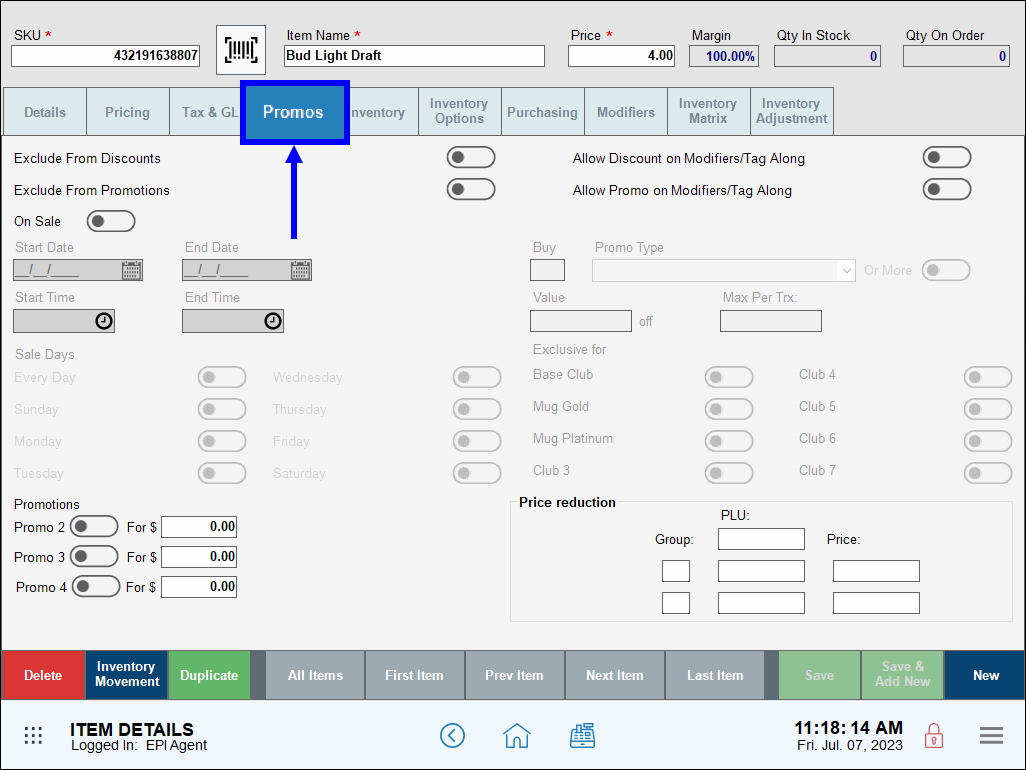
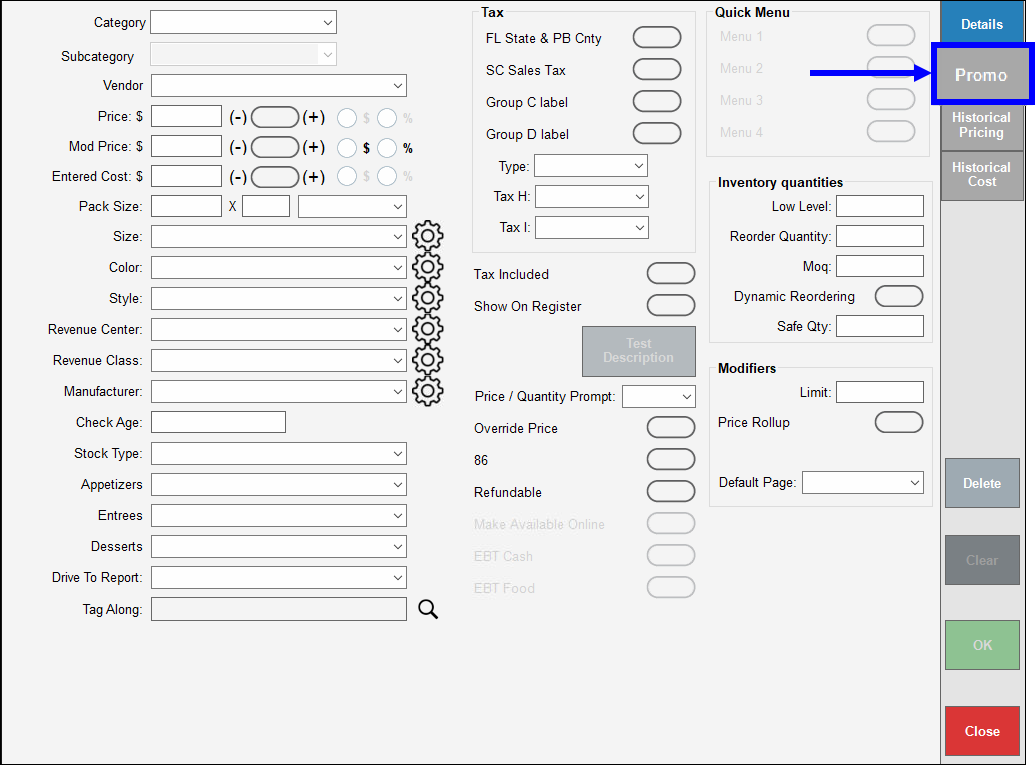
- Tap the Promos tab on the Item Details screen that displays.
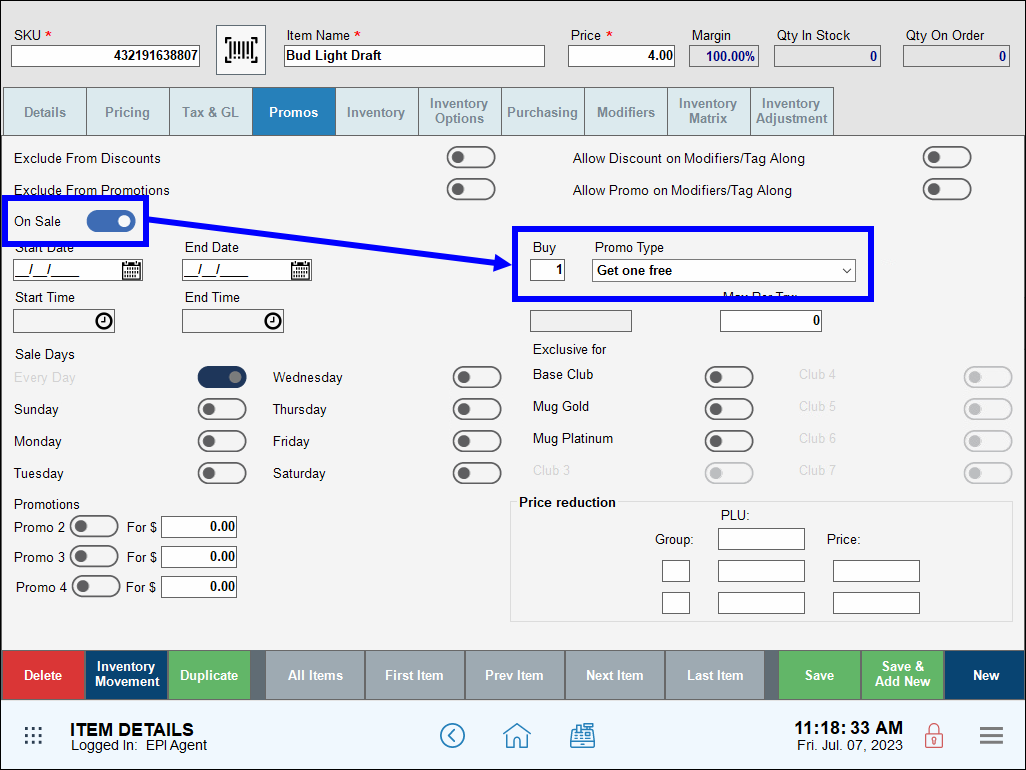
- Enable the On Sale slider and configure promo information as desired in the Buy field and Promo Type drop-down menu.
- From Home, navigate to Items > Item List.
- Note: Discounts apply to the lowest item sold as part of the promotion.
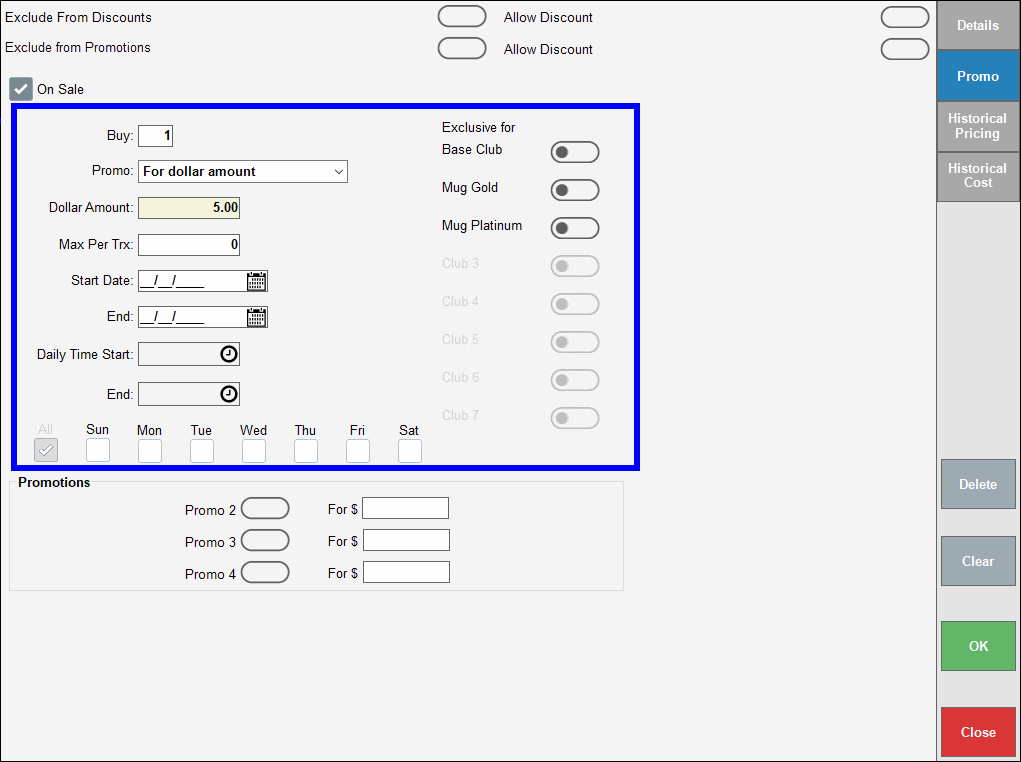
- Enable one or more Sale Days when the promotion will run.
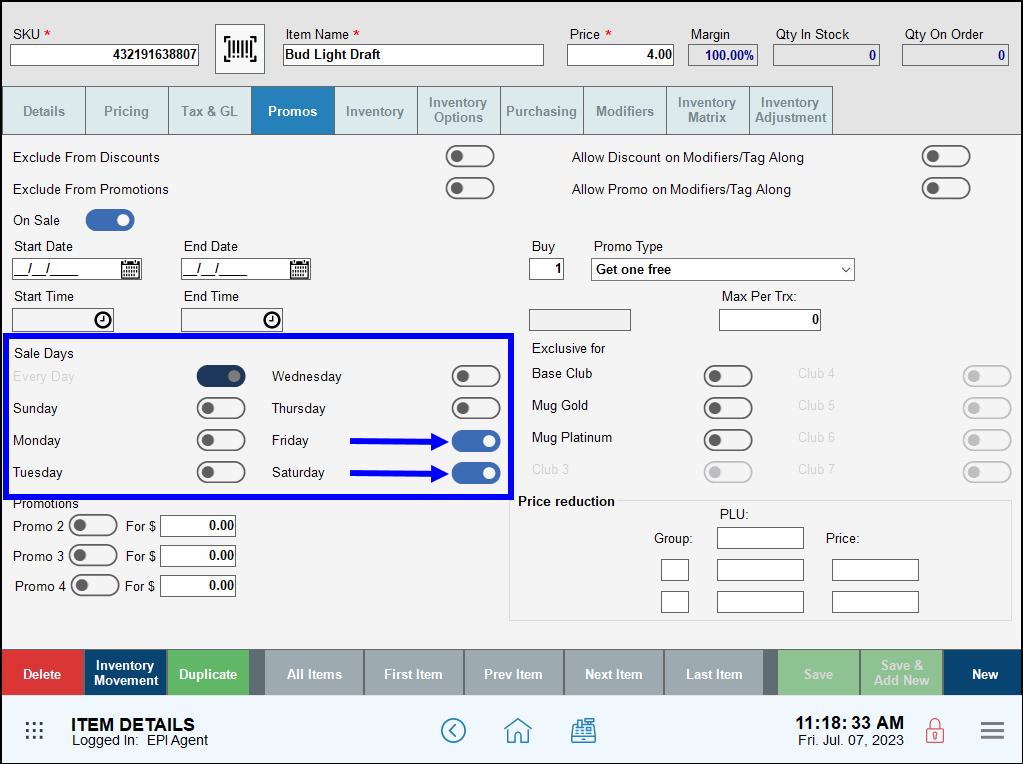
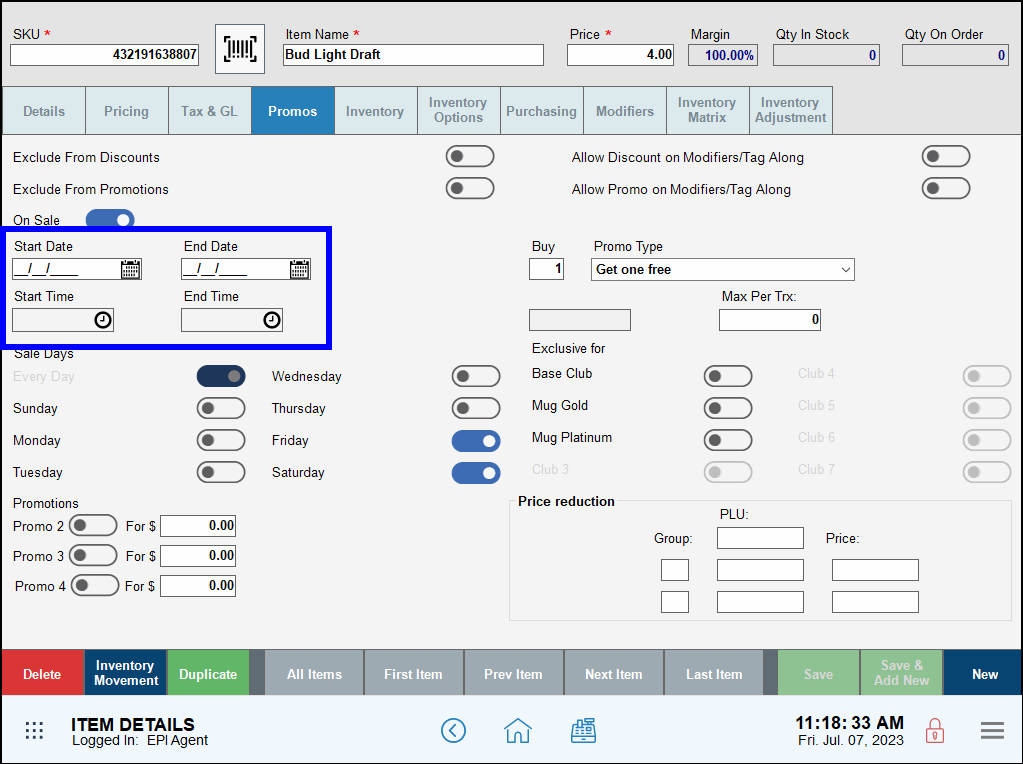
- Optional: Specify date ranges and times for the promotion by configuring the Start Date, End Date, Start Time, and End Time settings.
- Tap Save.
Required Fields
-
- Buy: Enter the amount of items a customer must purchase to qualify for discounts/promotions.
- Promo Type: Select the desired promotion from the drop-down menu.
- Max Per Trx: Enter the maximum amount of the item a customer can buy per transaction (e.g., a merchant may limit quantities sold to prevent the item from selling out too quickly).
- Start Date: Select the date the discount/promotion begins.
- End Date: Select the date the discount/promotion ends.
- Start Time: Select the time the discount/promotion begins.
- End Time: Select the time the discount/promotion ends.
- Note: Promos with a set end date and/or time will expire automatically. Nevertheless, promos can be deactivated at any time. See: Deactivate Discounts and Promos.
- Exclusive For: Select the desired club membership level(s) to receive club discounts/promotions.
- Promotions: Select the desired promo layers and add a discount/promotion price for each item group.
-
- Promo 2: Select to enable and enter promo layer for Promo 2.
- Promo 3: Select to enable and enter promo layer for Promo 3.
- Promo 4: Select to enable and enter promo layer for Promo 4.
- See: Create Promo Layers
-
Promo Examples
- Example: Liquor Store: offers a Buy One, Get One (BOGO) special: Buy one 18-pack of Bud Light Anniversary, get a second pack at 50% off on Fridays in July.
- Example: Spa: Mother’s Day Special: 25% off the purchase of a 50-minute Swedish Massage. This sale is valid for two weeks before Mothers Day.
- Example: Bakery or Market Deli: Seasonal Pie Sale: Pumpkin Pie on sale at the discounted price of $6.99/pie (regular price $10.99/pie). Sale prices is good for the second and third week of November.
View Promos at the Register
Check your work by ringing up promo items at the Register. View the promo discount amount above the order total. Promo discounts display at the Register by default. This setting can be modified in Register Preferences. See: Manage Promo Preferences.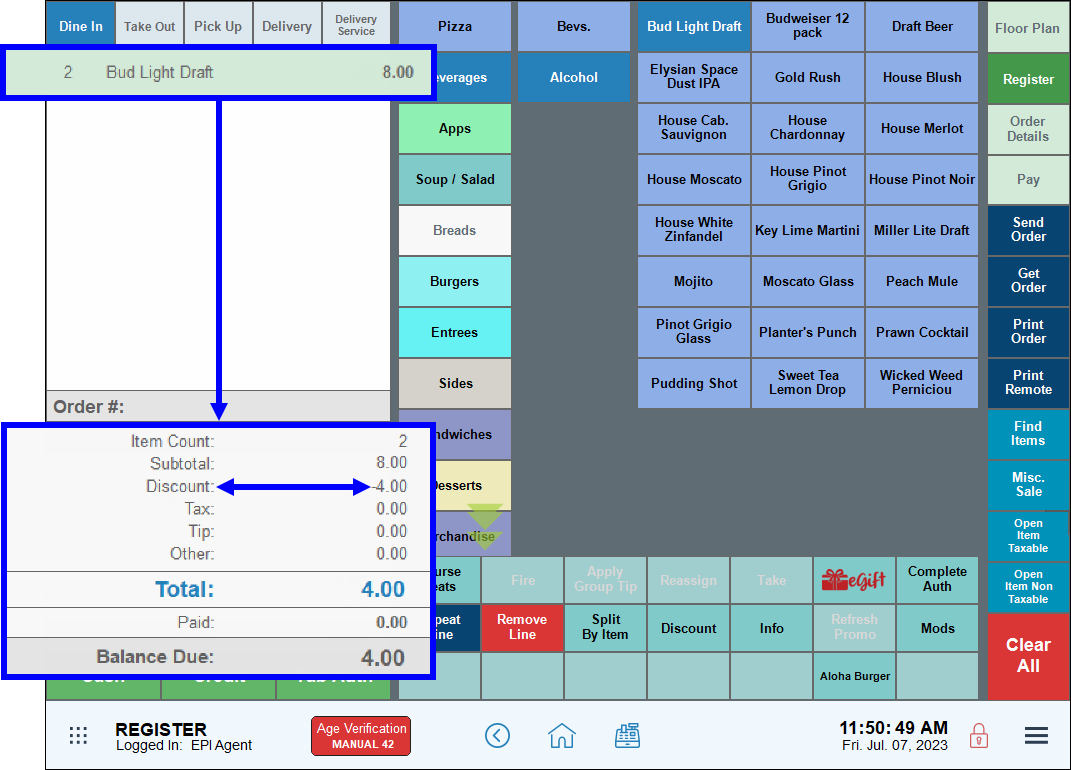
You can quickly and easily configure and apply a promo for a group of similar items. Create a temporary list of items, then use Modify All List Items to apply the same promotion to the items you’ve selected.
-
- From the Items List screen, tap Advanced Item Search to create a temporary list of items.
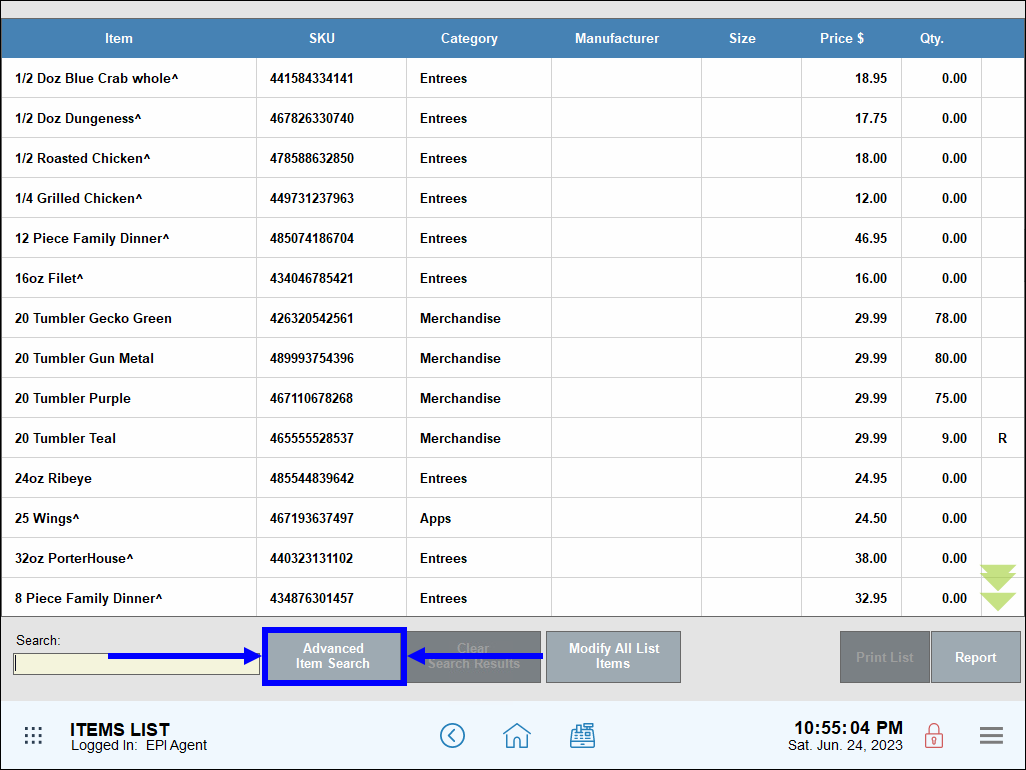
- On the pop-up that displays, select the desired filters and then tap Search.
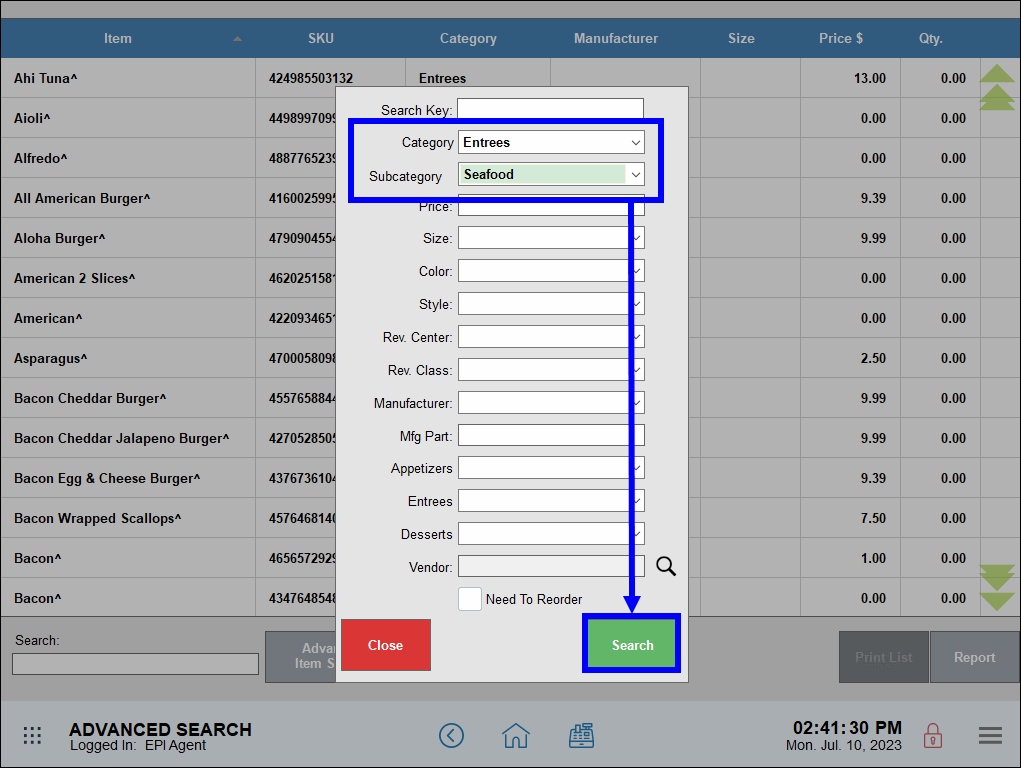
- Review search results to ensure all desired items are included, then tap Modify All List Items.

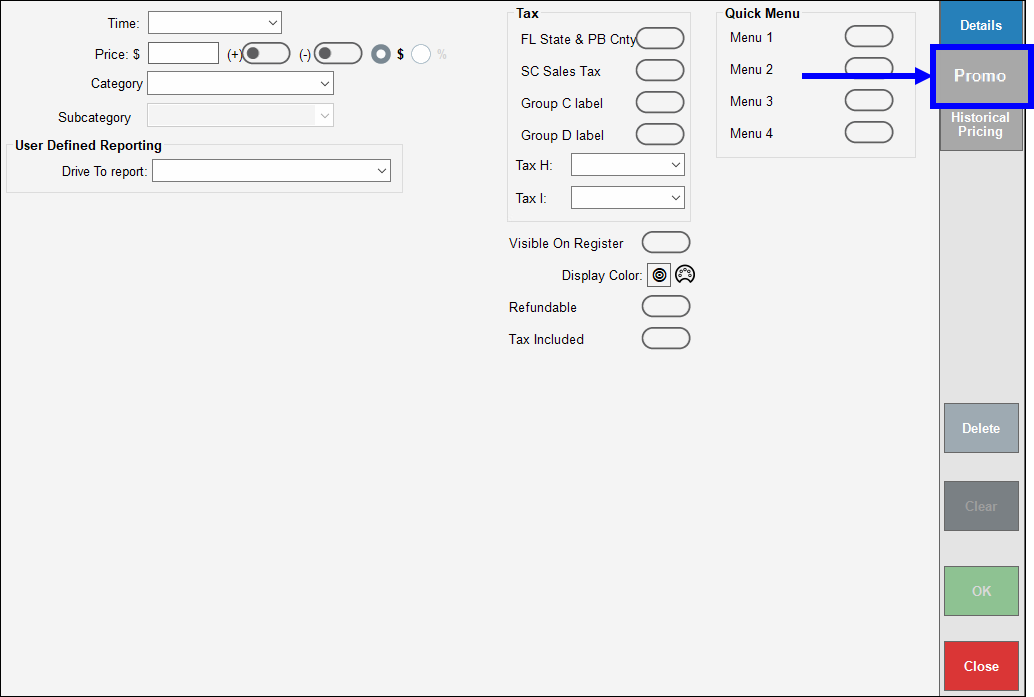
- In the work area that displays, tap the Promo tab.
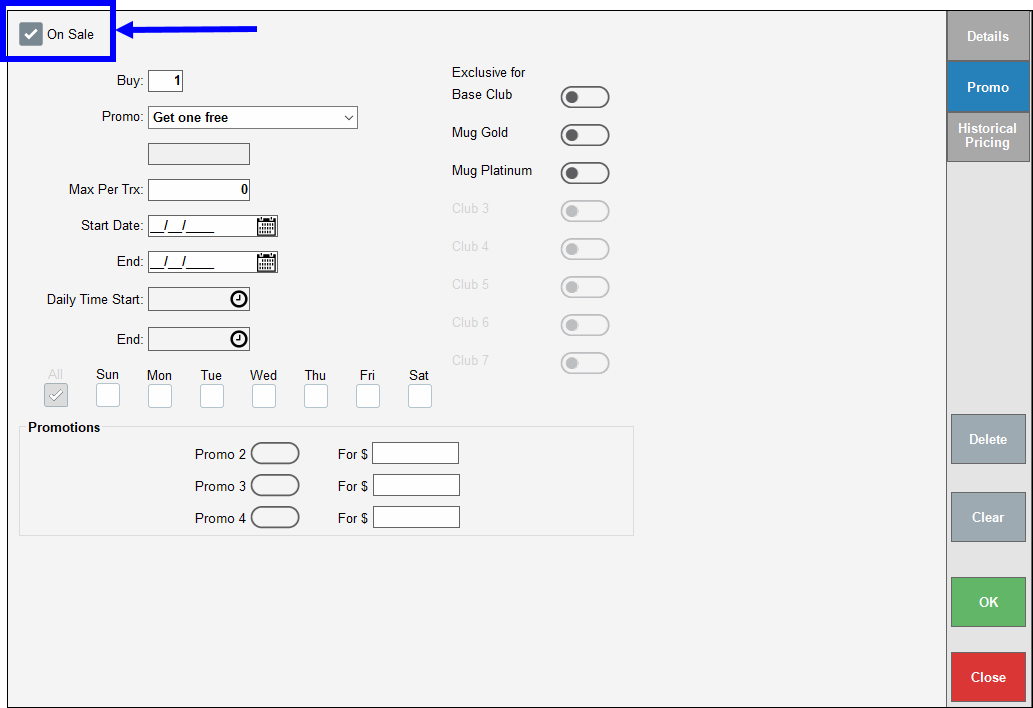
- Select the On Sale checkbox to activate the On Sale work area.
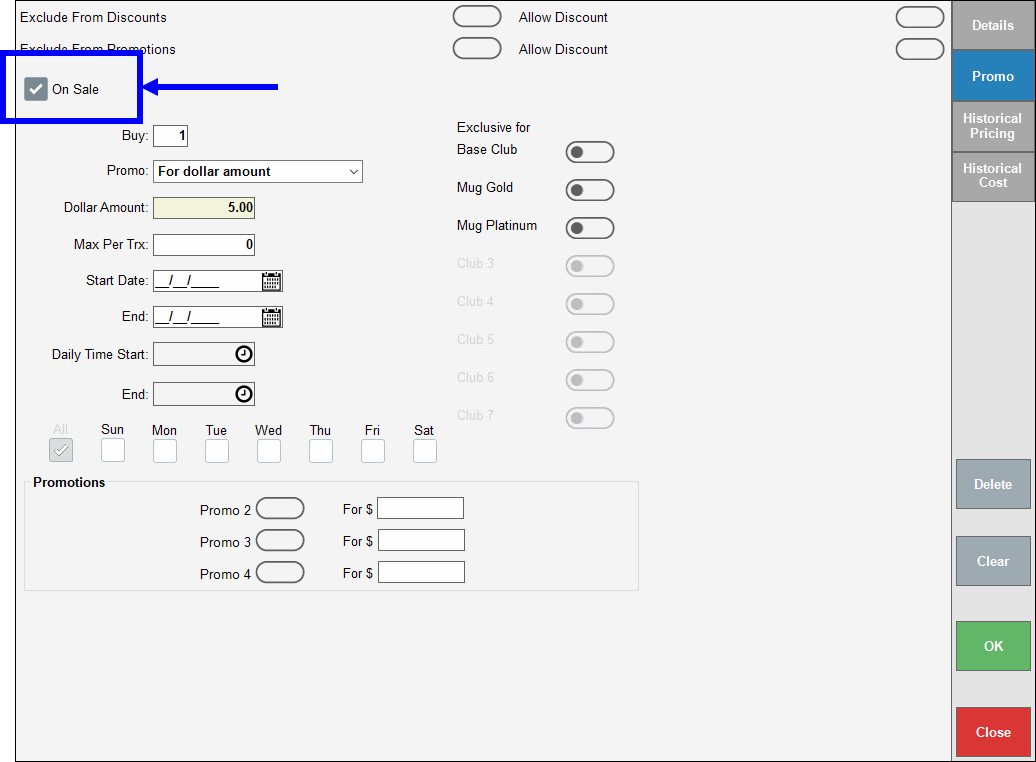
- Configure the following Promo settings:
- Buy: Enter the amount of items a customer must purchase to receive the promo.
- Promo: Select the desired promotion from the drop-down.
- Dollar Amount/Percentage Off: For dollar-based promos, enter the discount in dollars that a customer receives for this promo. (Note: When Dual Pricing is enabled, it will not change the specified dollar amount promo price, regardless of tender type). For percentage-based promos, enter the discount as a percentage that a customer receives for this promo.
- From the Items List screen, tap Advanced Item Search to create a temporary list of items.
- Note: This field displays either as Dollar Amount or Percentage Off, depending on the type of promo selected in the Promo field. The field displays as inactive for Get one free or Get one half price promos.
-
-
- Select at least one day of the week.
- All other fields are optional.
- Tap OK.
- On the warning pop-up that displays, tap Yes to confirm or No to continue making changes.
-
- Warning: These promos are immediately active for the list of items, unless constrained by day, date, and times. Do not tap Yes until you are ready to apply these changes. See: Modify Items in Bulk.
You can set up and apply a Promo for a group of similar services quickly and easily by following the same process as applying promos to groups of items. Create a temporary list of services, then use Modify All List Services to apply the same promotion on the items you’ve selected.
-
-
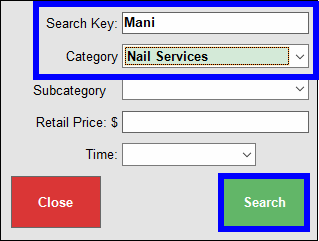
- From the Items screen, tap Advanced Services Search to create a temporary list of services.
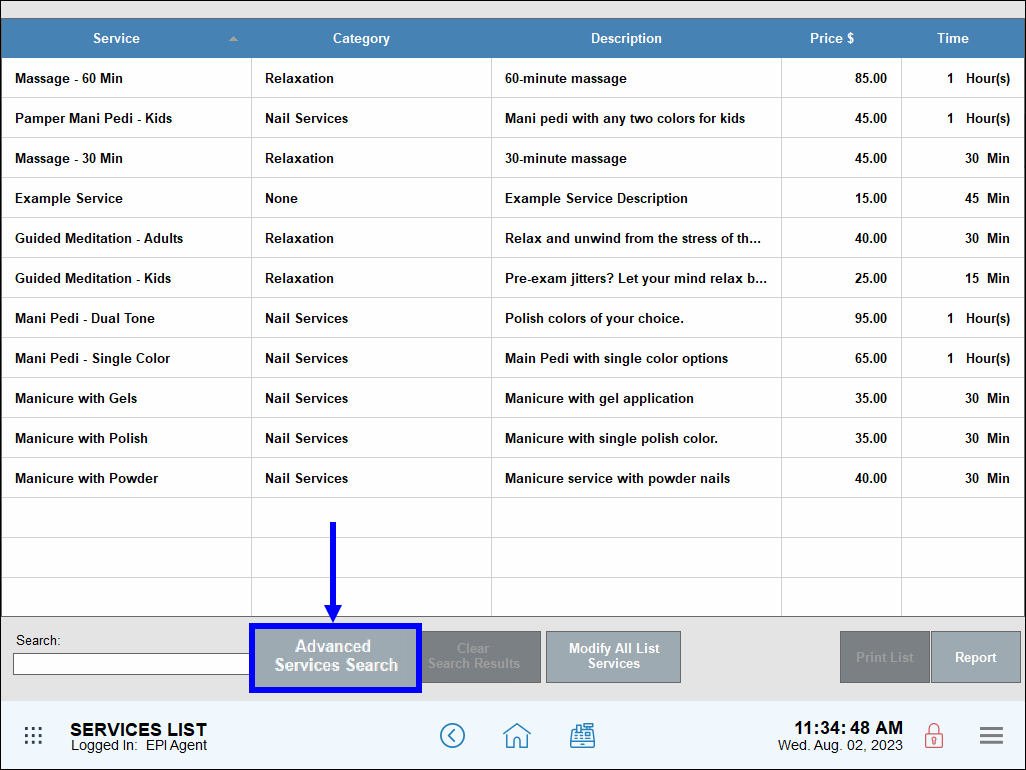
- Select the desired filters from the pop-up window that displays, then tap Search.
- Review search results and tap Modify All List Services.
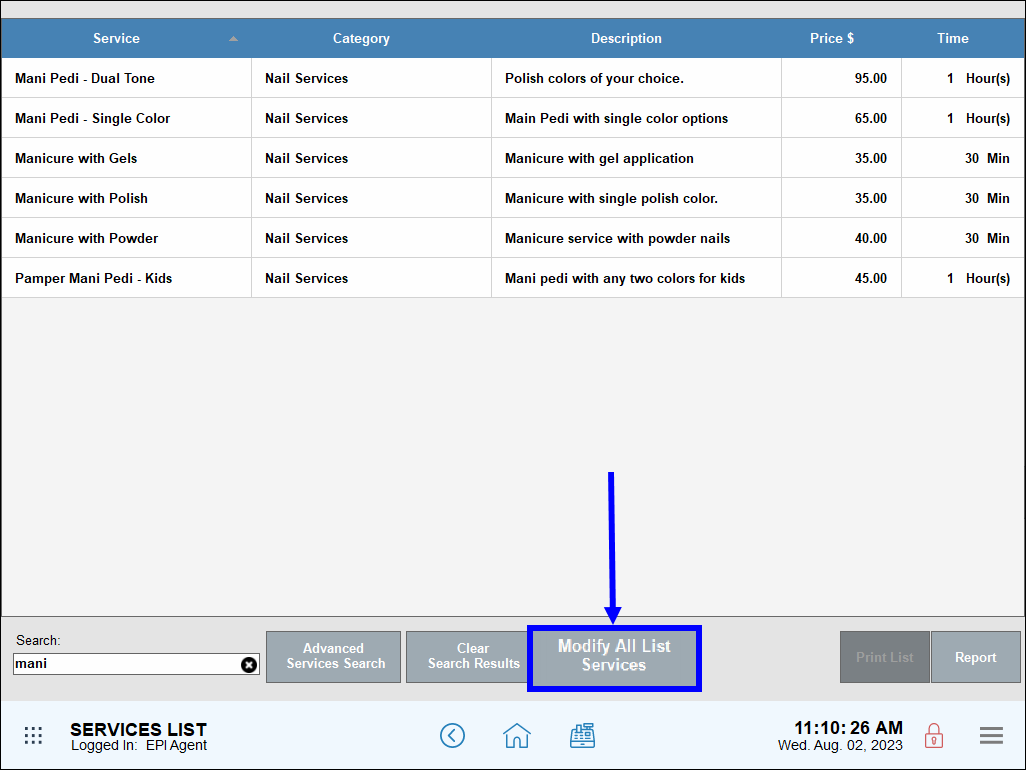
- From the Modify All List Services work area, tap the Promo tab, then configure promo settings as desired.
- Select the On Sale checkbox and configure service promo settings as desired.
- Note: Service group promos feature the same settings as Item group promos. See: Apply Promo to a Group of Items.
- Tap OK, then confirm and reconfirm promo service changes.
- Warning: These promos are immediately active for the list of items, unless constrained by day, date, and times. Do not tap Yes until you are ready to apply these changes. See: Modify Items in Bulk.
- From the Items screen, tap Advanced Services Search to create a temporary list of services.
-
Restaurants and bars use Promo Layers to create Happy Hour Specials. Additional times and prices can be layered onto promos. Up to 3 promo layers can be applied: Promo 2, Promo 3, and Promo 4 options.
- Example: Happy Hour specials on pitchers of beer may include:
For Bud Light: $5 pitchers between 5 p.m. – 6 p.m. (Promo 2), $6 pitchers between 6 p.m. – 7 p.m. (Promo 3), $8 pitchers between 7 p.m. – 8 p.m. (Promo 4)
For Yuengling: $7 pitchers between 5 p.m. – 6 p.m. (Promo 2), $8 pitchers between 6 p.m. – 7 p.m. (Promo 3), $9 pitchers between 7 p.m. – 8 p.m. (Promo 4)
- See: Create Promo Layers
How can we improve this information for you?
Registered internal users can comment. Merchants, have a suggestion? Tell us more.