- Note: The Exatouch Inventory App is currently available to select users for beta testing. We anticipate the full release within the first half of 2023.
Expand how you manage inventory with the Exatouch Inventory App! The app allows you to quickly and easily add inventory, transfer items to another location, and create purchase orders. Designed to complement the Exatouch POS System, the mobile app offers increased convenience and efficiency.
This guide provides detailed instructions on installing and operating the mobile app. Instructions follow best practices to facilitate a successful installation and operation of the app on supported Apple and Android mobile devices.

The following procedures summarize the process of logging into the app once it’s downloaded to your mobile device. Apple users should download the app from the App Store. Android users can download the app from the Google Play Store app.
Configuring Login Credentials
- Download the Exatouch Inventory App to your mobile device.
- Install and launch the app. The login page displays.
- Enter the username and temporary password.
- Note: The The username will be the email address associated with your Merchant account. The password will be provided in the Electronic Payments welcome email.
- Follow the prompts to set a new password, if desired.
Logging into the App
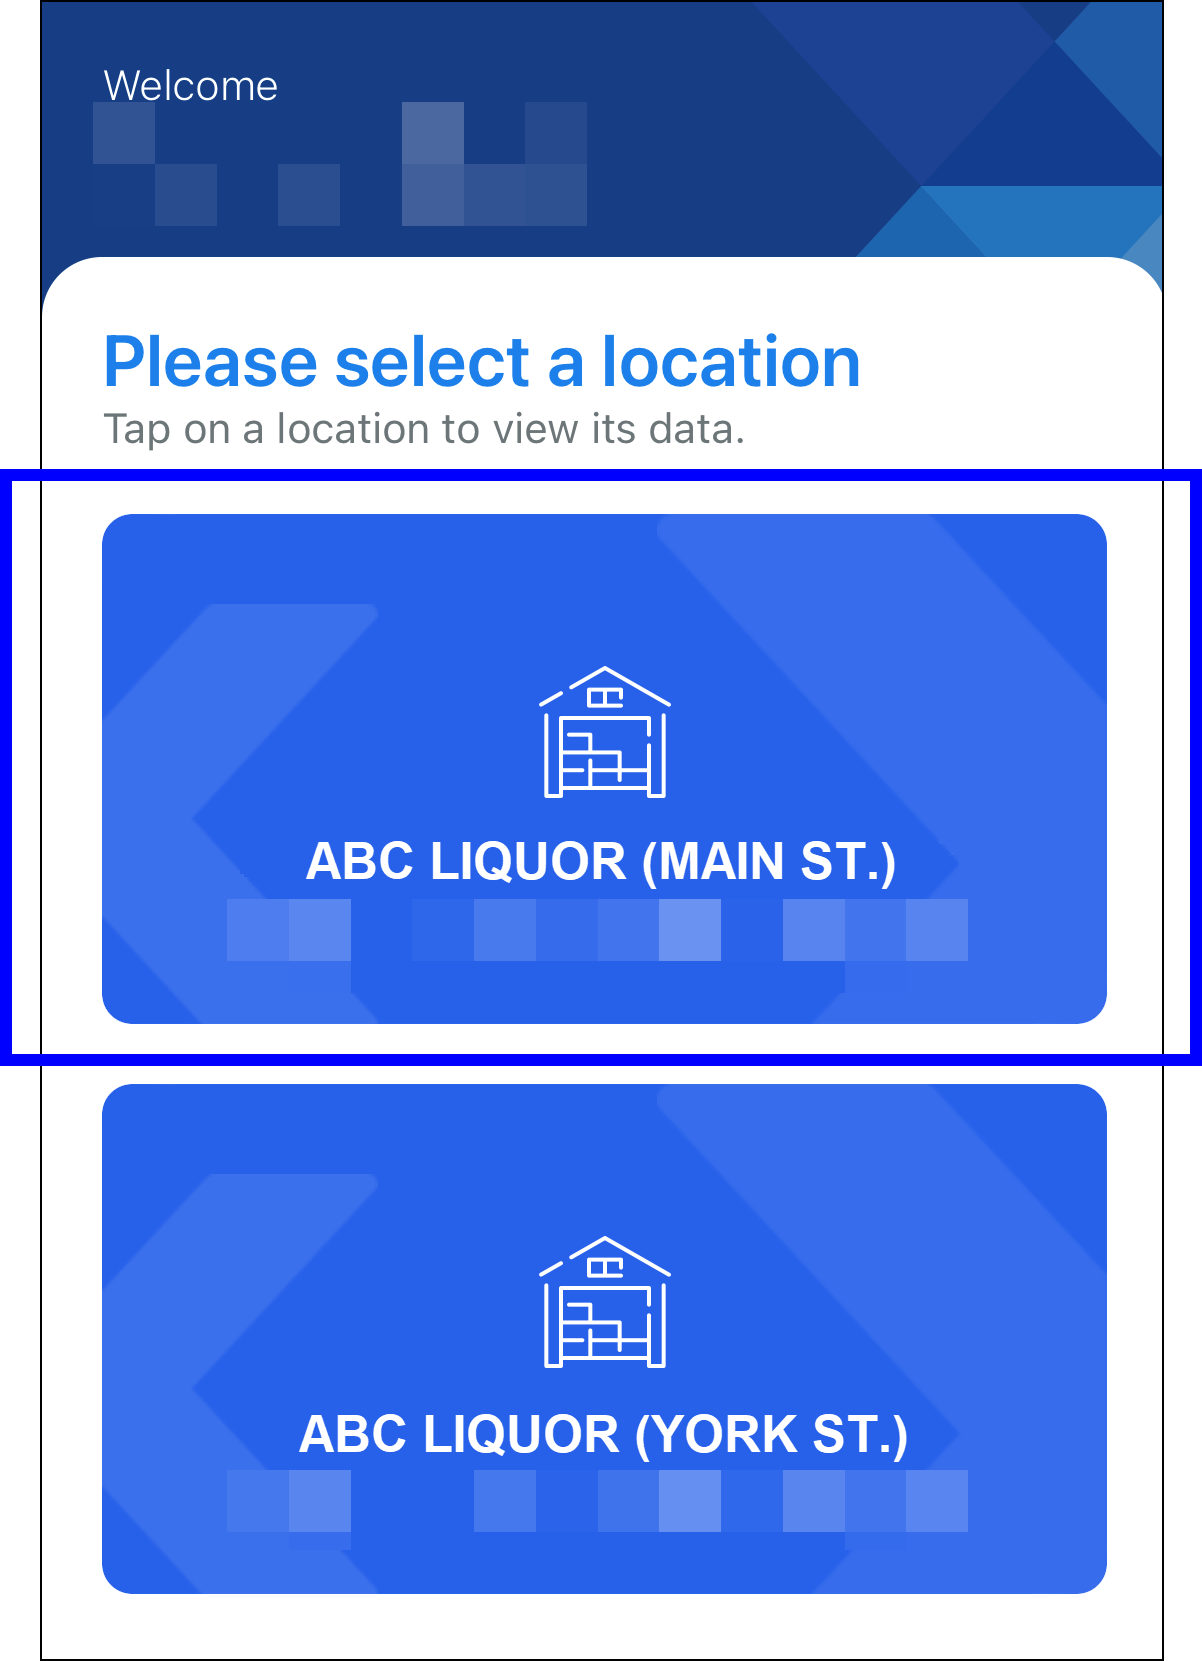
- Launch the Exatouch Inventory App. The Welcome screen displays.
- Enter login credentials into the Email and Password fields.
- Tap Login.
- Select a Location, if prompted.
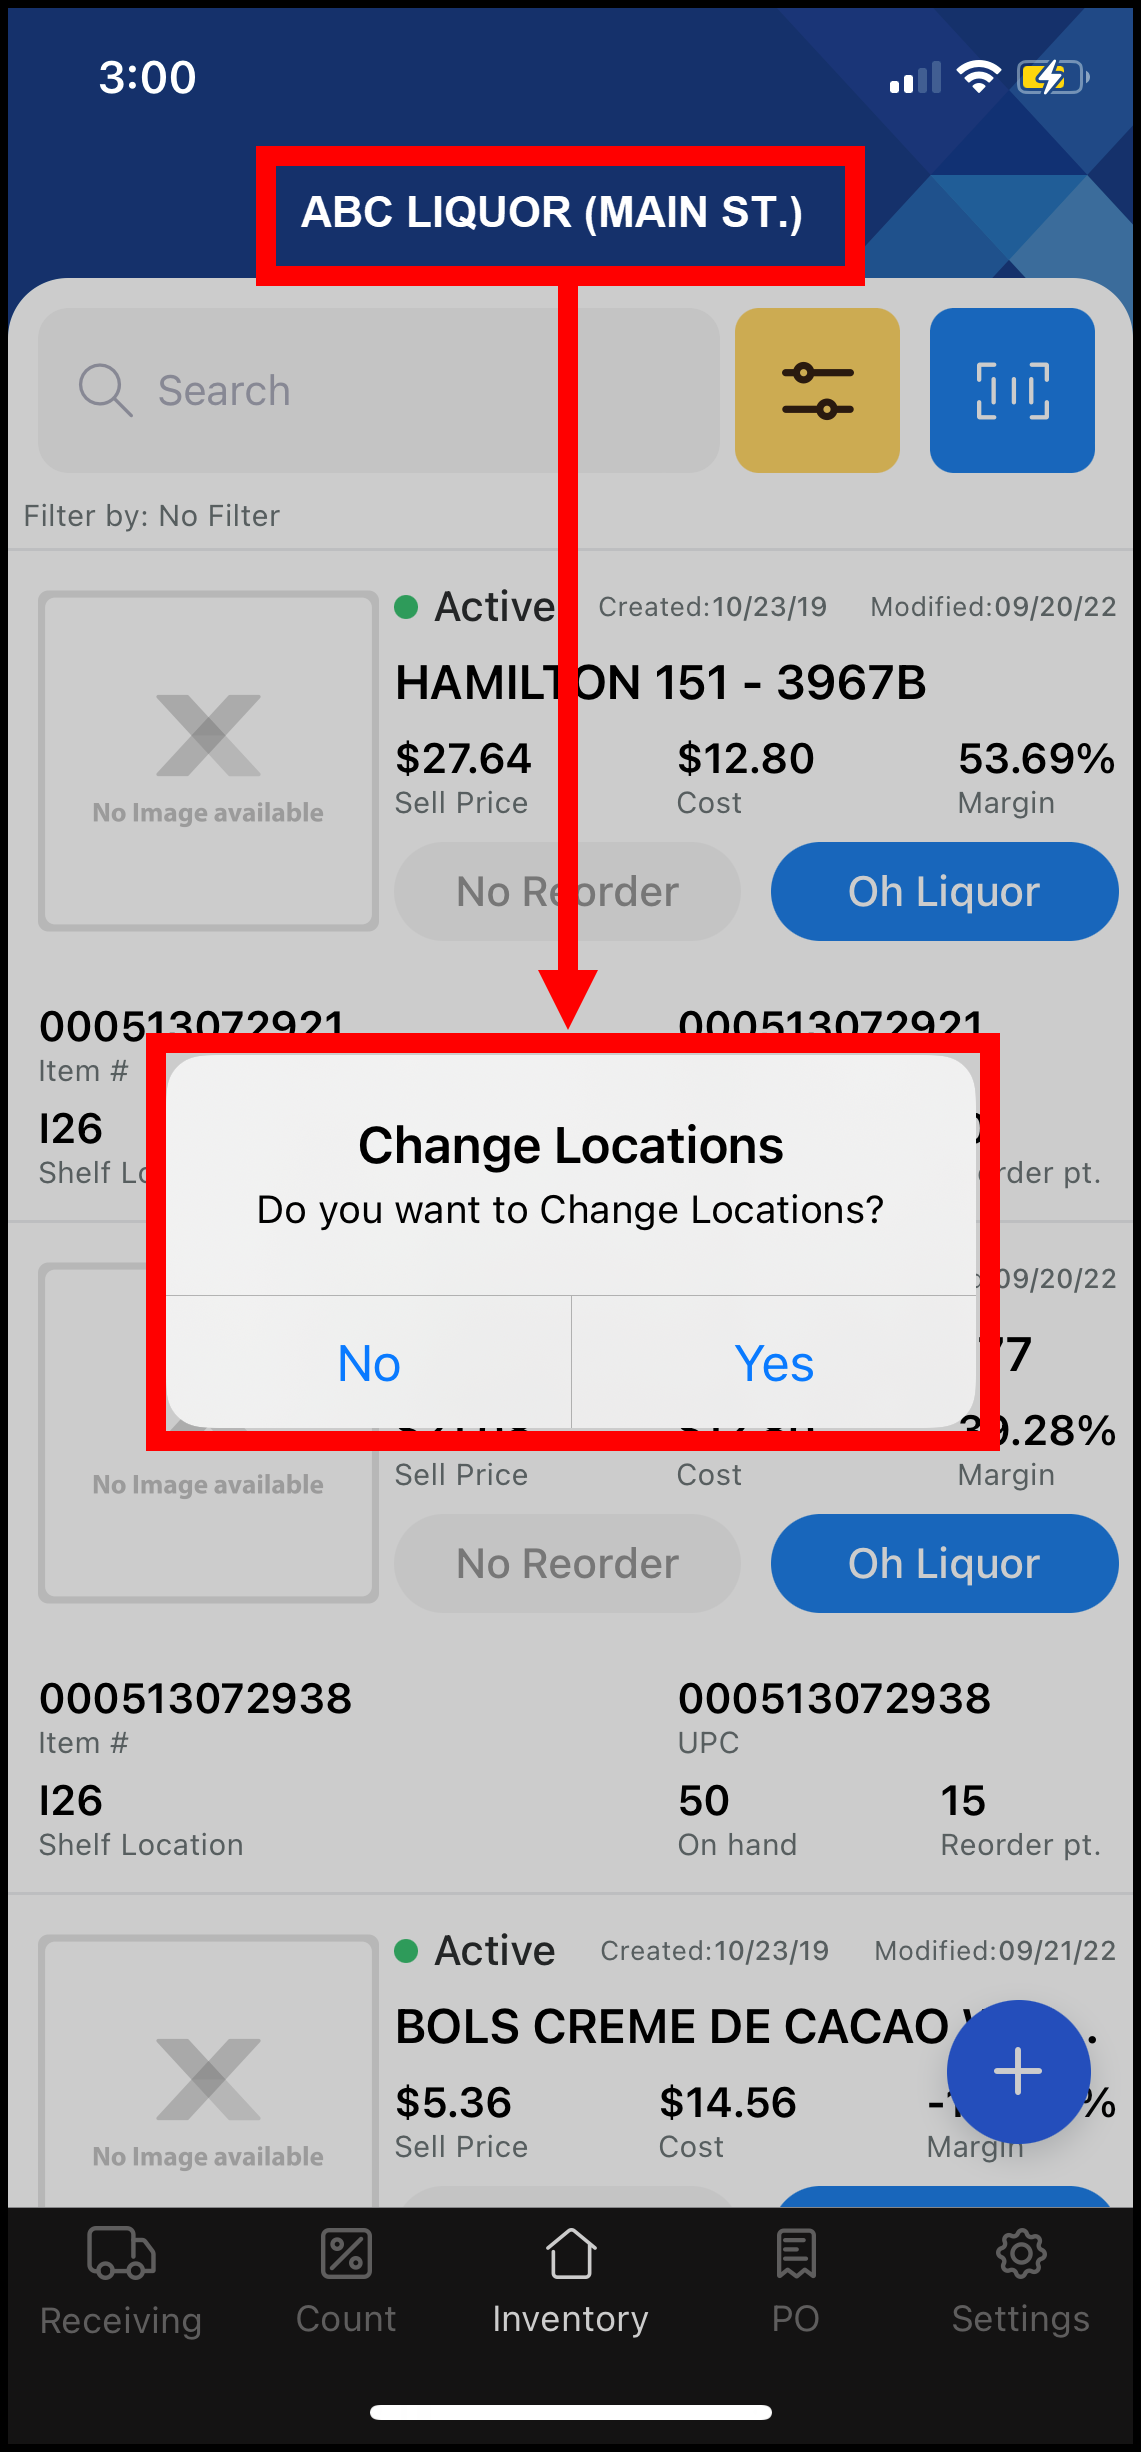
- Toggle between locations by tapping the Location name at the top of most screens.
- Tap Yes, then select a new Location.
Resetting Passwords
Perform the following to reset forgotten passwords or to change an existing password.
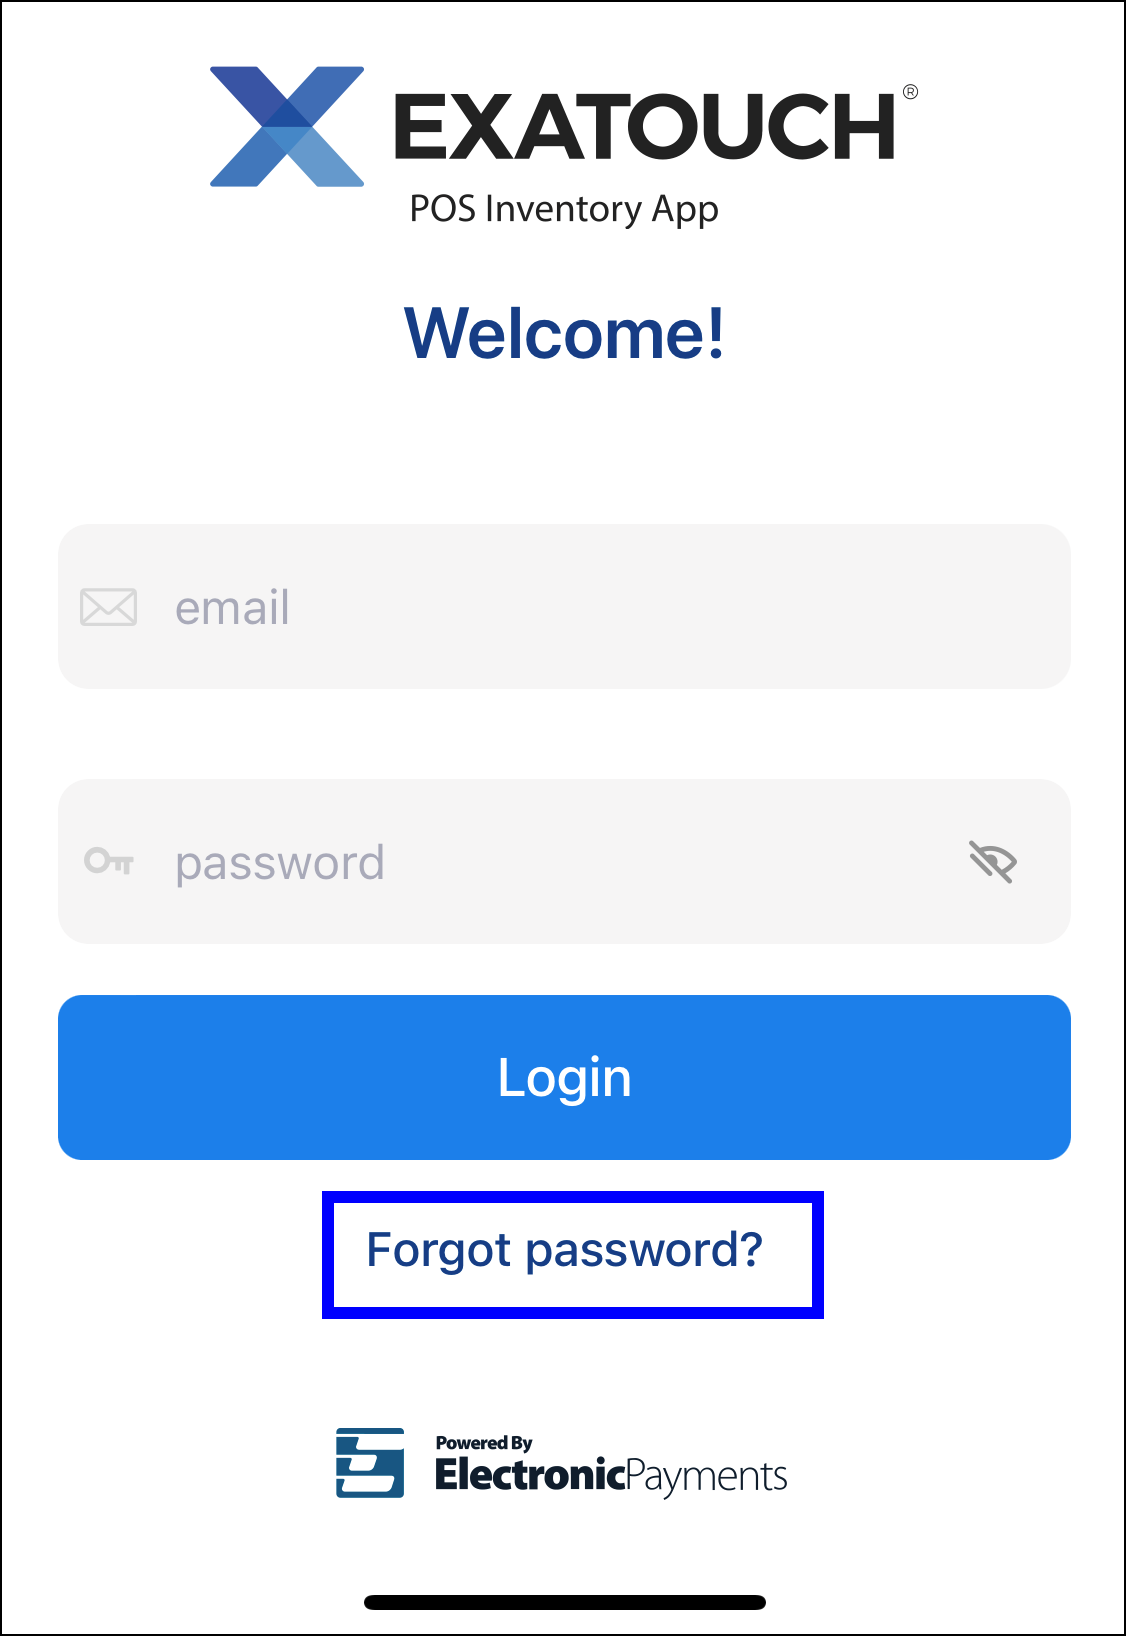
- From the Login screen, tap the Forgot Password? link.
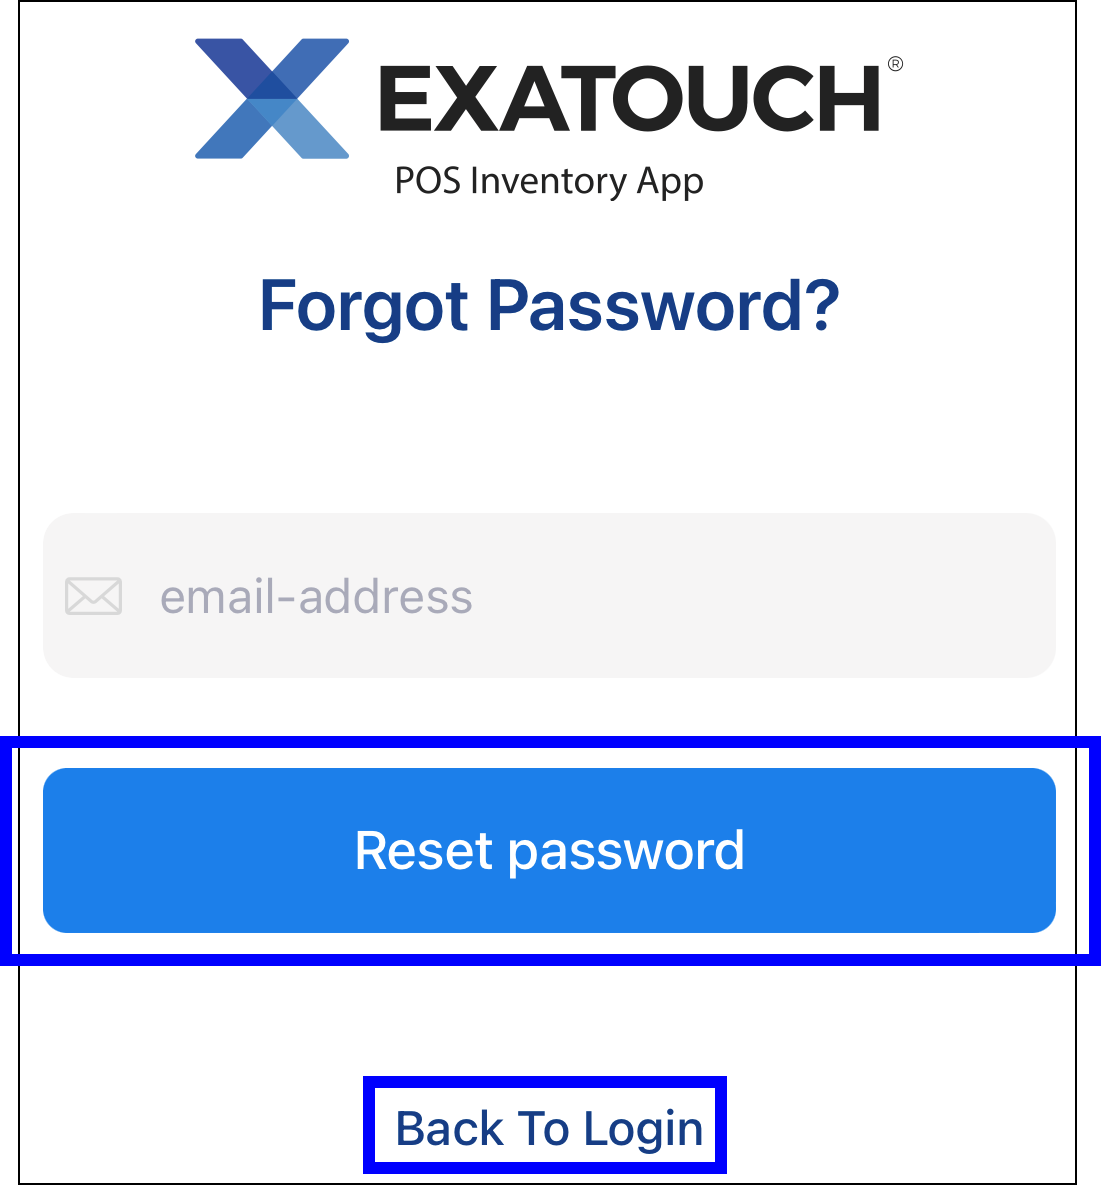
- On the Forgot Password screen, enter your username in the email-address field.
- Tap Reset password to reset your password or Back to Login to return to the Login screen.
- Follow the prompts to reset your password.
The Exatouch Inventory App is designed for easy navigation, allowing merchants to track inventory quickly and conveniently. Merchants can add items to inventory, transfer items to other locations, create purchase orders, and much more.
Tab Descriptions
Tap one of the five tabs on the bottom navigation bar of most screens in the app to perform basic functions. The following table provides a high-level description of each tab:
| Tab Name | Tab Image | Description |
|---|---|---|
| Receiving |  |
Tracks the status of inventory on order |
| Count |  |
Quickly updates the quantity on hand |
| Inventory |  |
Allows merchants to create and edit product descriptions, add items to purchase orders, transfer items to another location and adjust item quantity |
| PO |  |
Tracks and finalizes in-progress purchase orders |
| Settings |  |
Contains activity logs, online Knowledge Base, and Log Out button |
Receiving Tab
Tap the Receiving tab to track the status of purchase orders and inventory transfers. Merchants can search for a specific purchase order or transfer, and complete or partially complete a purchase order.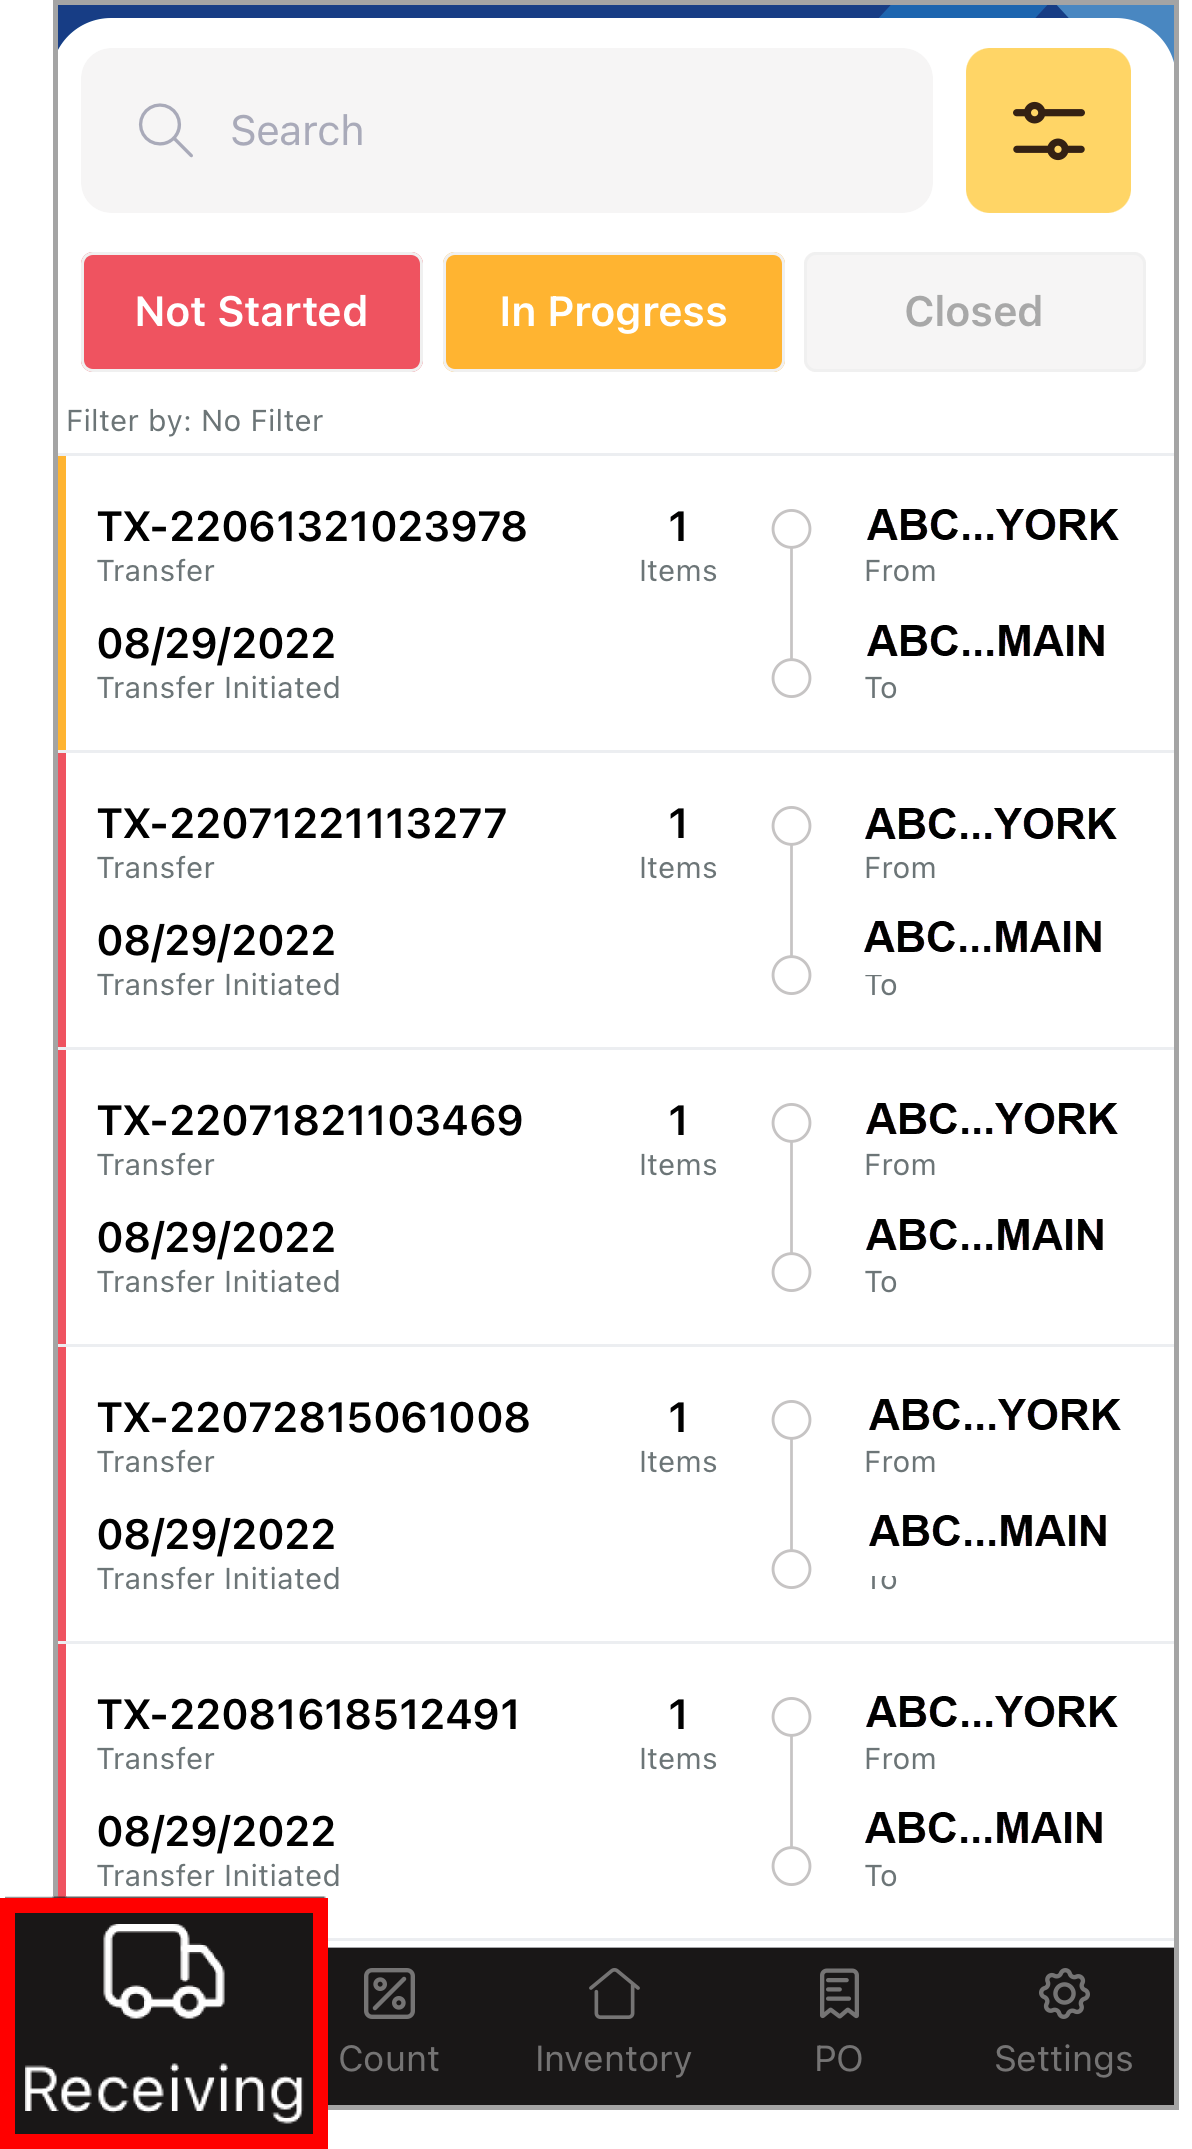
Select the Receiving tab to perform the following, as needed:
- Search Field – Search the status of a purchase order by entering a keyword or phrase.
- Filter Button – Tap to sort or apply filters to a purchase order status.
- Not Started Button – Tap to only display purchase orders yet to be created.
- In Progress Button – Tap to only display purchase orders that are in progress.
- Closed Button – Tap to only display closed purchase orders.
Count Tab
Merchants can use the Count tab to review and/or modify the amount of an item in inventory. The tab includes a barcode scanner that merchants can use to search inventory by UPC information. Merchants can also use the Reconciliation page to confirm inventory adjustments.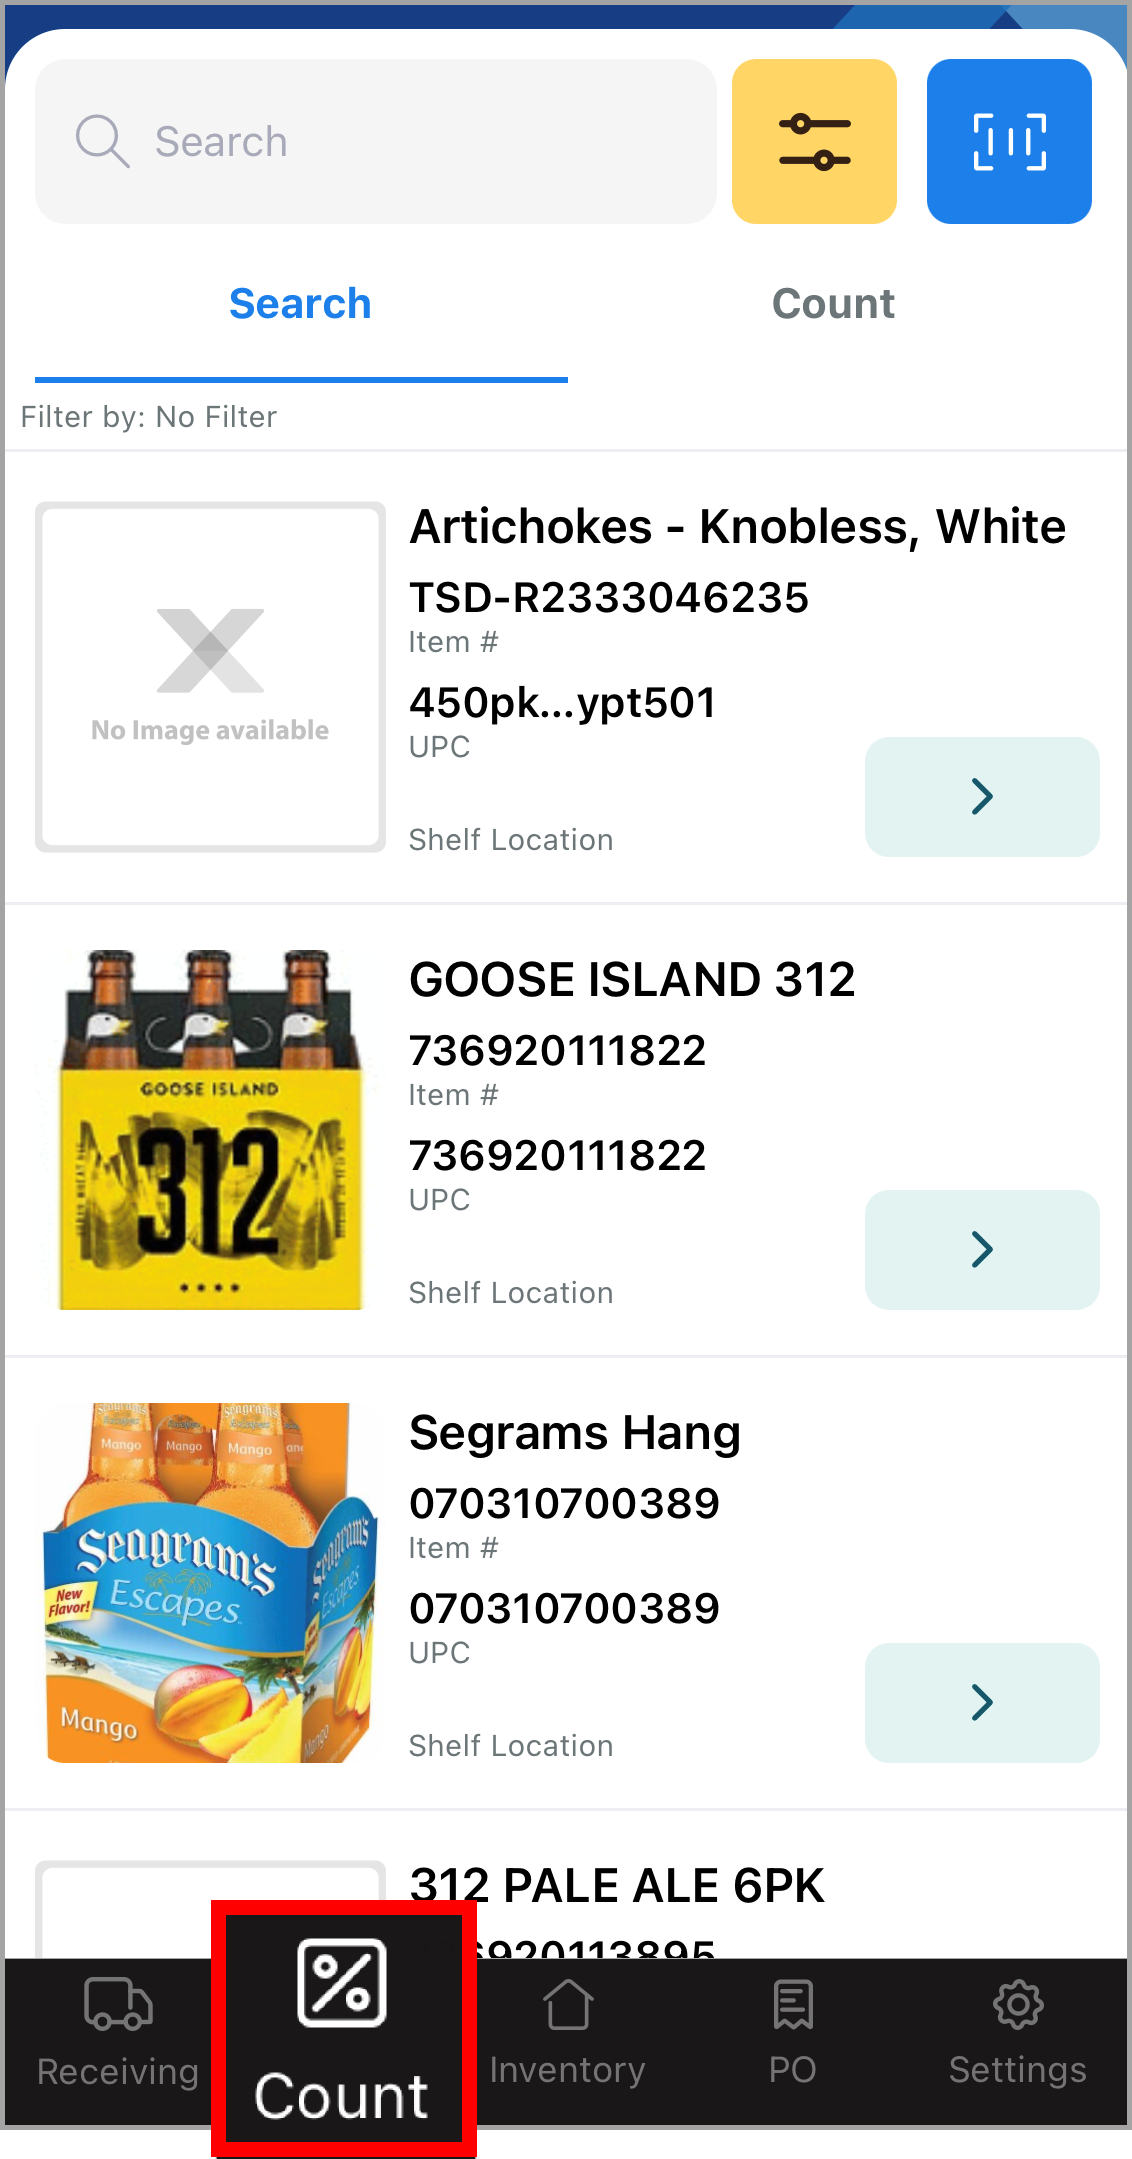
Select the Count tab to perform the following:
- Search Field – Search to find items in count by entering a keyword or phrase.
- Filter Button – Tap to sort or apply filters to items in count.
- Barcode Scanner – Tap to scan an item’s UPC information.
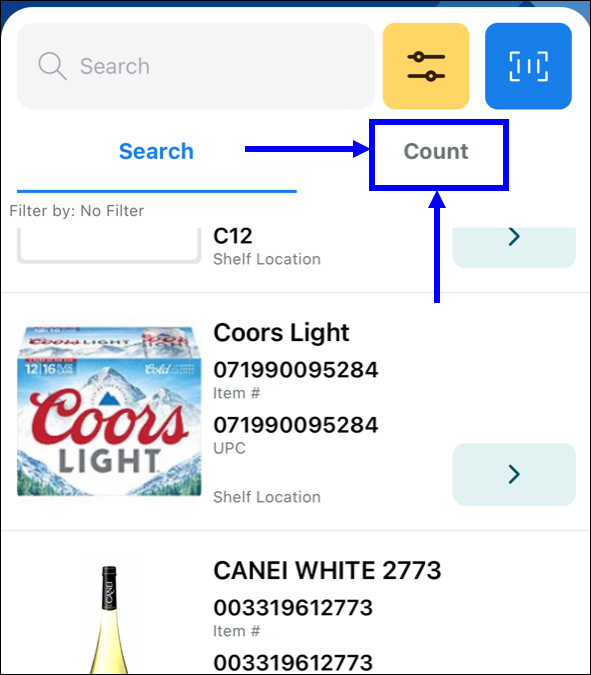
- Search Link – Located in the upper navigation bar, the Search link lets merchants scroll through a list of available items in inventory.
- Count Link – Located in the upper navigation bar, users must first select an item from the Search link and enter a stock quantity. Once those steps are completed, merchants can use the Count link to perform the following functions:
- Refresh Button – Tap to refresh the Count list to view the most current inventory counts.
- Done Button – Tap to complete counting items and transition to the Reconciliation screen.
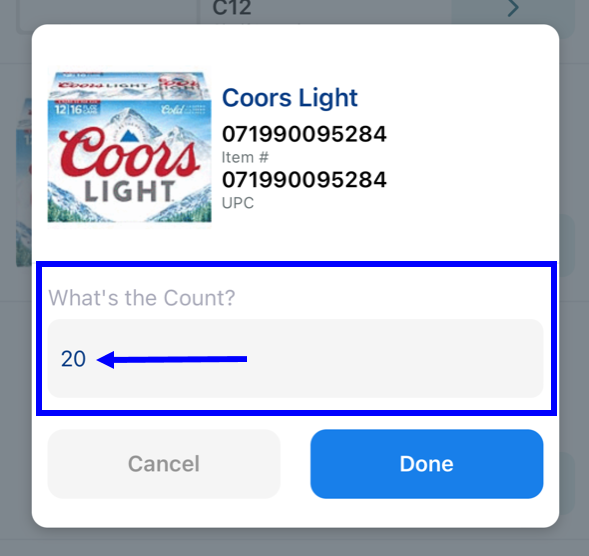
Adding More Items
Perform the following to update the quantity of items:
- Tap the Search tab.
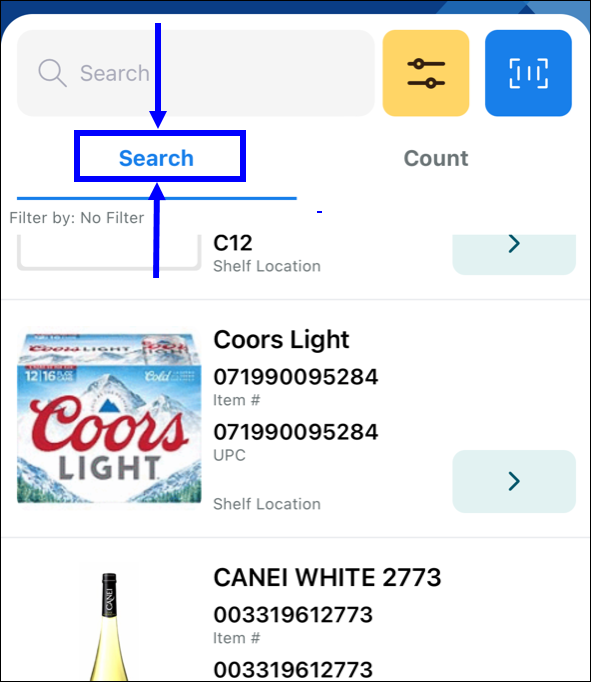
- Enter an item name in the Search field or scroll through the list to locate a desired item.
- Tap the item. A pop-up displays.
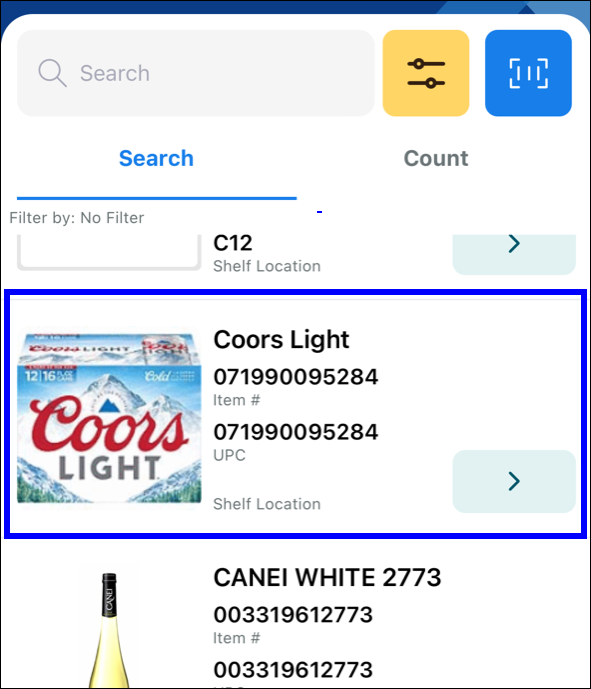
- In the What’s the Count? field, enter a quantity and tap Done.
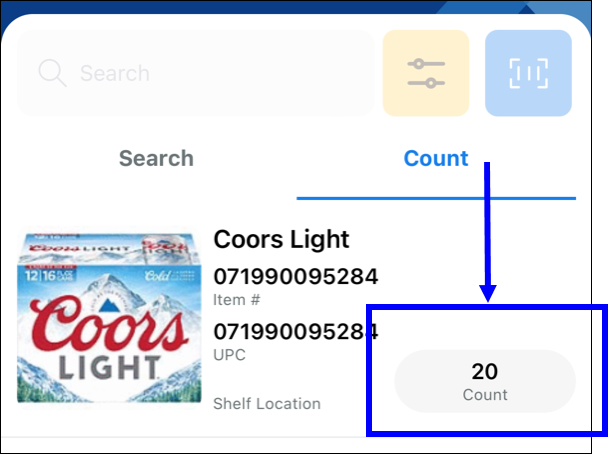
- Tap the Count tab. The item for which you entered a quantity displays.
- Verify the correct quantity and tap Done.
Reconciliation Page
After tapping Done, the Reconciliation screen displays. Use the Reconciliation page to confirm inventory counts and perform any last minute adjustments before finalizing the count.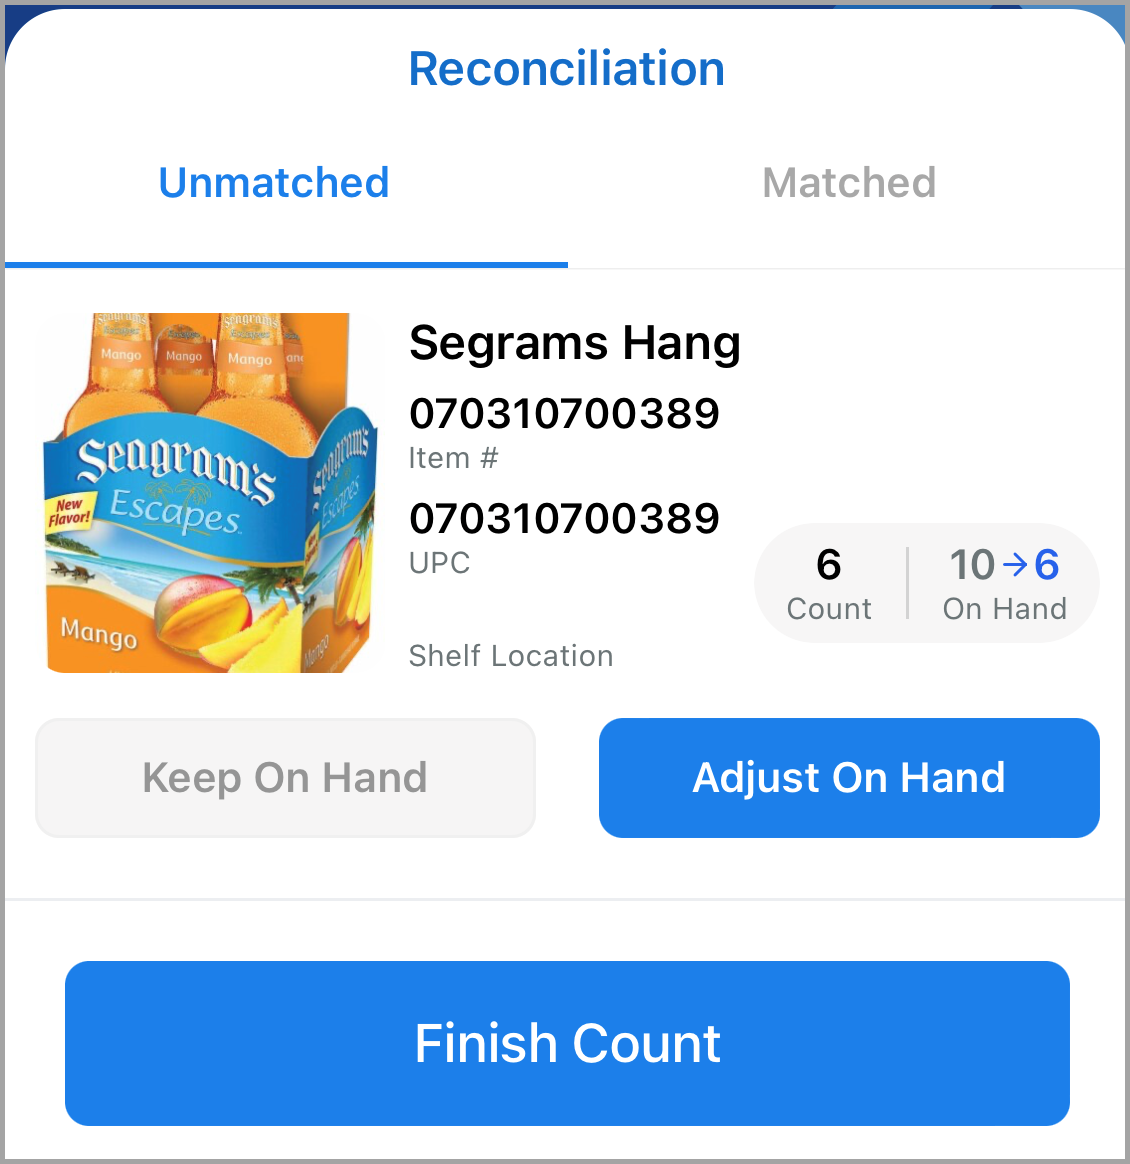
The Reconciliation screen includes the following:
- Unmatched Tab – The tab displays all items where the Count and On Hand amounts do not match.
- Matched Tab – The tab displays all items where the Count and On Hand amounts match.
- Keep On Hand Button – Select to override the Count amount.
- Adjust On Hand Button – Select to override the On Hand amount.
- Finish Count Button – Tap to complete inventory reconciliation.
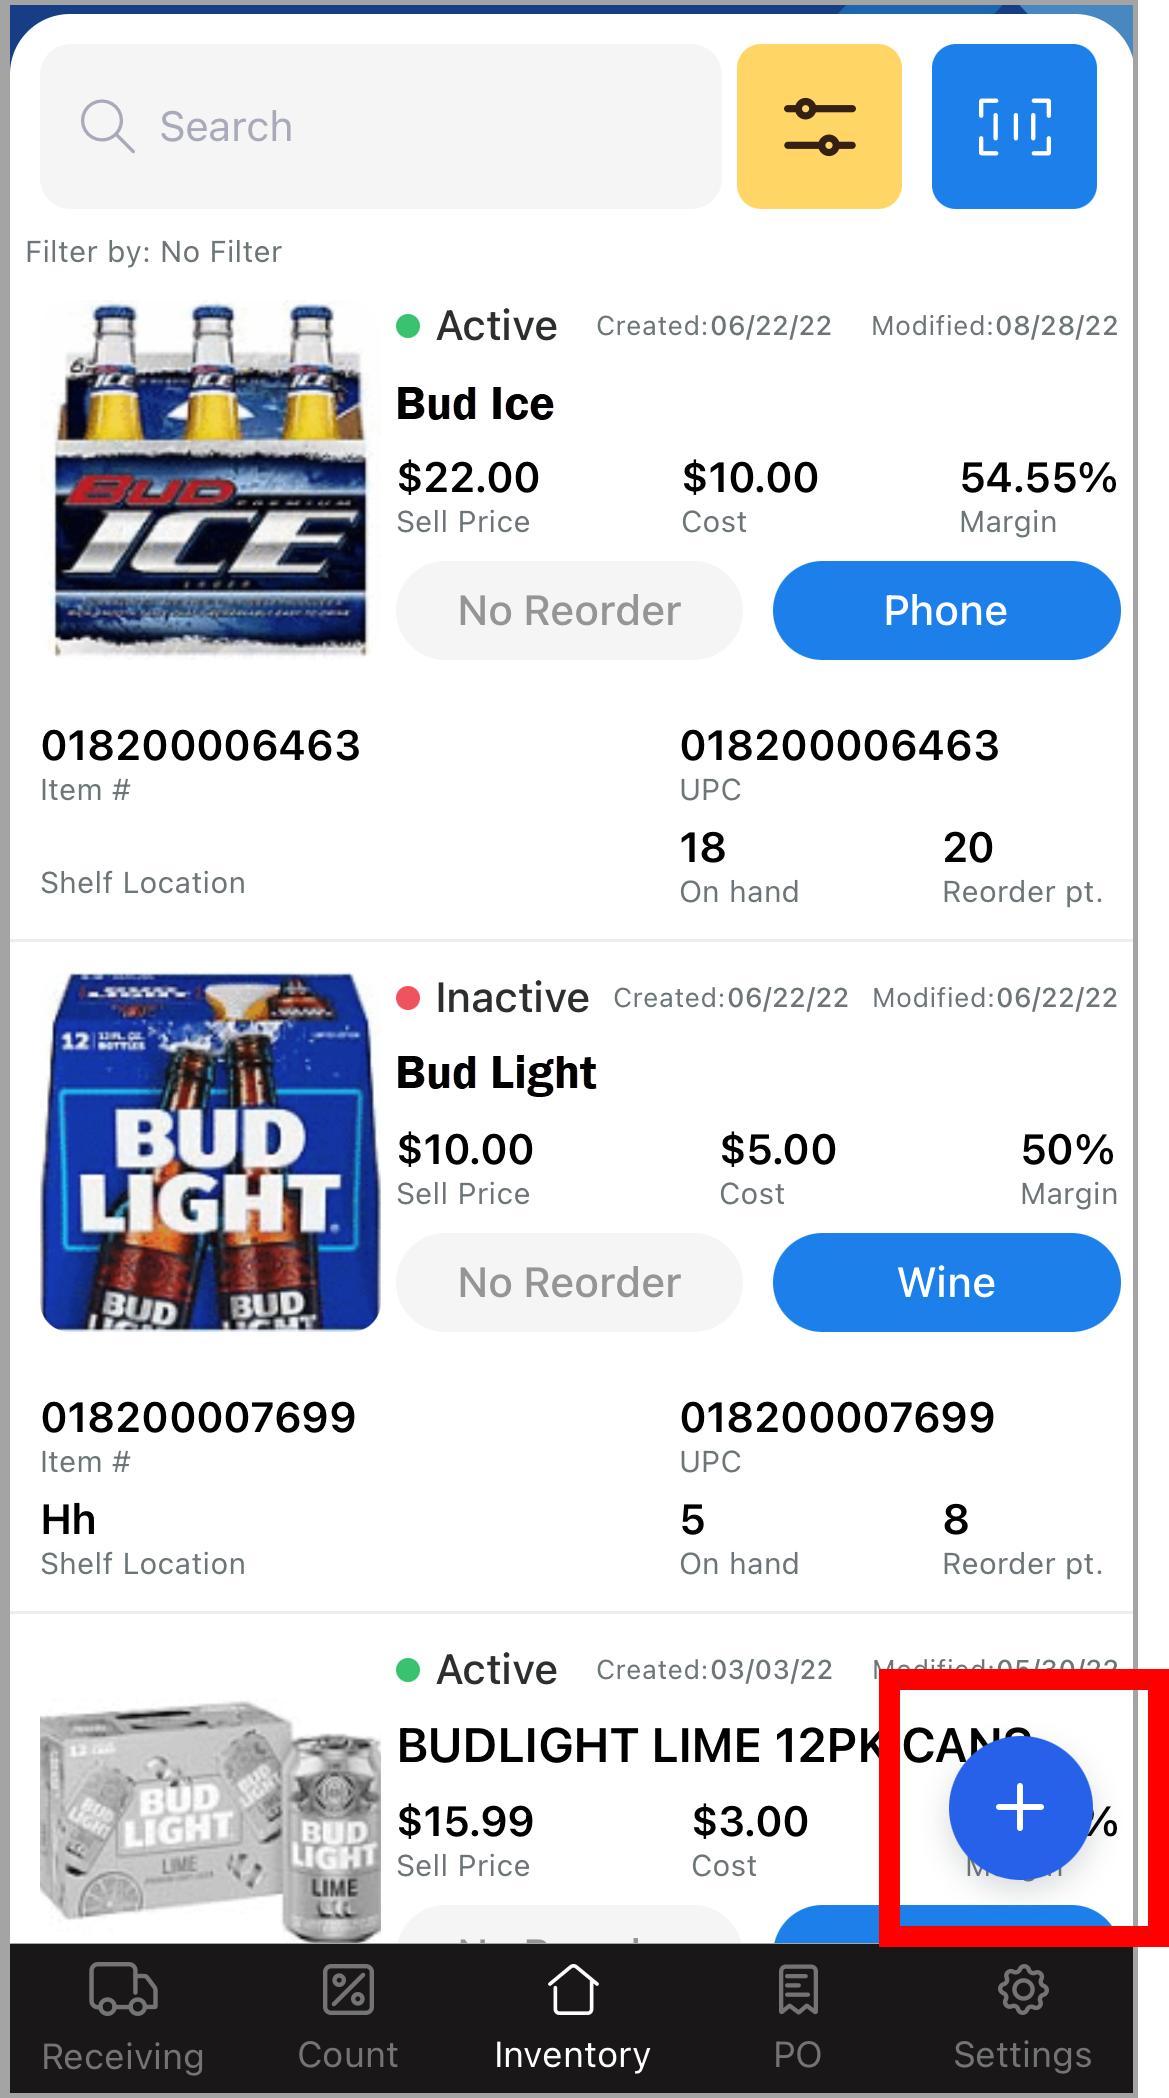
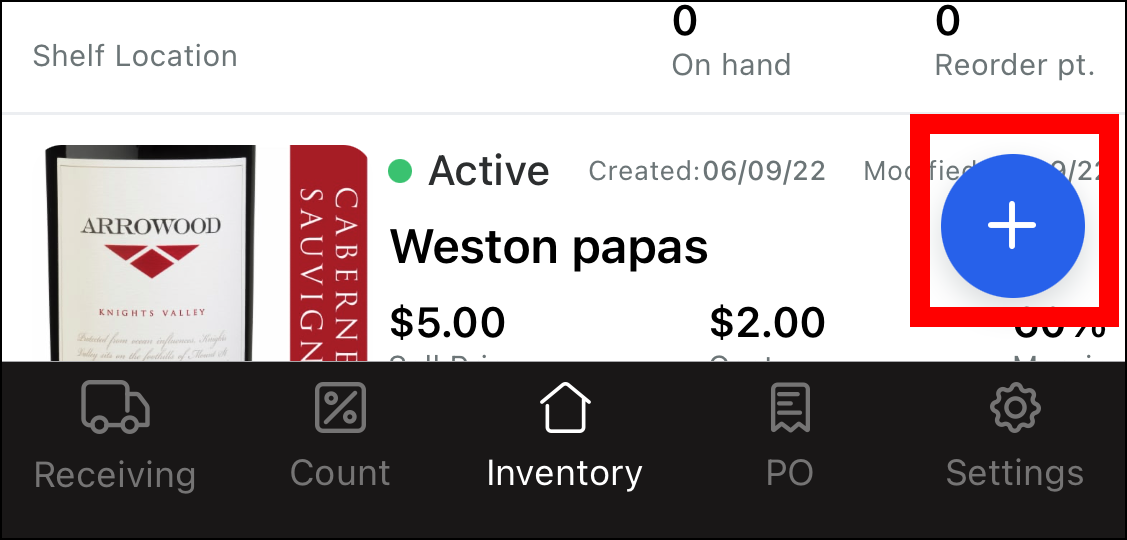
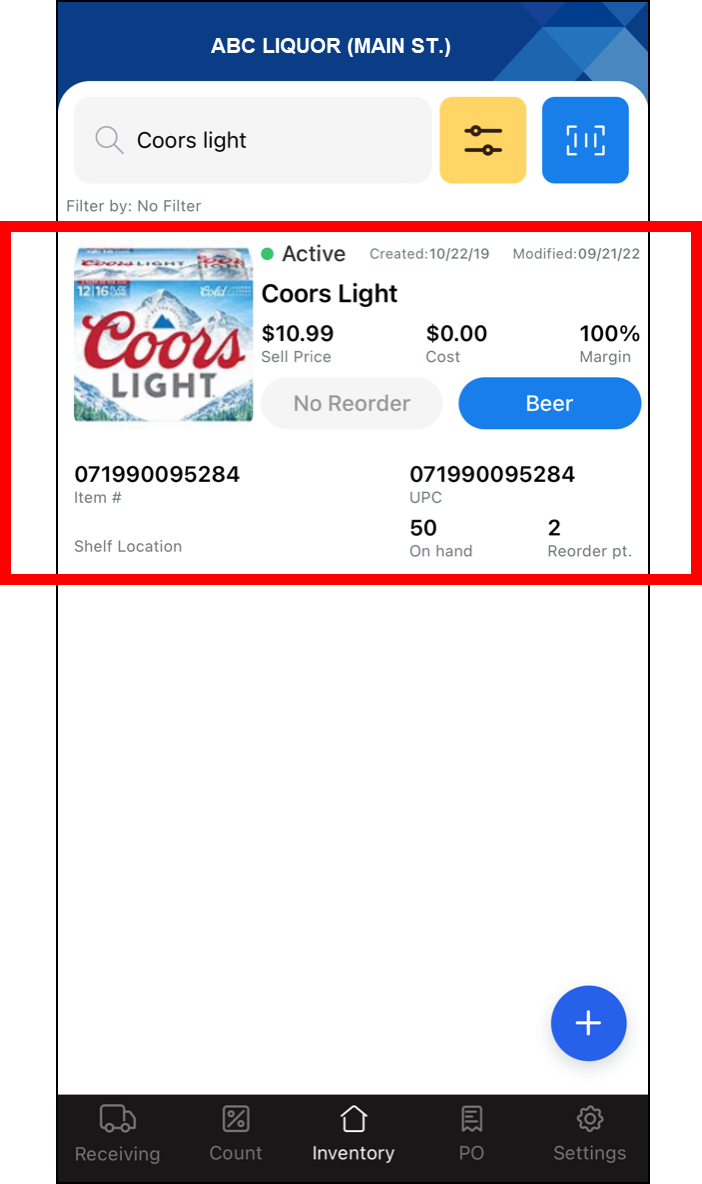
Inventory Tab
Use the Inventory tab to add items to inventory, add and edit product details, and search for available inventory. The Inventory tab also allows merchants to adjust inventory quantity, add items to purchase orders and transfer items to other locations within the app.
Tap the blue Add Item (+) button in the lower right corner of the screen to add product information.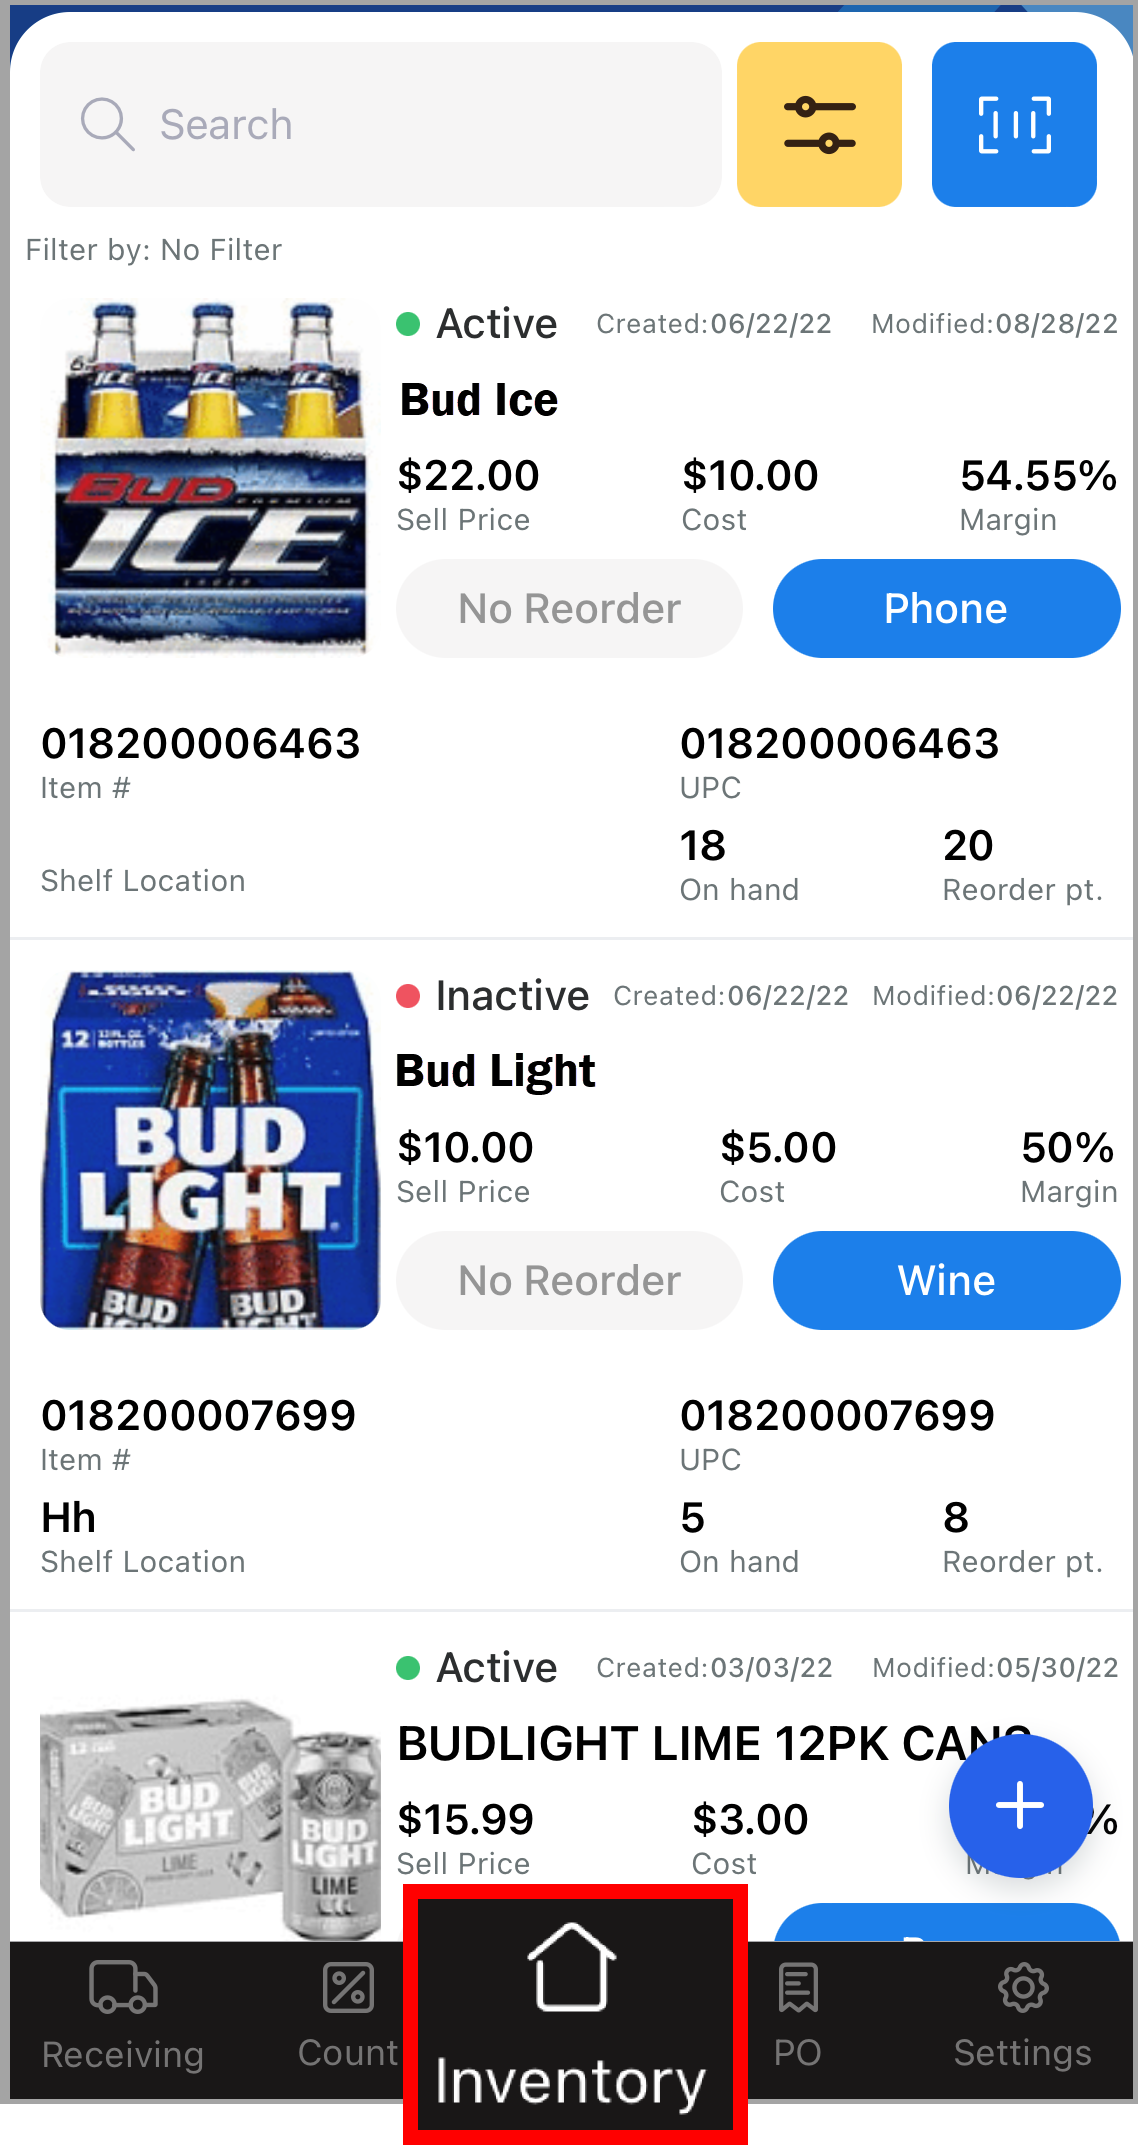
Inventory Descriptions
The following fields display on the Item Details page when adding inventory information:
| Field | Description |
|---|---|
| Item Name | The name of the item |
| Item # | The vendor’s part number or item number |
| UPC | The UPC number of an items |
| Shelf Location | The Location of the Item |
| Sell by Weight? | Whether the item is sold by weight. Default: No. |
| Weight Value | The measurement of the item being sold based on its weight. Selectable options include Ounces and Lbs. NOTE: This field only displays when the Sell by Weight? dropdown is set to Yes. |
| On Hand Quantity | The amount, in units, of the item in stock |
| Reorder Point | The amount, in units, the On Hand Quantity reaches to denote when it is time to reorder more of the item |
| Reorder Quantity | The amount, in units, the app reorders when the On Hand Quantity value is reached |
| Sell Price | The price per unit of the item |
| Cost | The cost per unit the merchant pays when ordering the item |
| Tax Code | The tax code of the item, if applicable |
| Category | The category of the item |
| Subcategory | The subcategory of the item |
| Vendor | The name of the vendor |
| Measurement Unit | The method in which the item is measured, such as by volume, weight, time, or packaging (i.e., Gallons, Grams, Minutes, Carton, Case, etc.) |
| Unit Size | the value of the Measurement Unit |
| Age Restriction | Determines whether to set an age restriction. Options include 18+, 21+, or None |
| EBT Eligible | Determines whether the item is EBT eligible. Options include Yes or No |
| Product Description | The description of the EBT eligible item |
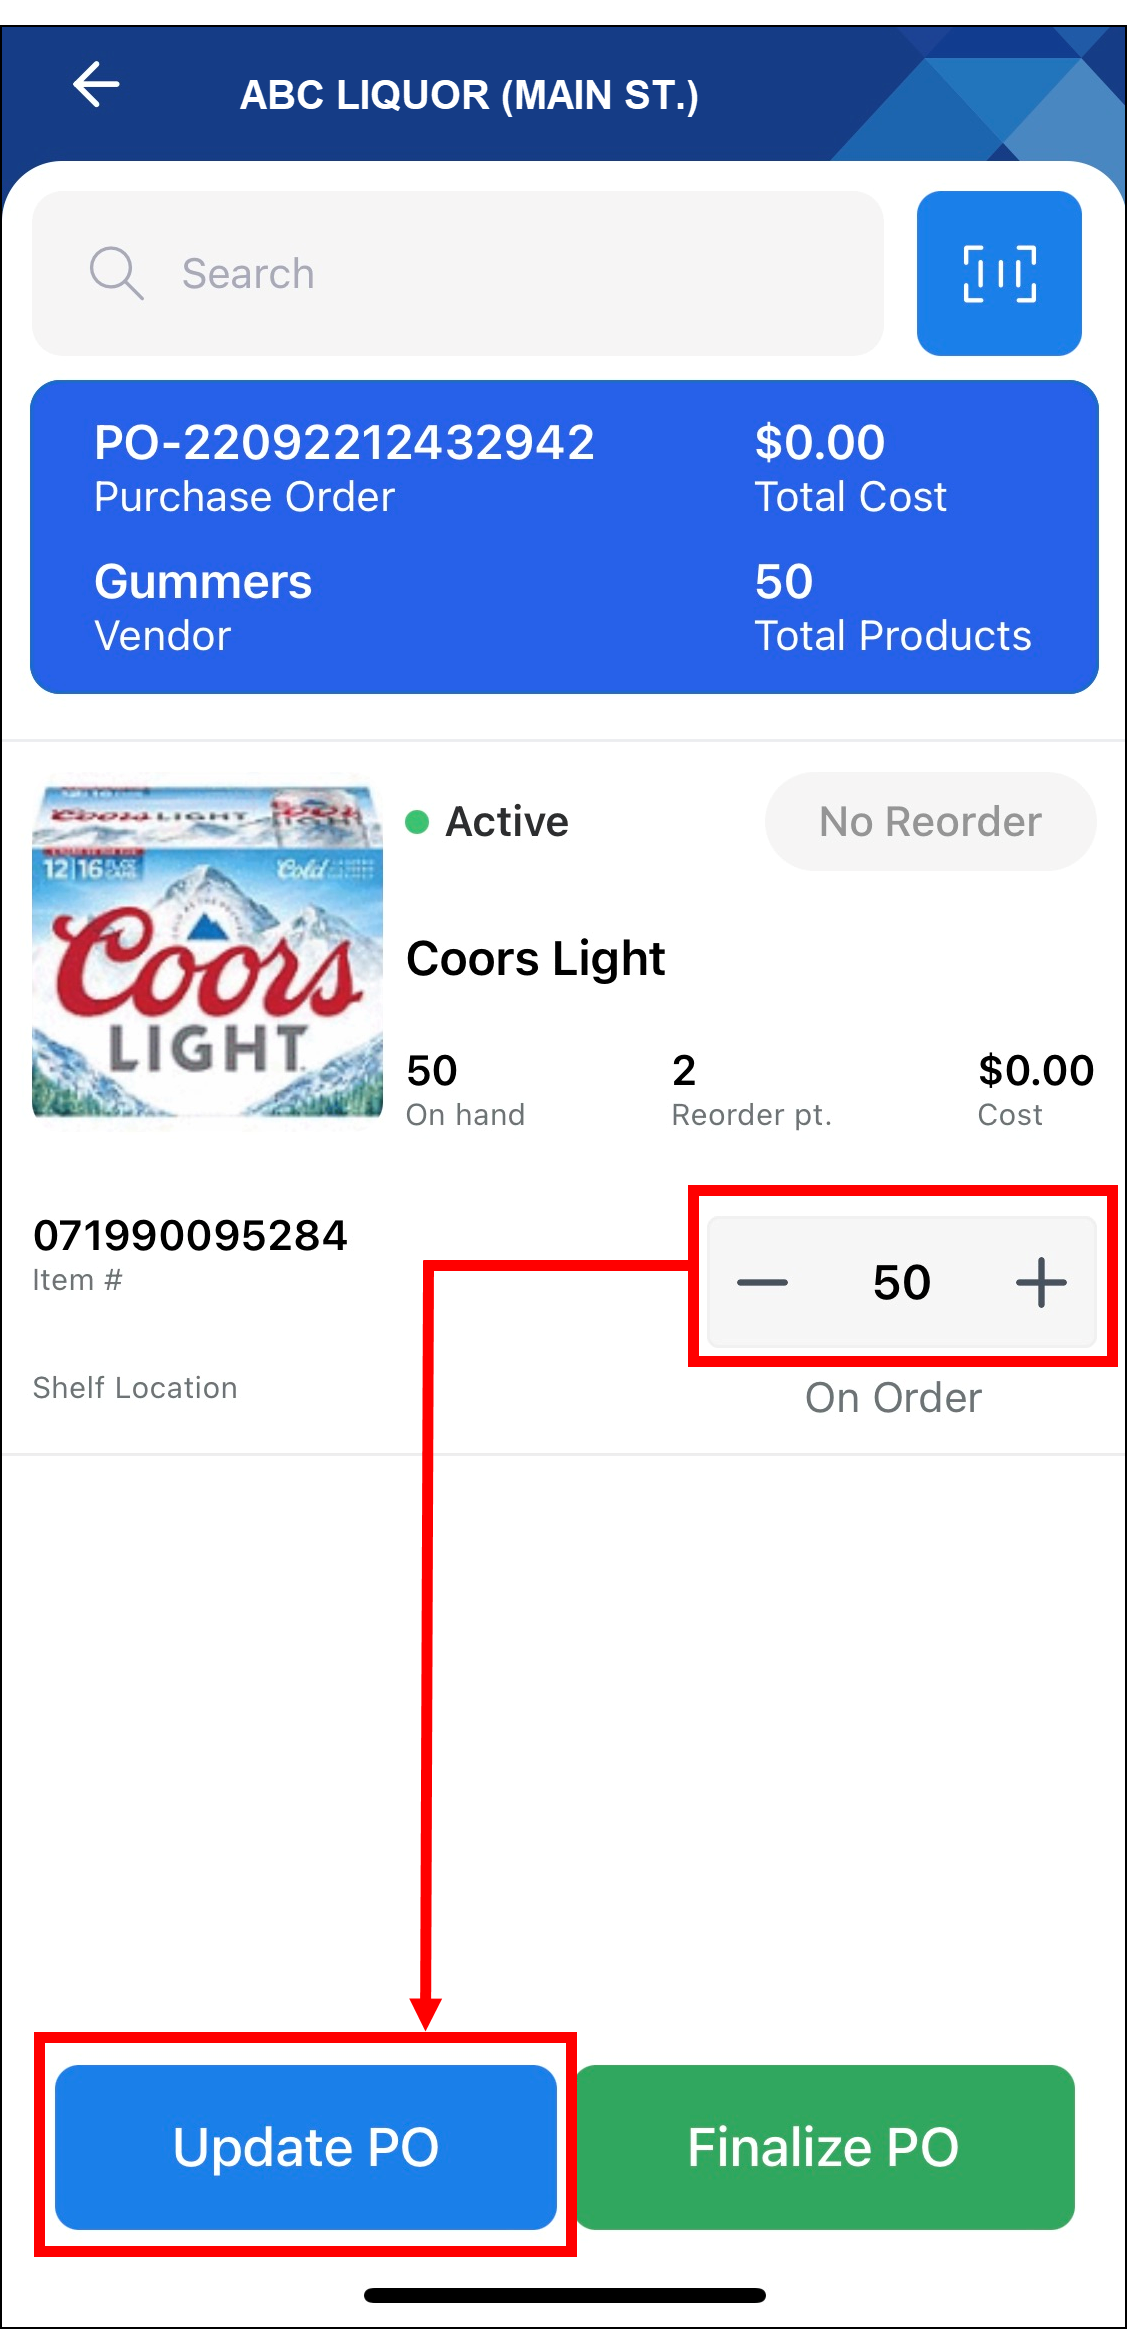
PO Tab
Use the PO tab to view and/or update in progress purchase orders. Merchants can add, subtract, or change the quantity of items.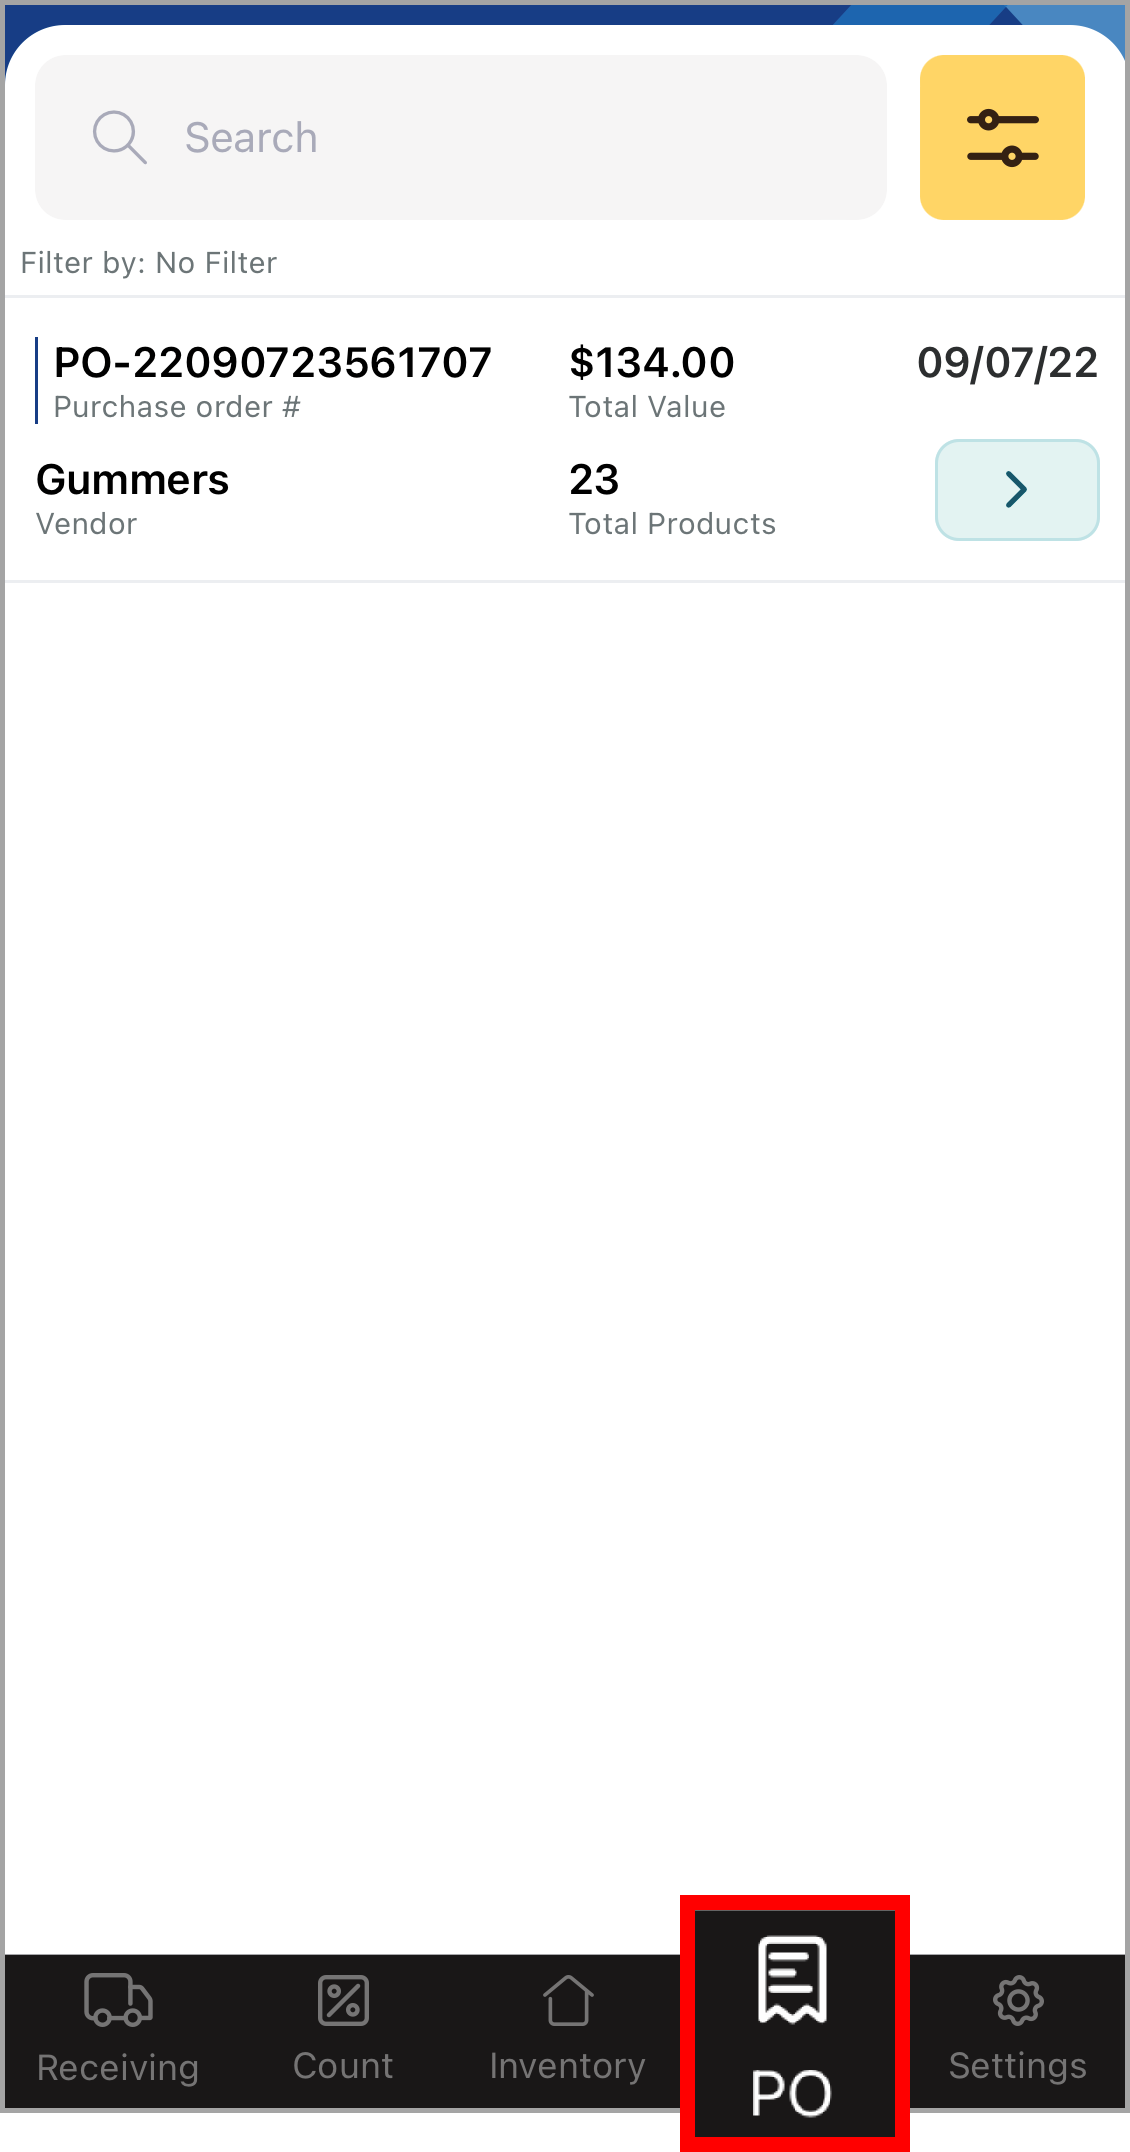
Select the PO tab and perform the following, as needed:
- Search Field – Search among active purchase orders by key word or phrase.
- Filter Button Tap to sort or apply filters to active purchase orders.
- POs – Tap an active purchase order to review and/or update the PO.
- Barcode Scanner – Tap to search for items within the active PO.
- Update PO – Tap after making any changes to items in the PO.
- Finalize PO – Tap to finalize the PO, sending it to the Receiving tab.
Settings Tab
The Settings tab allows merchants to review recent activity, consult app documentation, or log out.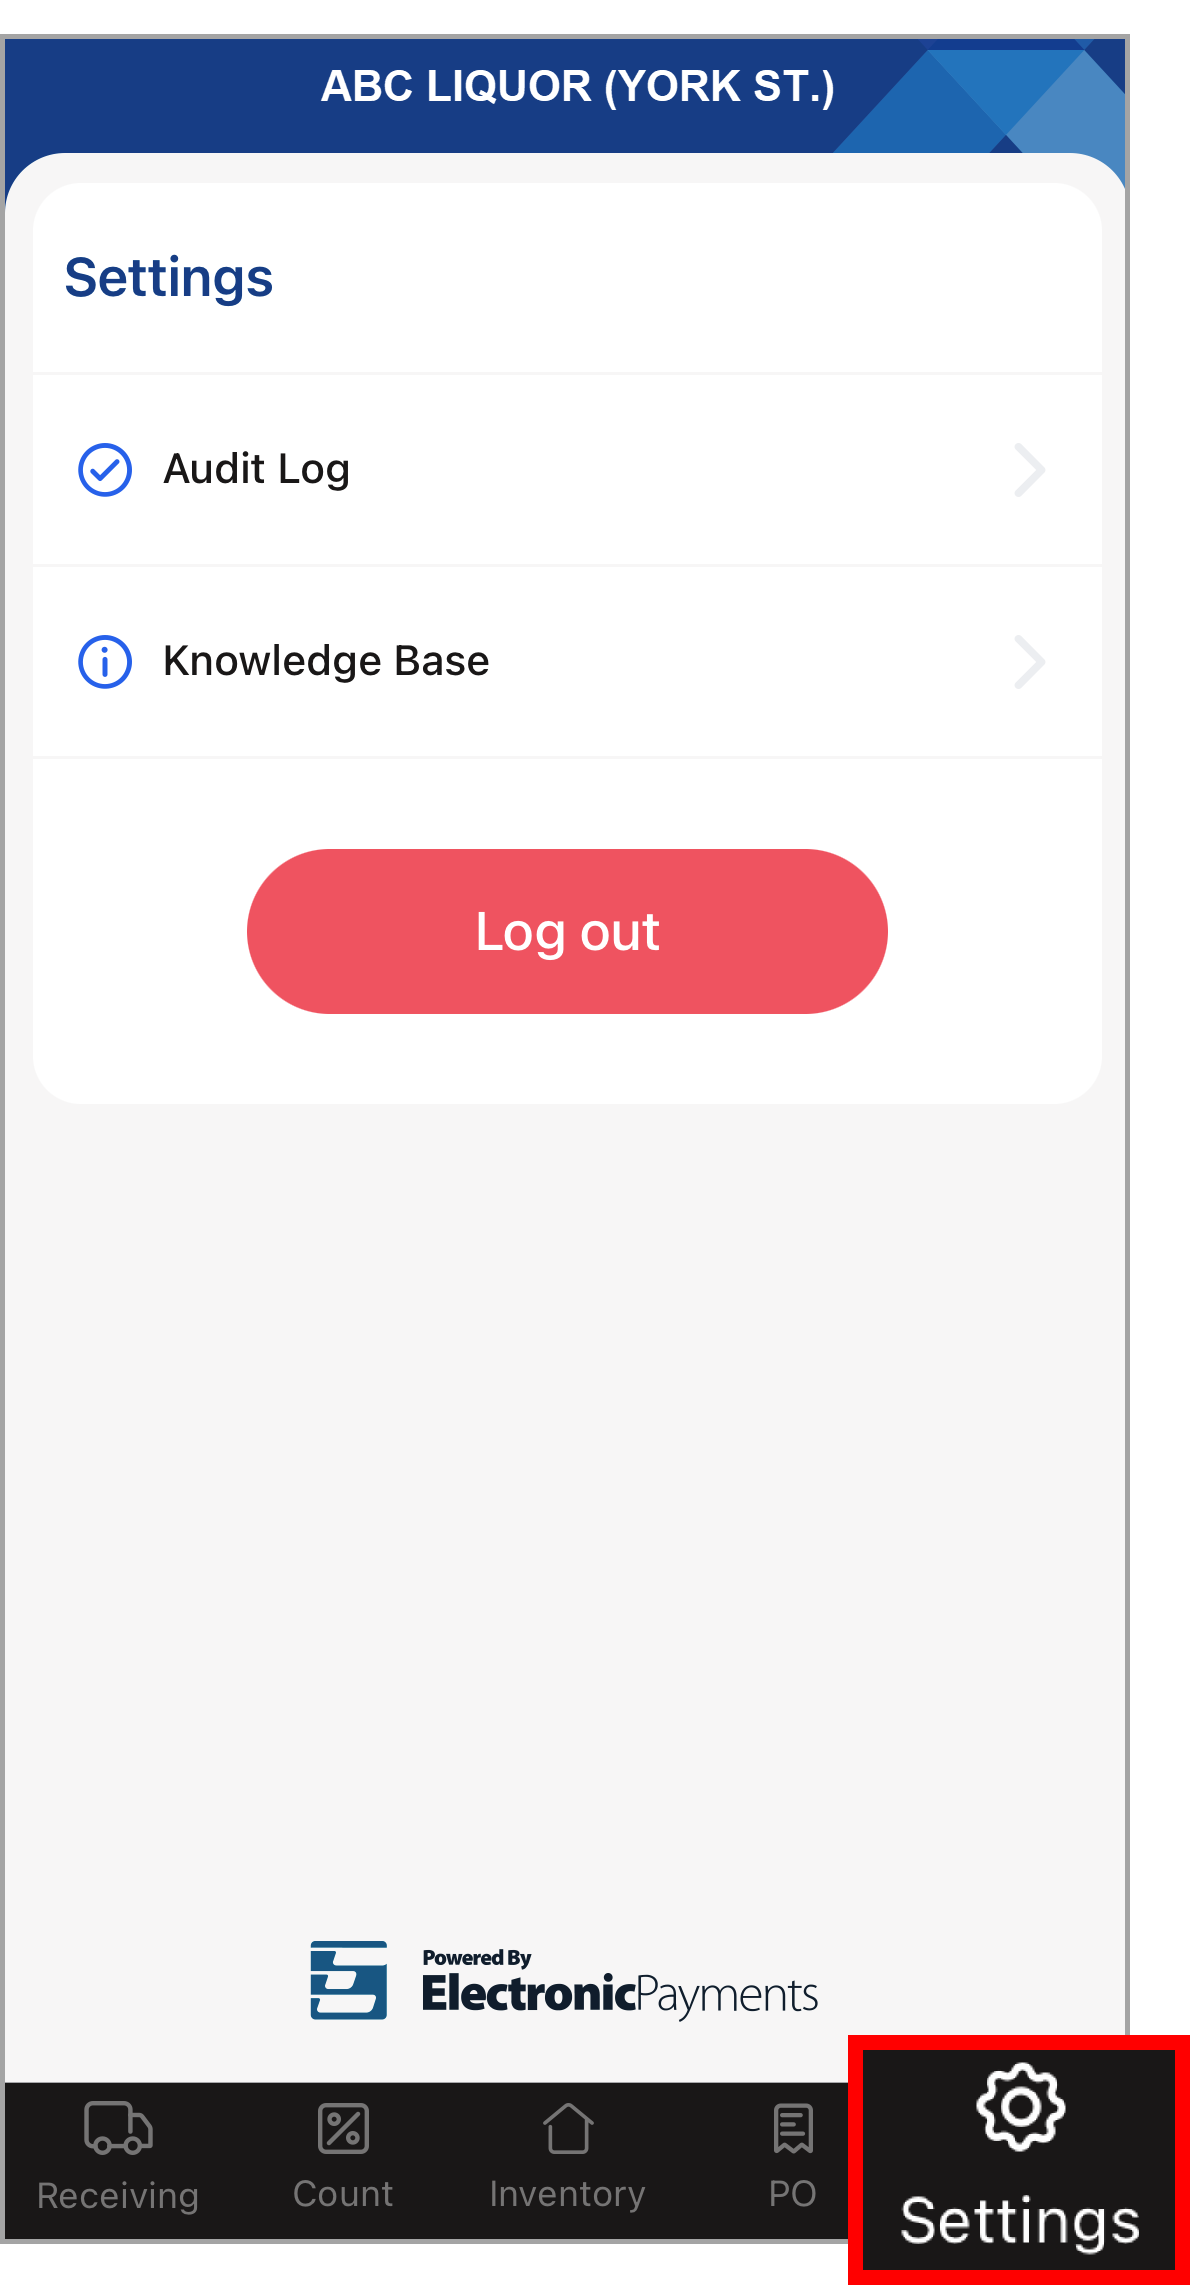
Select the Settings tab to perform the following, as needed:
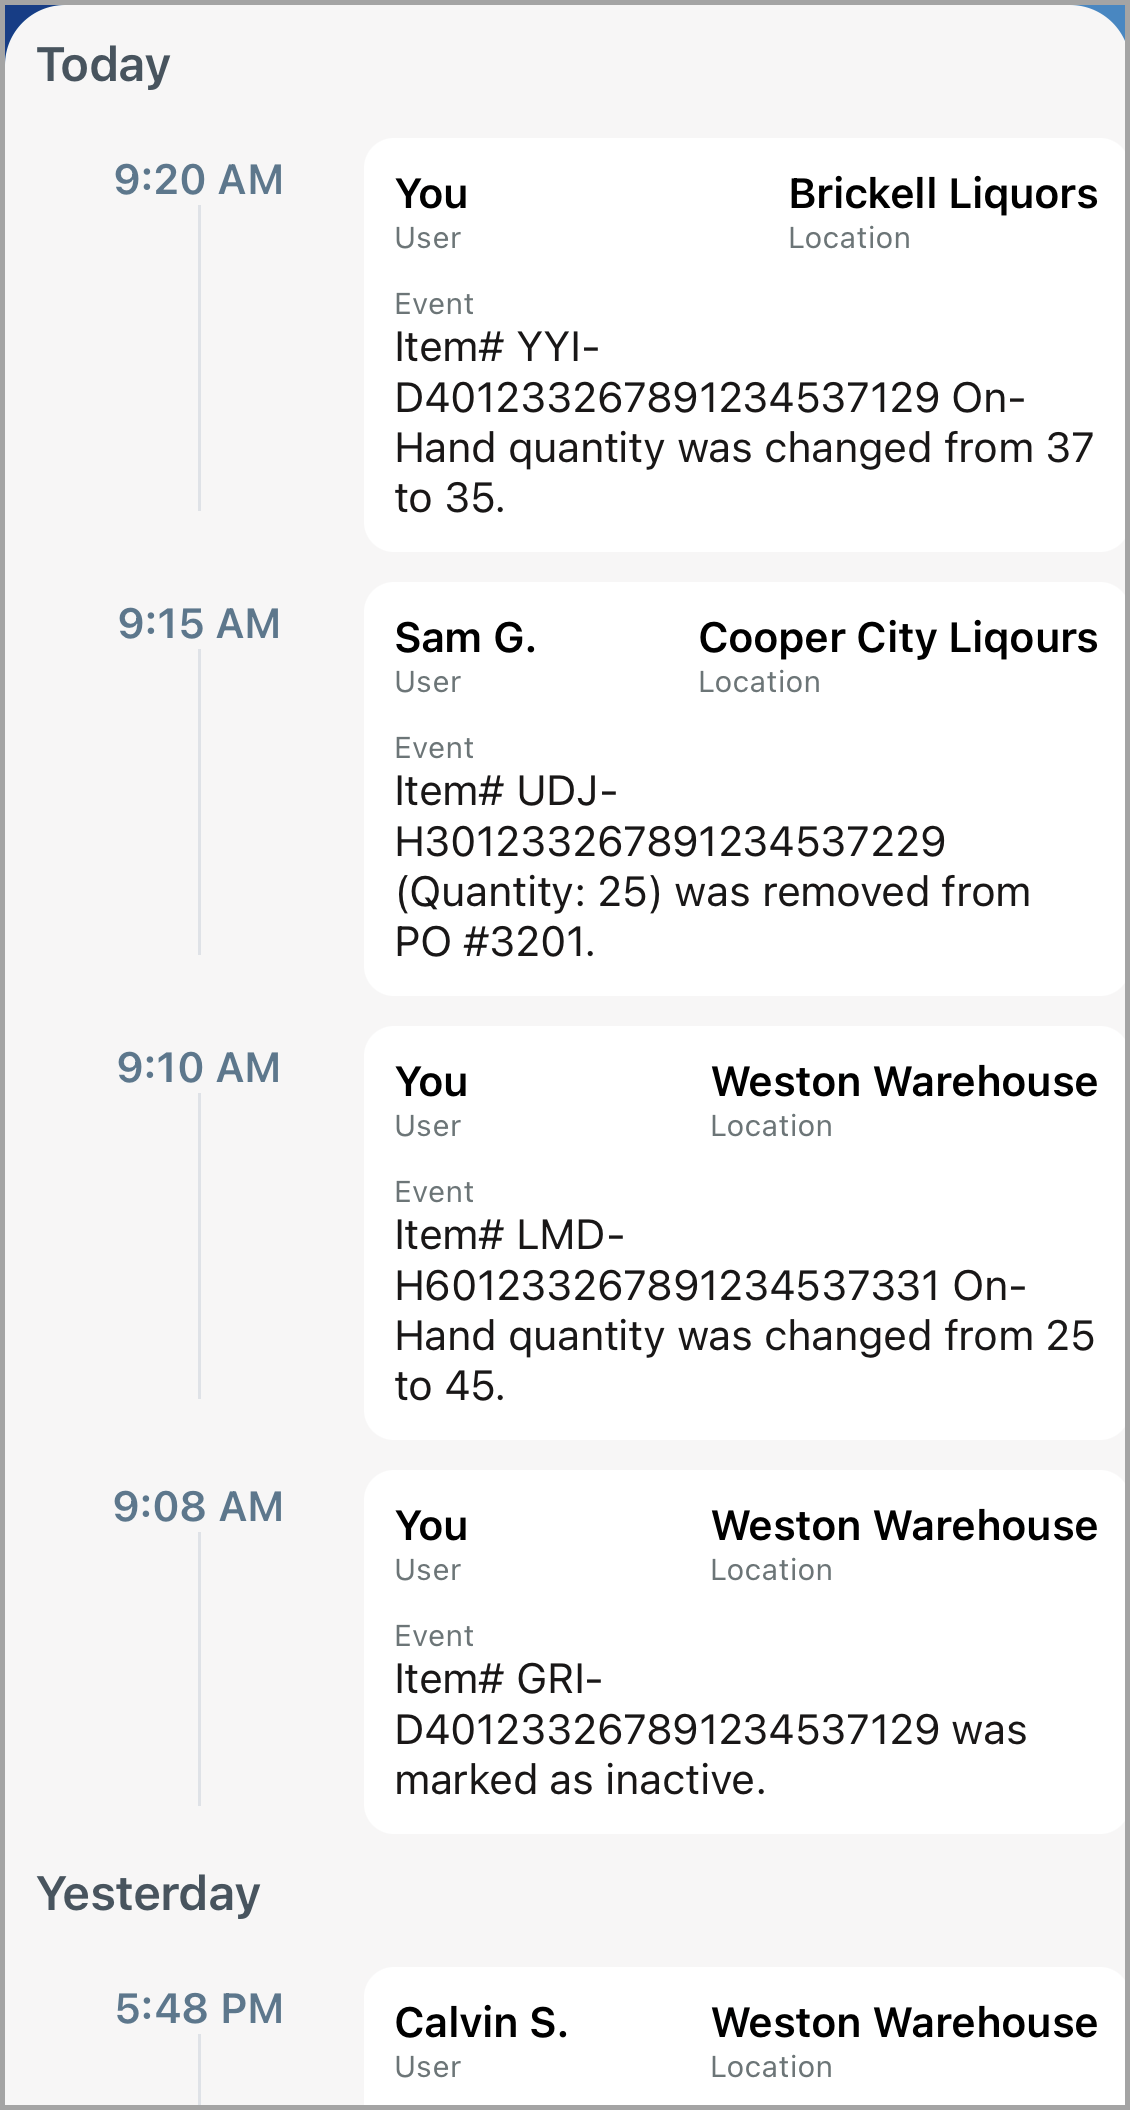
- Audit Log – Tap to review a detailed log of recent app activity.
- Knowledge Base – Tap to review app documentation and help procedures.
- Log out – Tap to log out of the app.
Adding Items to Inventory
- Select the Inventory tab. The Inventory page displays.
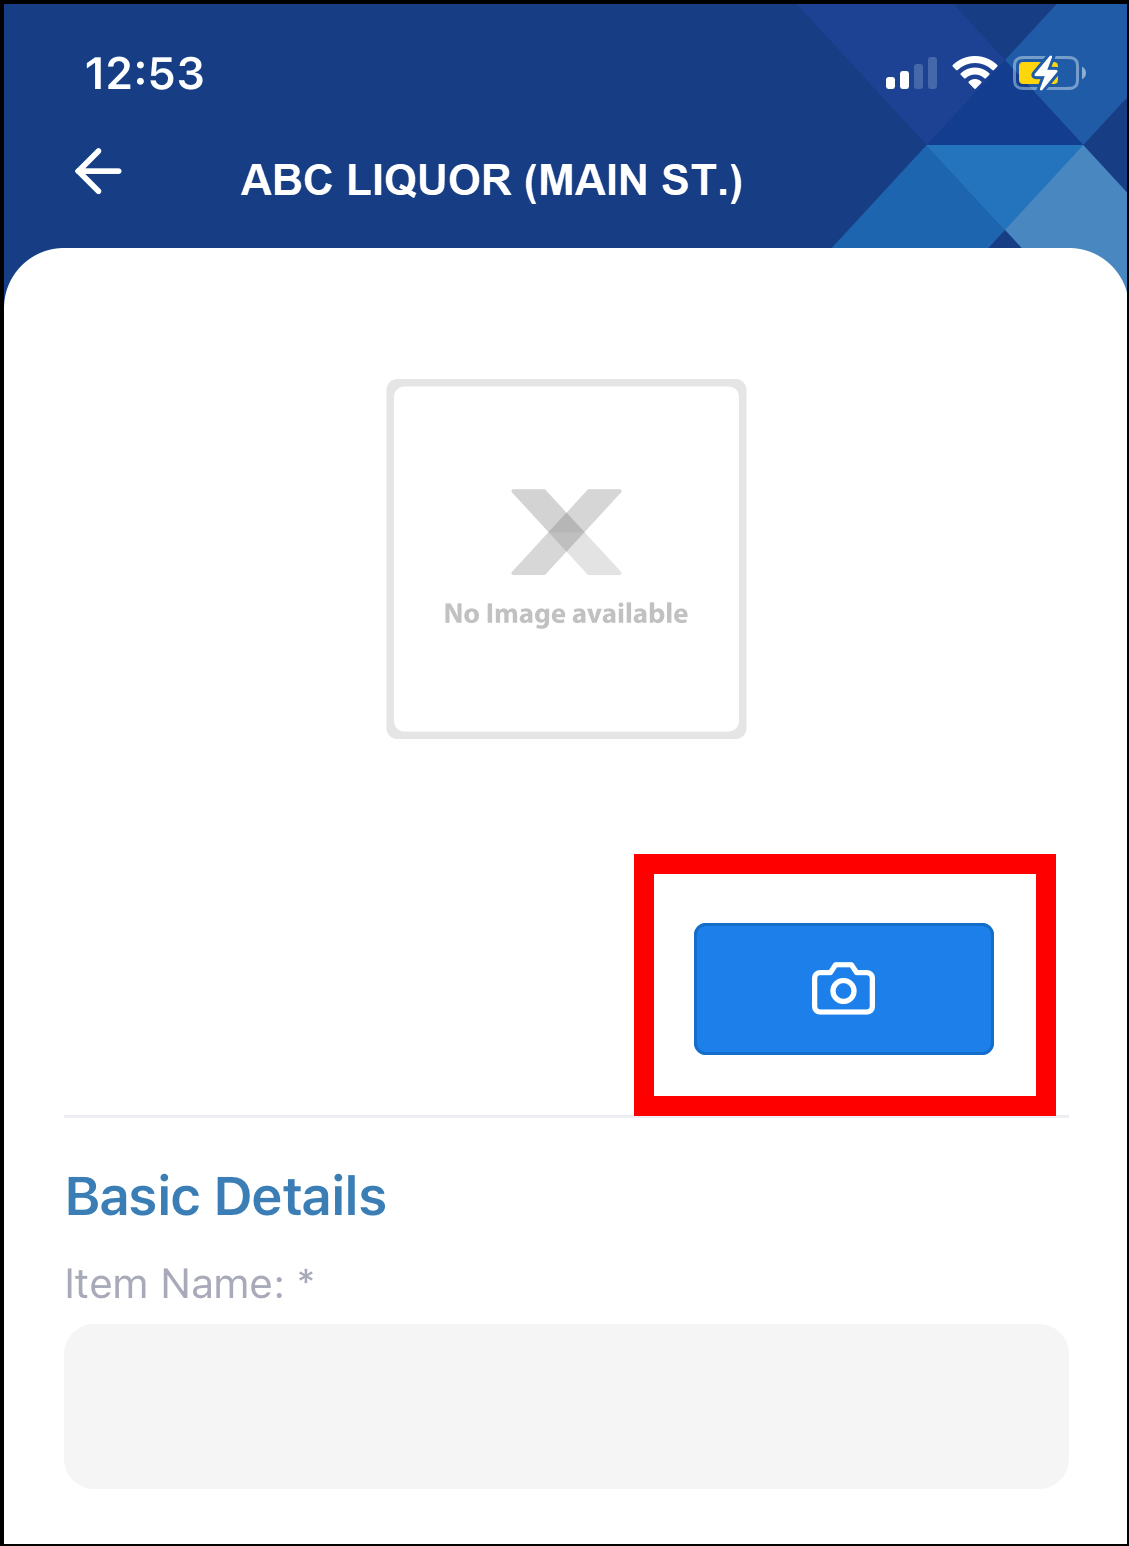
- Tap the blue Add Item button at the lower right of the screen. The Add Item screen displays.
- Tap the Camera button to take a picture of the item (optional) or scan a barcode.
- In the Basic Details section, complete the following fields.
- Item Name – Enter the name of the item.
- Item # – Enter the SKU number.
- UPC – Enter the UPC number.
- Shelf Location – Enter the shelf location (optional).
- In the Quantity section, complete the following fields:
- Sell by Weight – In the dropdown, select whether the item is sold according to its weight.
- Weight Value – If the item is sold by weight, select Ounces or Lbs (pounds) to determine how the weighted item is measured.
- On Hand Quantity – Enter, in units, the number of items in stock.
- Reorder Point – Enter the quantity an item must reach before the app alerts the merchant when to order more of the item.
- Sell Price – Enter the price per unit.
- Cost – Enter the item’s cost.
- In the Properties section, complete the following fields:
- Tax Code – Enter the tax code (optional).
- Category – Enter a subcategory for the item.
- Subcategory – Enter a subcategory for the item.
- Vendor – Enter the name of the vendor. If there is no vendor, enter No Vendor.
- Measurement Unit – Select the unit of measurement from the dropdown.
- Unit Size – Enter the size of the item.
- In the Age Restriction section, select an age restriction limit.
- In the EBT Eligible section, complete the following fields:
- EBT Eligible – From the dropdown, select whether the item is EBT eligible.
- Description – Enter a description of the EBT eligible item in the Description field.
- Tap Save Information.
Editing Items in Inventory
- Tap the Inventory tab.
- Select an item to edit.
- Tap Edit Information.
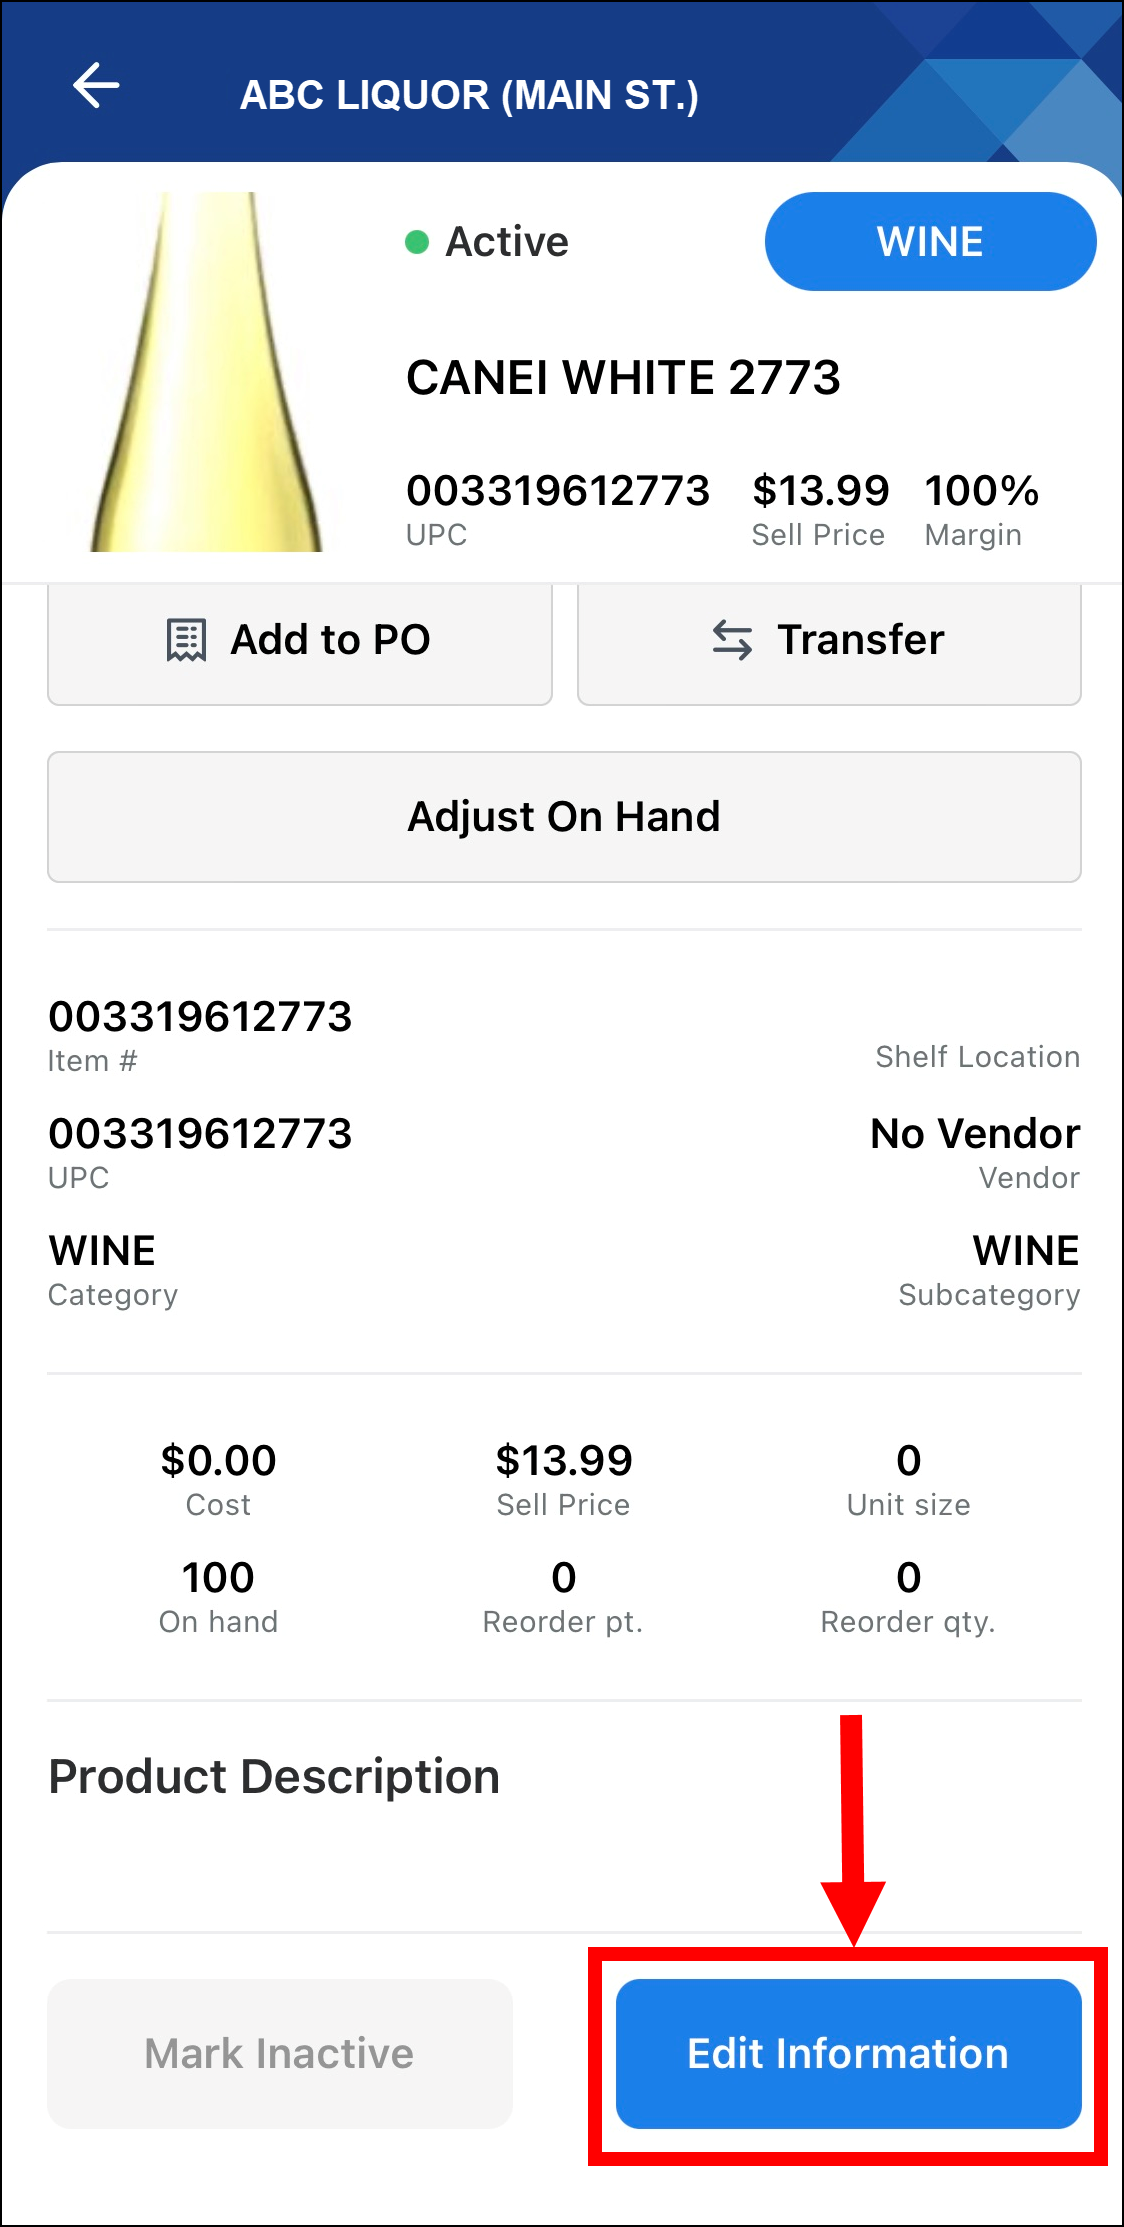
- Add or revise fields as desired, then tap Save Information.
Transferring Inventory to Another Location
Merchants can use the Inventory tab to transfer items from one location to another. This feature is useful for businesses with multiple addresses where one address is out of an item and the other address has a surplus. Merchants can transfer surplus items to the address where the item is out of stock.
- From the Welcome screen, select the Location that has a surplus amount of the items to transfer.
- Tap the Inventory tab.
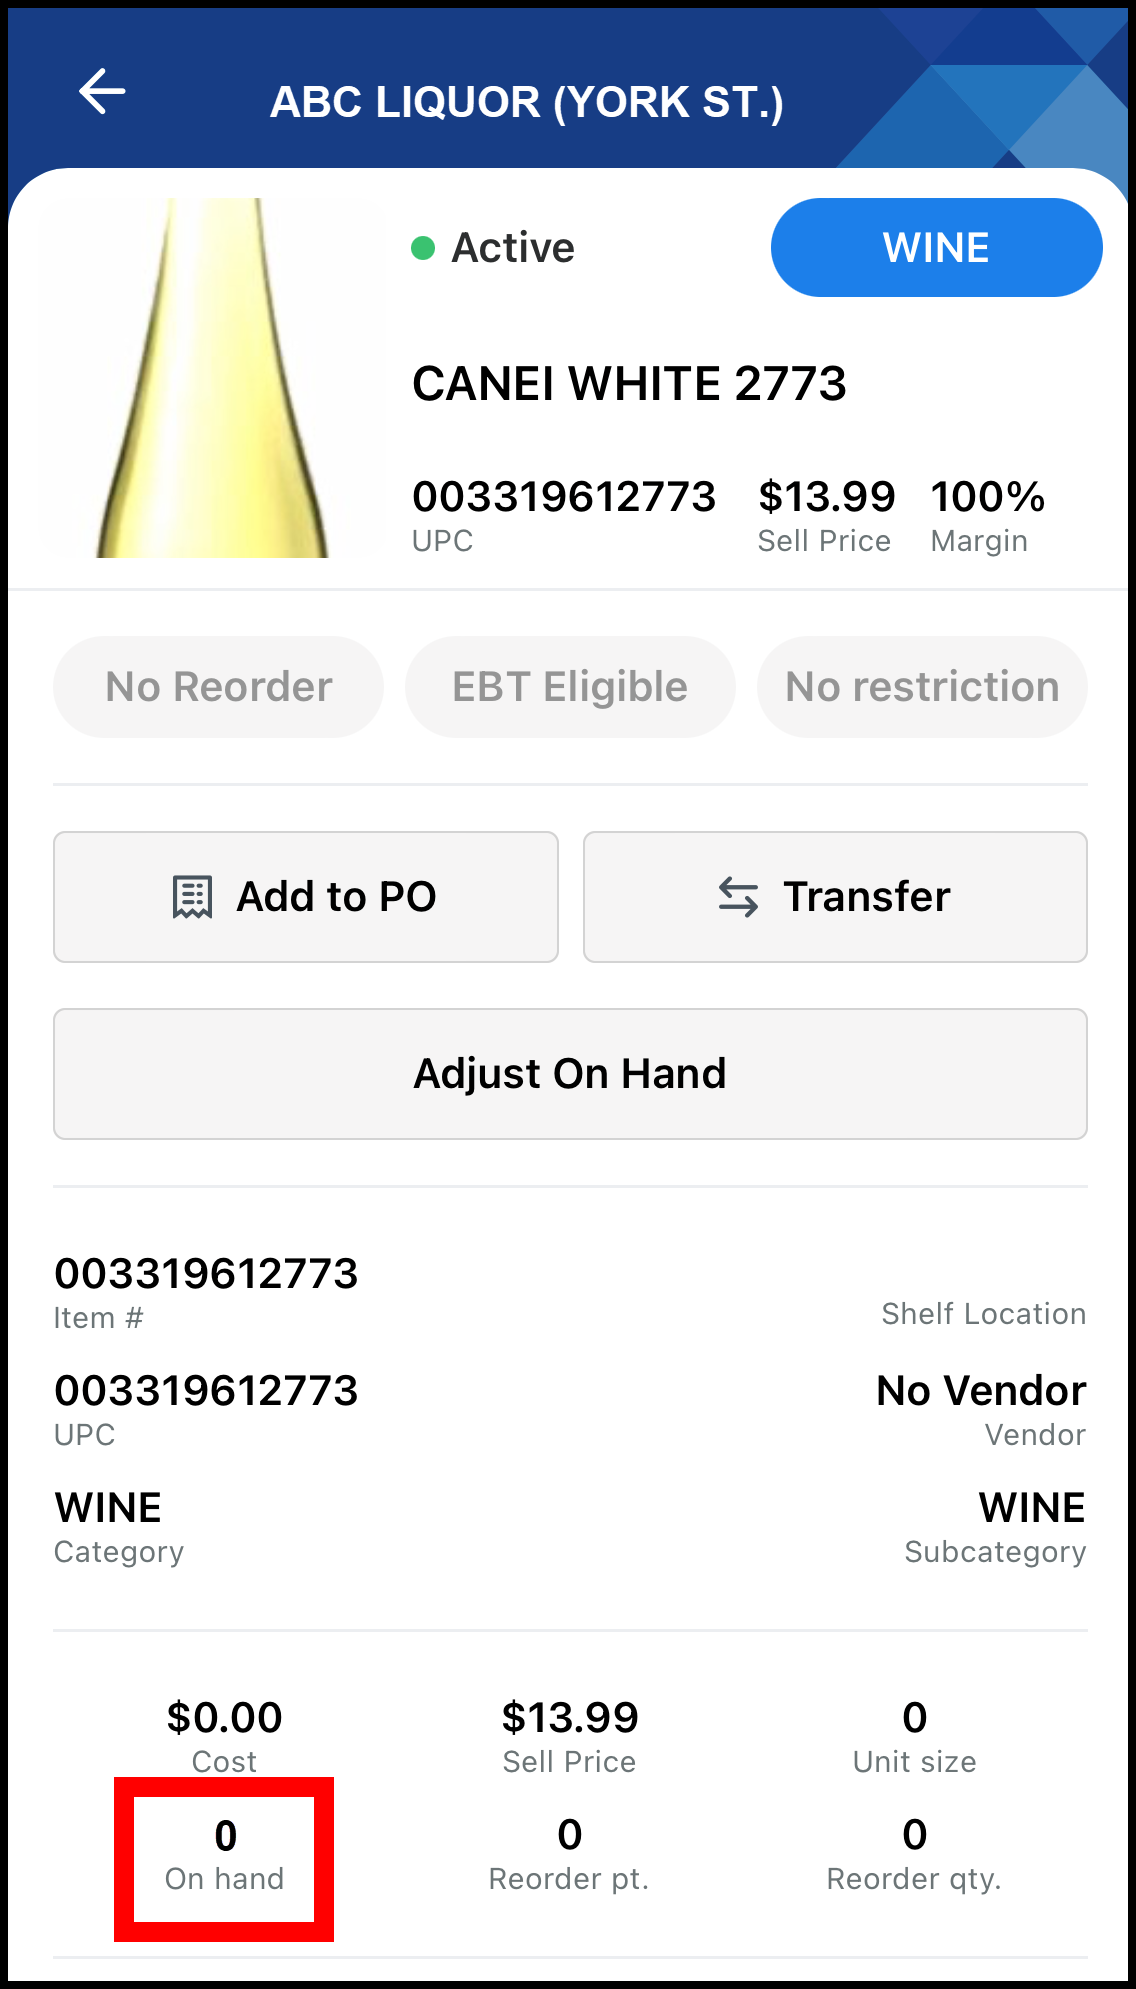
- Select an item to transfer. The Item Details screen displays.
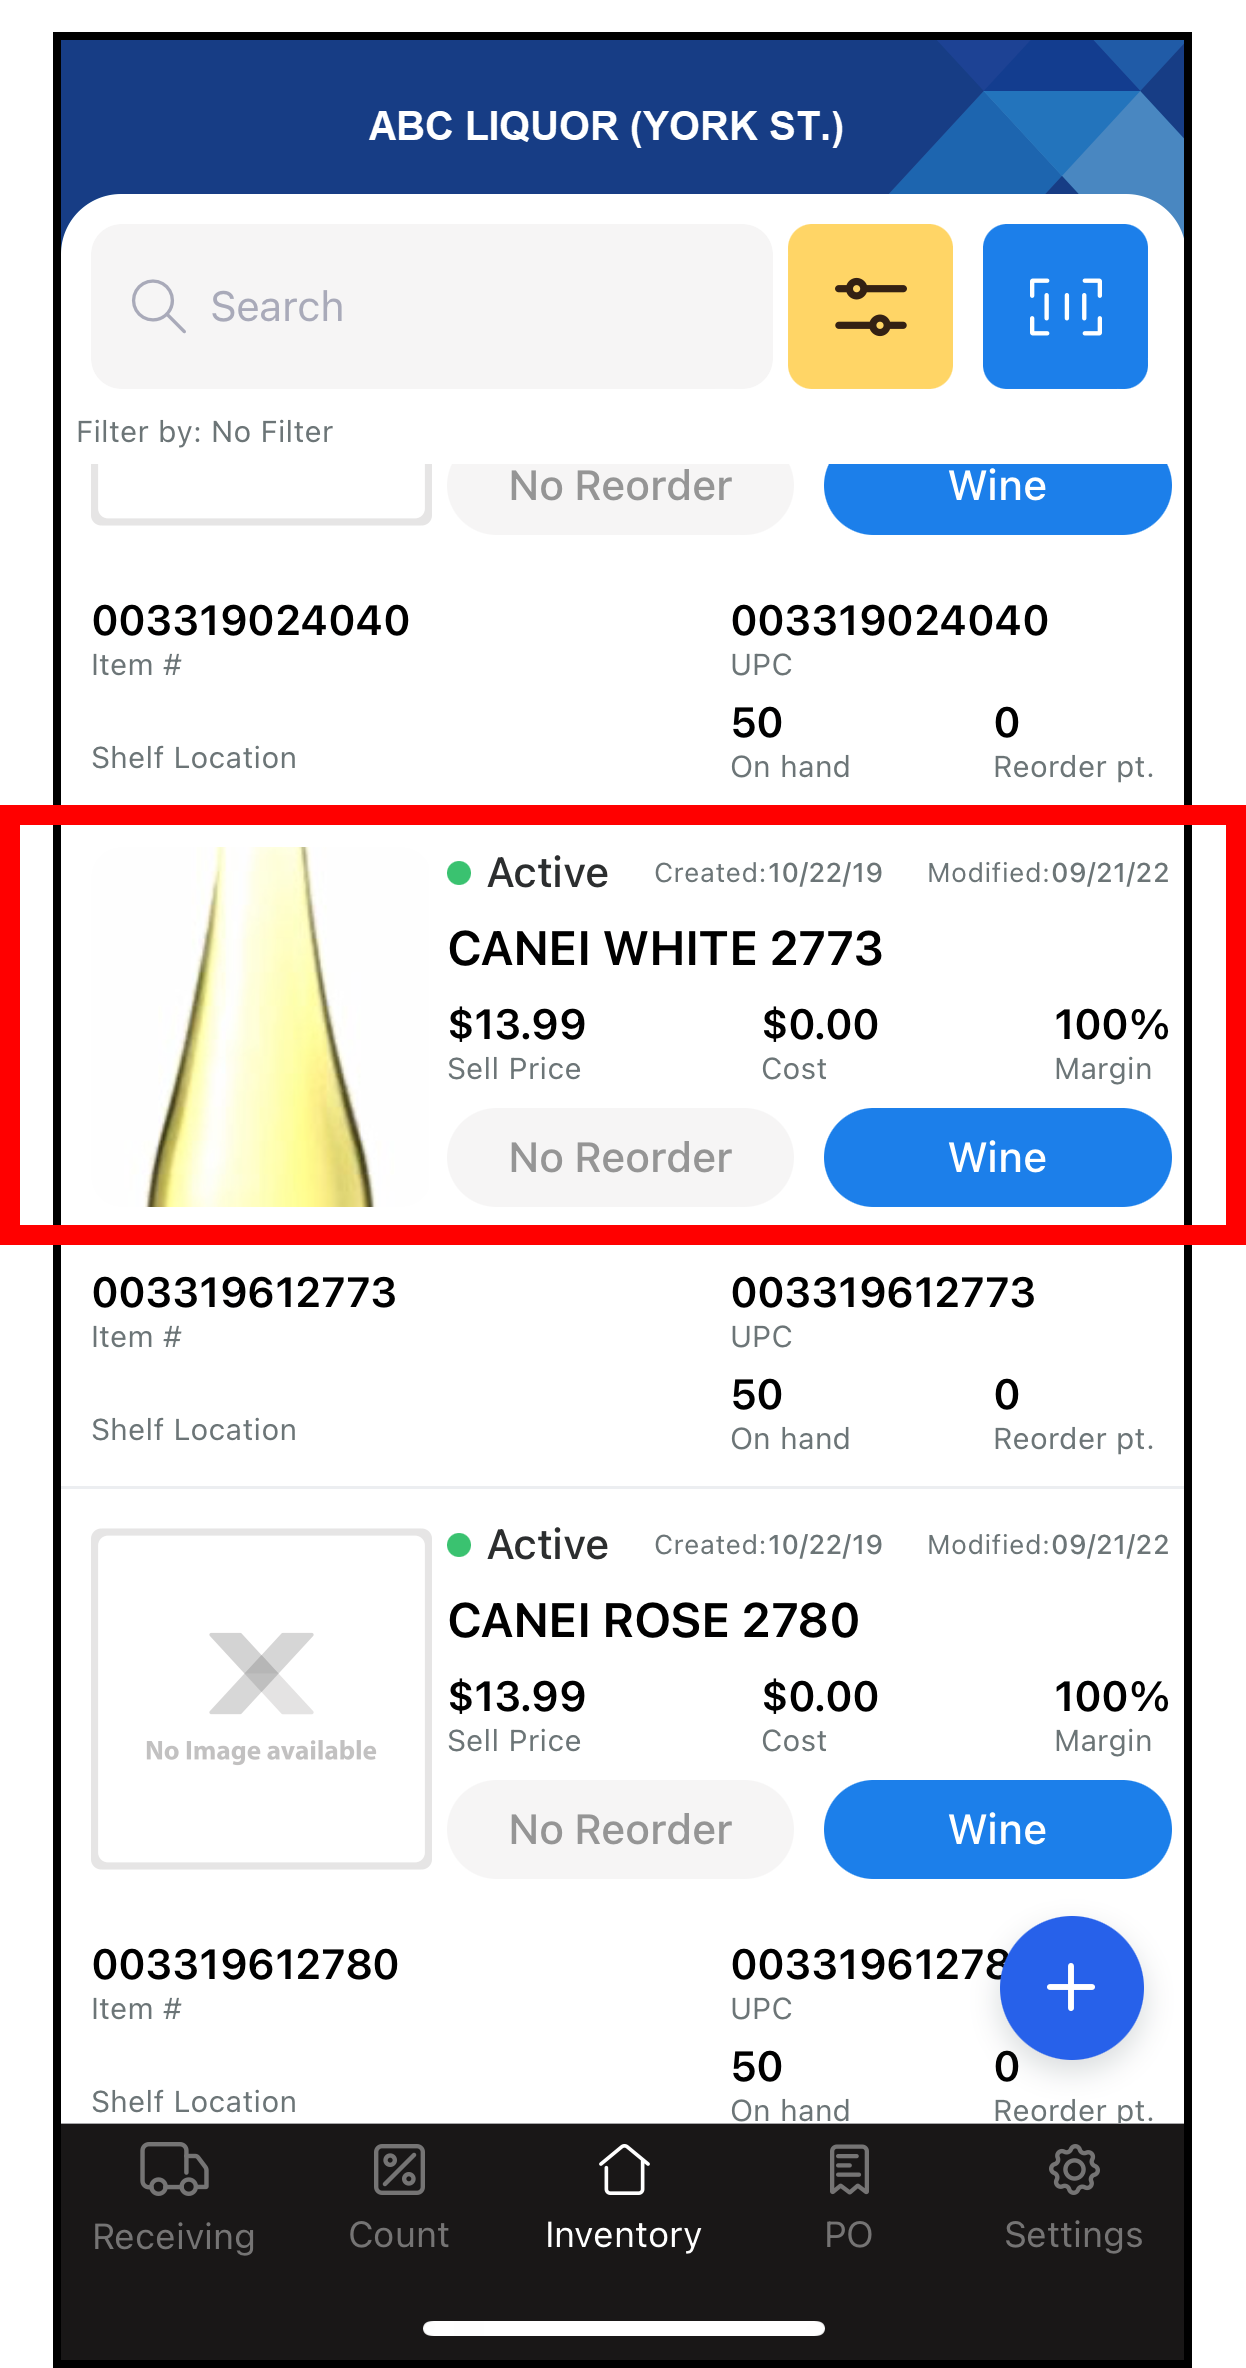
- Review the On hand value to verify that an adequate supply of the item exists.
- Tap the Transfer button.
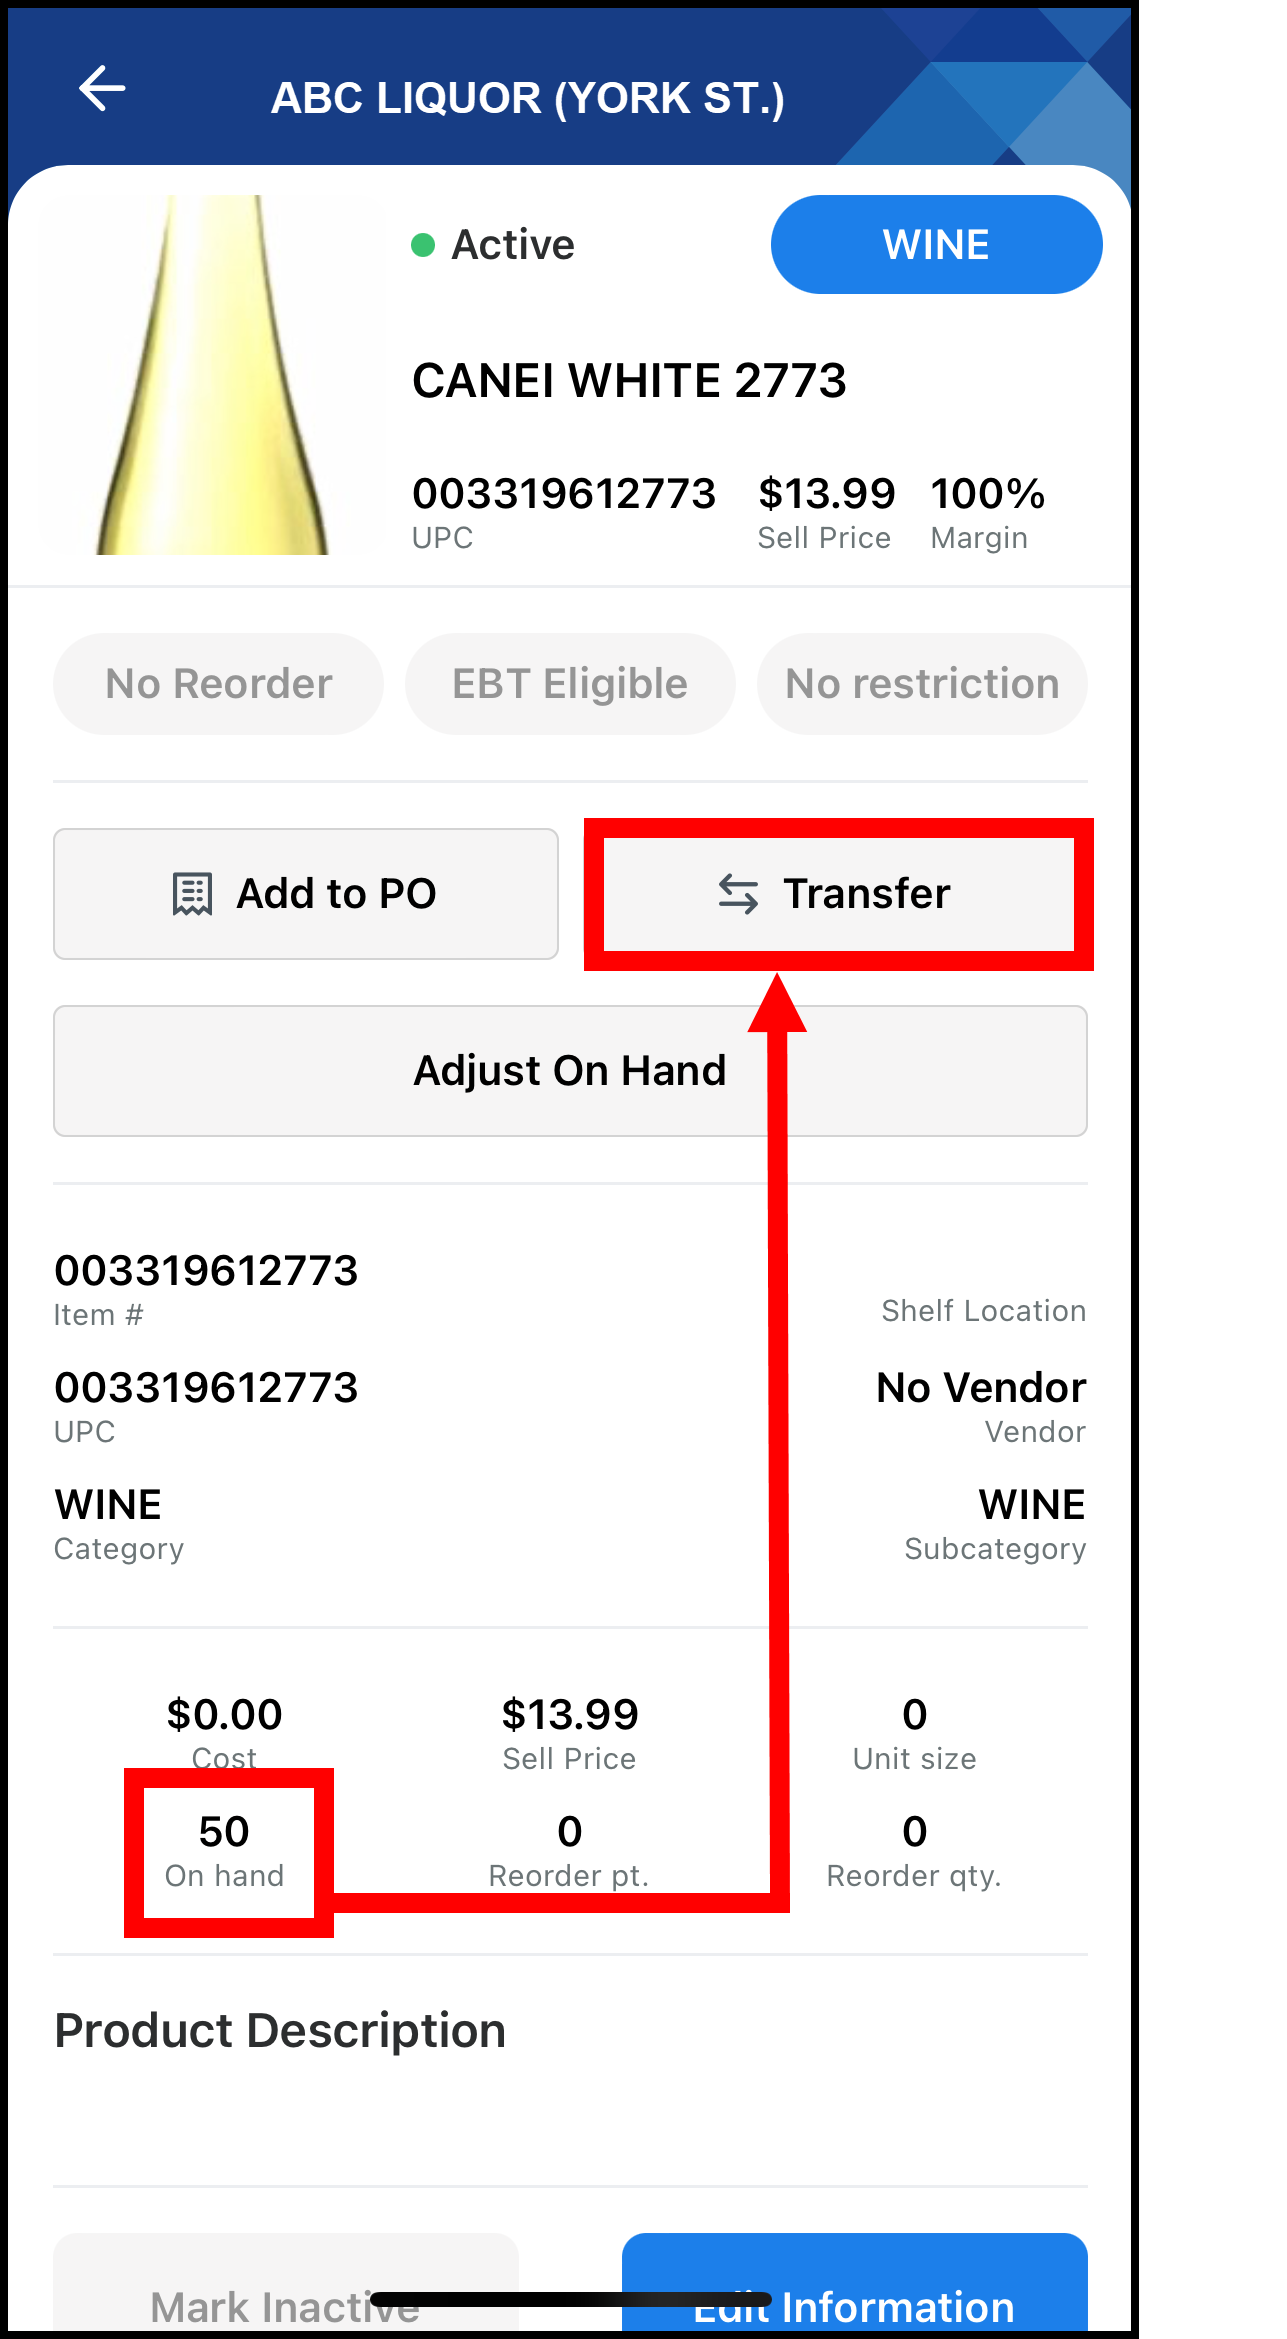
- On the Item Transfer page, in the From section, perform the following:
- From the dropdown, select the Location with the surplus of items.
- In the Amount field, enter an amount to transfer.
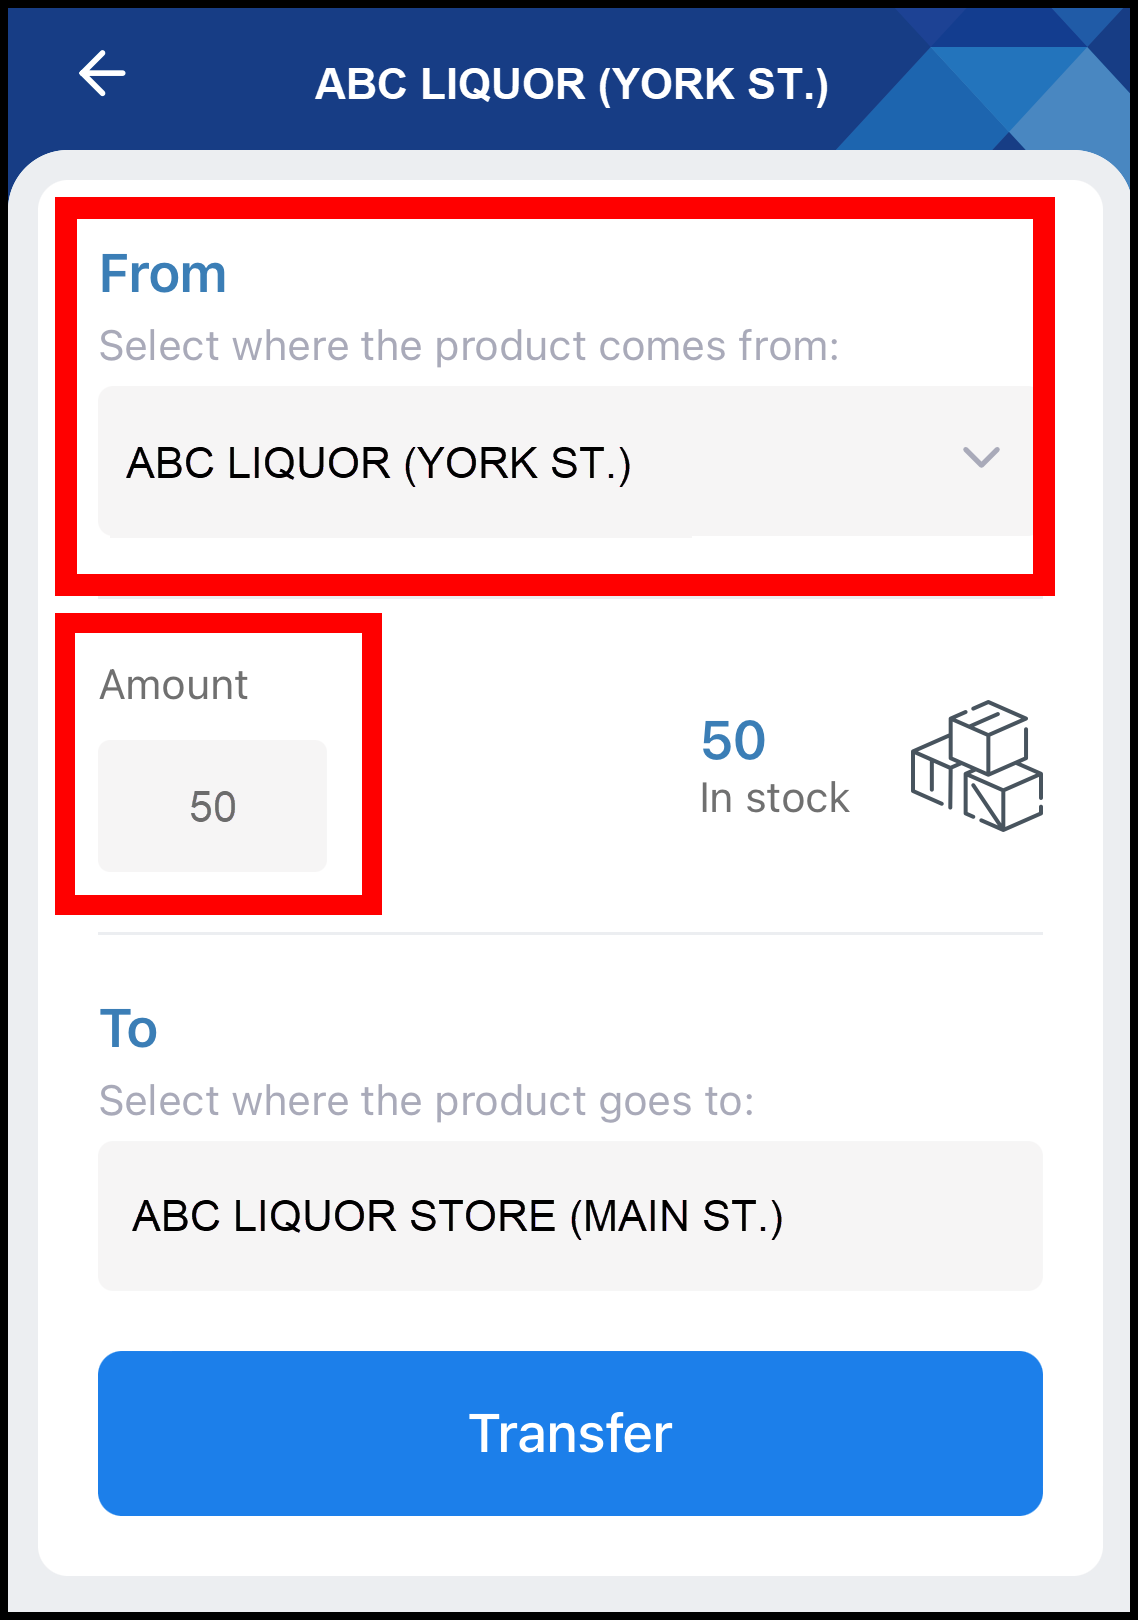
- In the To section, select the Location that will receive the items.
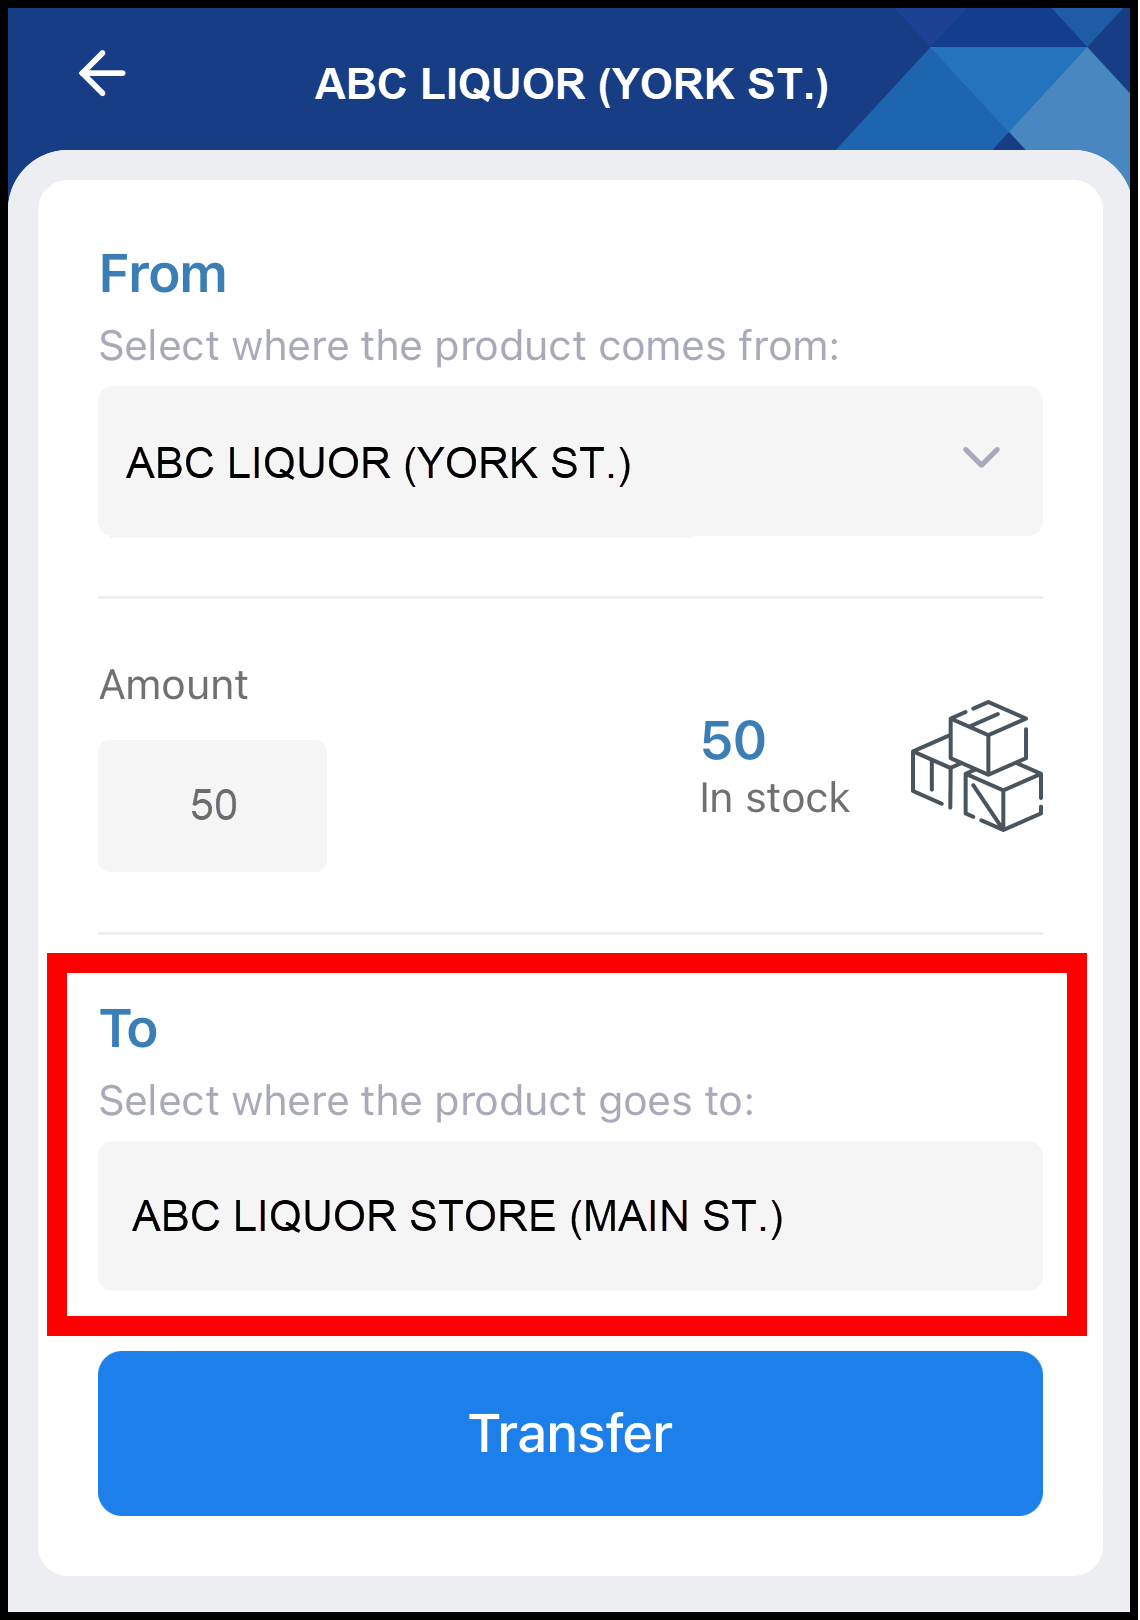
- Tap the Transfer button.
- Once the Transfer created success message displays, tap OK.
Verifying Inventory Transfers
After transferring inventory to another Location, perform the following to verify that the items transferred successfully.
- On the Item Details screen, verify the On hand value has deducted correctly.
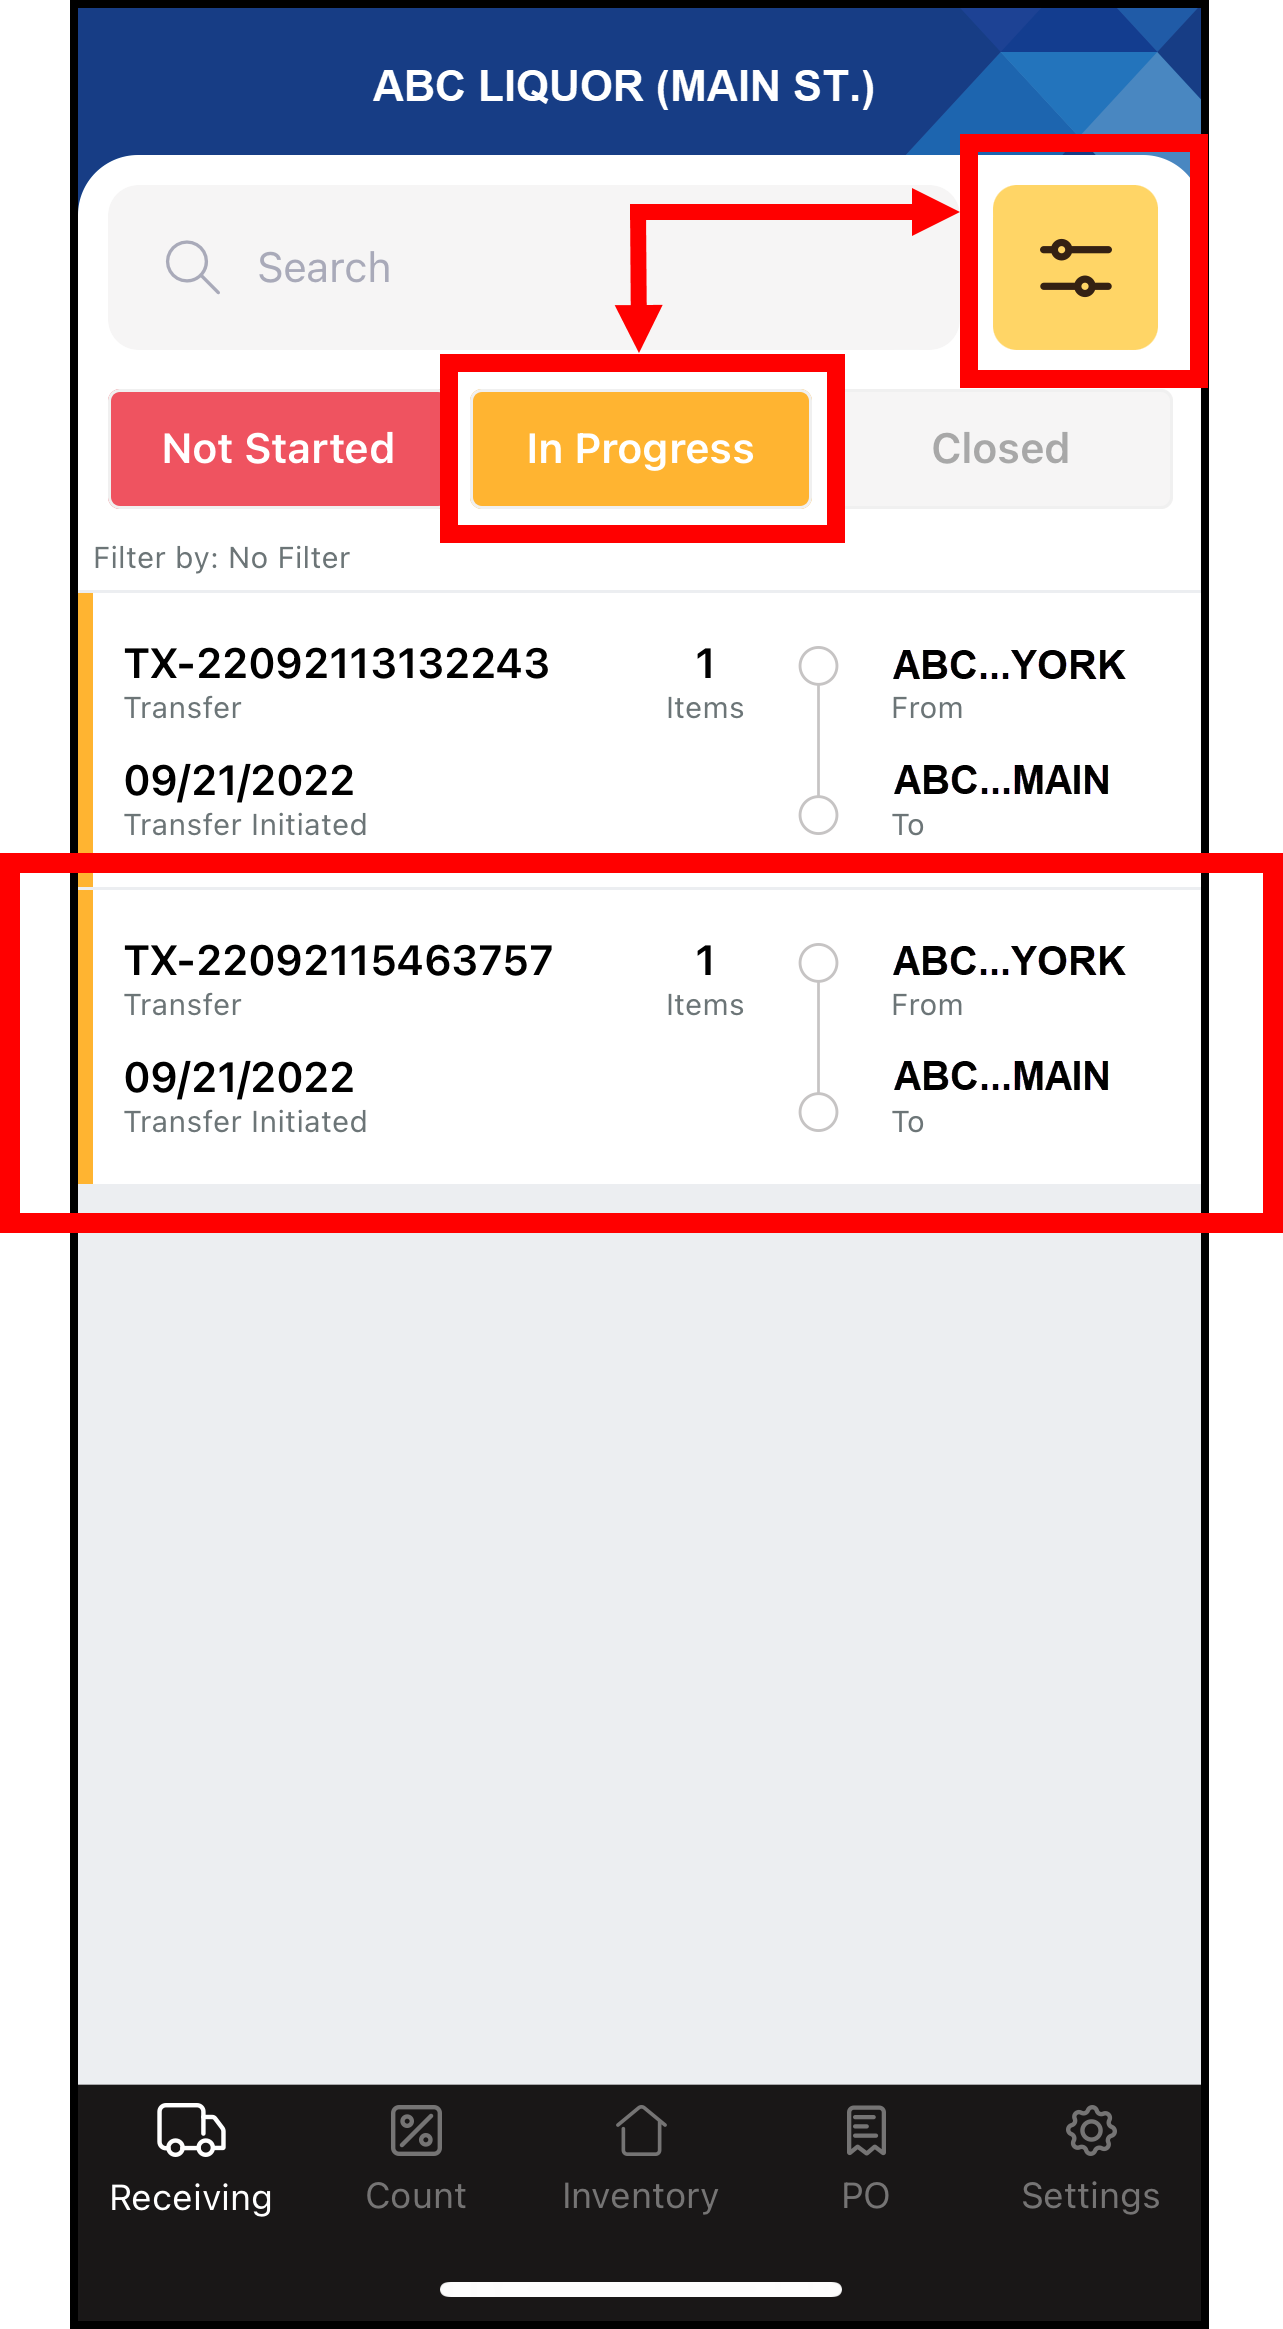
- Toggle to the Location that received the items you just transferred.
- From the bottom ribbon, tap the Receiving tab. The Receiving page displays.
- Select the transfer you initiated from the list of transfers and purchase orders. Use the Filter button or tap the In Progress button to narrow your search.
- Verify details of the transfer on the Purchase Order details page.
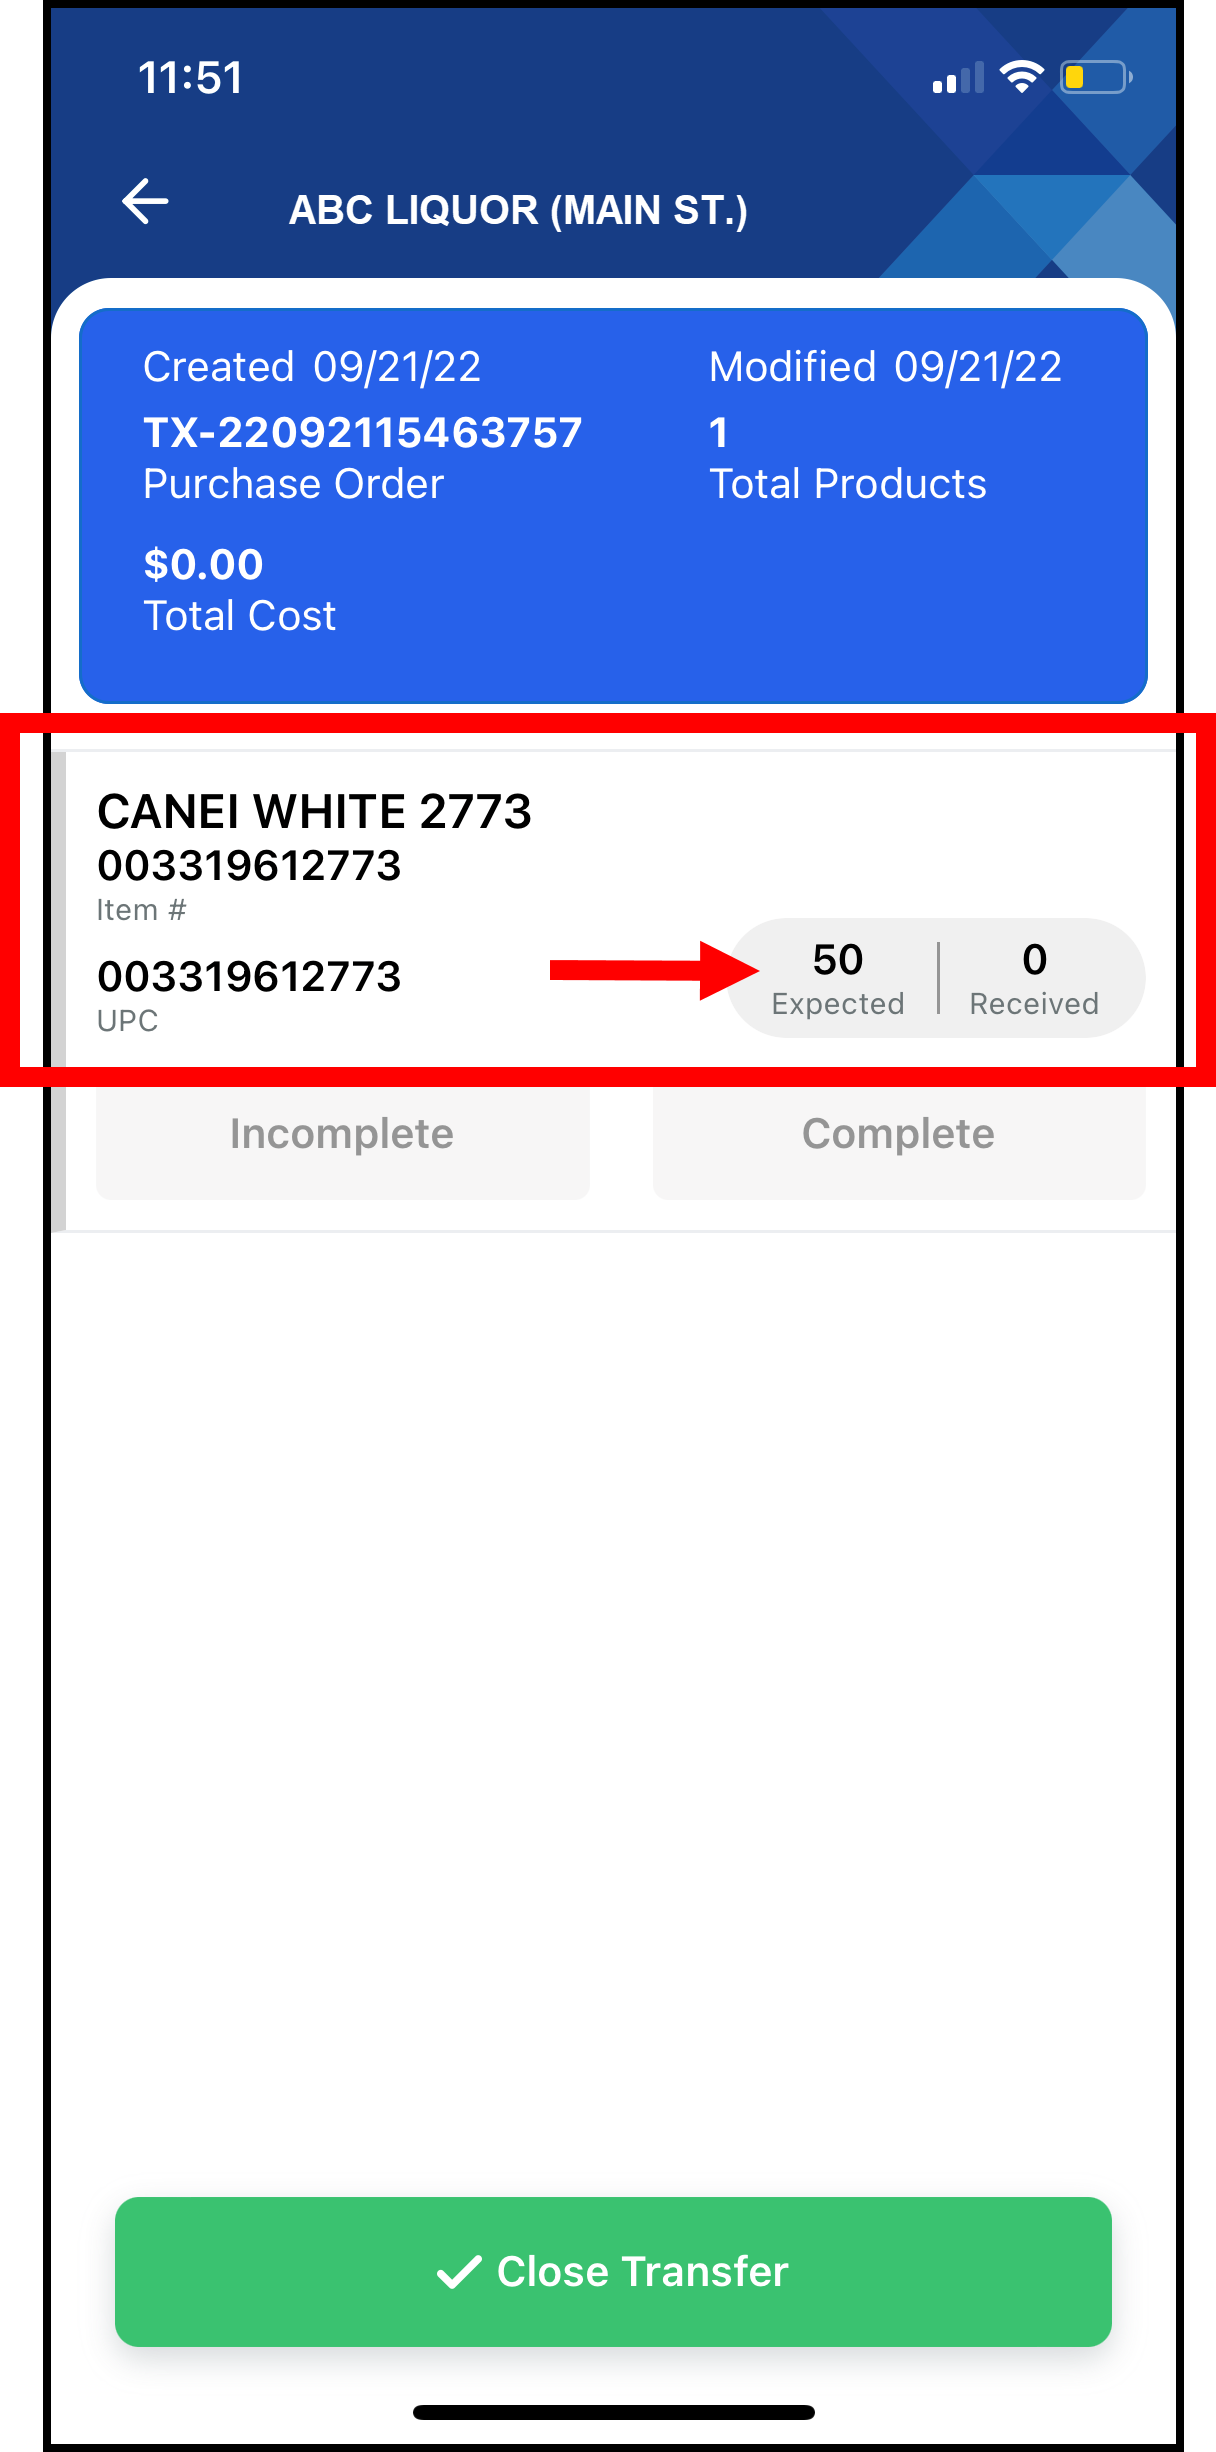
- Tap Complete, then tap Close Transfer.
- Tap Close on the popup to finalize the transfer. A Transfer Closed message displays, indicating a successful transfer.

- Tap OK.
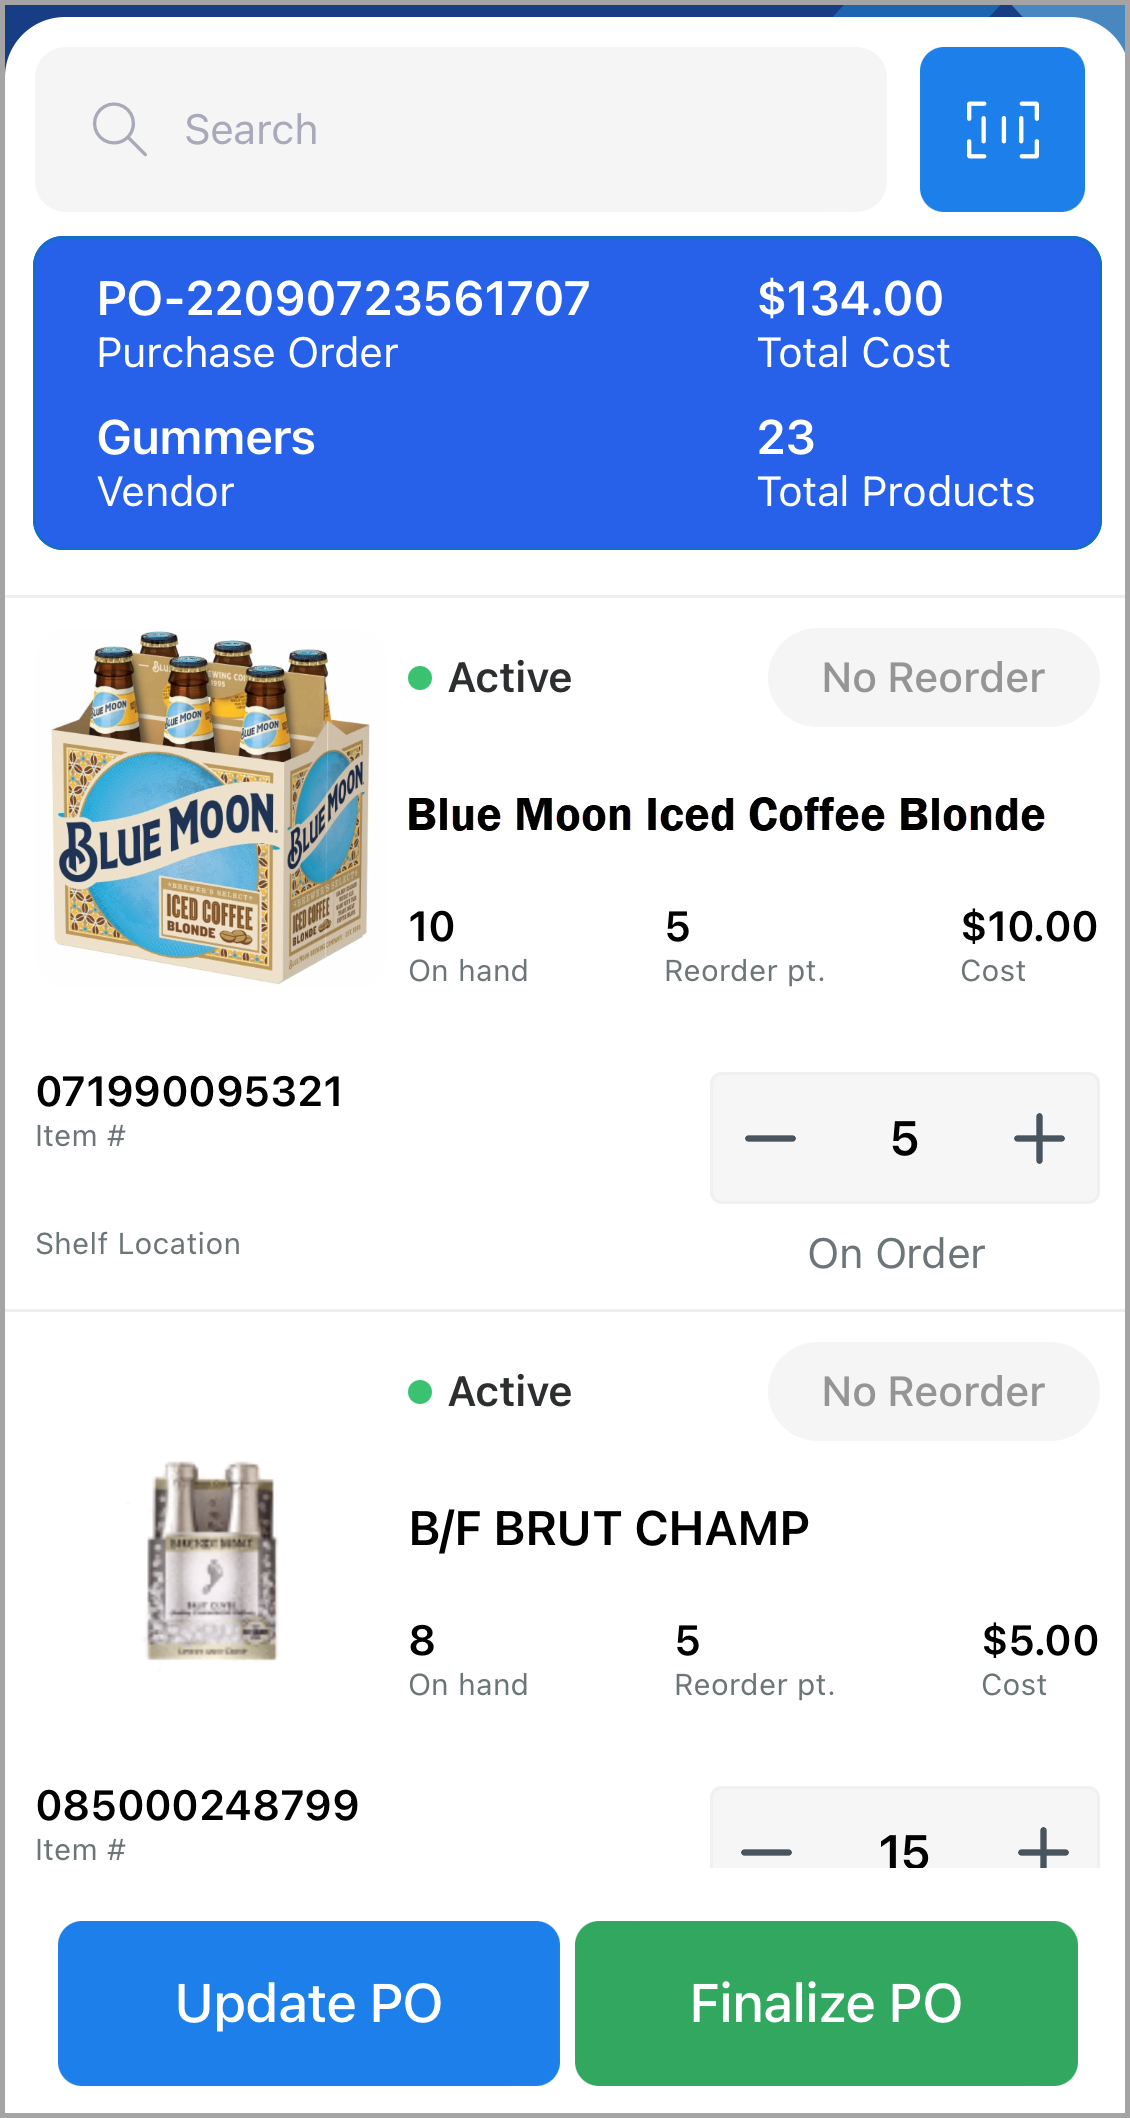
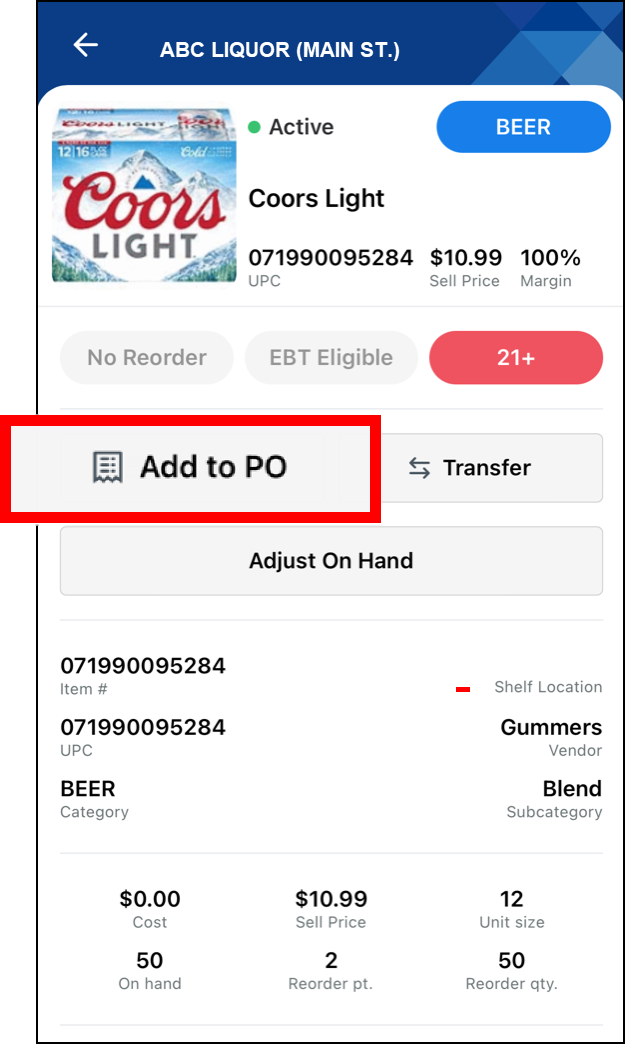
- From the Inventory tab, select an item to reorder.
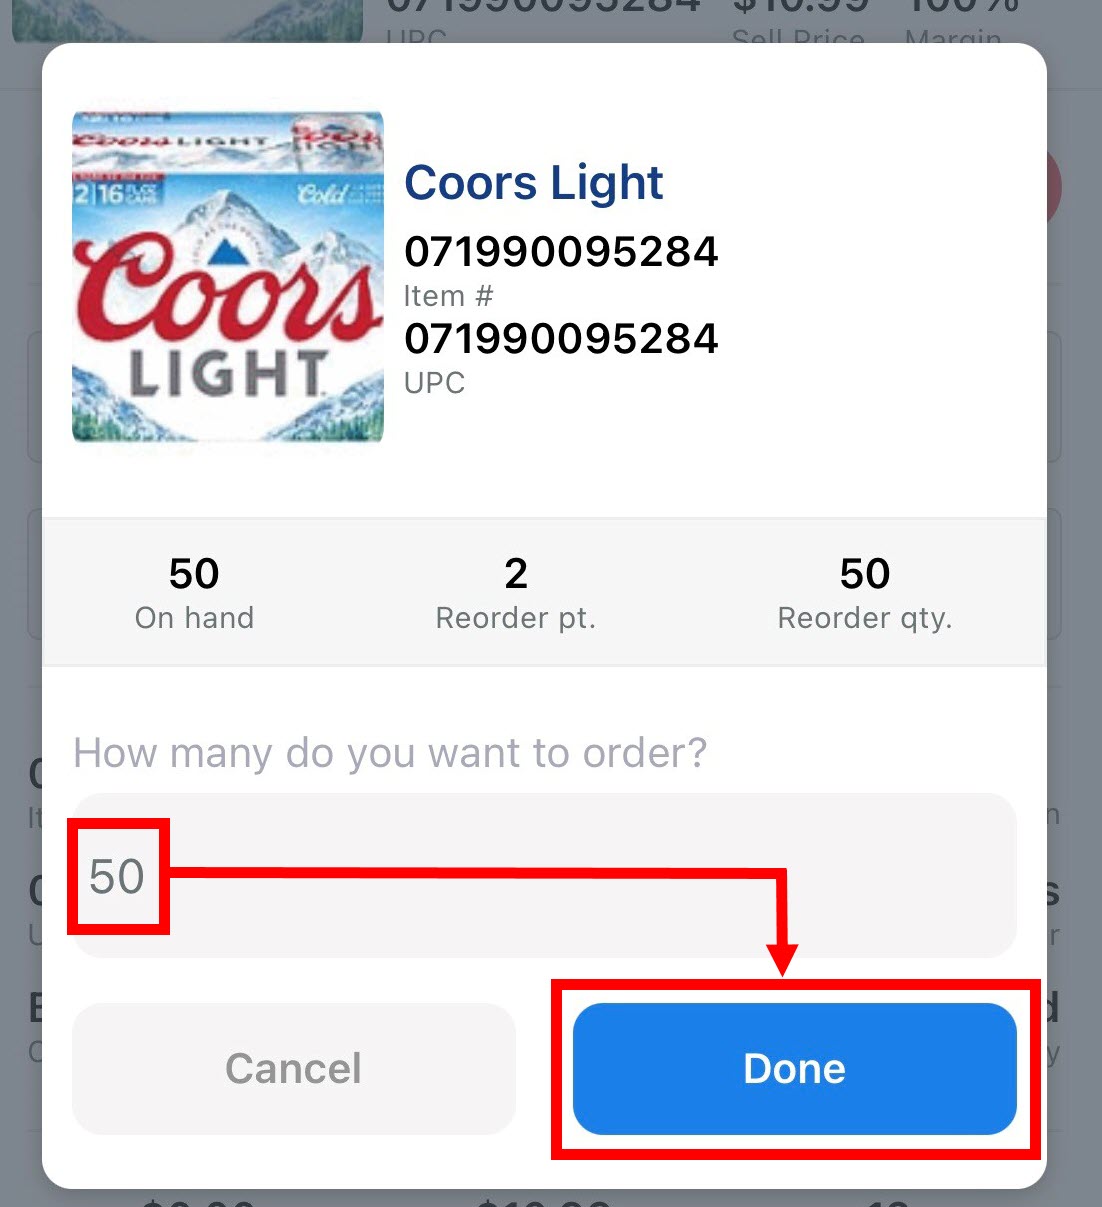
- Tap the Add to PO button. A Purchase Order pop-up displays.
- Enter an amount to order, and then tap Done.
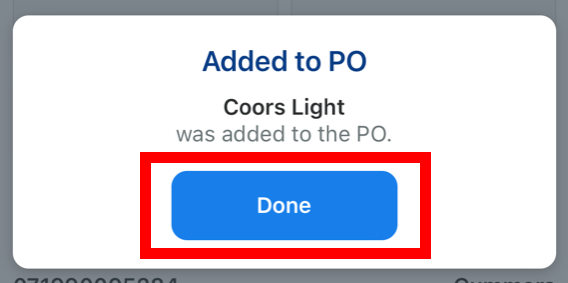
- Once the Added to PO success message displays, tap Done.
- Navigate to the PO tab and select the order you just created. The PO Details page displays.
- If changes in quantity are needed, perform the following:
- Adjust the quantity either by tapping the Plus (+) or Minus (-) sign, or by entering a new value in the order quantity field.
- Tap the Update PO button. The PO Details page refreshes.
- Once the PO is correct, tap the Finalize PO button. A pop-up displays
- In the pop-up, tap Enter the PO expected date. A scroll bar displays.
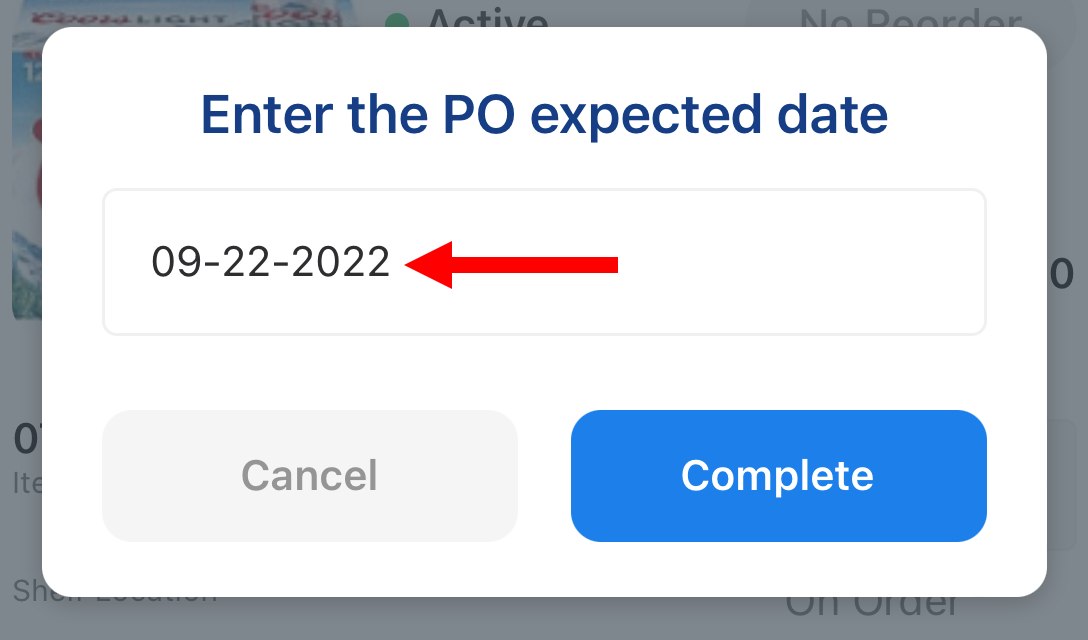
- Adjust the scroll bar to select an expected delivery date, and then tap Confirm.
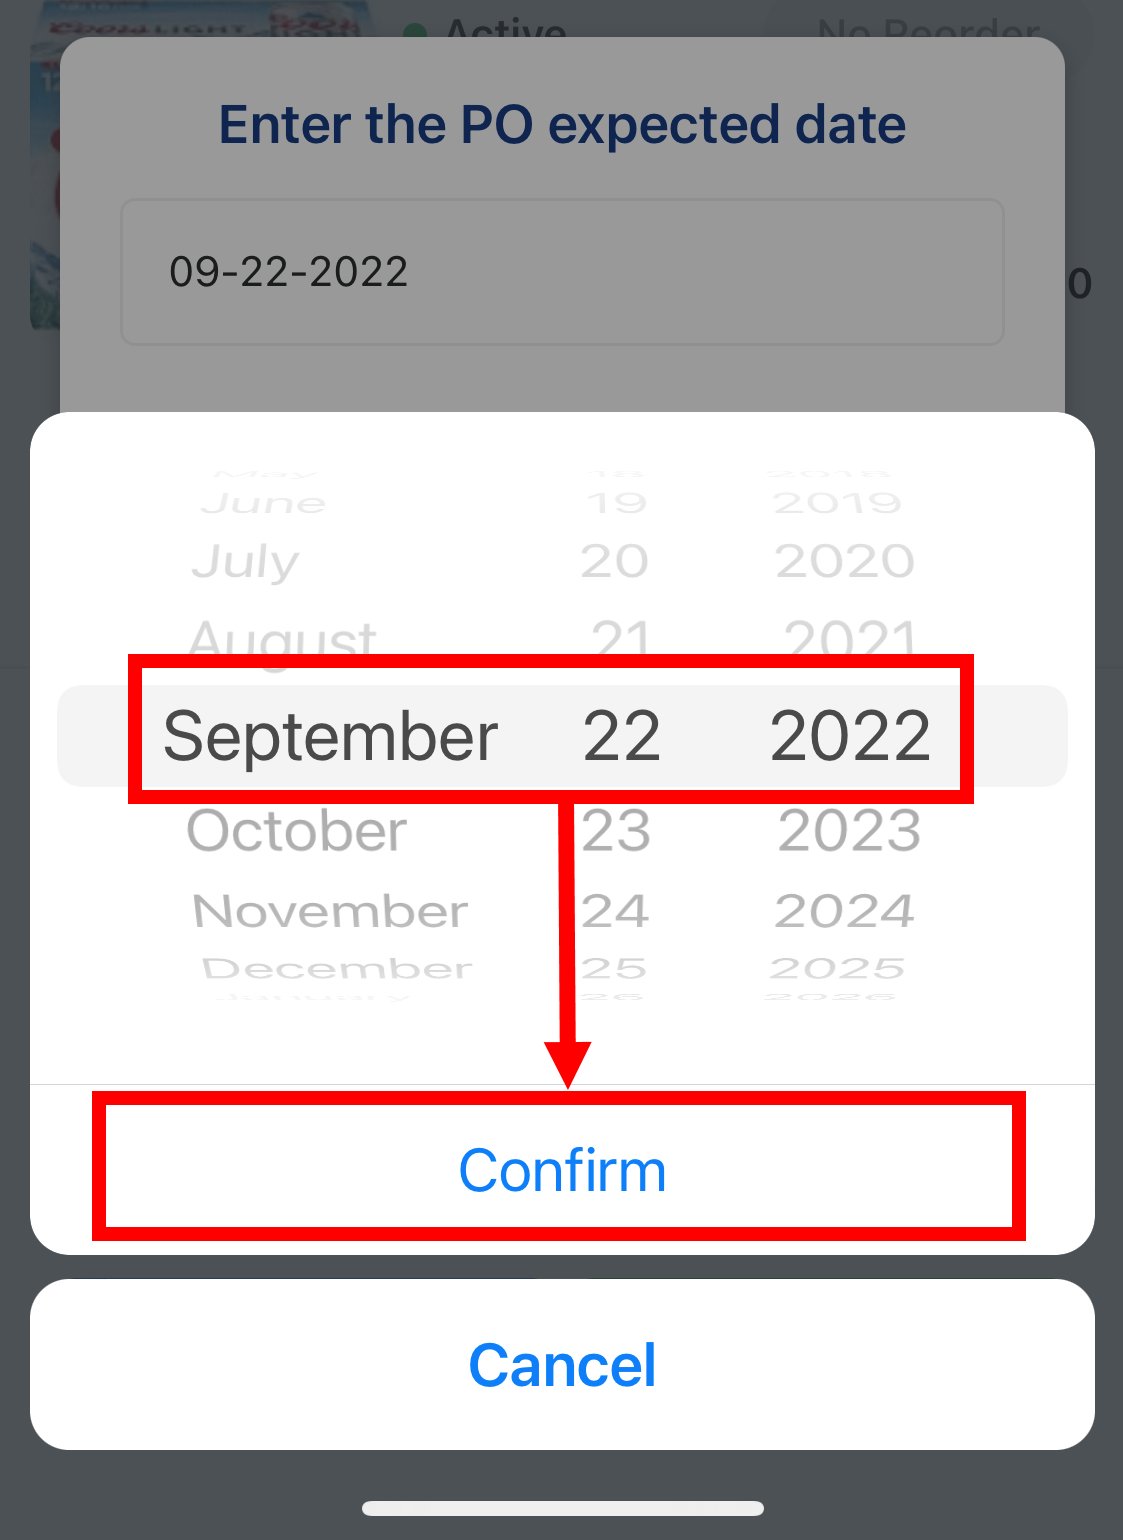
- Tap Finalize PO.
Creating Purchase Orders
Merchants can order more items via the Inventory tab to create a Purchase Order.