One of the many methods of payment accepted by Exatouch is bank checks! Though not typically used, Exatouch still supports them as an official tender as long as the register or customer profile settings are correct.
To allow customers to pay via check, do the following:
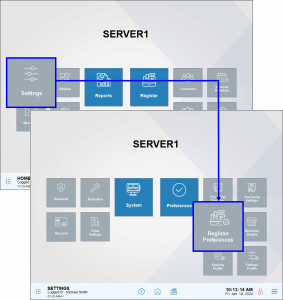
- From Home, tap Settings and then Register Preferences.
- In the General tab, tap the Allow Customer Checks toggle to enable.
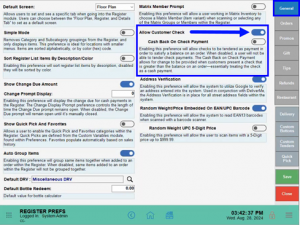
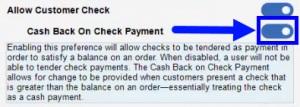
- To allow customers to write a check for over the amount due and receive cash back, enable Cash Back on Check Payment.
- To allow customers to write a check for over the amount due and receive cash back, enable Cash Back on Check Payment.
To accept a check as payment, do the following:
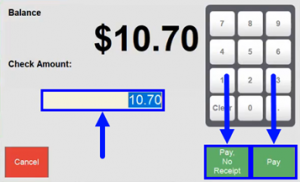
- In the Register, tap the Pay tab and then tap Check.
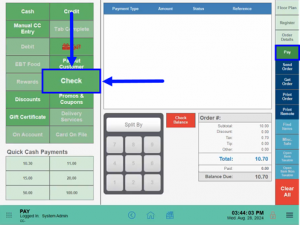
- Choose Pay or Pay, No Receipt.
- If the system allows cash back on check payments, then adjust the check amount, and then select the appropriate receipt option.
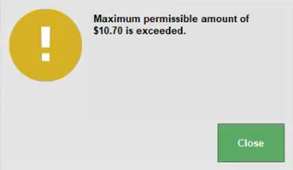
- Note: If the Cash Back on Check Payment toggle is not enabled and a merchant tries to process a cash back transaction, this error message will appear.
- If the system allows cash back on check payments, then adjust the check amount, and then select the appropriate receipt option.
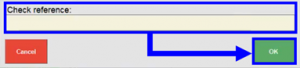
- Type in a Check reference, and then tap OK.
- Tip! If a customer opts for cash back, the Change Due window will display before the receipt appears.
If you want to disallow a customer from paying with bank checks in the future, you can enable the Do Not Take Checks setting in their customer profile.
- Note: We strongly recommend that customers are attached to an order whenever checks are accepted to ensure correct settings are honored during the transaction.
- Tap Customer, then Customer Details if a customer is already selected. For more information on Customer Details, see Find Customer Details.
- In the Details tab, tap the Do Not Take Checks toggle.
- Tap Save.
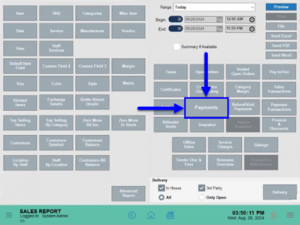
To generate all data for checks taken as payment, do the following:
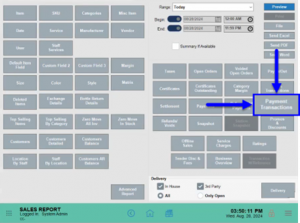
- From Home, tap Reports and then Sales.

- For all payment transactions:
- Tap Payment Transactions.
- The payment data can be exported via Excel, PDF, or Word.

- Tap Payment Transactions.
- For payment data that includes references:
- Tap Payments.
- The payment data can be exported via Excel, PDF, or Word.
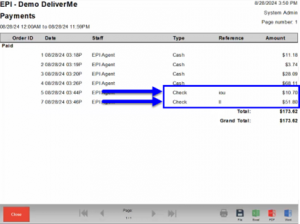
- Tap Payments.
How can we improve this information for you?
Registered internal users can comment. Merchants, have a suggestion? Tell us more.