Use Security Profile controls to define and create User Types that control access to sensitive areas of Exatouch. Fine-tune user types to suit your business needs: Allow some or all user types to override pricing, limit label printing, or turn on logging for specific tasks.
Three security profiles for your default user types come pre-defined in your Exatouch Point of Sale system: Admin, Power, and Regular. Edit these profiles, copy and edit an existing profile, or create a new profile to secure your Exatouch app as needed.
When you add a new staff member to your Exatouch Point of Sale system, you must assign a Staff Type and a User Type to their staff record.
Select a Staff Type that matches their job role, such as Manager, Cashier, Server, or other type of staff you’ve defined for your organization.
Select a User Type to refine each users’ access to specific tasks within Exatouch. Most Cashiers may need only Regular User access, while one or two specific Cashiers may need Power User access to accomplish more specialized tasks, such as applying a discount in the Register app.
Edit existing profiles to enable or disable access to specific controls, or to turn logging on or off for specific controls.
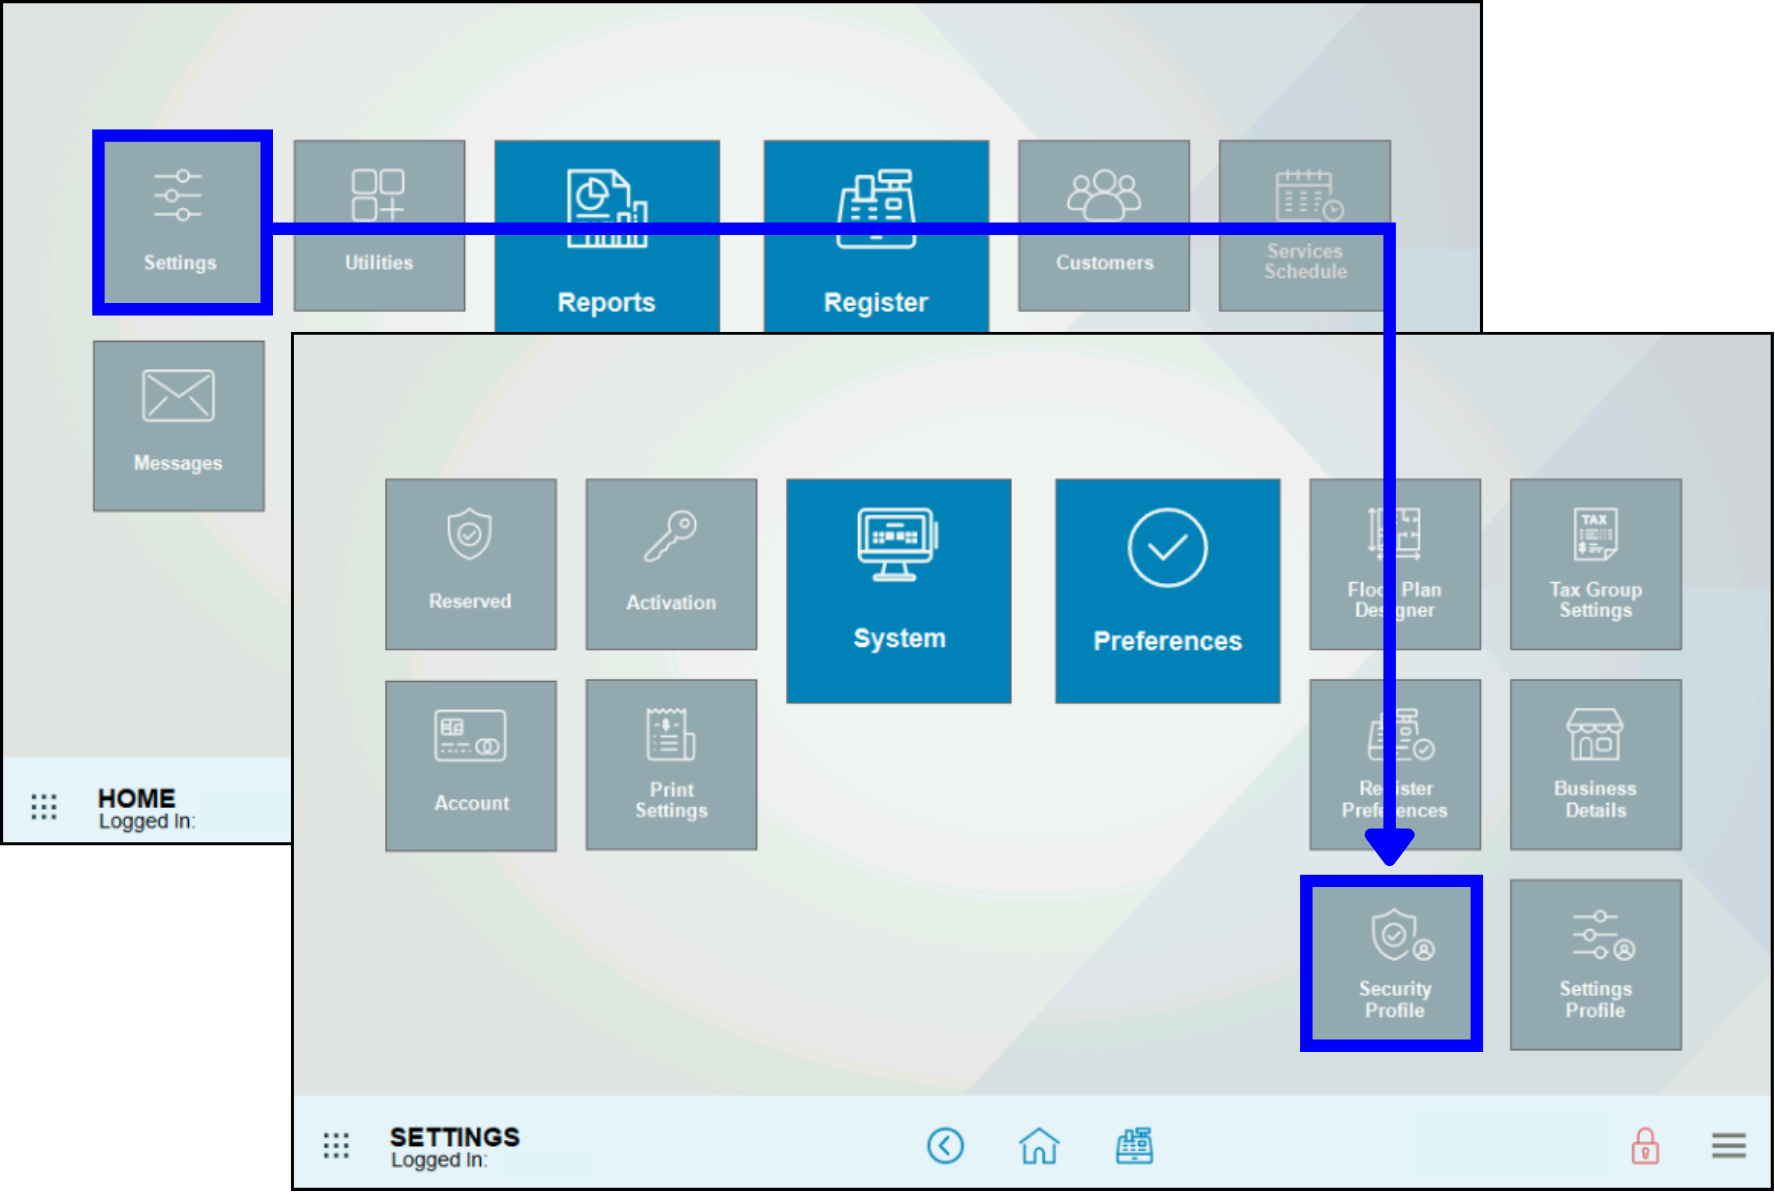
- From Home, navigate to Settings > Security Profile.
- Tap to select a Profile to edit.
- Scroll through the list of controls to find a control, or use Permission Search to find a specific control. Tap a control’s Description to select it and see more details about what it does. Tap the appropriate Allow or Log toggle to enable or disable access and logging for this control.

- Repeat for all controls as needed, then tap Save to save your changes.
- After you’ve saved your changes, assign this updated User Type to staff members as needed.
- Note: Any changes you make to a profile affects the access for all users of that profile.
If editing an existing profile isn’t appropriate for your needs, copy and edit an existing profile instead. Use this new profile to expand access to specific staff members.
- Example: Let’s turn on access to and logging of actions for Item Reconciliation tasks by making a copy of the Regular User Type and editing the copy.
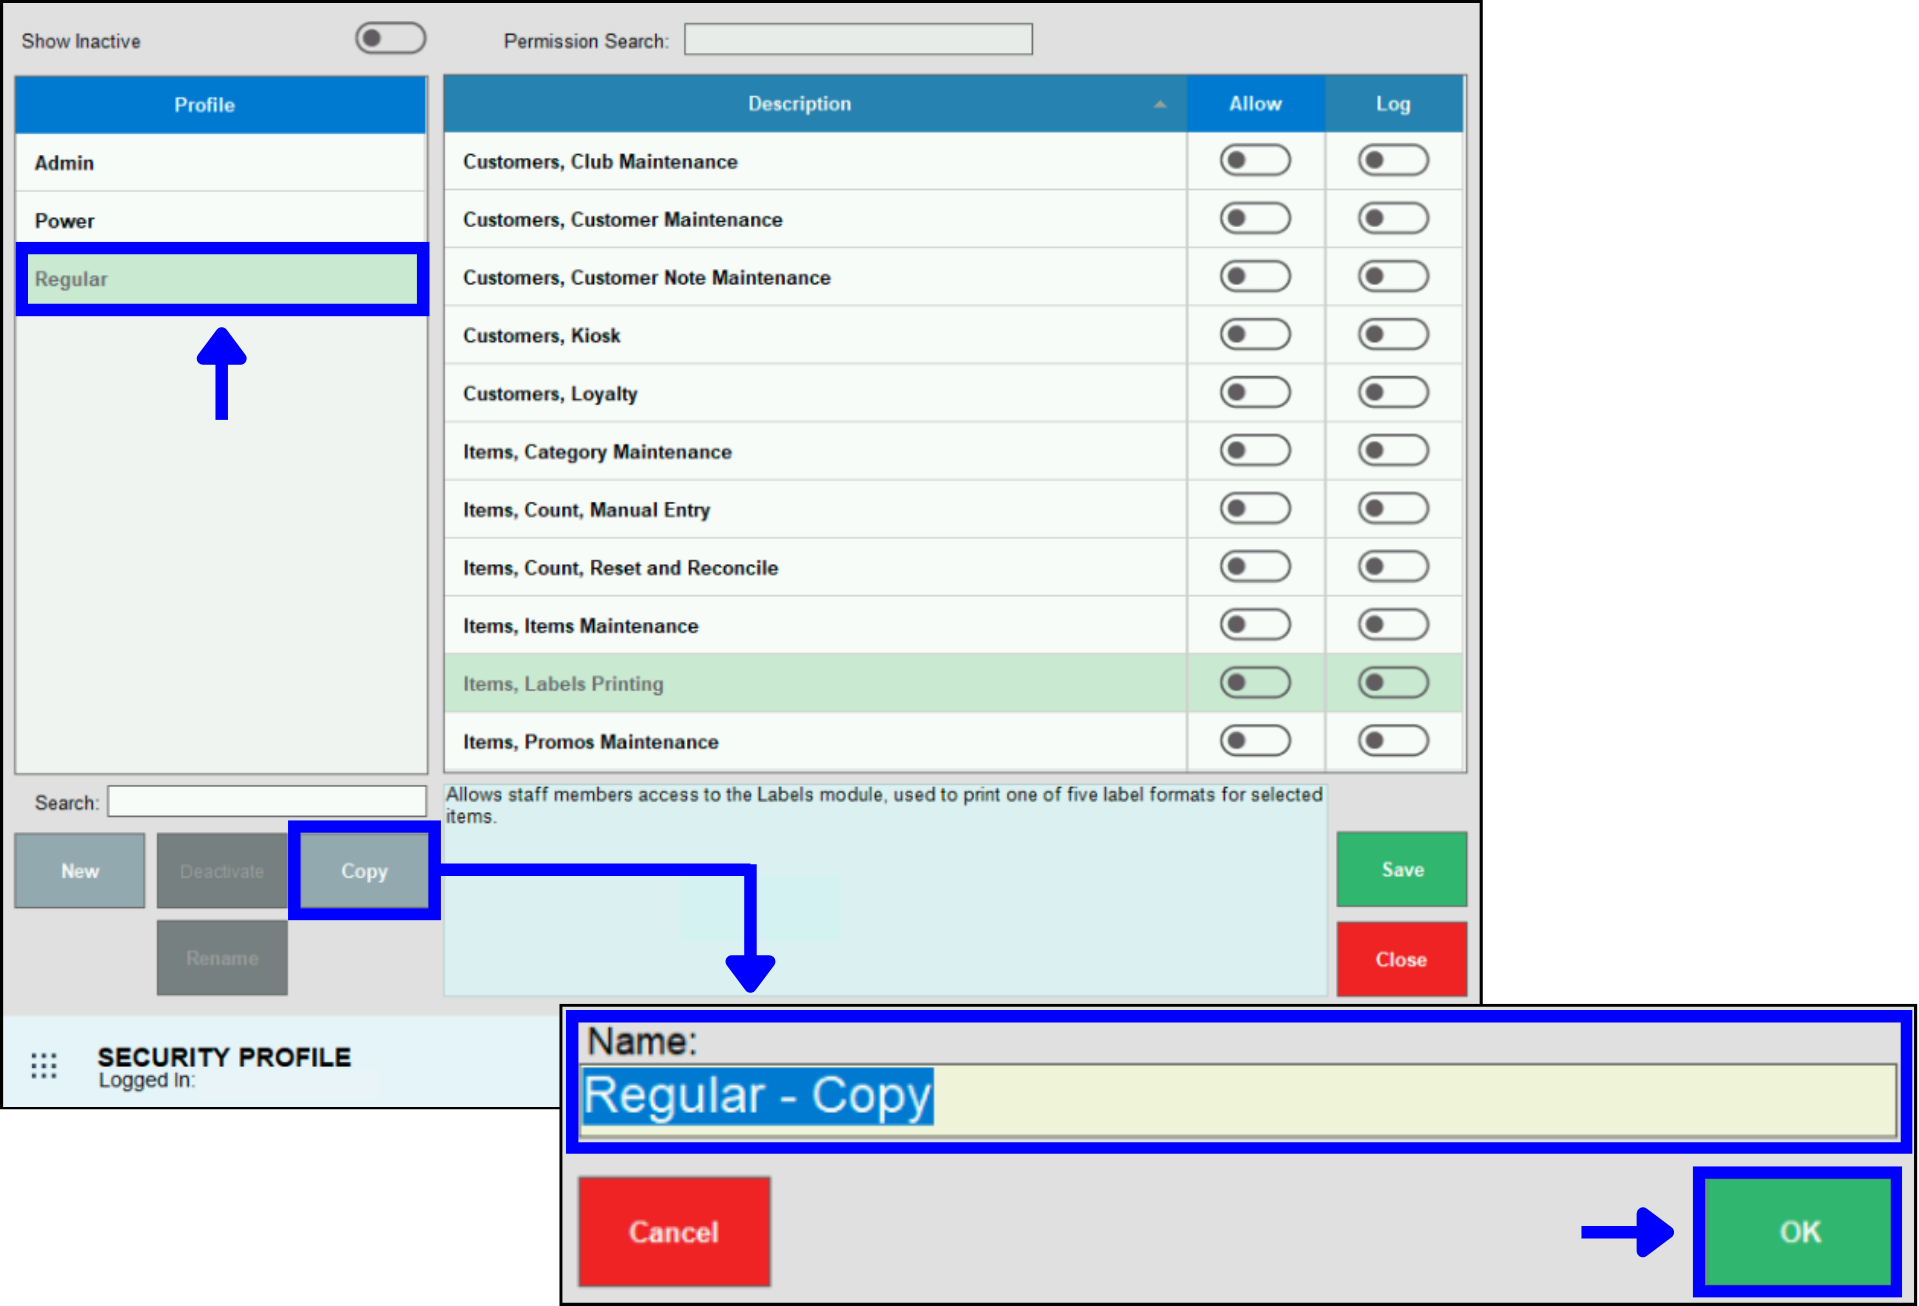
- From Home, navigate to Settings > Security Profile, then tap to select the Regular profile.
- Tap the Copy button. A prompt opens, allowing you to name the copied profile. Click OK to accept the default or the name you enter.
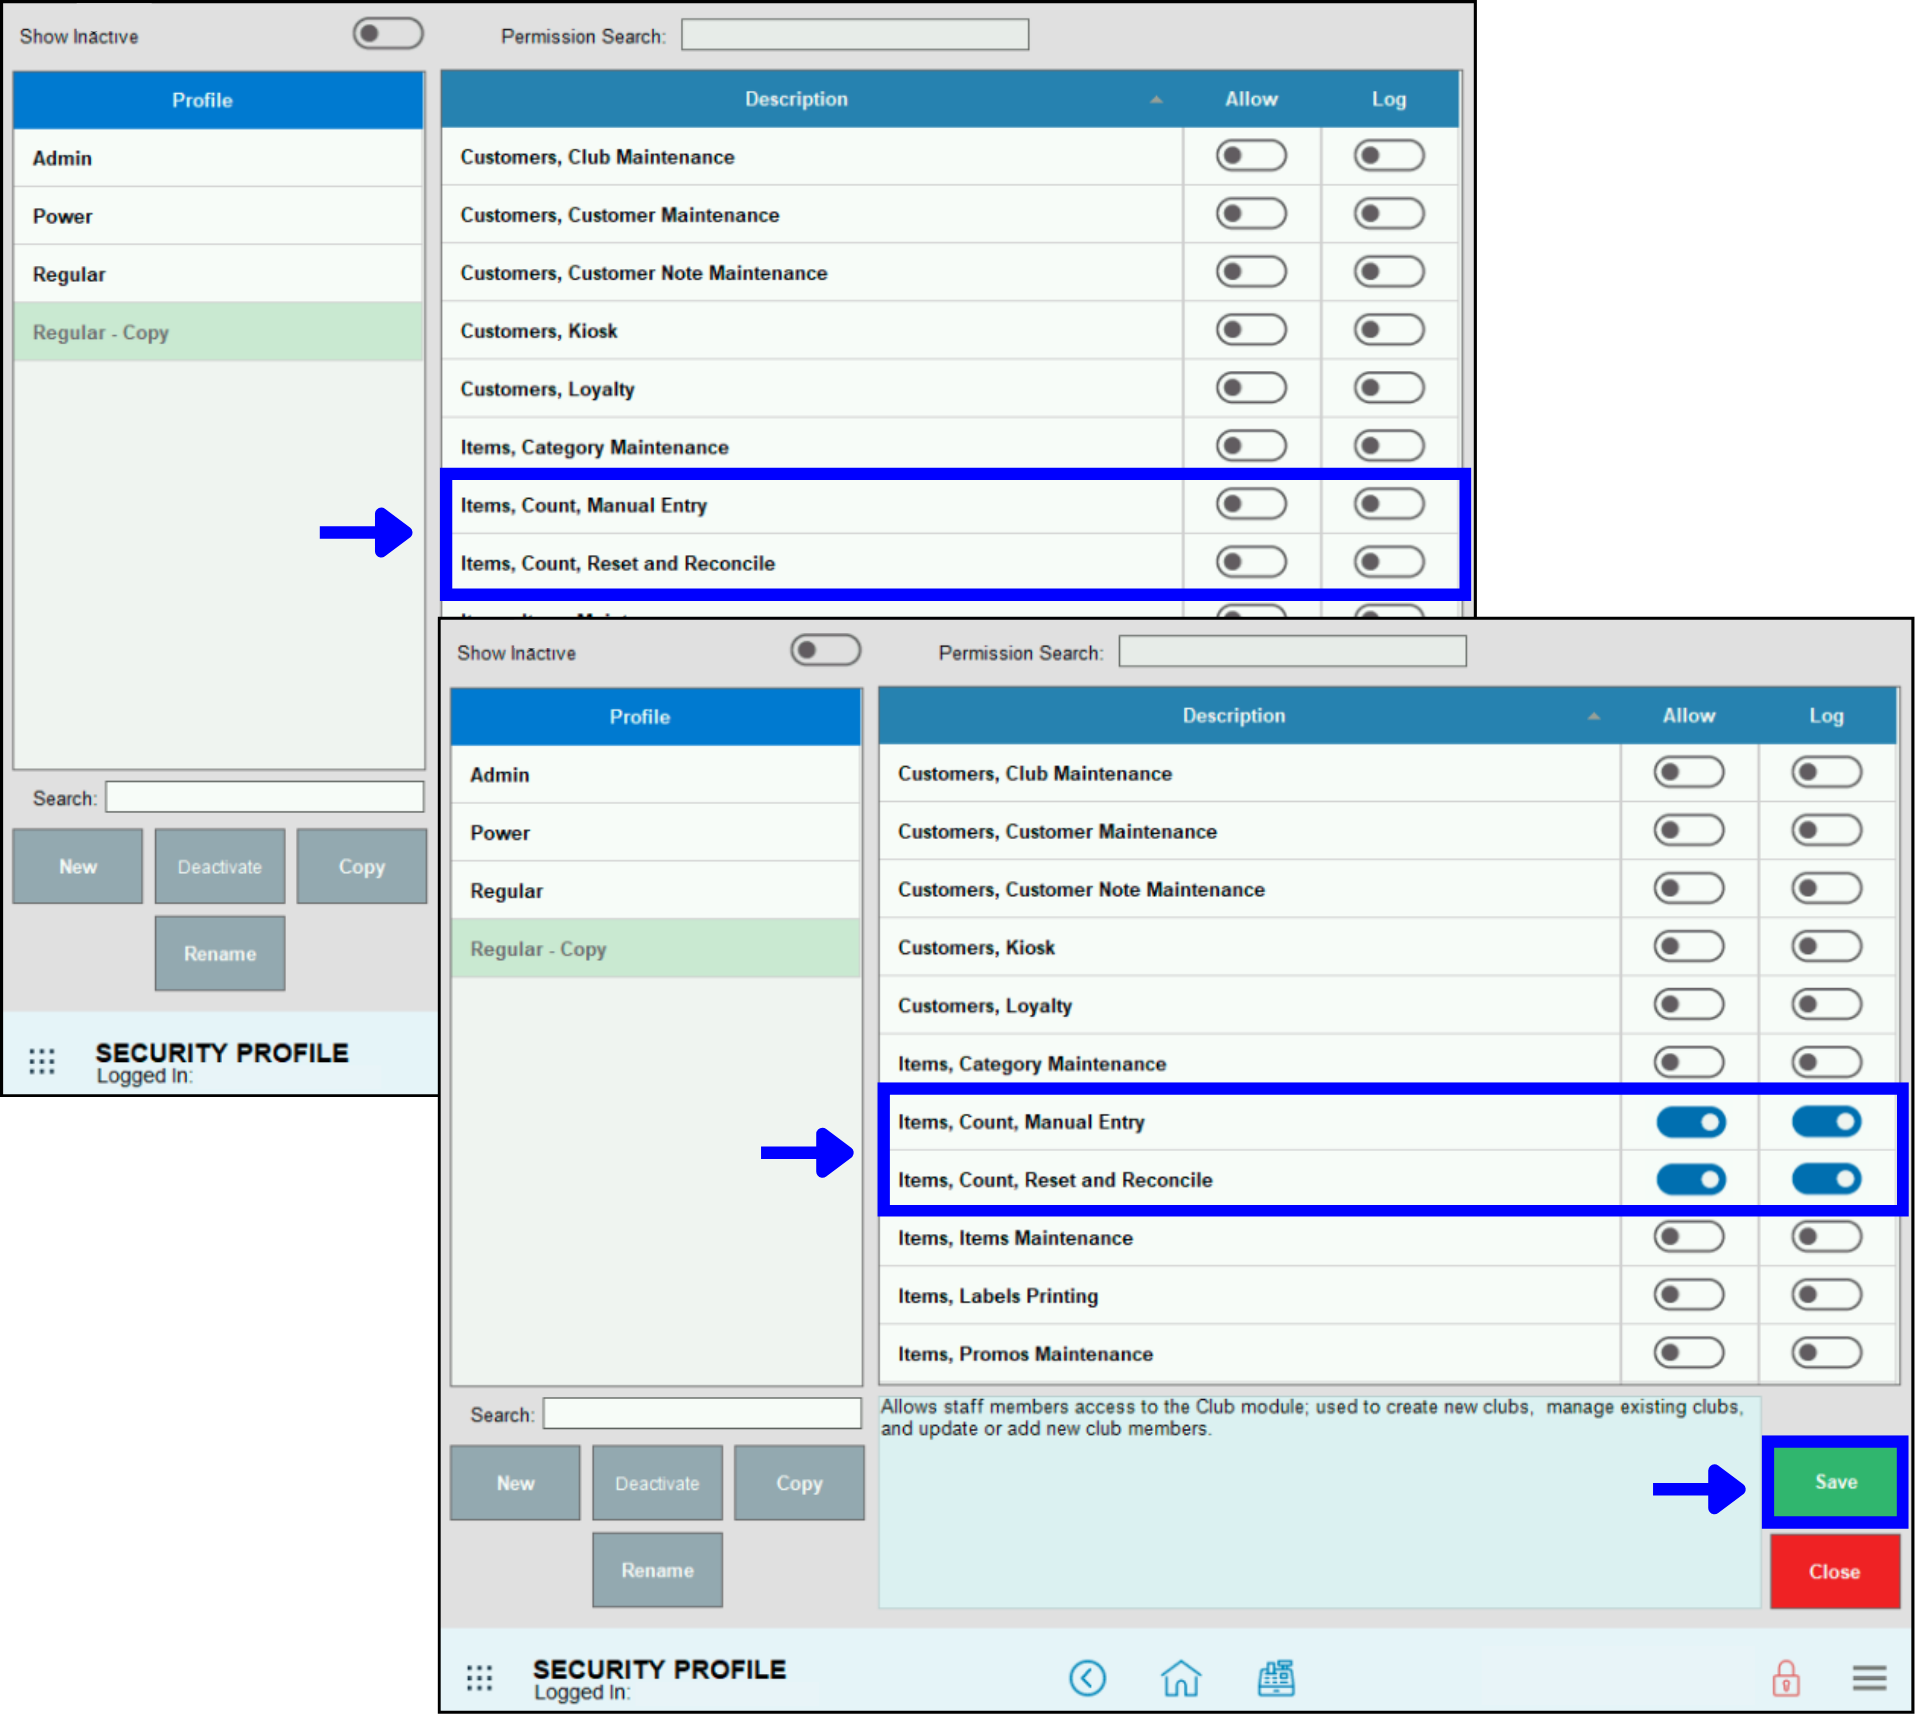
- Scroll through the list of controls or use Permission Search to find Items, Count, Manual Entry and Items, Count, Reset and Reconcile.
- Tap the toggle to enable and Allow the user access to the area affected by this control.
- Tap the toggle to enable and Log user actions in the area affected by this control.
- Repeat for any other controls needed, then tap Save to save your changes.
- After you’ve saved your changes, assign this updated User Type to staff members as needed.
If you want to keep your default User Type Security Profiles at their baseline settings, you can easily create a new profile to handle your custom needs.
- Caution: By default, all controls are set to Allow for new User Type Security Profiles — edit to remove access to unneeded controls.
- Example: Let’s create a profile named IT Users for your IT specialist. We’ll set it up to allow access only the Utilities and Settings for your business in your Exatouch Point of Sale system.
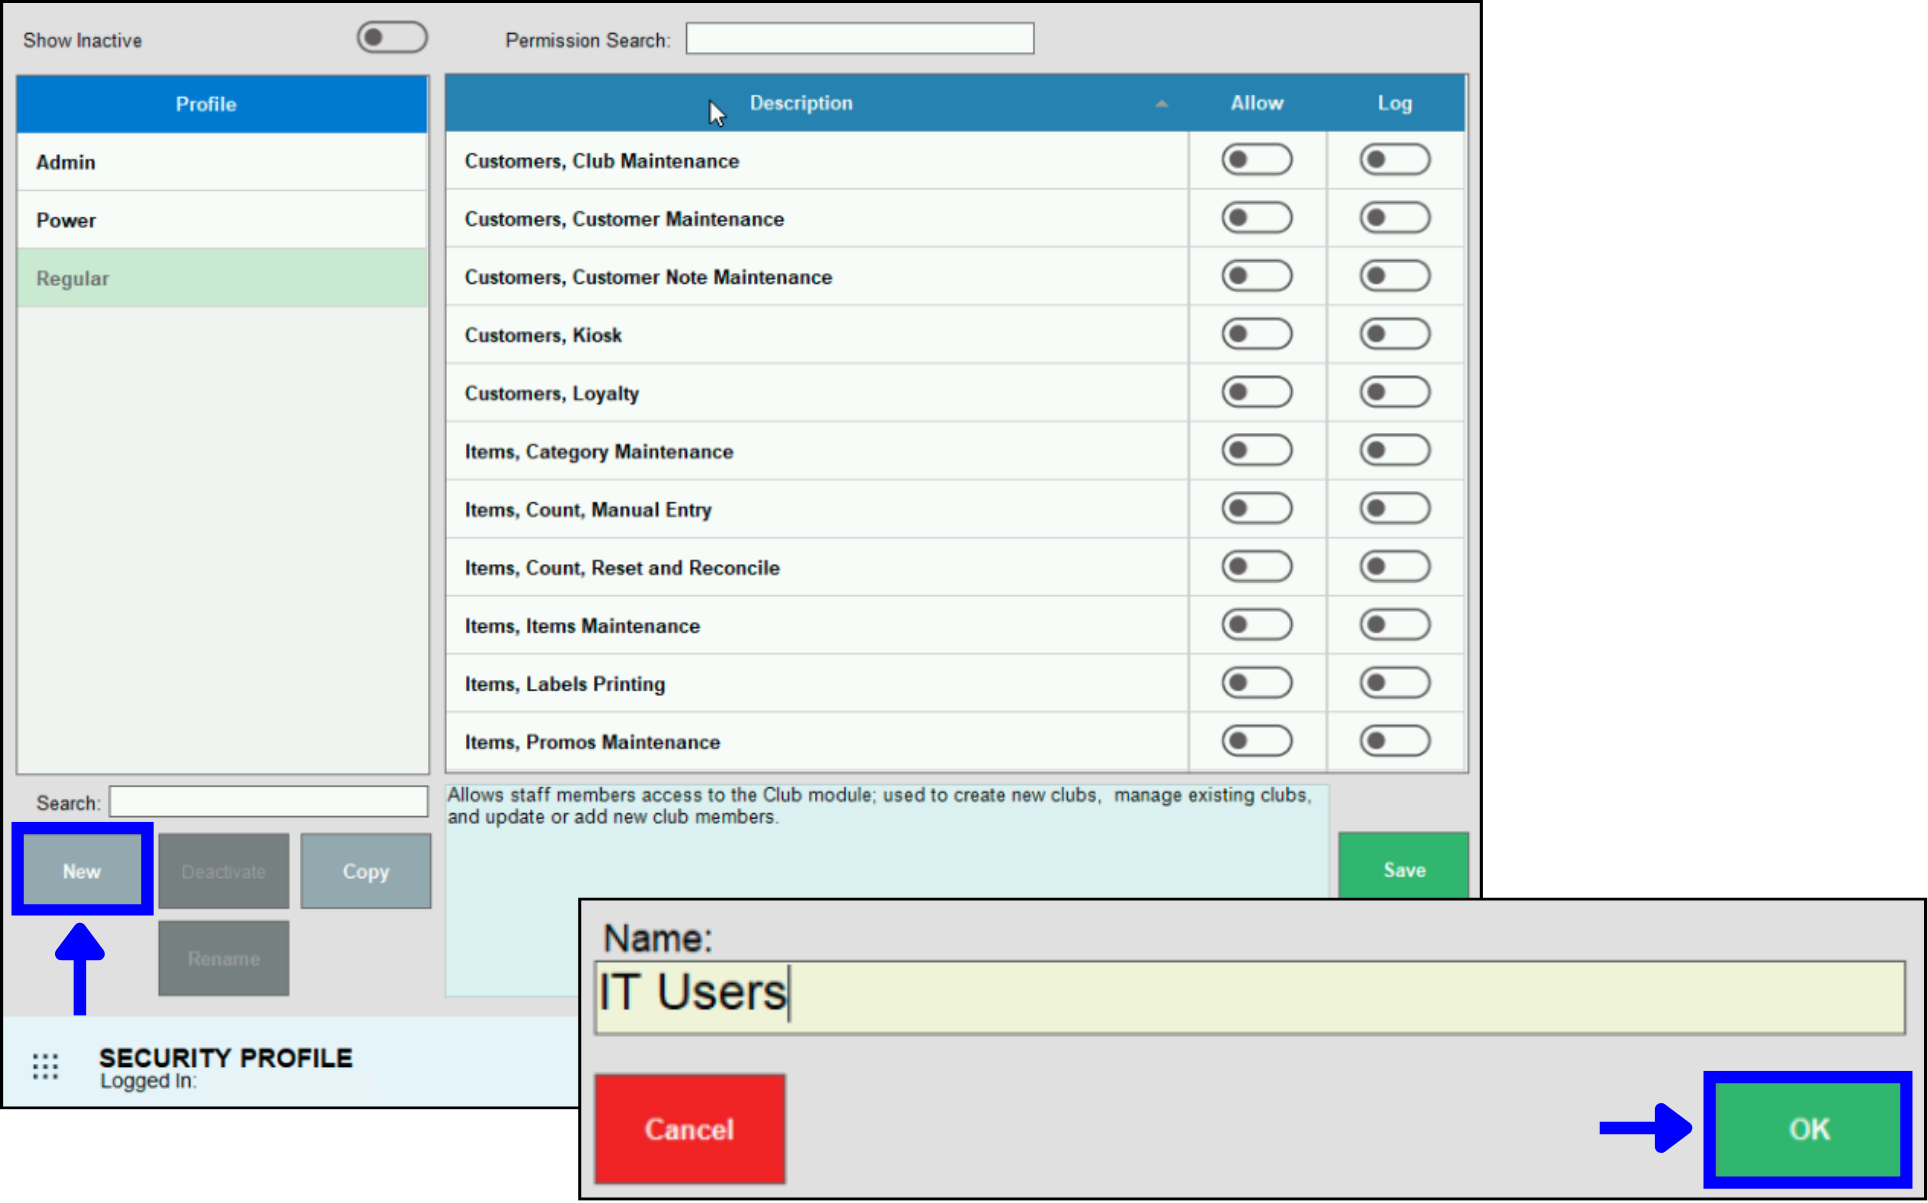
- From Home, navigate to Settings > Security Profile, then tap the New button.
- A prompt opens, allowing you to name the new profile. Click OK to accept the default name or the name you enter.
- Tap and hold the Allow column label to disable access for all controls.
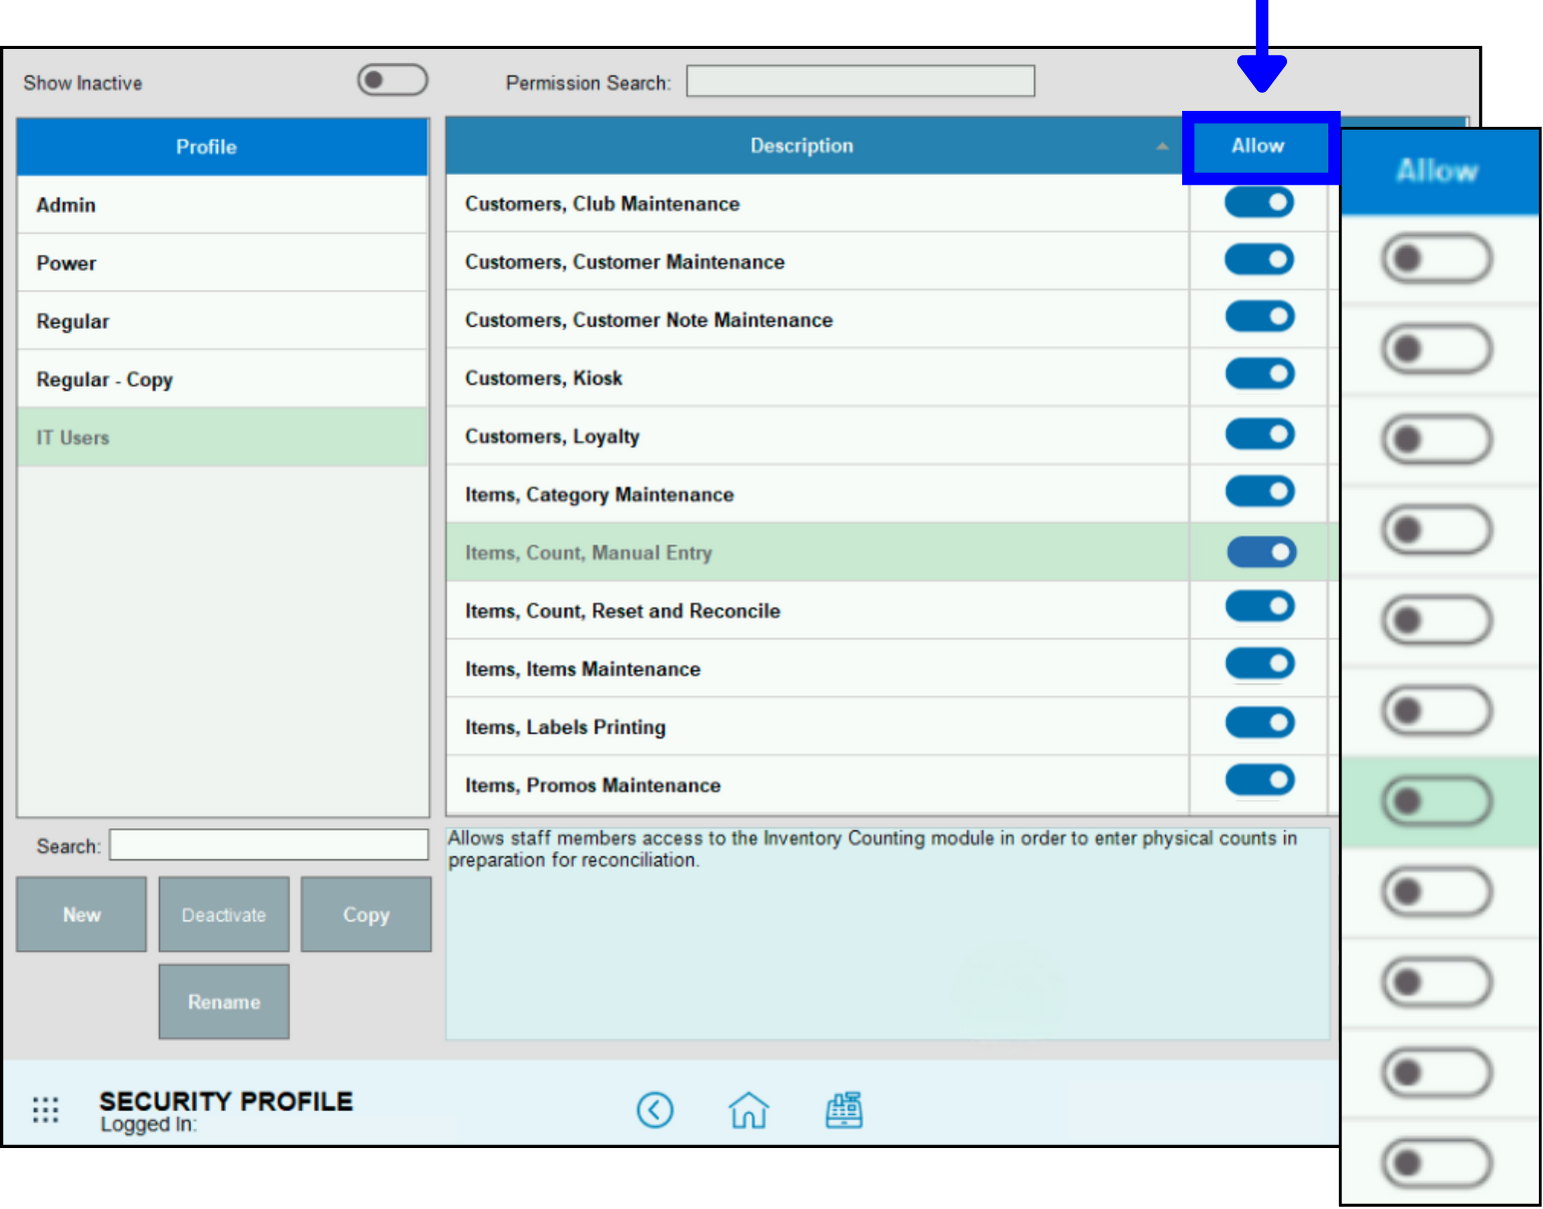
- Scroll through the list of controls or use Permission Search to find Utilities and Settings controls.
- Tap to Allow access to Utilities and Settings controls as needed.
- Tap to enable logging for any control as needed.
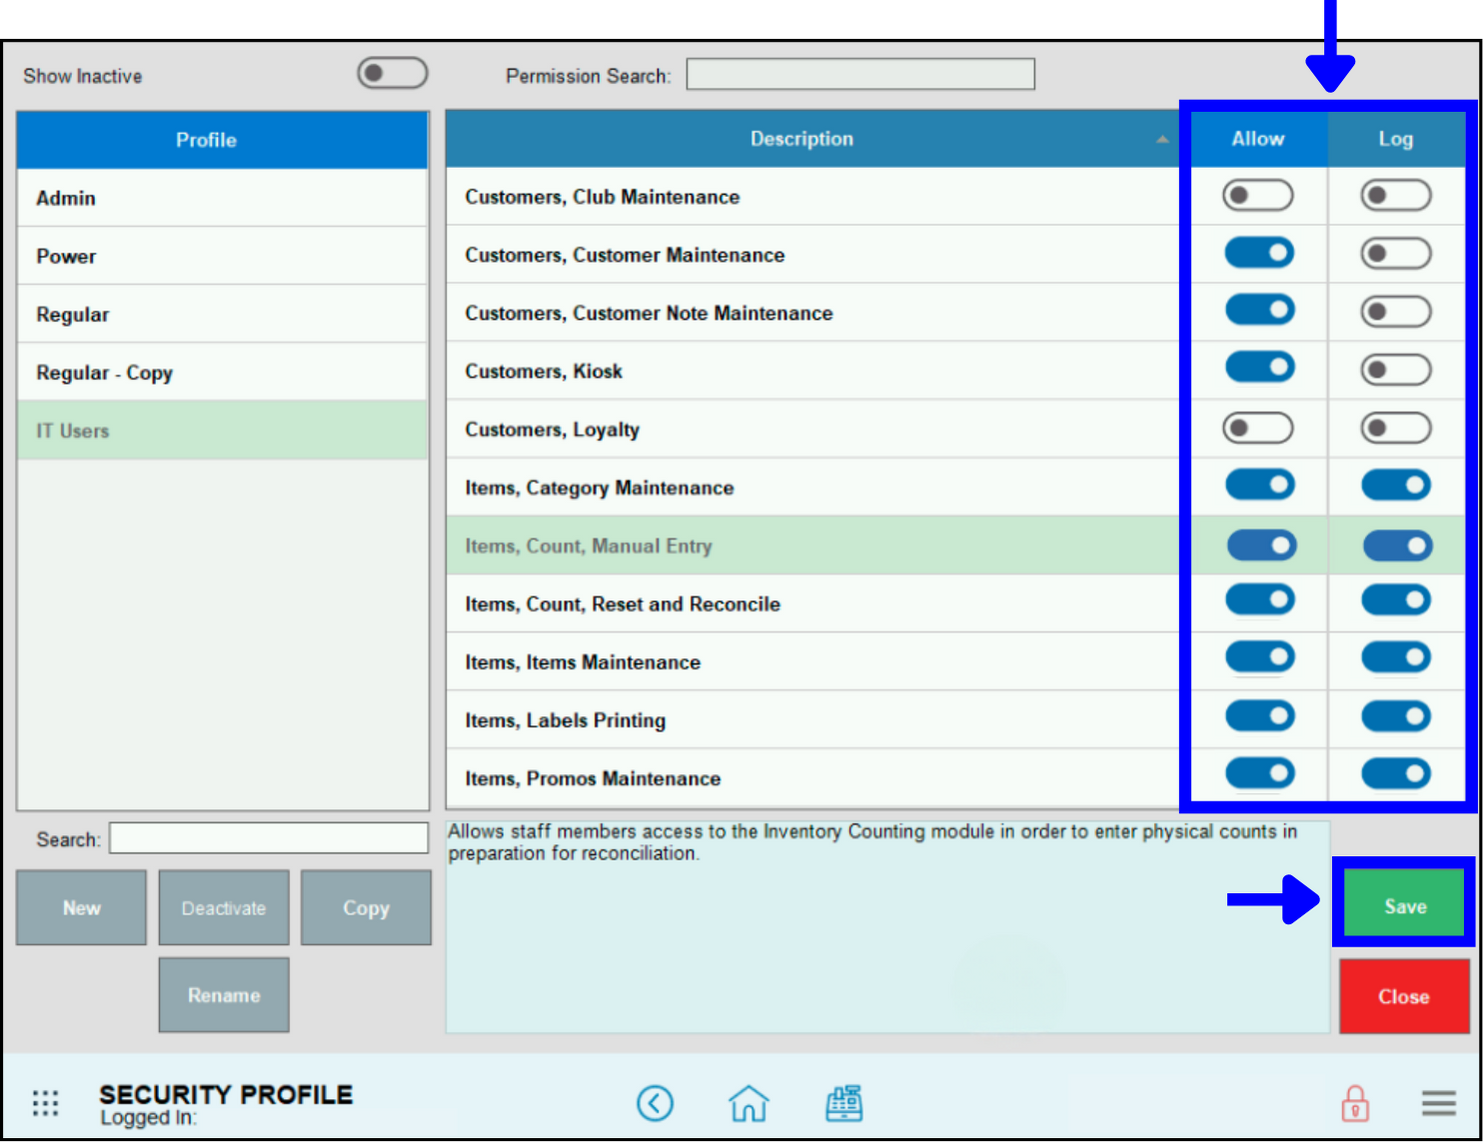
- Tap Save to save your changes.
- After you’ve saved your changes, assign this updated user type to staff members as needed.
Rename any profiles you’ve created quickly and easily.
- From Home, navigate to Settings > Security Profile, then tap to select a profile.
- Tap the Rename button. A prompt opens, allowing you to rename the profile. Enter a new name, then tap OK to accept your entry.
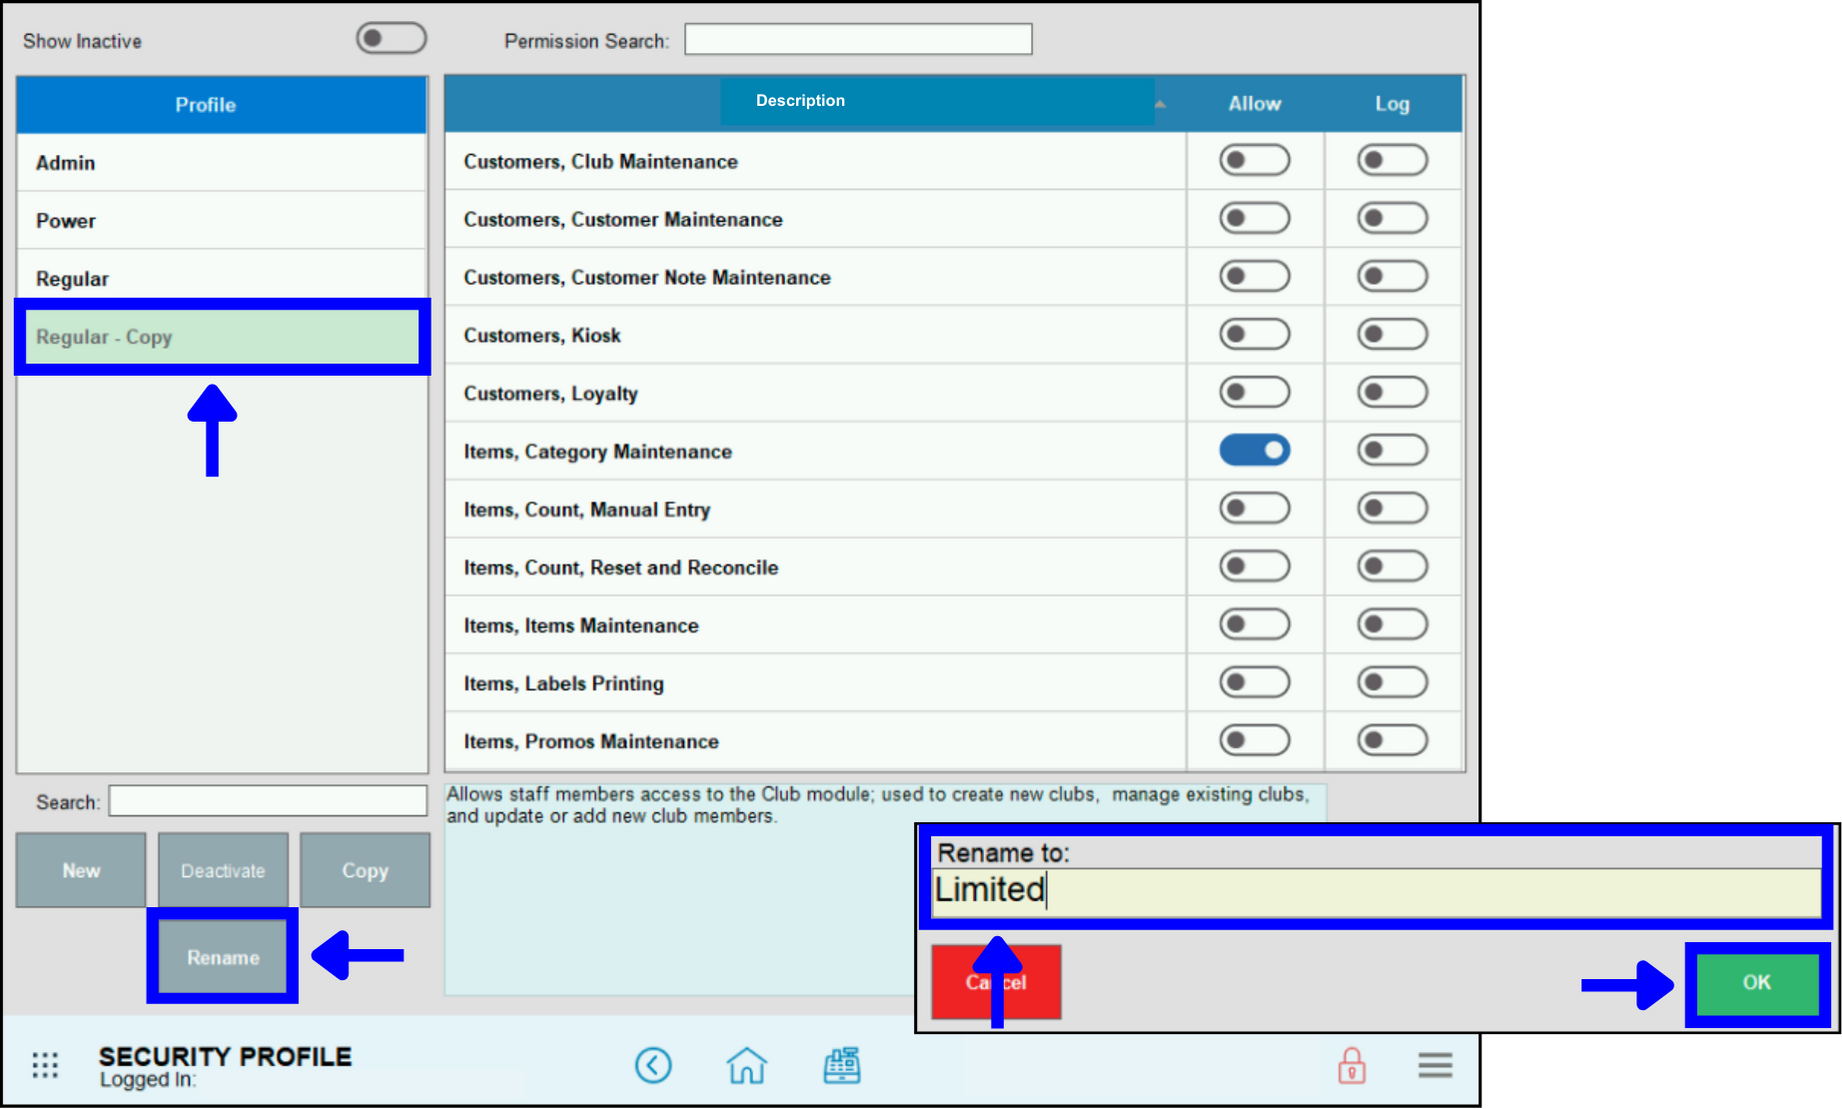
- Tap Save to save your changes.
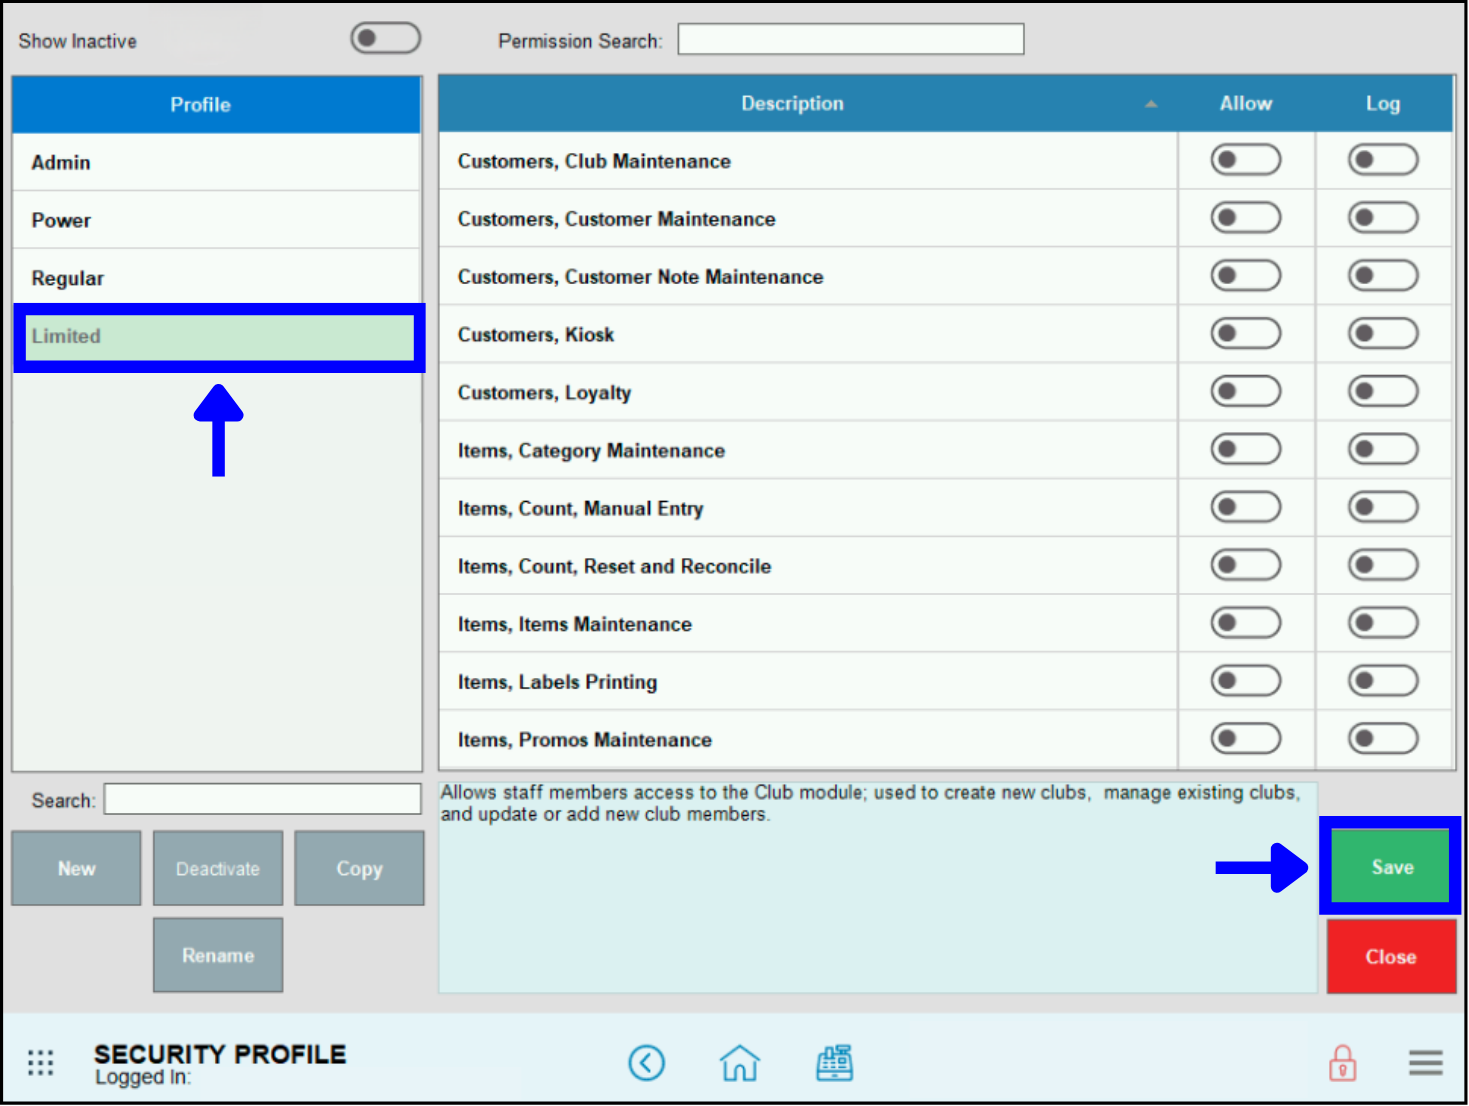
- Note: Admin, Power, and Regular are default profiles and cannot be renamed.
Deactivate any profiles you’ve created quickly and easily.
Before you deactivate a user type security profile, check your staff list to see what staffers are assigned this user type. Change their user type to a type that will remain active as needed.
Find Staff Members Assigned a Specific User Type
- From Home, navigate to Staff > Staff List. A staff list work are opens.
- Scroll through your list of staff members, or use Search to find staff members assigned the user type (listed in the User column) you intend to deactivate.
- Tap to open each affected staff member’s profile, and change their User Type to an unaffected User type. Save your changes.
- When all adjustments have been made, deactivate the User Type in the Security Profile work area.
- Note: You can skip this step. If you skip this step, users assigned deactivated User Types can’t access any Exatouch system functions until you assign them an active User Type.
Deactivate a User Type Security Profile
- From Home, navigate to Settings > Security Profile, then tap to select a profile.
- Tap the Deactivate button.
- Note: Admin, Power, and Regular are default profiles and cannot be deactivated.
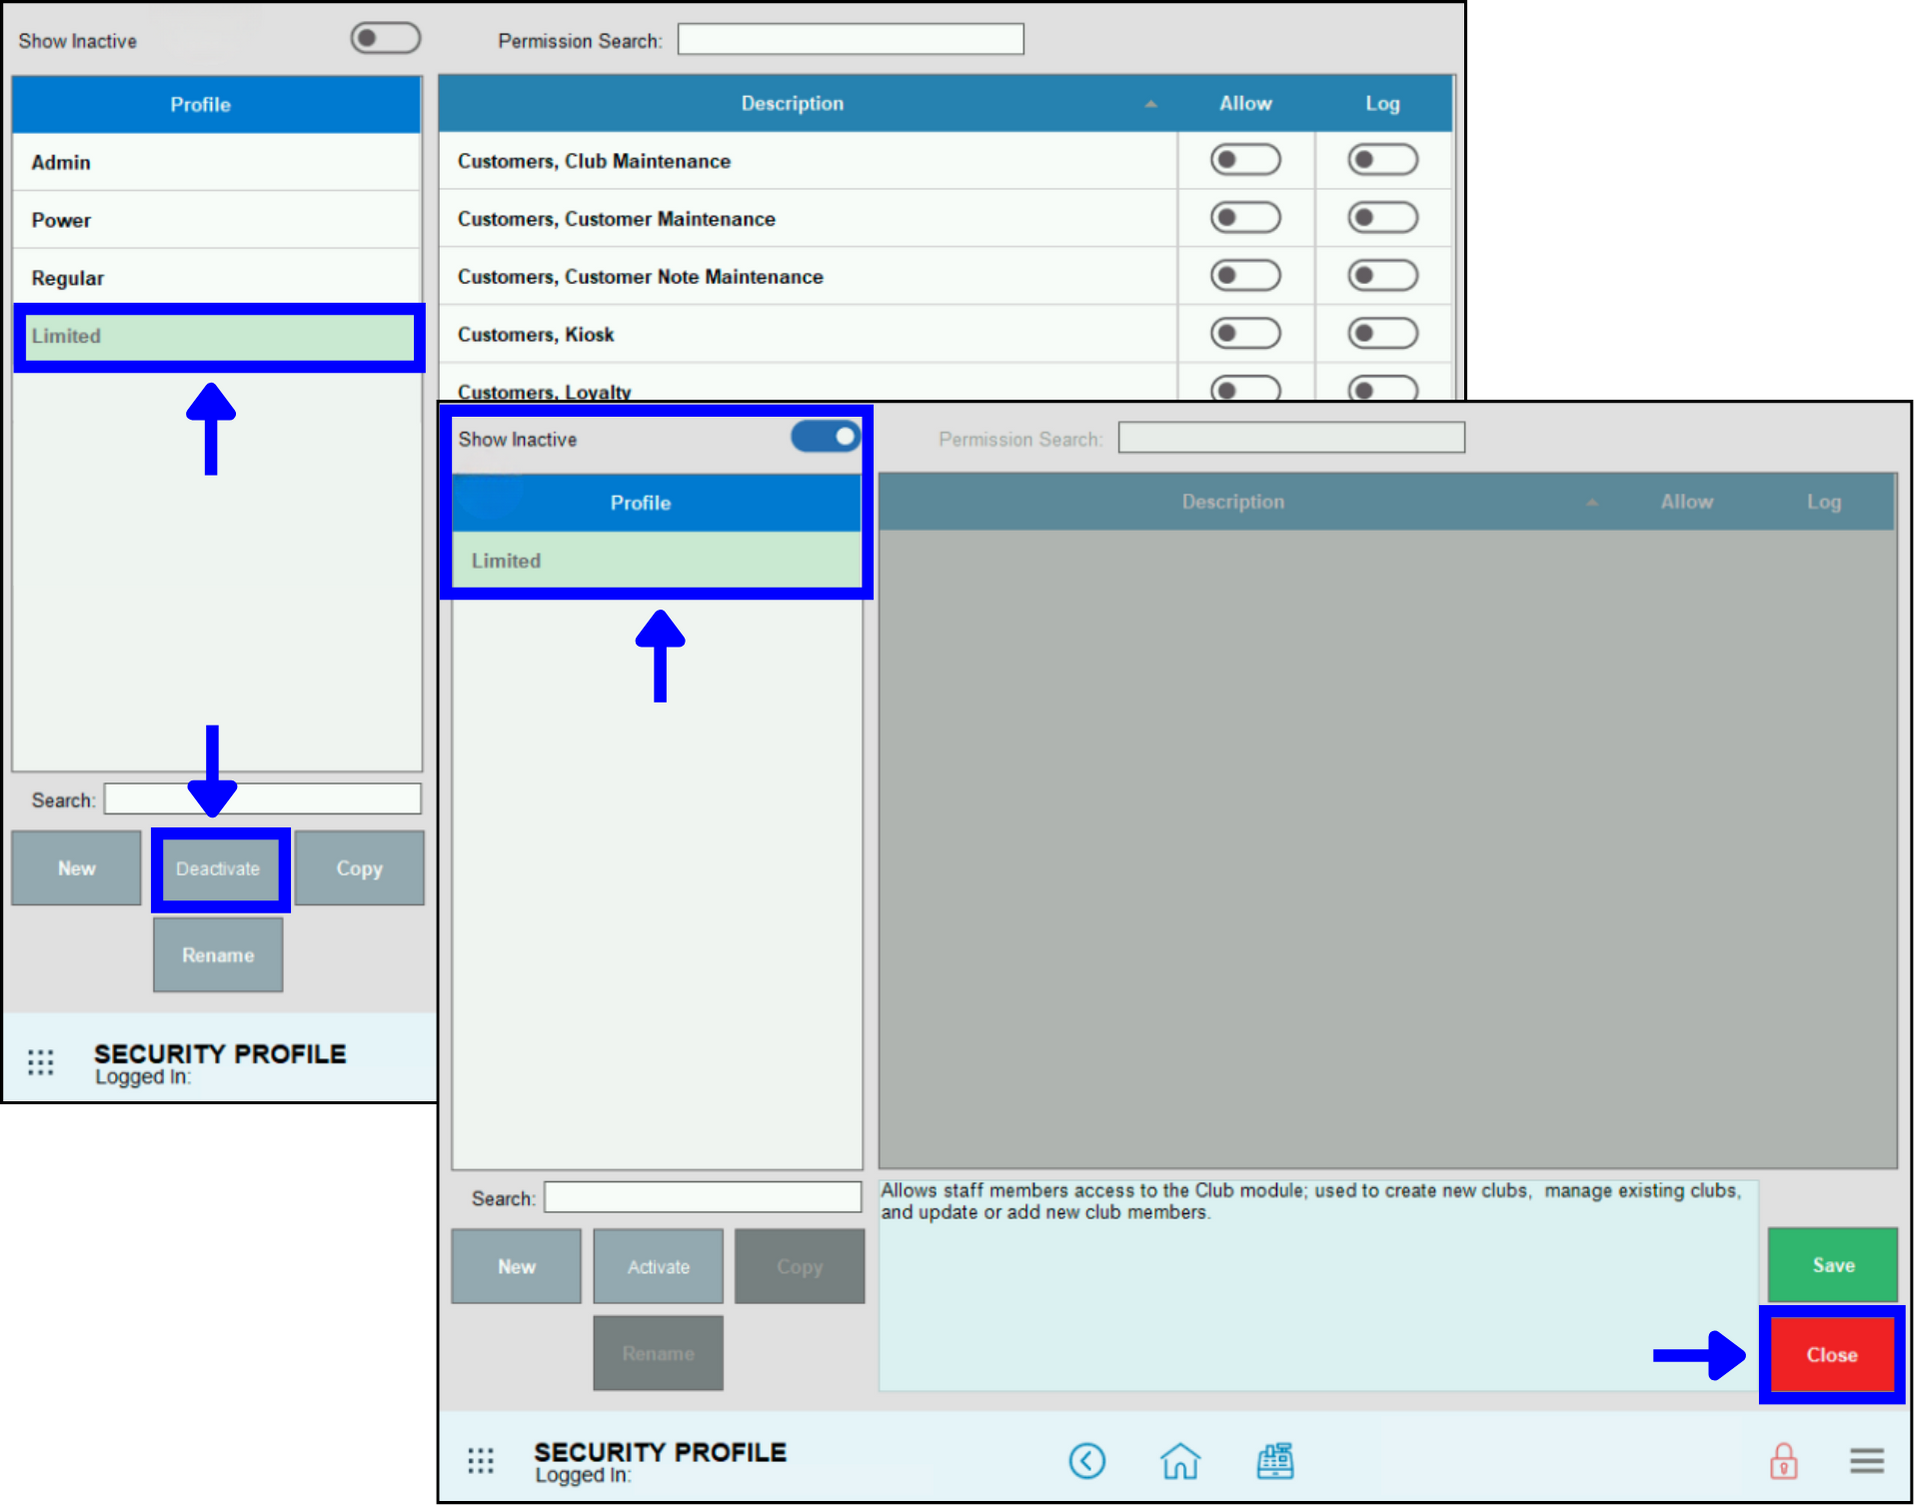
- The profile is removed from view.
- To view deactivated profiles, tap the Show Inactive toggle. You can tap to select a deactivated profile and tap Activate to return it to active status.
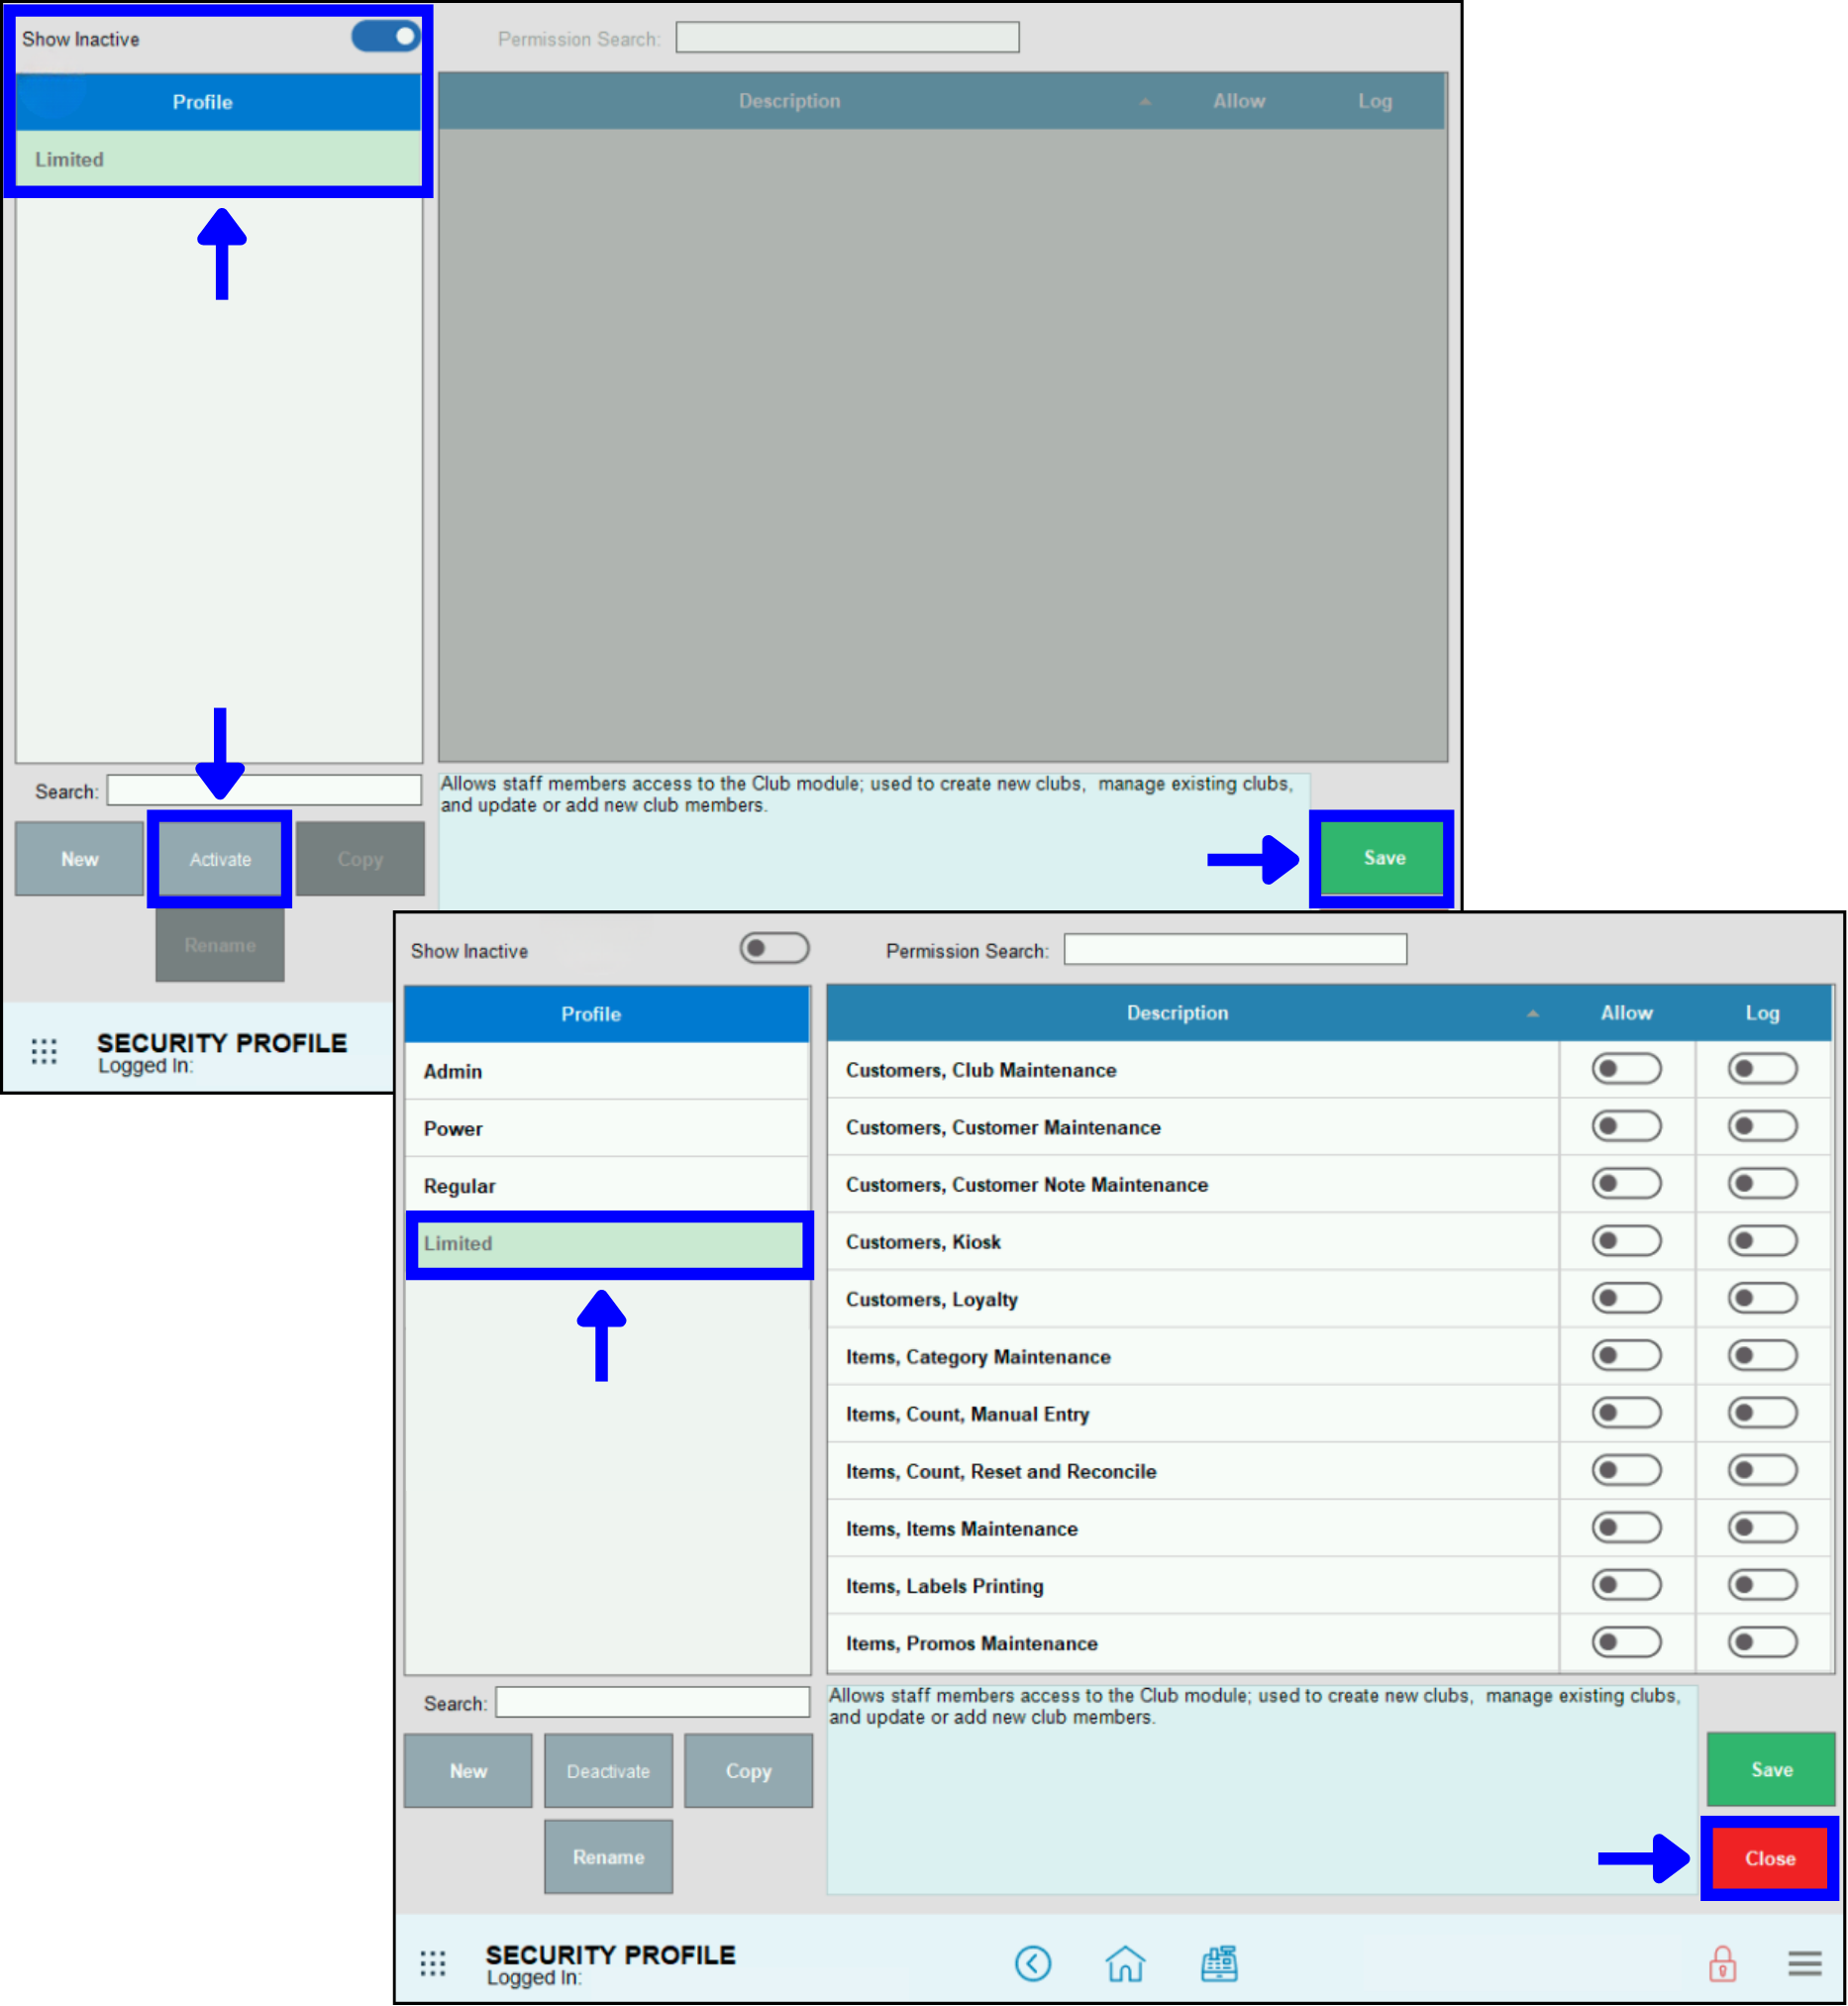
- Tap Save to save your changes.
- Caution: If you try to deactivate a profile that is currently assigned to any staff members, you are prompted to verify this change.
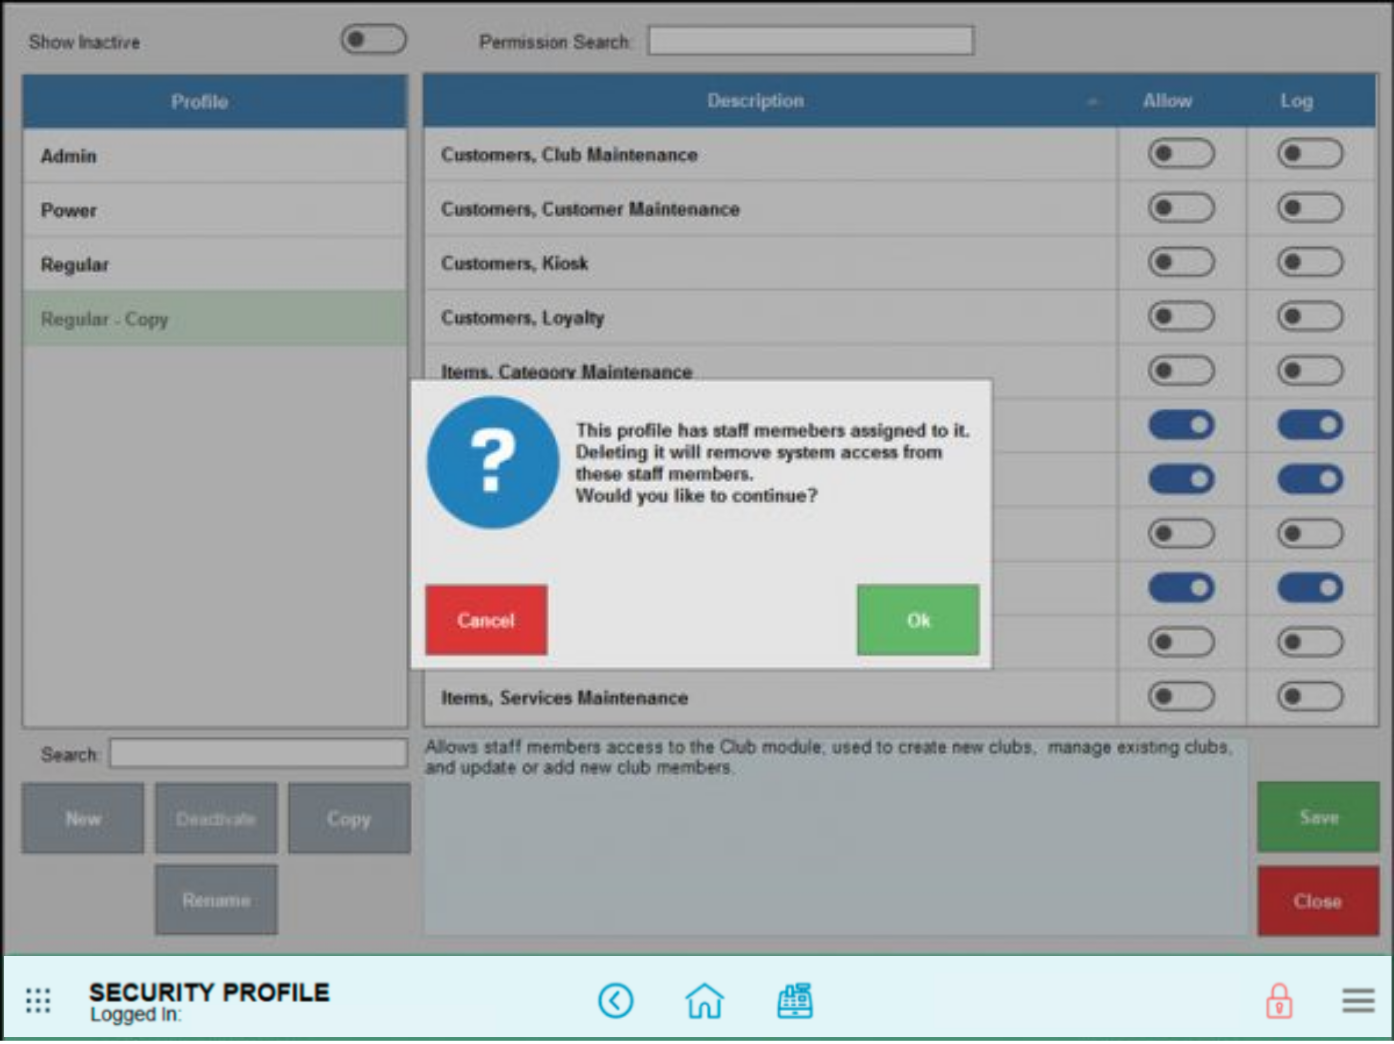 Click Ok to continue or Cancel to reassign User Types first. If you deactivate the profile anyway, the staff member can’t access Exatouch system functions until you assign them an active User Type.
Logs allow merchants a way of tracking who is completing which tasks in Exatouch. This process provides merchants with more information to finetune permissions.
- Note: Only Admin users are able to change user settings in Security Profile by default. To give other users this ability, an Admin will have to enable that setting in the desired security profile. For more information, see Admin PIN Requests.
- From Home, tap Settings, and then Security Profile.
- Select the Profile from the list.
- Find the setting that you’d like to log, and then enable the toggle in the Log.
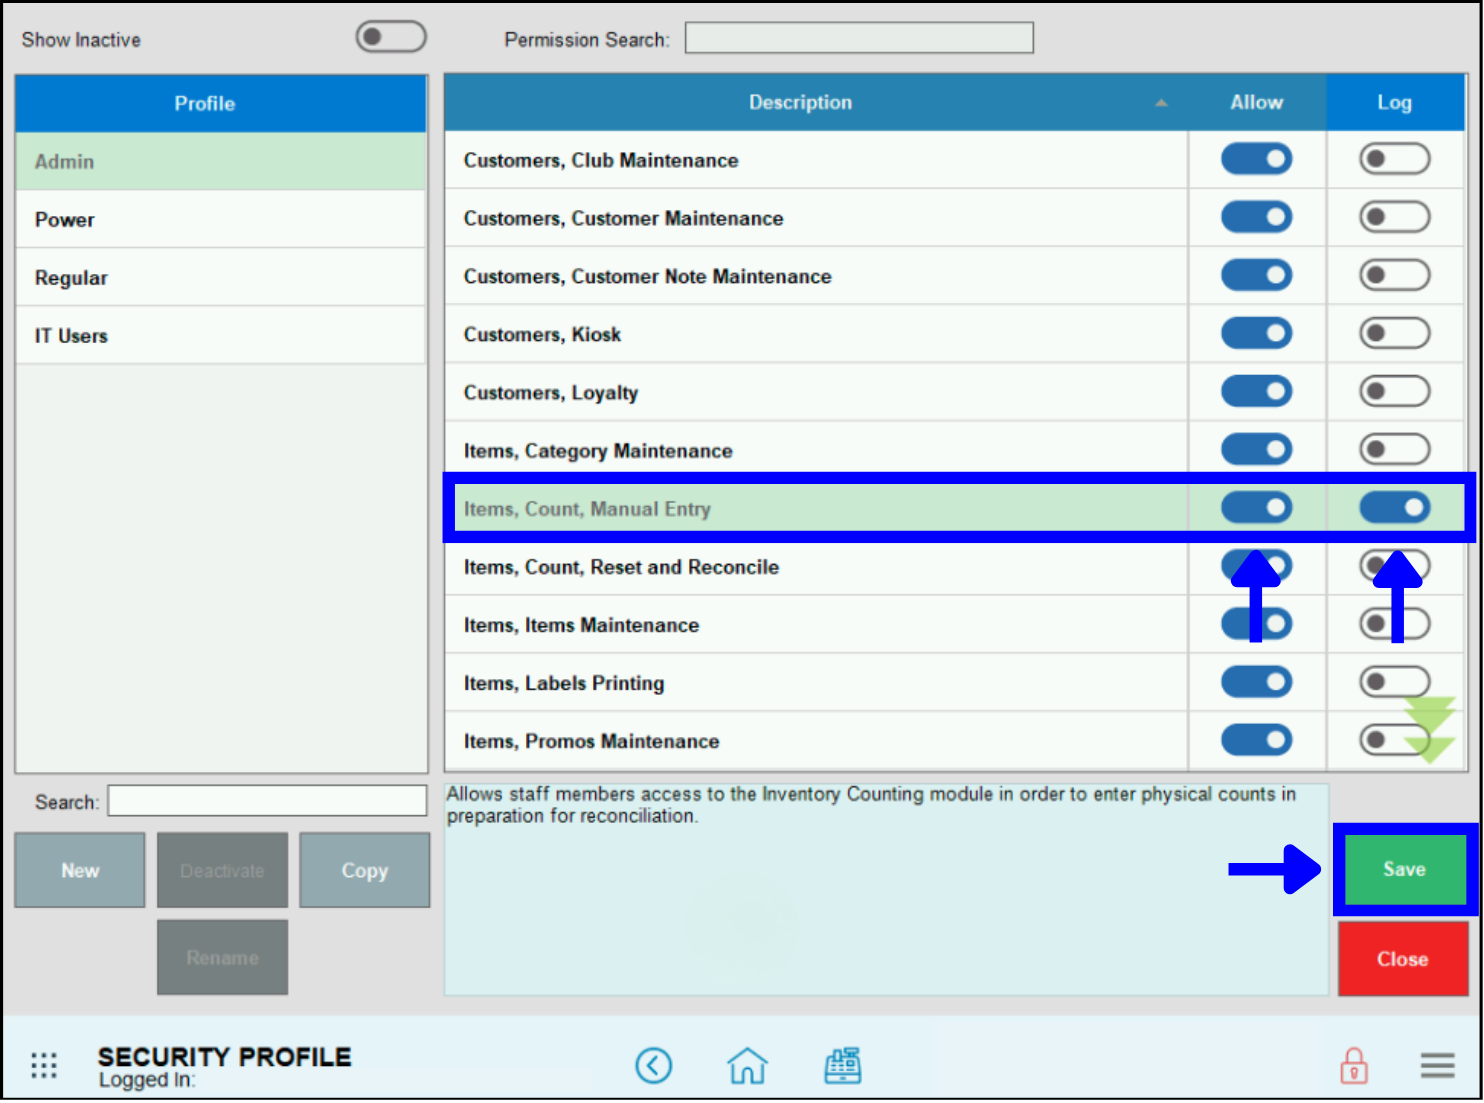
- Note: Anyone can access and complete Admin tasks if they have an Admin PIN.
- Tap Save.
If log is enabled for functions in a user’s security profile, then generating an activity log report will show all of the recent activity the user has engaged in. To generate this report, do the following:
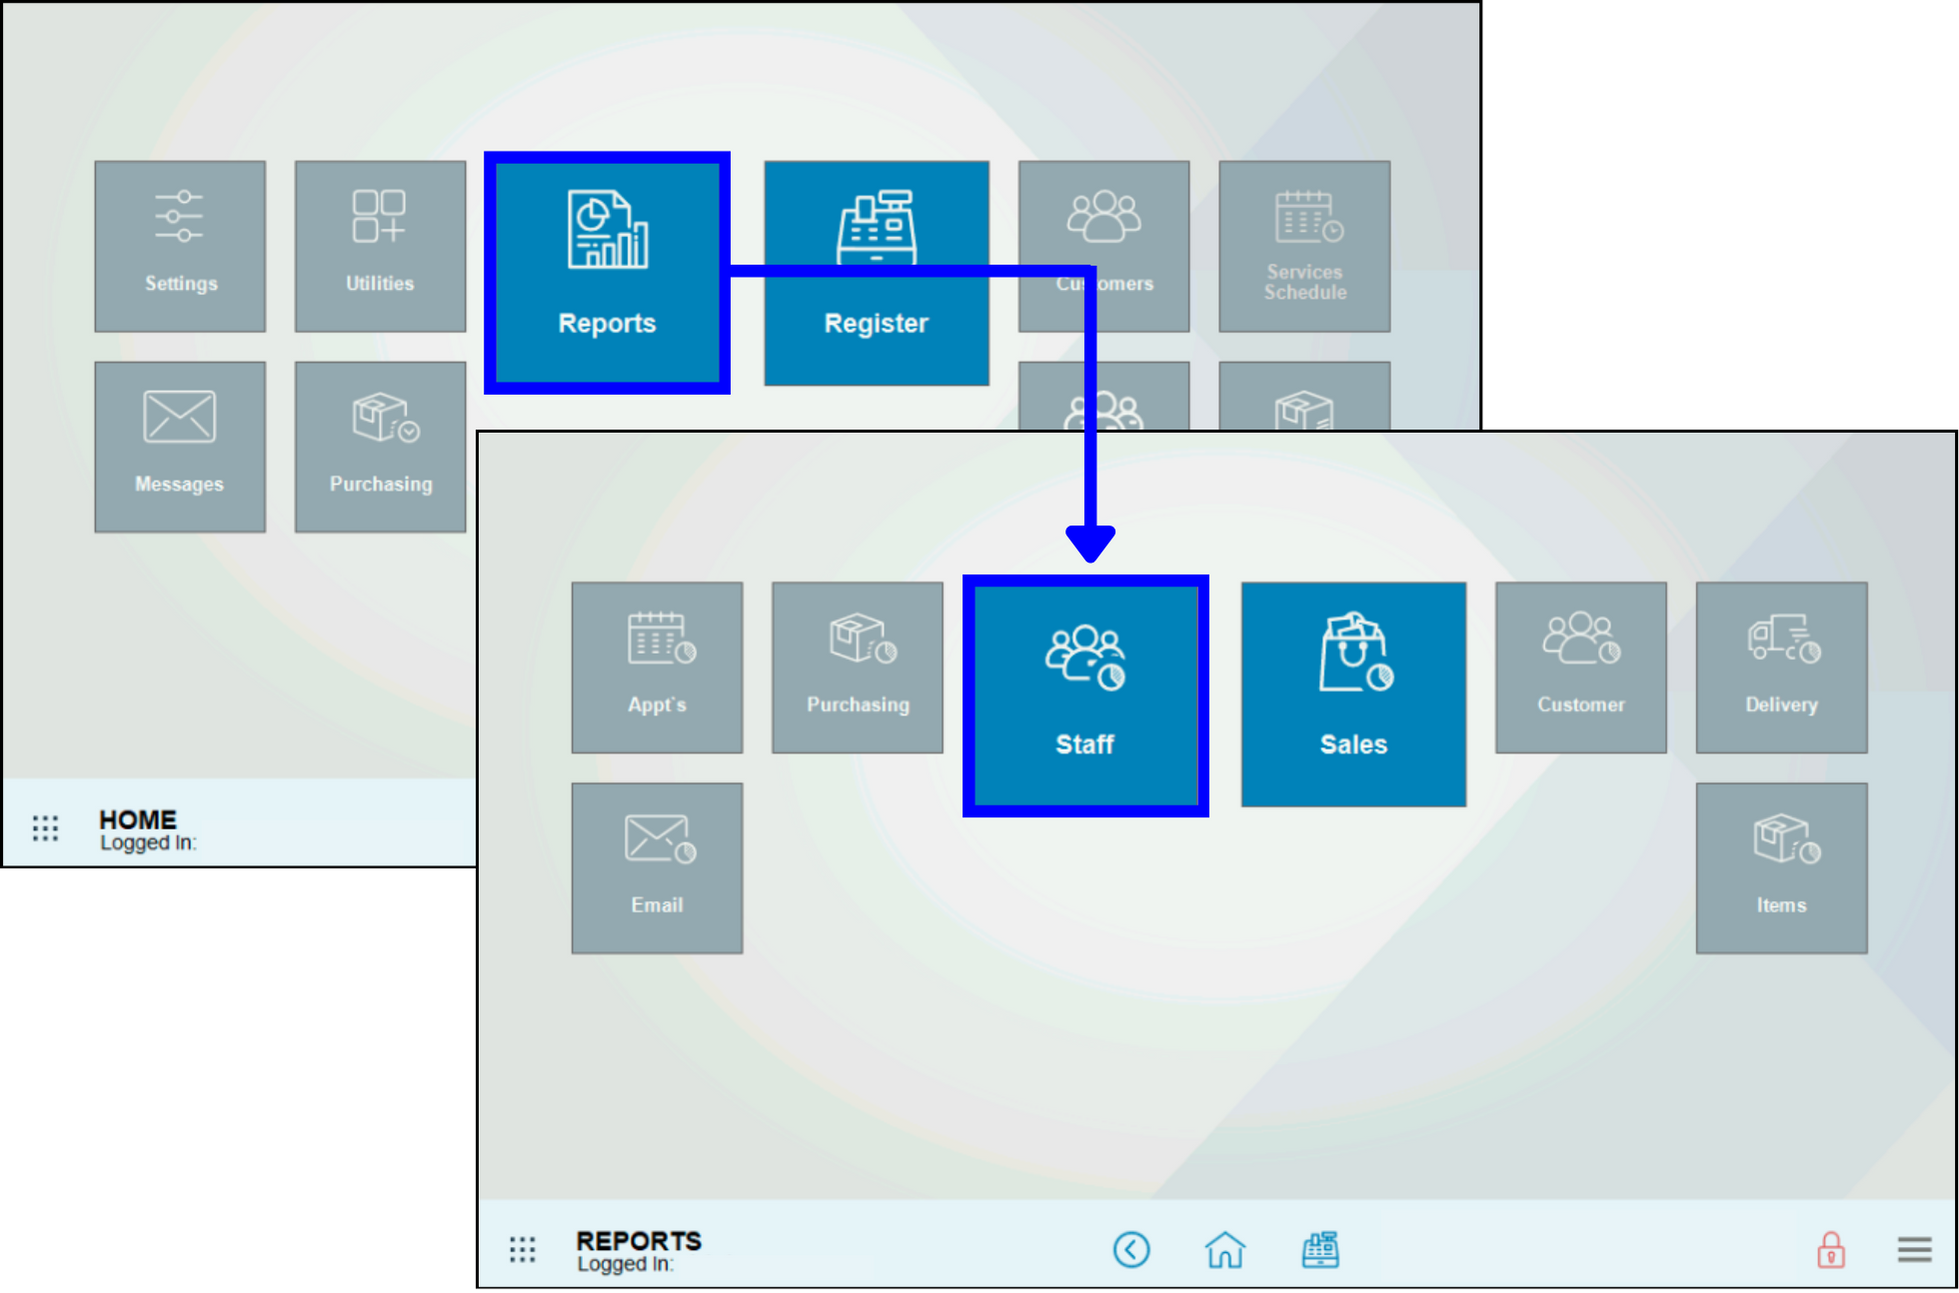
- From Home, tap Reports, then Staff.
- Tap Activity Log.
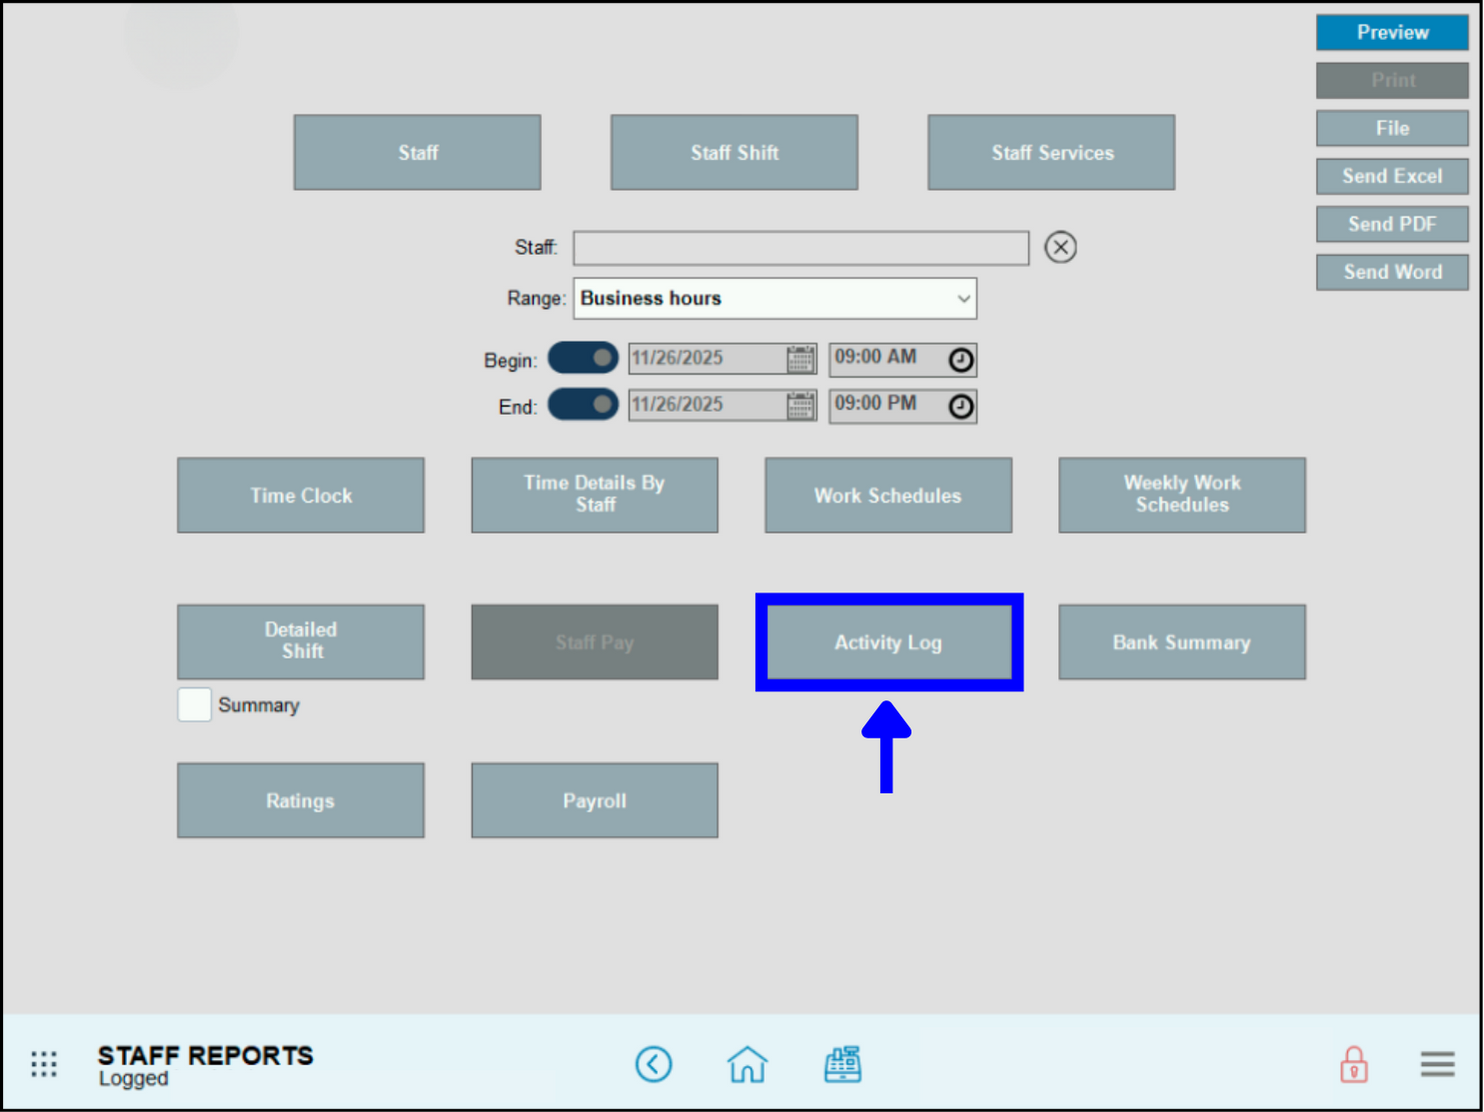
The log appears with login information and activity for each user.

How can we improve this information for you?
Registered internal users can comment. Merchants, have a suggestion? Tell us more.