This article contains basic troubleshooting information for Exatouch equipment such as payment terminals, printers, and scanners, as well as a list of issues that will require a call to the Exatouch Technical Support Team.
If you need to reboot or reset the Exatouch terminal, first try to restart Exatouch.
If a simple restart does not work, try the following sequence:
- Restart the computer using CTRL-ALT-DEL.
If this does not resolve the issue, contact the Exatouch Technical Support Team.
For payment errors, record what is on the terminal screen and contact the Exatouch Technical Support Team.
- Note: For the DECLINES error message, the cardholder should call the issuing bank.
If the barcode scanner isn’t reading barcodes or QR codes (as applicable), perform the following general troubleshooting steps.
If the scanner does not light up when you pull the trigger or swipe an item:
- Reseat the USB cable connecting the scanner or stand (as applicable) to the Exatouch station.
- Remove smudges or debris from the glass with a lint-free cloth and/or appropriate cleaning solution.
- Make sure the ambient lighting provides enough contrast for the laser to read the barcodes or QR codes, e.g., scan the items above the counter or away from the shelf, rather than under the counter or at the back of the shelf.
- Use the default settings to print out the reset sequence barcodes/QR codes on white paper (do not reduce the size); make sure the printouts are high-resolution, unwrinkled, and streak-free. Either cut the barcode into separate strip, fold the paper over, or cover up the preceding and following barcodes with another piece of paper so that you don’t inadvertently scan the wrong barcode.
If the scanner does light up when you pull the trigger or swipe an item, but is not adding items to the register:
- Update the scanner by using the barcode reset sequence. The reset sequences for each scanner model are linked above and in each section below.
- You may have to go through the reset sequence more than once. If one of the barcodes didn’t register during the first-round reset, the troubleshooting sequence won’t work.
- Use a print version of the reset sequence barcodes, rather than scanning them onscreen (screen glare may interfere with the scanner function).
Cipherlab 1D USB Barcode Scanner with Stand
The Cipherlab Barcode Scanner attaches via USB to the Exatouch station. It can only read 1D barcode information, and cannot read QR codes.
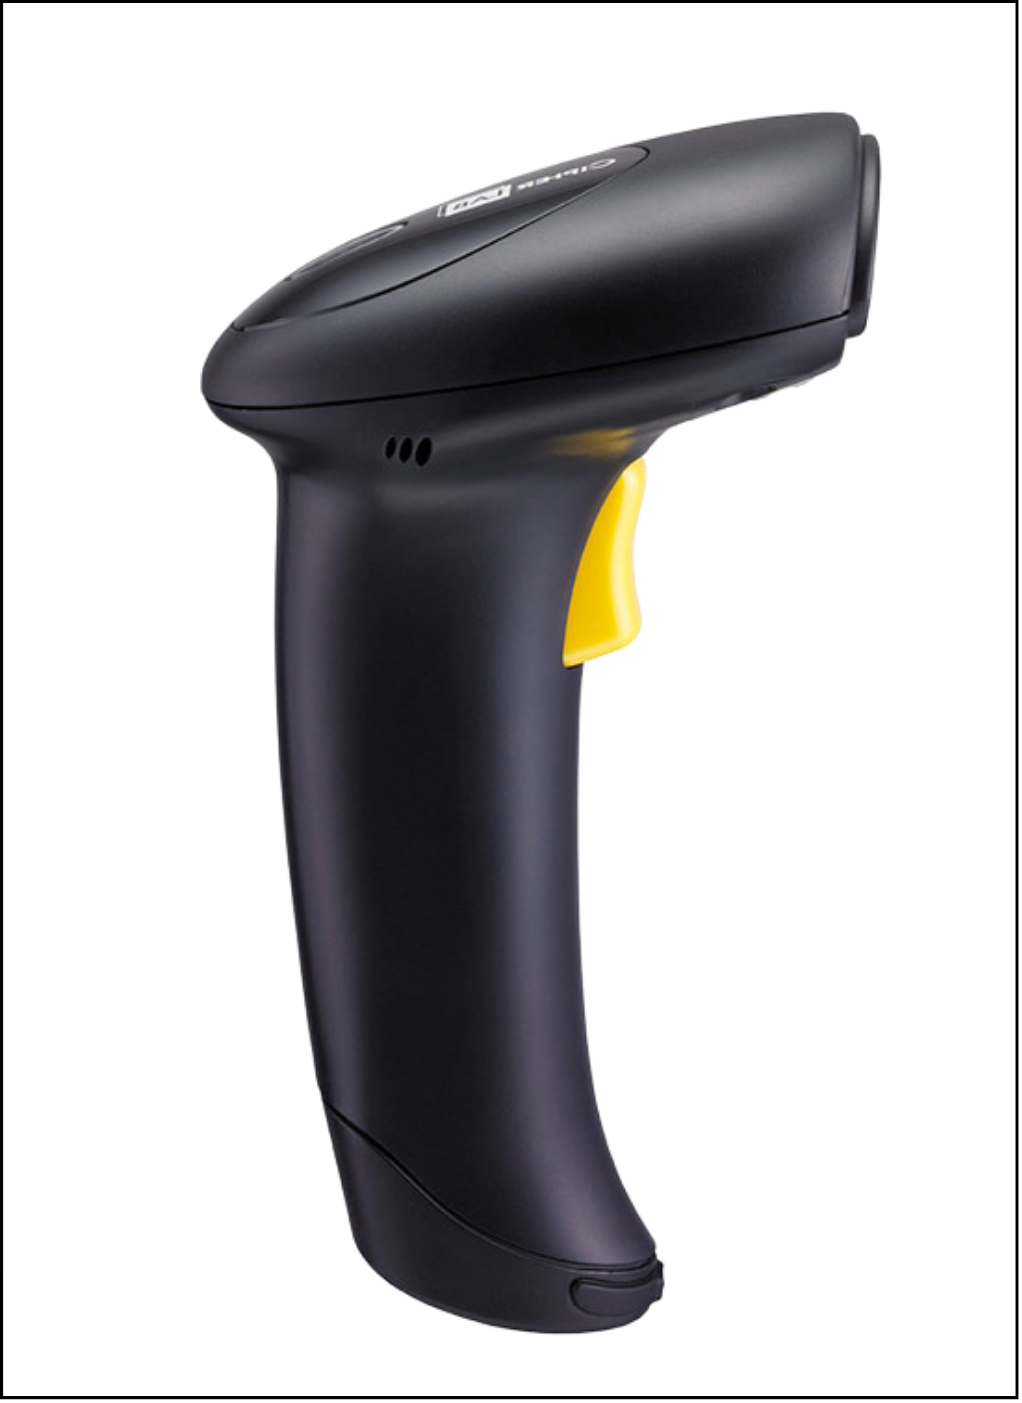
The two-part Cipherlab reset sequence consists of:
- Part One: Default Settings (5 steps)
- Scan Enter Setup.
- Scan Save User Settings as Defaults.
- Scan Restore System Defaults.
- Scan Restore System Defaults.
- Scan Update.
- Part Two: Enabling UPC-E (4 steps)
- Scan Enter Setup.
- Scan Enable UPC-E Addon 2.
- Scan Transmit UPC-E System Number.
- Scan Update.
- Note: Both Part One and Part Two of the reset sequence must be performed sequentially; only doing one or the other will not properly reset the scanner.
Get the Cipherlab 1D Barcode Scanner reset sequence here.
DataLogic Magellan In-Counter Scale
The DataLogic Magellan In-Counter Scale attaches via USB to the Exatouch station. It can read both barcodes and QR codes, via an in-counter scanner or remote display scanner.
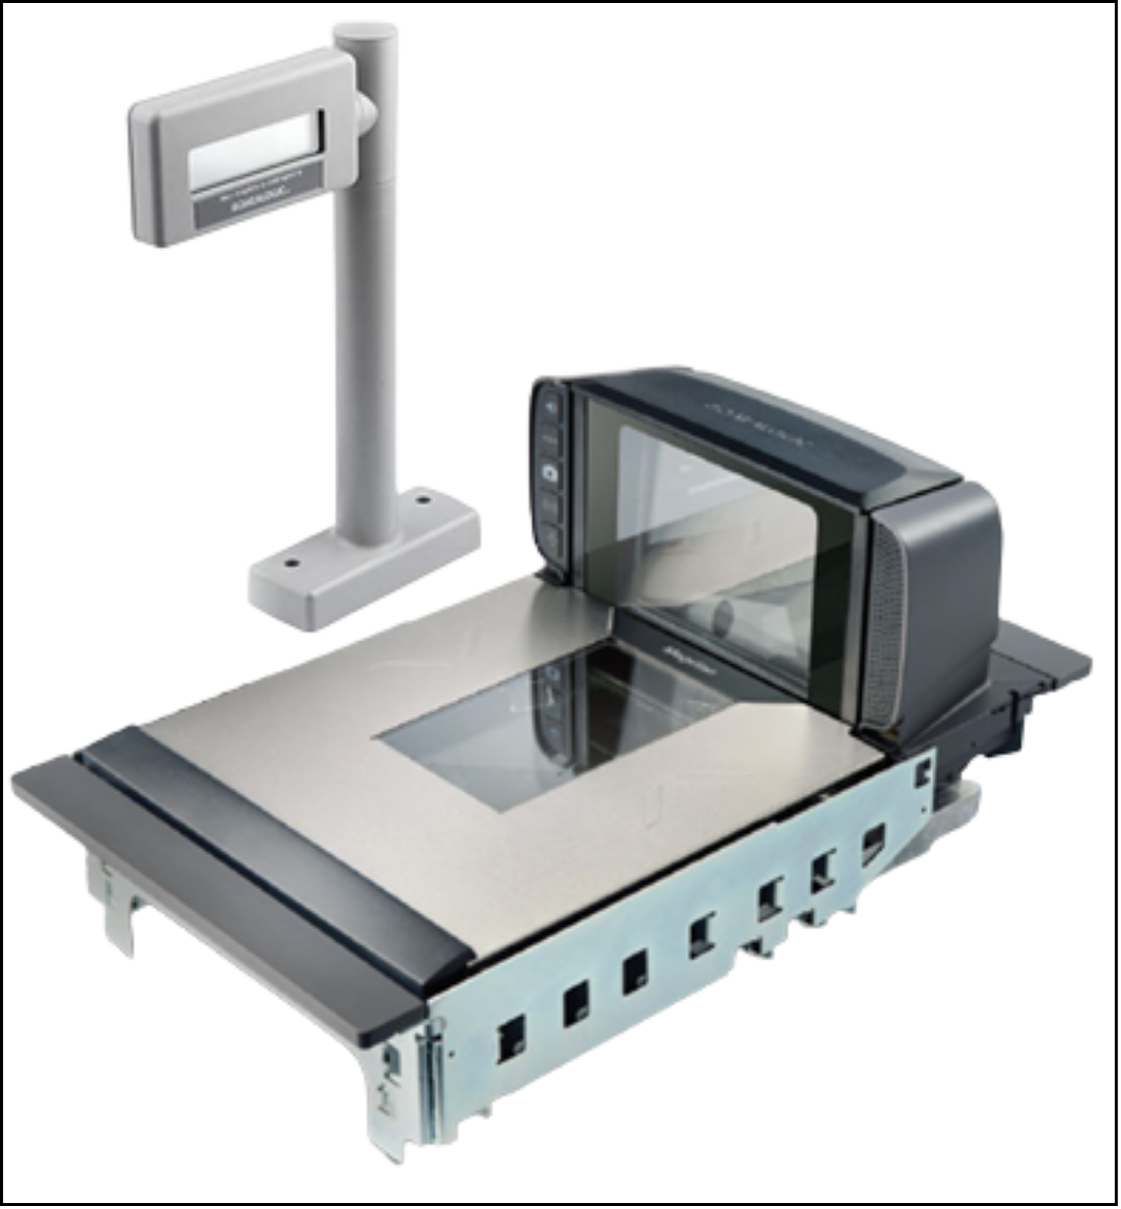
The DataLogic Magellan In-Counter Scale reset consists of:
- Scan Return to Factory Settings.
- Scan UPC-E Check Digit Enable.
- Scan UPC-A Check Digit Transmit.
- Scan EAN-13 Check Digit Enable.
- Scan Enable EAN-8 Check Character.
- Scan Code 39 Label ID = B – 4 byte.
Get the DataLogic Magellan In-Counter Scale reset sequence here.
Disabling the DataLogic Magellan Remote Display
Merchants who choose not to use the remote display should note the following:
- The remote display must first be connected to the scale/scanner in order to disconnect it properly.
- Merely detaching the cable from the scanner will not properly disconnect the remote display.
To enable the remote display, make sure the cables are correctly attached and then:
- Scan Enter/Exit Programming Mode.
- Scan Remote Display Enable.
- Re-scan Enter/Exit Programming Mode.
To disable the remote display:
- Scan Enter/Exit Programming Mode.
- Scan Enter/Exit Programming Mode.
- Re-scan Enter/Exit Programming Mode.
Get the DataLogic Magellan Remote Display reset sequence here.
Symbol 2D Omnidirectional Presentation USB Scanner with Stand
The Symbol 2D Omnidirectional Presentation Scanner attaches via USB to the Exatouch station. It can read both barcodes and QR codes.
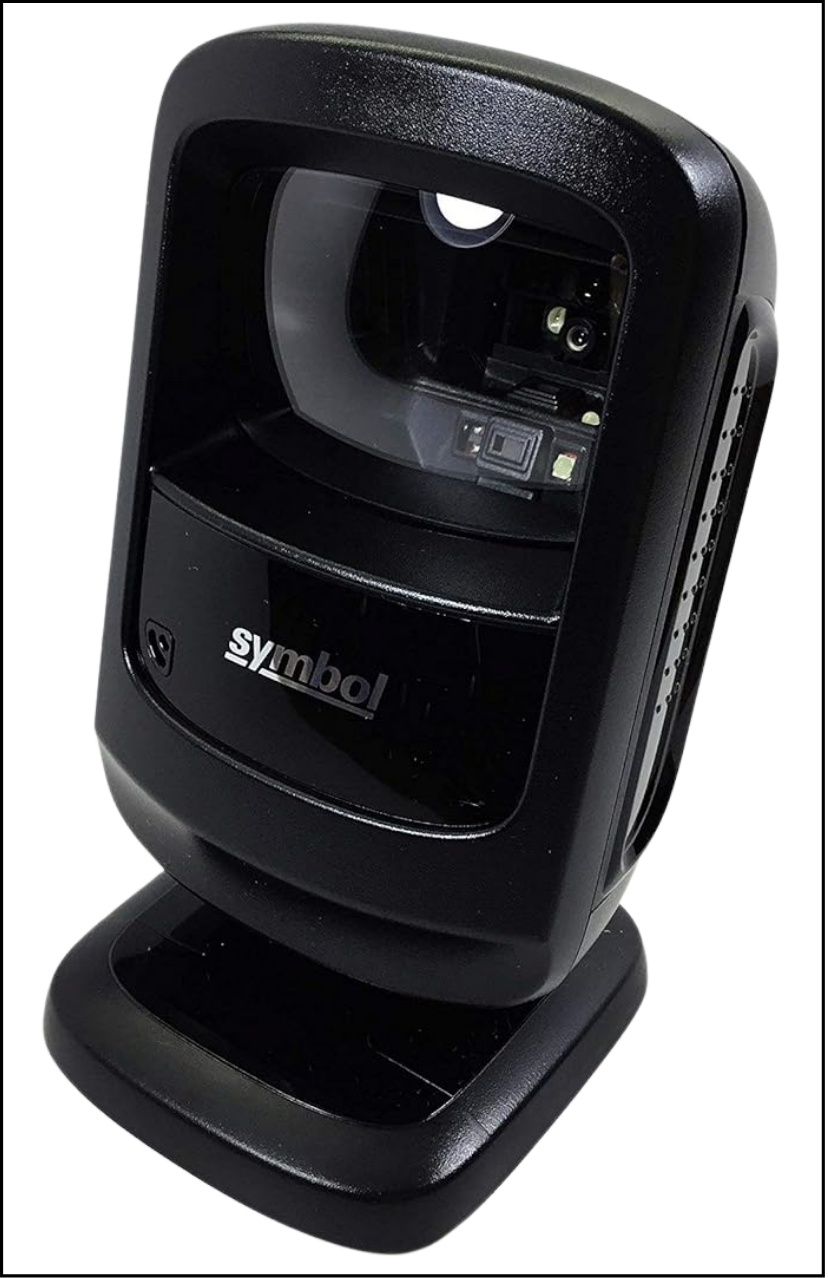
The Symbol 2D Omnidirectional Presentation Scanner reset consists of scanning two barcodes in sequence:
- Set Defaults.
- Add an Enter Key.
Get the Symbol 2D Omnidirectional Presentation Scanner reset sequence here.
Zebra 2D USB Barcode Scanner with Stand
The Zebra 2D USB Barcode Scanner attaches via USB to the Exatouch station. It can read both barcodes and QR codes.
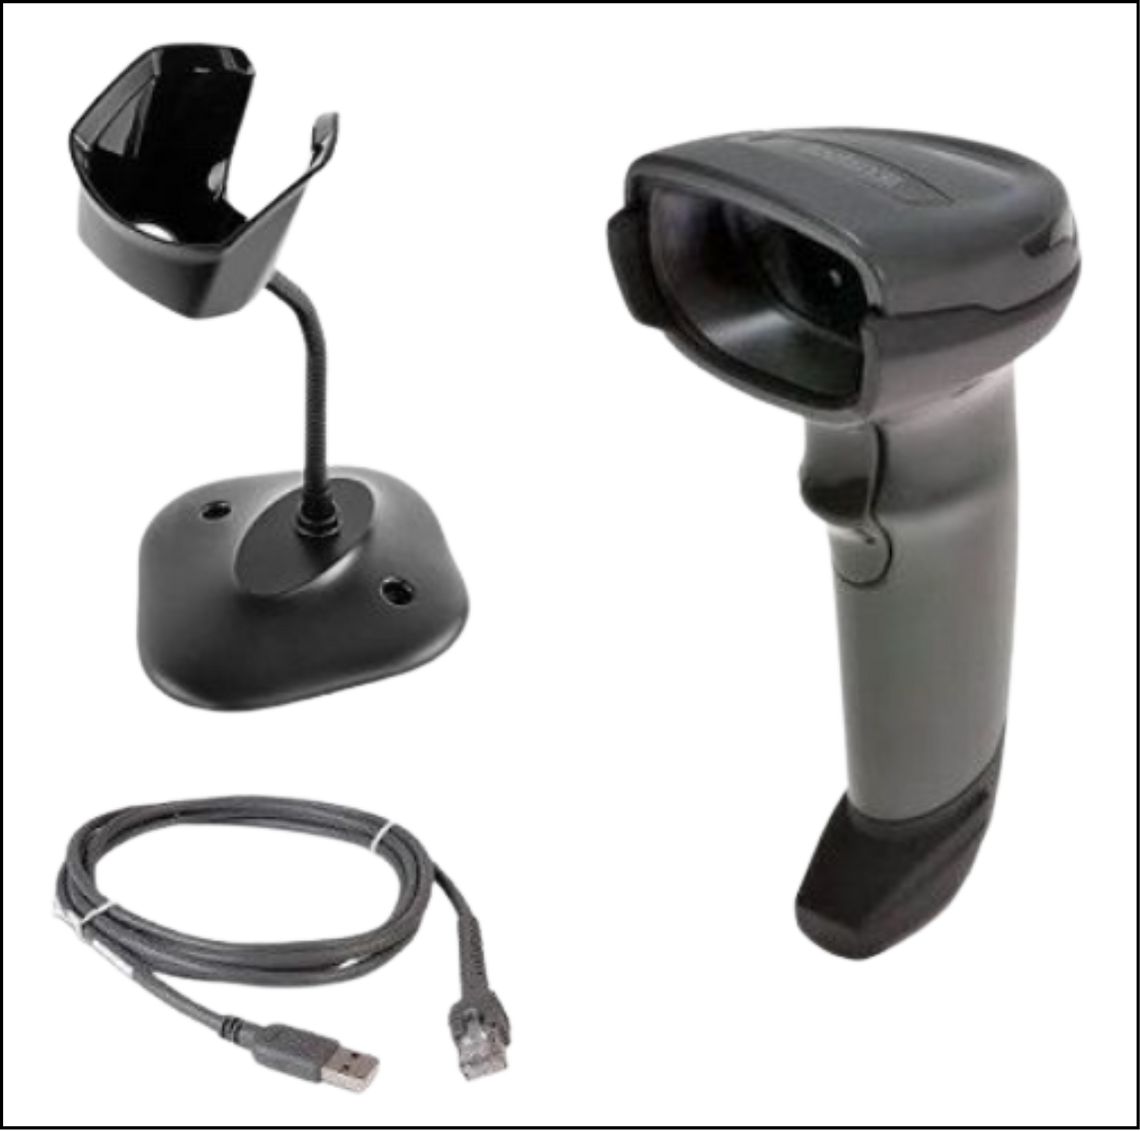
The Zebra 2D USB Barcode Scanner reset consists of scanning two barcodes in sequence:
- Set Defaults.
- Add an Enter Key.
Get the Zebra 2D USB Barcode Scanner reset sequence here.
Zebra 2D Bluetooth Barcode Scanner with Stand
The Zebra 2D Bluetooth Barcode Scanner rests and recharges in the stand; the stand is connected via USB to the Exatouch station. It can read both barcodes and QR codes.

In addition to the general troubleshooting steps above, check the following for the Zebra 2D Bluetooth Barcode Scanner:
- Make sure the scanner has been charged. A full charge should provide up to 84 hours/110,000 scans.
- Make sure the scanner has not decoupled from the stand.
- If they have decoupled, use the scanner to scan the barcode and QR code on the bottom of the stand to reestablish the connection.
After charging the scanner and recoupling the scanner and stand, perform the Zebra 2D Bluetooth Barcode Scanner reset by scanning two barcodes in sequence:
- Set Defaults.
- Add an Enter Key.
Get the Zebra 2D Bluetooth Barcode Scanner reset sequence here.
Occasionally the connection between Exatouch and the payment terminal will be broken; the most common reasons for receiving an error message are because of network disruptions, physical breaks (e.g., the cables are detached) or because the terminal is offline.
When the connection has been disrupted, Dejavoo and PAX terminals (all models) will display an error message:
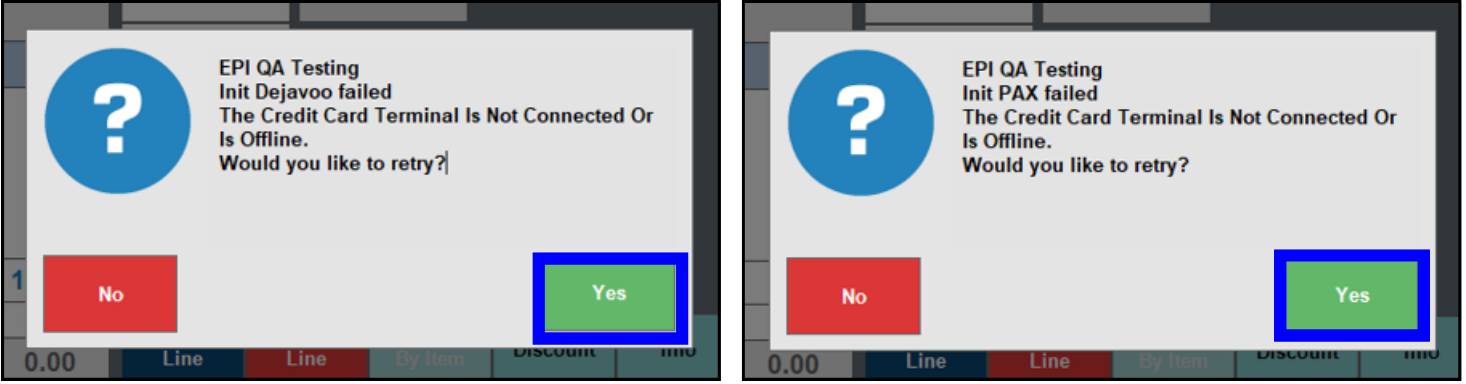
If you see this error message:
- Tap Yes and wait for the connection to be re-established.
- If that does not work, proceed to the general troubleshooting sequence below.
Check/Clean Terminal Connections
- Check that the terminal power and indicator light are on. If not, make sure that:
- The internet/ethernet and power cables are securely plugged into the terminal and the correct AC adapter.
- The cables are in good physical condition, and are not twisted, frayed, or otherwise damaged.
- The adapter is plugged into a working electrical outlet or power strip.
- Clear away any blockages or physical obstructions.
- Use a can of air to gently blow away dust, paper particles, or other debris in terminal connections, chip readers, and housing.
- Use an electrical contact cleaner to gently dissolve any dirt, grease, or smudges from externally-accessible parts of the terminal. (We do not recommend using alcohol, glass cleaner, or other household cleaning solutions, as they can damage electronic/electrical components.)
- After checking/cleaning the terminal connections and housing, restart Exatouch.
- Run a test sale for a minimum of $1.00, to make sure the terminal is working properly before serving another customer.
- If the transaction is successful, that means the connection to the payment terminal has been re-established, the problem has been solved, and no further steps are needed.
- Note: Always turn the equipment off before using the air can or electrical contact cleaner, and allow all surfaces to dry before reconnecting them and turning the equipment back on.
When to Contact the Technical Support Team
If the cable/power check and equipment restart does not resolve the payment terminal connectivity issue, please contact the Exatouch Technical Support Team for assistance.
Most printer errors can be resolved by performing basic equipment and connectivity checks. Occasionally, you may need to correct specific (usually minor) error messages or activate print setting categories. The general troubleshooting process below will take you through some of the common issues that can happen to receipt, label, and remote printers.
Open the Printer Status Page
If the printer is not receiving a print job, a yellow triangular warning icon should appear in the lower menu bar.

- Click on the warning icon to bring up the Printer Status page.
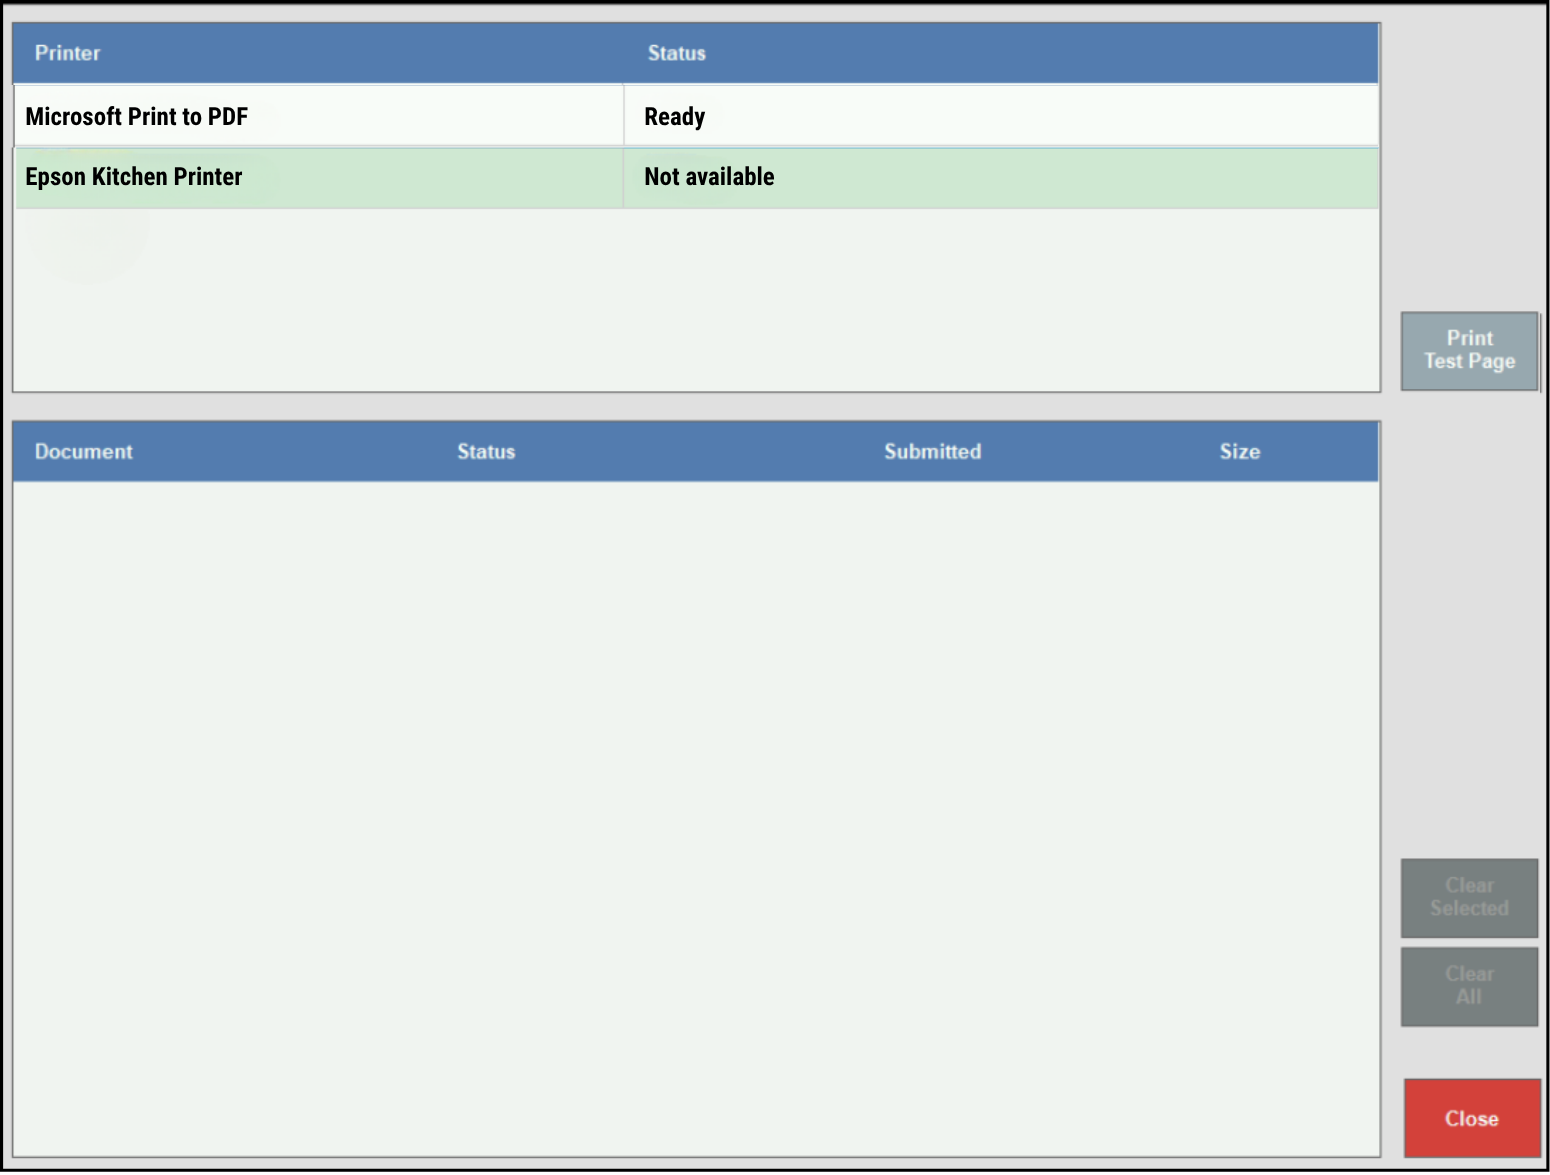
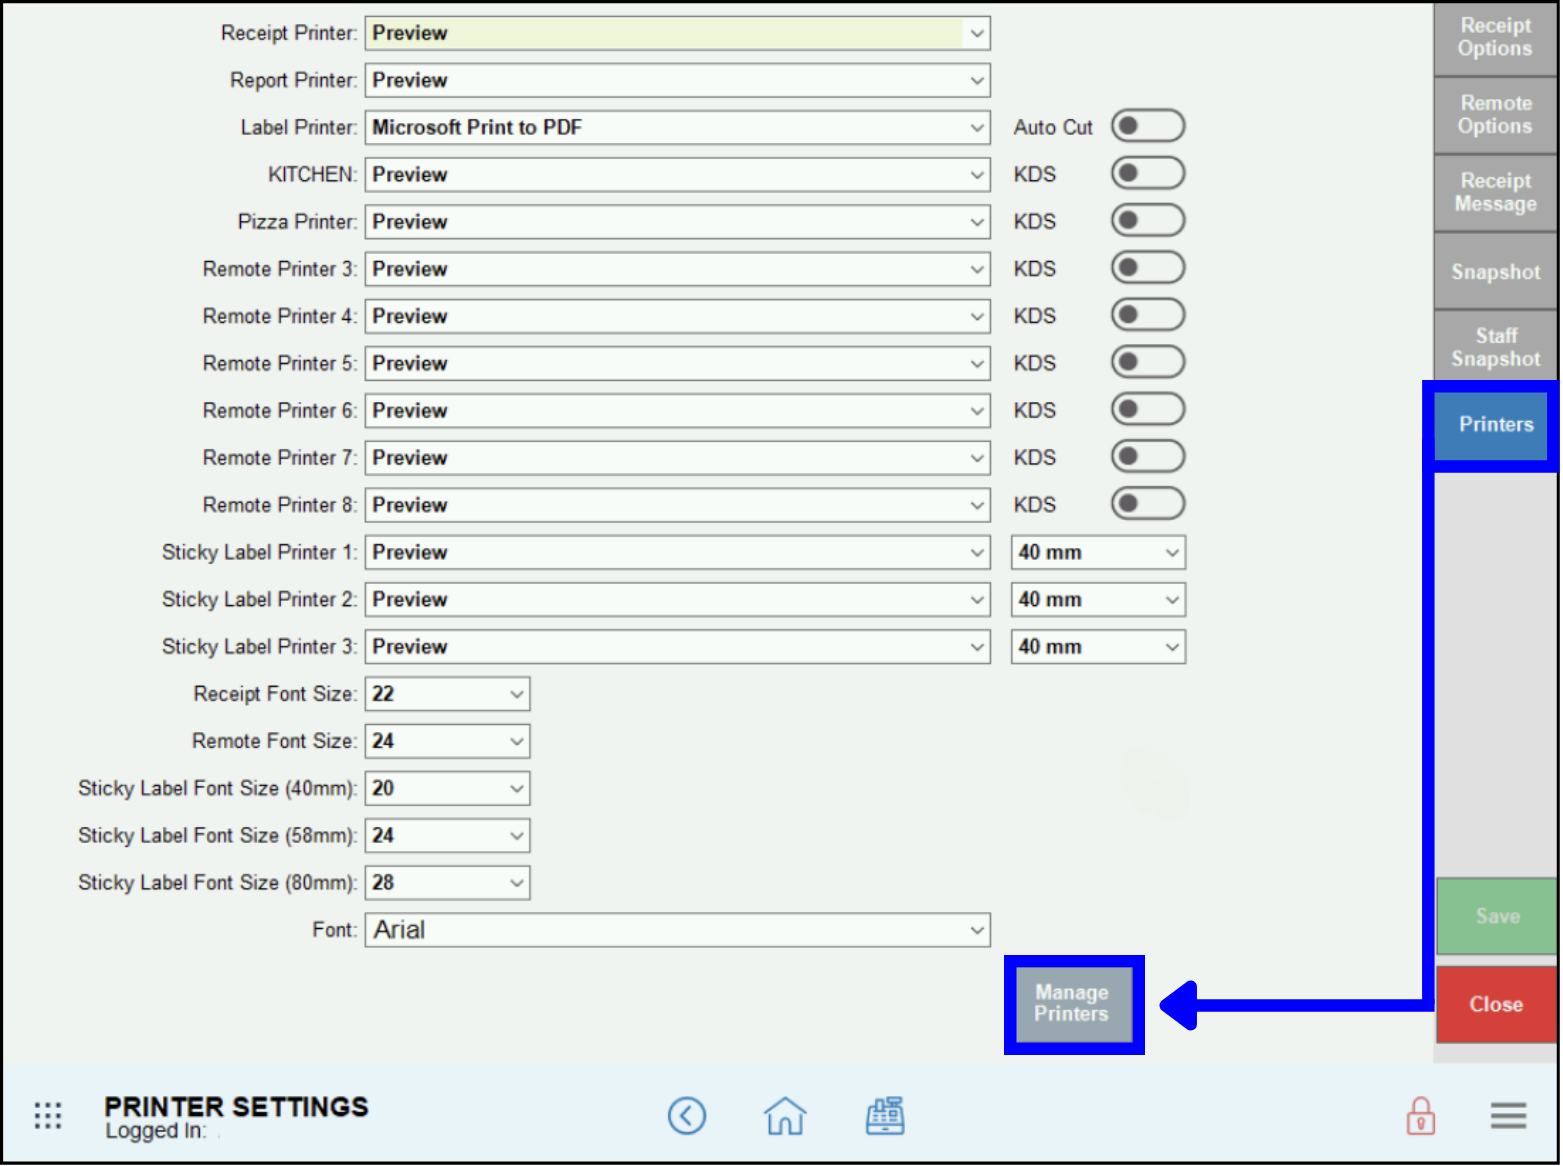
- If the warning icon does not appear, go to Home > Settings > Print Settings > Printers > Manage Printers to bring up the Printer Status page.
The Printer Status page will usually indicate what the error is. If you are getting a Not Available status, proceed with a basic equipment and connectivity check; in most cases, printer errors can be resolved in-house by the user.
Check the Connections
Before doing anything else, check that the printer power and indicator light(s) are on. If not, check the following for remote and sticky label printers:
- The printer power cable is securely plugged into the printer and the correct AC adapter.
- The printer is plugged into a working outlet or power strip.
- The power and ethernet cable(s) are connected. Make sure that the cables are not twisted or frayed, the plastic tabs aren’t broken, and they are securely plugged in at all ports.
Note that different printer models may have indicator lights in different places: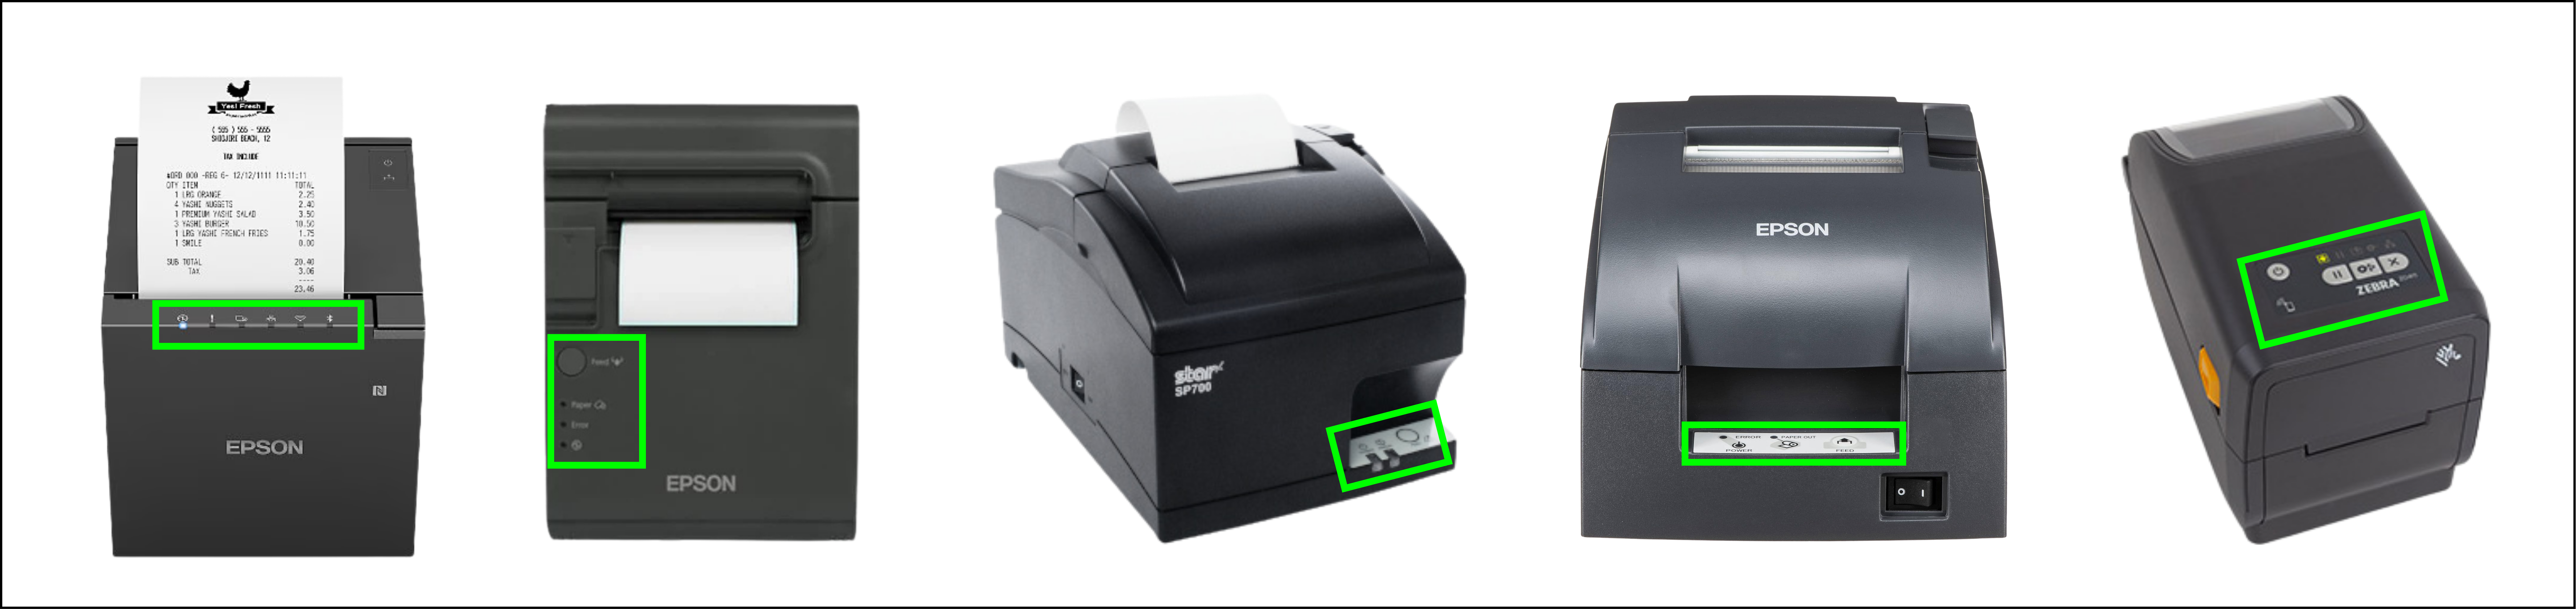
For receipt and label printers, check the following:
- The USB cable is securely plugged into the printer and the correct USB outlet.
- The USB adapter is plugged into a working outlet or power strip.
For kitchen, sticky label, or other remote printers, check the following:
- The ethernet cable from the printer is securely plugged into the router or switch.
- The router or switch is securely plugged into the wall outlet.
- All equipment is plugged into a working outlet or power strip (as applicable).
Clean the Printer
Make sure there are no blockages or physical obstructions:
- Use a can of air to gently blow away dust, paper particles, or other debris in the receipt paper compartment.
- Use an electrical contact cleaner to gently dissolve any dirt, grease, or smudges from cords and contact points. (We do not recommend using alcohol, glass cleaner, or other household cleaning solutions, as they can damage printer components.)
Check the Error Messages
Once the printer is plugged in, turned on, and cleaned, go to Home > Settings > Print Settings > Printers > Manage Printers and print a test page from the Printer Status screen. 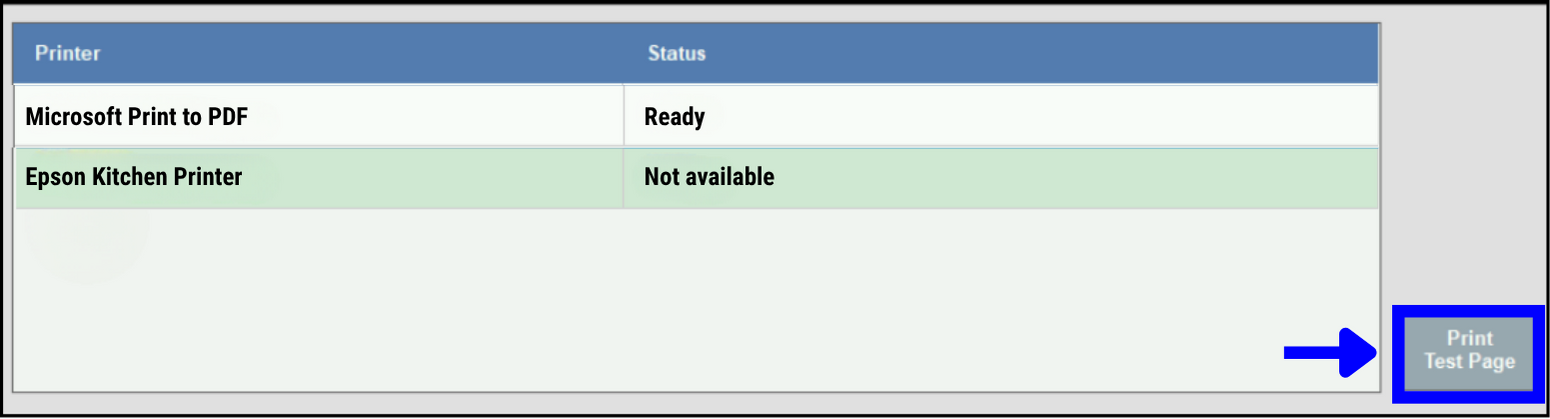
If the printer is still not working, check for other error messages in the Status column. Common issues can include:
- Paper Jam – Open the printer, remove any jammed paper or other obstruction in the auto-cutter, and ensure the correct paper is properly loaded.
- Out of Paper – Load a new roll, ensuring it is installed and feeding correctly.
- Paper Size Mismatch – Make sure the loaded paper matches the required size.
- Wrong Paper – Using regular instead of thermal paper can cause blank receipts to print.
- Roll Paper Cover Open – Make sure the roll paper cover is tightly closed.
- Note: Actual error messages may vary, depending on the printer model.
Check the Categories for Remote and Sticky Label Printers
If the printer is connected, set up with the correct thermal paper, and no error messages are present but is still not printing receipts with the correct information:
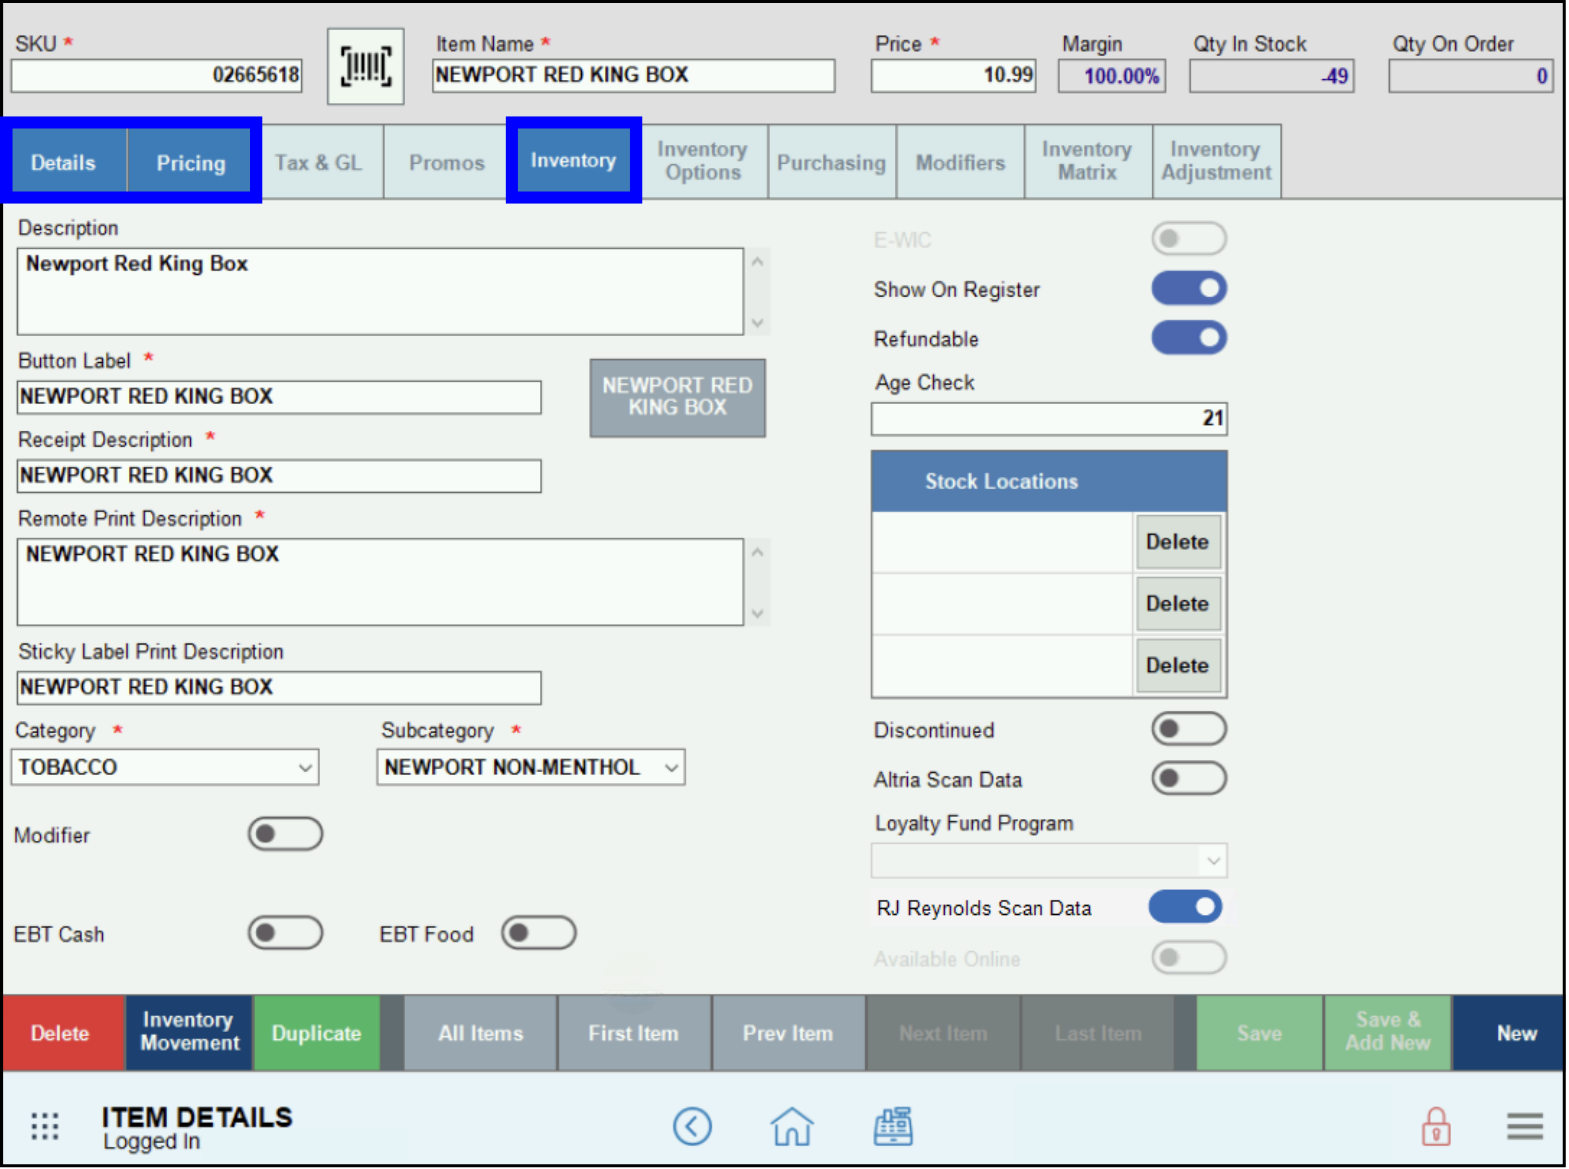
- Go to Home > Items > Categories.
- Confirm that the relevant Categories have been set to print. For example, if you want to send Specialty Pizzas to the Pizza Printer, make sure that Pizza Printer has been checked.

Rebooting/Restarting Printers and Routers
Do not reboot the server, router, or switch without first contacting the Exatouch Technical Support Team.
- Rebooting the server will disconnect all Sidekick stations.
- Rebooting the router or network switch will bring down the entire POS system.
- Reboots should always be done with tech support on the line to avoid extended downtime.
When to Contact the Technical Support Team
If these troubleshooting processes do not resolve the printer issue(s), there may be a problem with the Windows installation or network. Please contact the Exatouch Technical Support Team for assistance; do not attempt to reinstall software yourself.
Merchants enrolled in the RJ Reynolds and/or Altria Scan Data programs may occasionally receive error messages when sending files or running reports. After the initial setup has been validated, most issues are caused by incorrect data entry, such as the wrong dates, account numbers, promo/discount info, etc. The topics below cover the most common problems and solutions.
When troubleshooting Scan Data error messages, follow these steps:
- Check your data entry for errors; see below for the most common errors and solutions. Note: If you are enrolled in both the RJ Reynolds and Altria Scan Data programs, make sure you are entering the information into the correct program.
- Contact your Scan Data representative for assistance with program-related issues.
- Contact the Exatouch Technical Support Team for assistance with Exatouch system-related issues.
Test File Troubleshooting
SFTP Authentication Failure Message
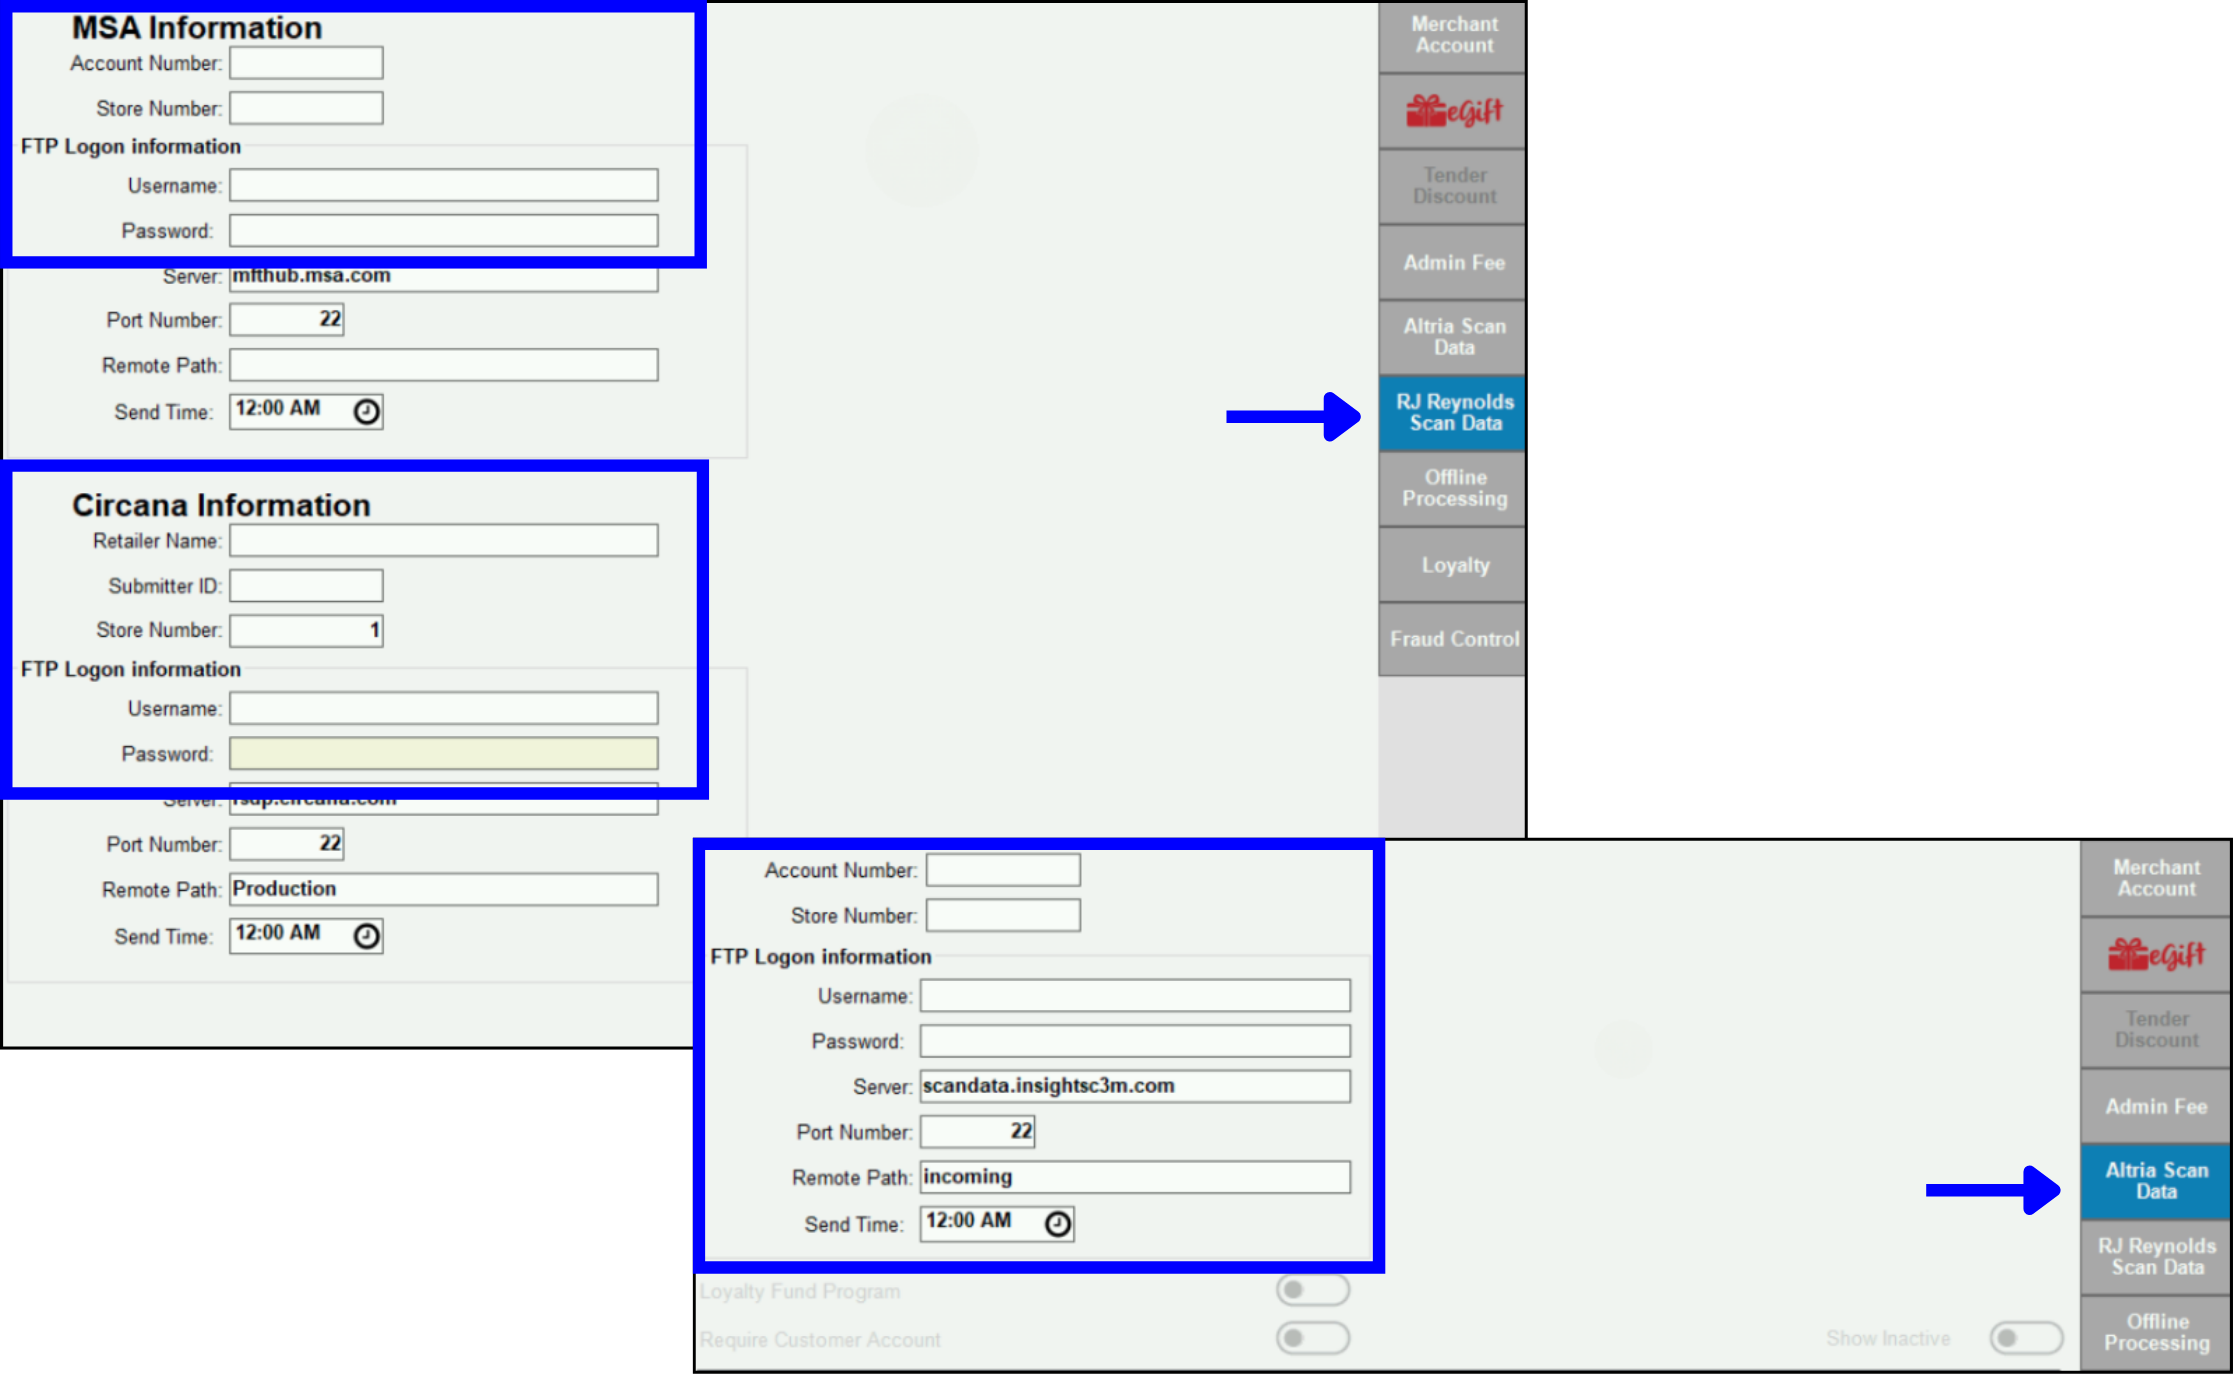
If you receive an SFTP authentication failure message when trying to send a Test File, double check the account information for Altria and/or RJ Reynolds (Circana and MSA). After correcting any errors, resend the test file.
Altria Account Information
- Account Number
- Store Number
- Username
- Password
RJ Reynolds Account Information (Circana)
- Retailer Name
- Submitter ID
- Account Number
- Store Number
- Username
- Password
RJ Reynolds Account Information (MSA)
- Account Number
- Store Number
- Username
- Password
Items Set Up Incorrectly
If items have been set up incorrectly, you will receive an error message after the test file has been sent. In this case, contact your Scan Data representative to determine which items are incorrect. Correct any errors and resend the test file.
See the “Configure Item Requirements” section for both Scan Data Program – RJ Reynolds and Scan Data Program – Altria for more information about correctly setting up items.
Sales Report Troubleshooting
Communication Errors
If you experience any issues sending Sales Reports to Scan Data, you may have a communication issue with the internet connection. In this case, simply resend the file for the specific week that the transmission failed.
SFTP Authentication Failure Message
If you receive an SFTP authentication failure message when trying to send a Sales Report, double check the account information for Altria and/or RJ Reynolds (Circana and MSA). After correcting any errors, resend the report.
Altria Account Information
- Account Number
- Store Number
- Username
- Password
RJ Reynolds Account Information (Circana)
- Retailer Name
- Submitter ID
- Account Number
- Store Number
- Username
- Password
RJ Reynolds Account Information (MSA)
- Account Number
- Store Number
- Username
- Password
Wrong Date for the Sales Report
Scan Data reports are weekly reports and must have the correct dates within the report parameters. Check the date of the report (whether the dates were entered automatically or manually), correct the Start and End Dates as needed, and resend the Sales Report file.
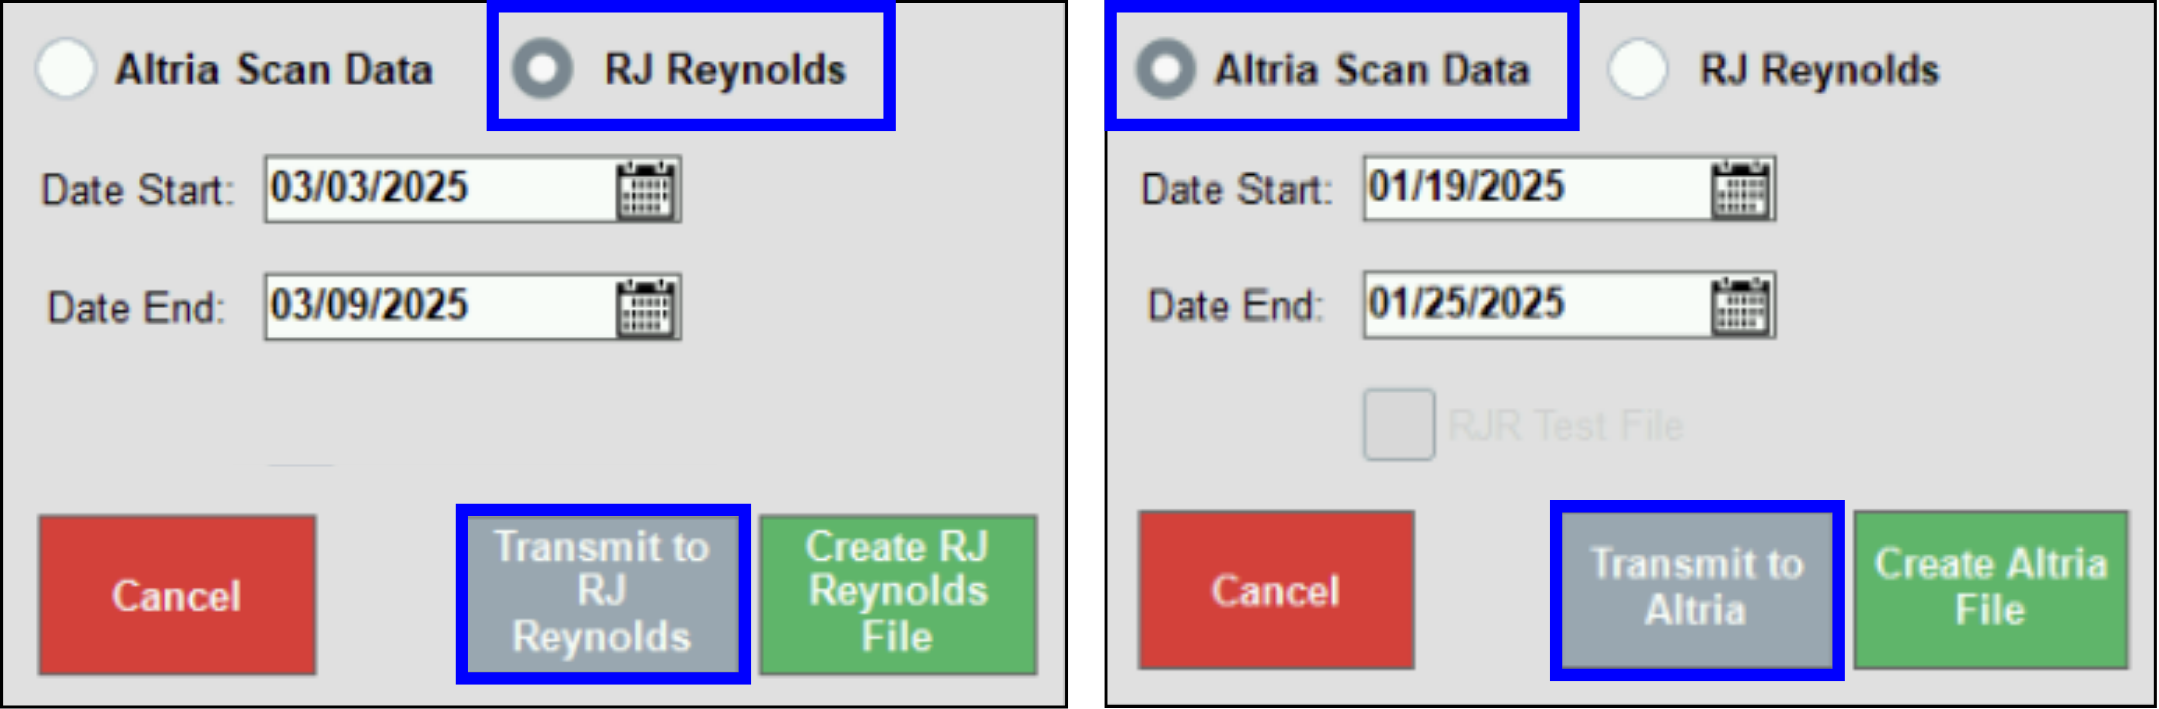
Check your email to make sure Sales Reports have been successfully submitted; the Insight section of the Scan Data platform will also provide information about Sales Reports submissions. Contact your Scan Data representative for more details about Insights or Issues.
Discount/Promo Troubleshooting
Discount/Promo Issue Report on a Sent Sales Report
An issue record will be generated if a discount or promo has been misreported because it was set up or recorded incorrectly. Merchants should check their Scan Data portal or contact their Scan Data representative for further details.
The resolution for these issues is to delete records, and resubmit the record through the FTP system.
- Note: Because the records with incorrect discounts have to be deleted, merchants will not be paid for those items. There is no way to retroactively be paid for incorrectly discounted items. Please contact the Exatouch Technical Support Team to correct the issue going forward so that payments can proceed.
If Exatouch freezes or shows a black screen upon startup, try to restart the system using Ctrl-Alt-Delete. If that does not work, contact the Exatouch Technical Support Team.
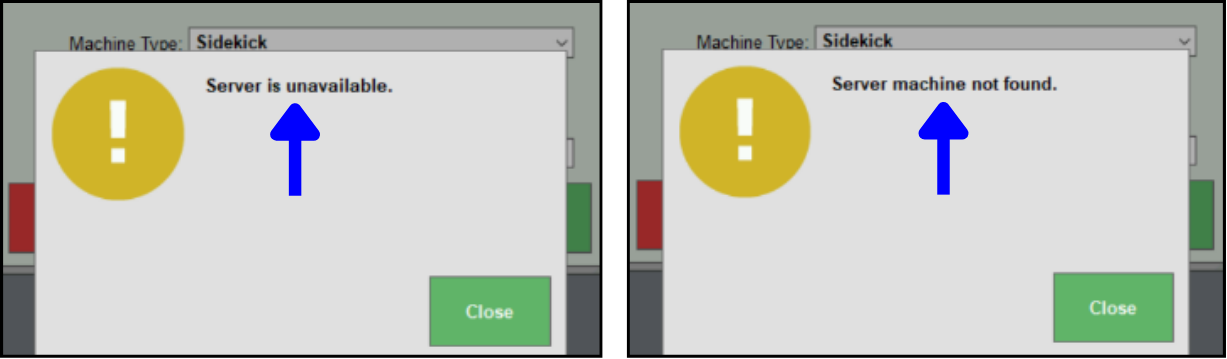
If an error message such as “Server machine not found” or “Server is unavailable” appears while using the POS system, restarting the Exatouch server and/or the POS can often reconnect the Server station and Sidekick, and resolve the issue.
Restart Sequence
Before beginning the restart sequence, check the Server and Sidekick Configuration Checklist, below.
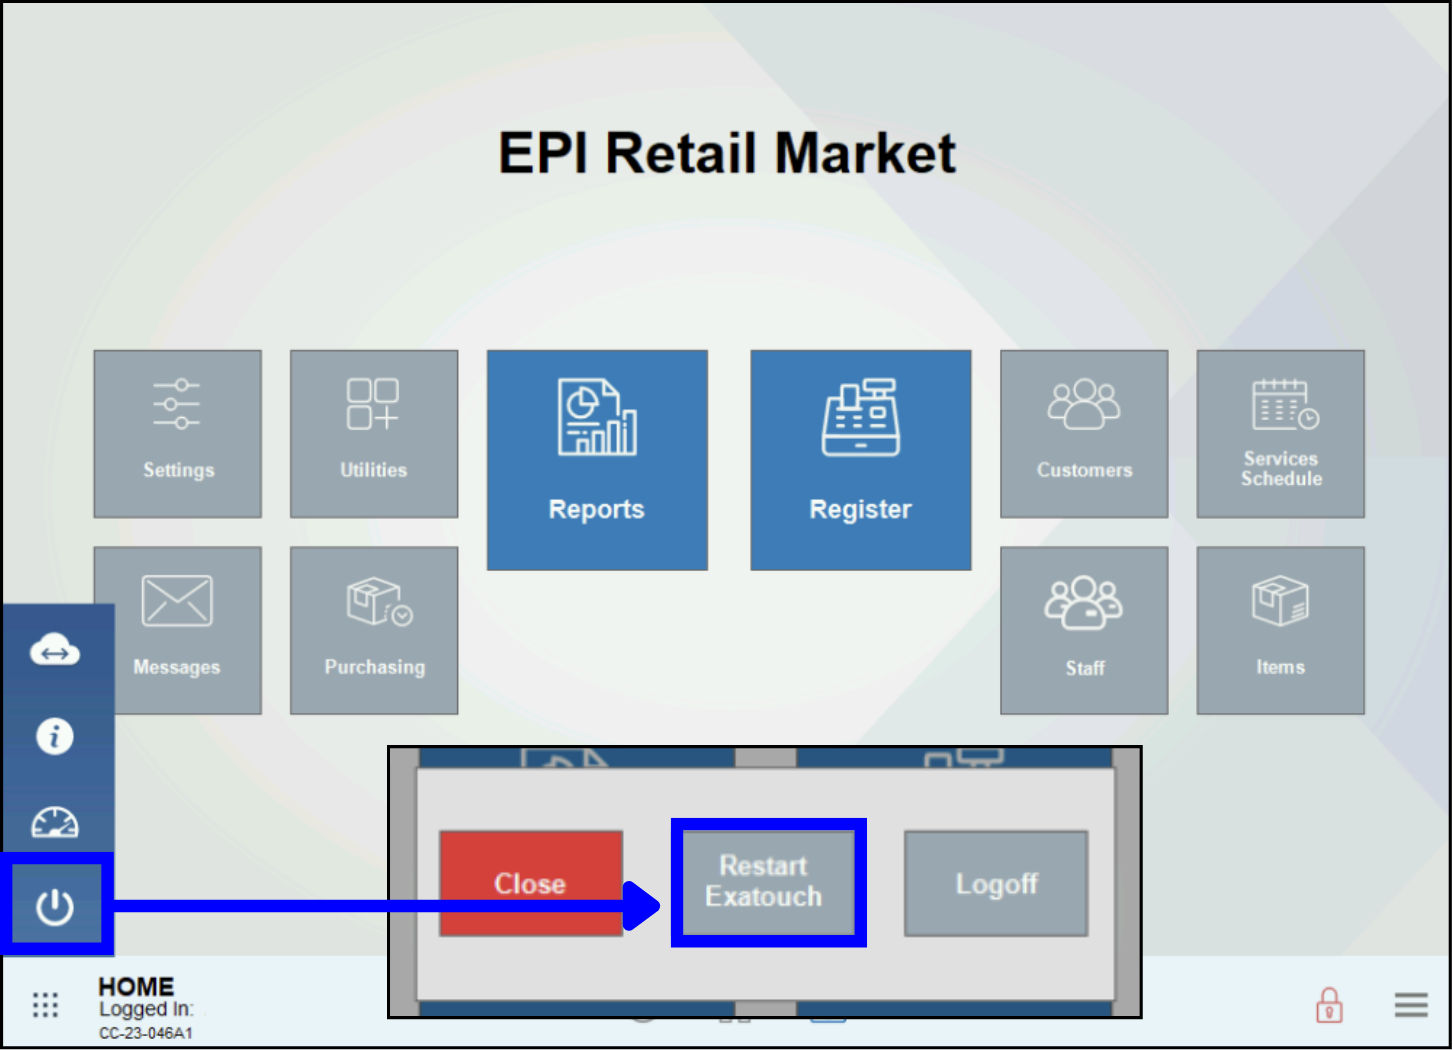
Exatouch has five power options available from the 9-dot menu, located on the bottom left of the Exatouch home screen.
- Close – Closes the power options window.
- Restart Exatouch – Restarts the Exatouch software but the computer stays on.
- Logoff – Signs out of Windows and brings the user to a Windows login page.
- Restart POS – Reboots the entire computer, including Sidekick(s).
- Shutdown POS – Powers down the entire computer, including Sidekick(s).
Restart Exatouch
If the server is not found or unavailable, restart the Exatouch server:
- Go to the 9-dot menu in the lower left corner of the Home screen.
- Click on the Power icon.
- Select Restart Exatouch.
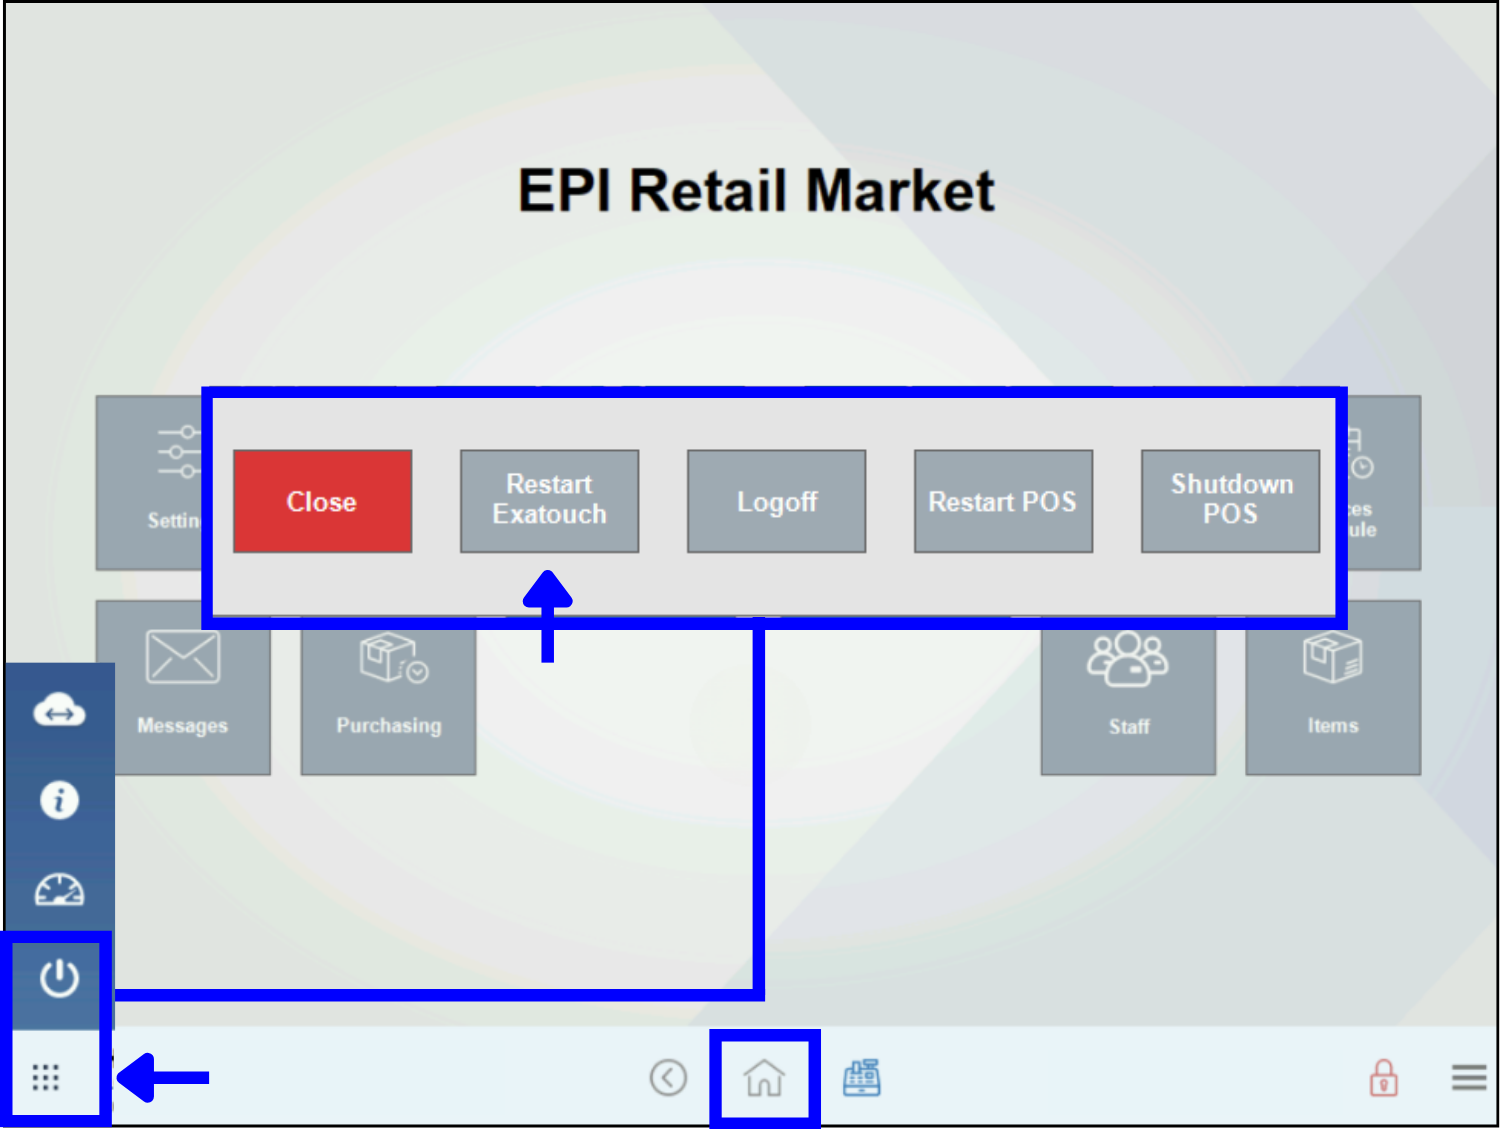
- Note: Because this is a server restart, all connected POS stations will be down while the reboot is in process. You should not have to restart all connected stations, and should only have to wait for the few minutes for the Server to come back online and available peripheral stations to reconnect.
Restart POS
If restarting the server doesn’t resolve the issue, restart the POS on the server and the Sidekick:
- Go to the 9-dot menu in the lower left corner of the Home screen.
- Click on the Power icon.
- Select Restart POS.
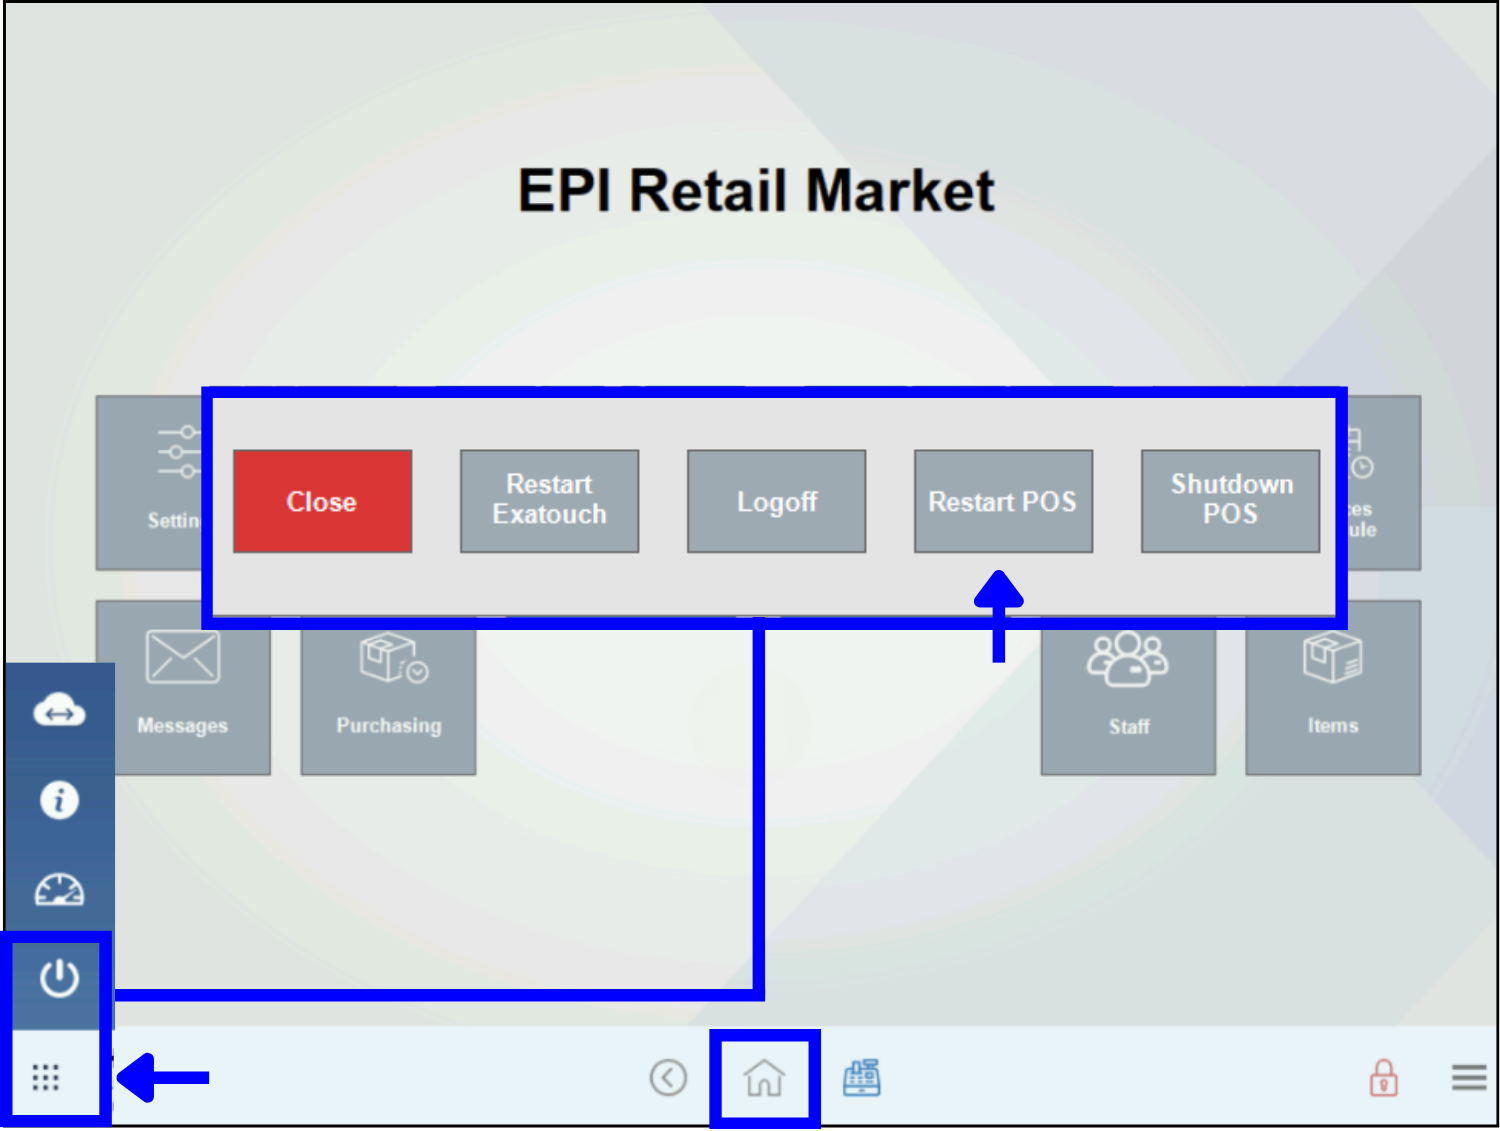
- If that doesn’t resolve the issue, select Restart POS for a second time.
- If you still get an error message after restarting both the Exatouch server and the Sidekick, contact the Exatouch Technical Support Team for assistance.
Server and Sidekick Configuration Checklist
Before restarting Exatouch server and the Sidekick(s), make sure that:
- The system wiring is correct. See the appropriate wiring diagram for more information.
- In Home > Settings > System, the server and Sidekick should be on the same network. If they are not on the same network, please contact the Exatouch Technical Support Team.
- Note: The server and the Sidekick IP addresses should have the same initial IP gateway numbers, e.g.:
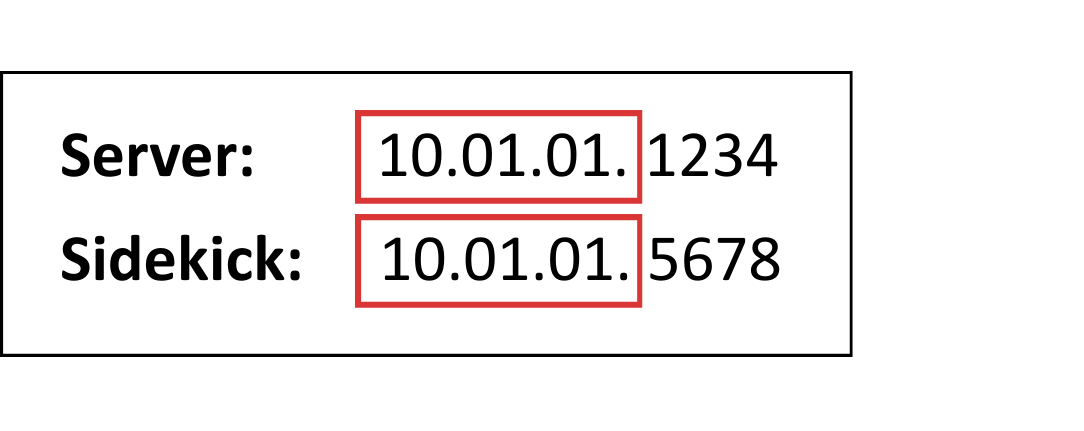
If the first three sets of numbers are not the same, then the server and Sidekick are on different networks and must be reconfigured. See Using the IP Address Instead of the Server Name (below) for more information.
Server Configuration
- Important: We recommend that you only check the server and Sidekick settings to validate the configuration. Changing them without EPI assistance may result in data loss. If your server and Sidekick configurations do not match, please contact the Exatouch Technical Support Team.
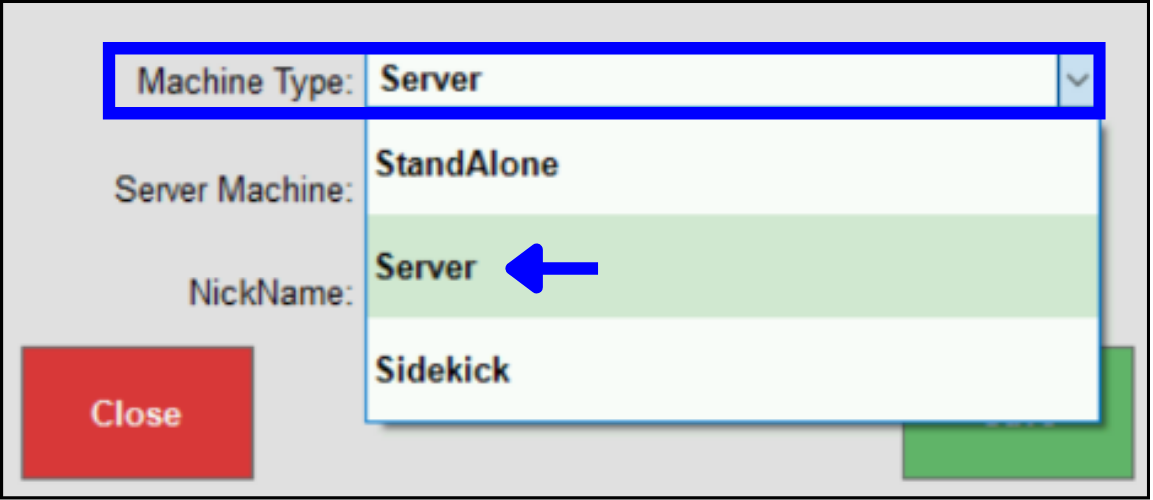
Ensure that the Exatouch server is correctly configured:
- Go to Home > Settings > System.
- Select Server as the Machine Type.
- Click Save.
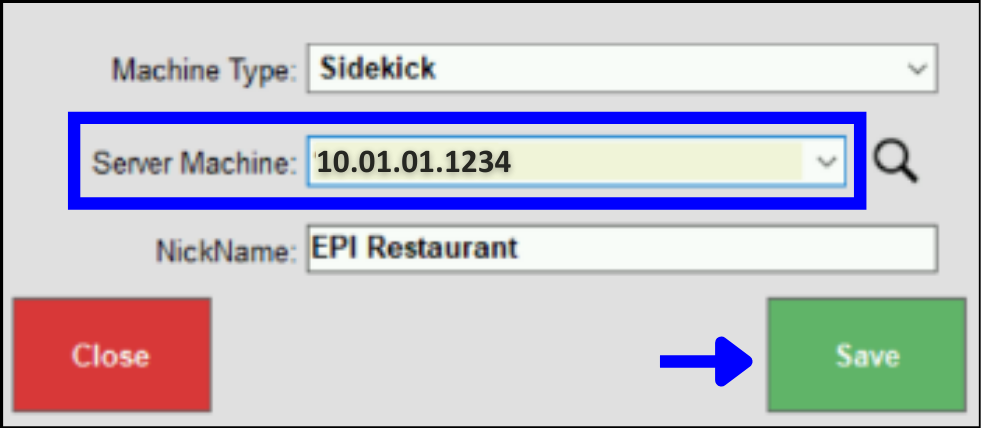
Sidekick Configuration
Ensure that the Sidekick is correctly configured:
- Go to Home > Settings > System.
- Select Sidekick as the Machine Type.
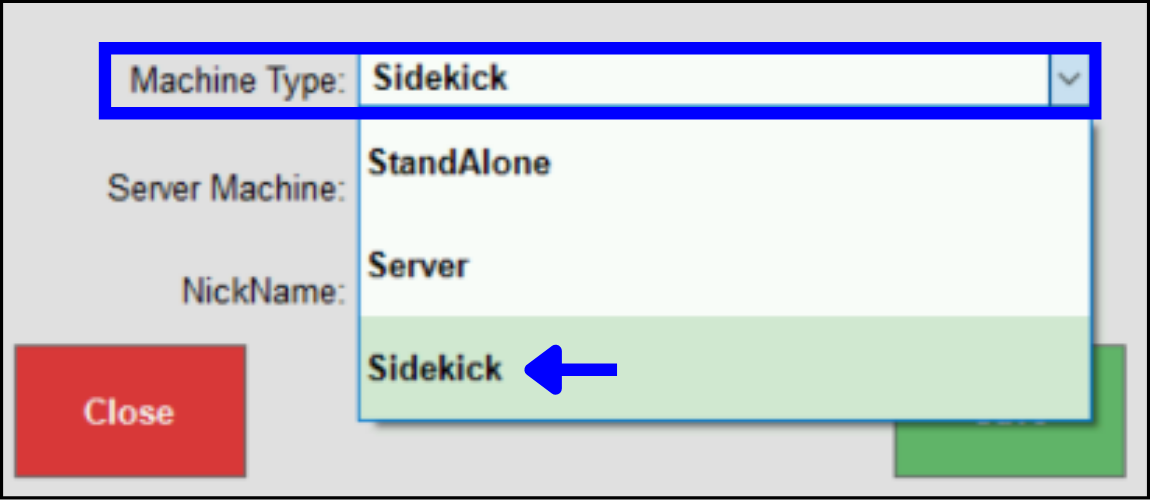
- Select Server1 as the Server Machine. Note: Merchants may choose any name for their main Server station during installation, but “Server1” or “XTServer (for BO Dell) will be the main Server station in the majority of Exatouch system configurations.
- Click Save.
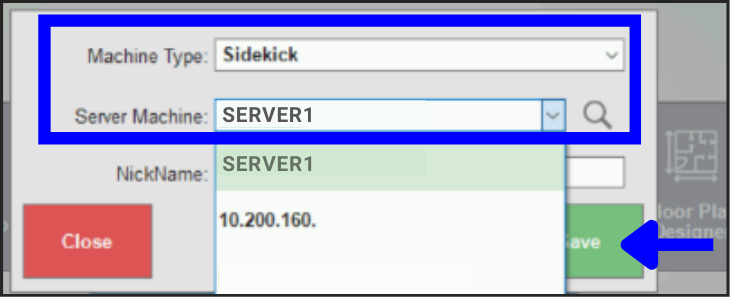
Using the IP Address Instead of the Server Name
You may prefer to use the IP address in the Server Machine field instead of a server name.
- To locate the IP address of a server, go to the 9-dot menu in the lower left corner of the screen.
- Select the speedometer icon.
- In the General tab, locate the IP address for the correct Machine Type and Computer Name. In this example, Machine Type = Server and Computer Name = Server1.
- Copy the IP address of Server1 (10.01.01.1234), and close the screen.
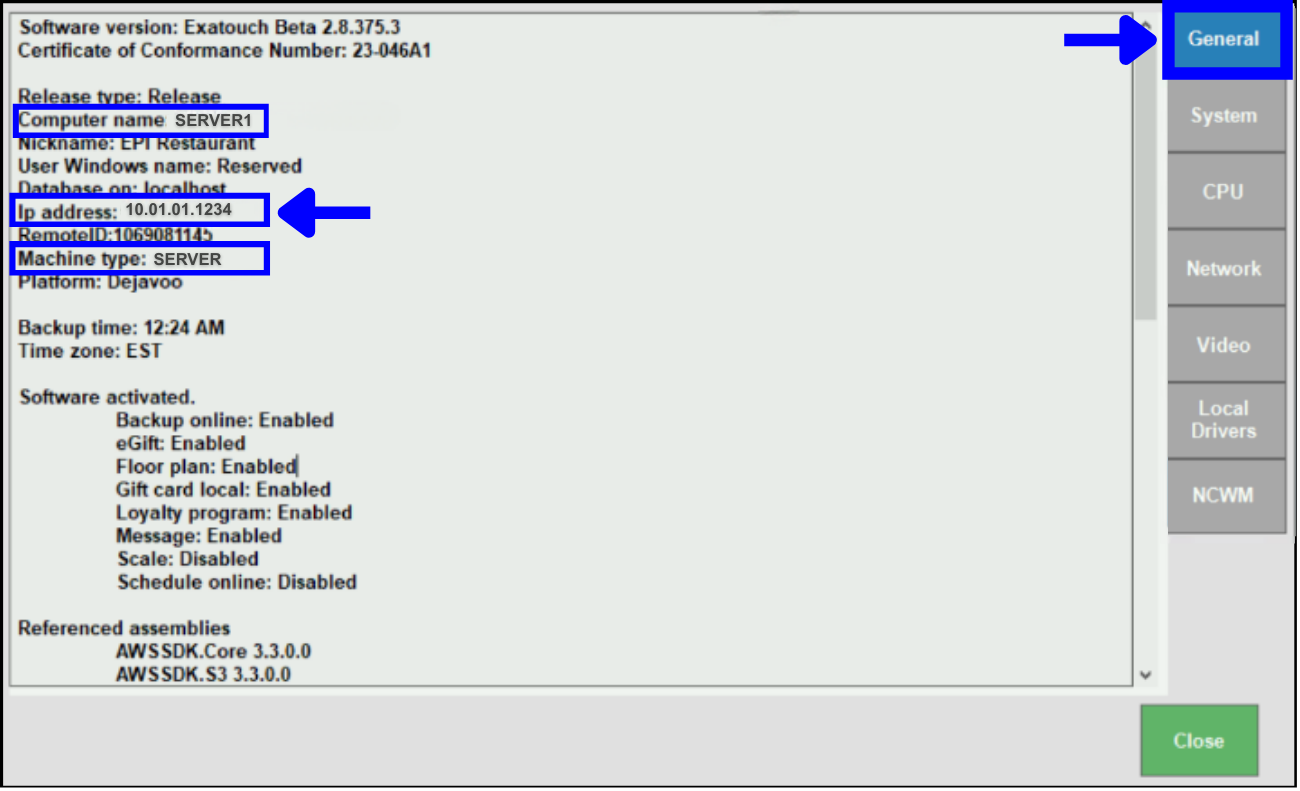
- Enter the IP address into the Sidekick Server Machine field.
- Click Save.
![]()
If all of the above items are correctly configured but you are still getting server error messages, perform an Exatouch Server/POS restart (see Restart Sequence, above) or contact the Exatouch Technical Support Team for assistance.
All Exatouch version updates are pushed out automatically; merchants do not need to initiate or manually install updates.
In the following scenarios, contact the Exatouch Technical Support Team immediately; do not attempt to troubleshoot or solve these issues on your own:
- Activate Dual Pricing program
- Adjust or confirm Auto Batch time
- Assign static IP or fix DHCP issues
- Change the scale timer or port settings
- Configure Epson kitchen printer for network access
- Connect printer or switch default printing
- Enable manual entry on Exatouch or pin pad
- Reserve IP addresses for Exatouch stations and devices
- Reset Exatouch menu or system defaults
- Resolve network connectivity issues
- Schedule Exatouch installation or follow up
- Set up or reconnect Sidekick
- Update or migrate Exatouch station lps
Do not reboot the server/router/switch or perform a factory reset without first contacting the Exatouch Technical Support Team.
How can we improve this information for you?
Registered internal users can comment. Merchants, have a suggestion? Tell us more.