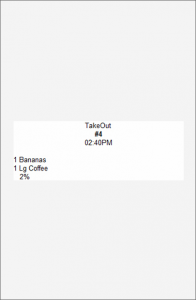
Whether you’re labeling multiple items to ensure a customer receives their complete order, or marking a container with complete order specifications, sticky labels are essential to order management.
The printer, which can be purchased from Exatouch , requires two cables: a supply power cable and an ethernet cable to connect to the router with the local network. This system does not have Bluetooth or wireless capabilities.
- Note: There is a plastic stopper provided with the printer that can be used to support smaller rolls of printer paper.
- Tip! Interested in learning more? Schedule a demo!
Printed sticky labels can help you keep orders organized and improve overall service.
- Note: Ink is not needed, as there is ink in the paper that is activated by the printer.
- From Home, open Settings, and then tap Print Settings.
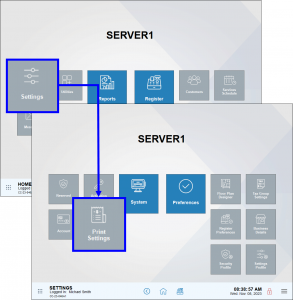
- Tap Remote Options tab.
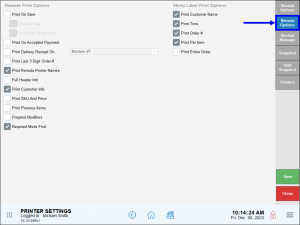
- Under Sticky Label Print Options, customize things such as what prints on the label and what labels should print for an order.
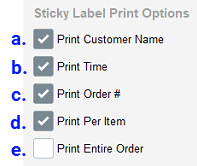
- Print Customer Name: Enable to print the customer’s name, if available, on sticky labels.
- Print Time: Enable to print the order time on sticky labels.
- Print Order #: Enable to print the order number on sticky labels.
- Print Per Item: Enable to print a sticky label for each item on an order. A coffee or deli shop might use this to label each drink and meal separately. Enabling this setting disables Print Entire Order.
- Print Entire Order: Enable to print a sticky label that lists all items on an order. A merchant might use this to print out a label listing the entire order to attach to a delivery box or bag. Enabling this setting disables Print Per Item.
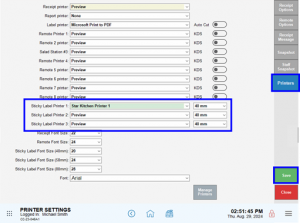
- From Home, open Settings, and then tap Print Settings.
- Tap Printers, and then select a printer from the dropdown menu next to Sticky Label Printer 1, 2 or 3.
- Select the correct roll size, and then Save the changes.
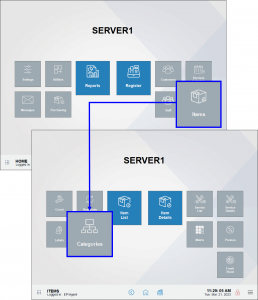
- From Home, tap Items>Categories.
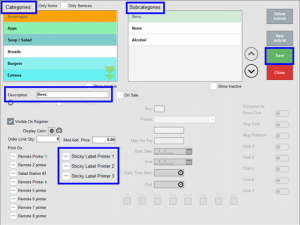
- Tap the applicable category, and then make sure that the checkbox(es) next to the correct printer is selected and Save.
- To assign a subcategory to the printer, make sure the subcategory item is selected before tapping the applicable checkbox(es) and saving your changes.
- Note: The selected category or subcategory will display in the Description textbox.
How can we improve this information for you?
Registered internal users can comment. Merchants, have a suggestion? Tell us more.