Exatouch Knowledge Base
Search the Exatouch Knowledge Base

Tax Exempt Orders

  • Last Updated: November 18, 2024

For certain types of orders, such as duty-free sales and government purchases, merchants can remove taxes on specific items or the whole order.

  • Manually removing taxes from an item with a custom button.
  • Automating exemption by updating a customer/company profile to be tax exempt.
Remove Tax from an Item

For information on how to add the Tax exempt item button to the register, see Custom Buttons.

To remove taxes from a specific item in an order, do the following:

  1. In the Register tab, add a taxable item to the order.
  2. Tap the item, and then tap the Tax exempt item.
    The Register screen. An item in an active order is selected, and a blue arrow is pointing from the item to the Tax Exempt Item custom button.
    • Note: The tax exempt status will affect the line selected, so if there are 10 items in a single line, all 10 will be tax exempt.
  3. In the window that appears, tap Apply.
    Window that a appears when the Tax Exempt Item custom button is selected. There are three buttons that take up the window: a red Close button, a grey Apply multiple button, and a green Apply button. The Apply button has a blue box around it.

    1. To remove taxes from multiple items at once, tap Apply Multiple, and select the items that should be tax exempt from the order list. Then, tap Multiple tax exempt.
      Window that a appears when the Tax Exempt Item custom button is selected. There are three buttons that take up the window: a red Close button, a grey Apply multiple button, and a green Apply button. The Apply multiple button has a blue box around it.
      The Register screen. Two items in an active order are selected, and a blue arrow is pointing from the items to the Multiple tax exempt custom button.

    • Note: When items that are already tax exempt are selected, the Tax exempt item button will change to Undo tax exempt item.
      The Undo tax exempt item custom button.
  4. Tap the Pay tab. The Order Preview window will show that taxes are removed.
    The Pay tab in the Register. There is an arrow pointing from the Pay tab to the Order # box, showing the Subtotal as 73.88, and the Discount, Tax, Tip, and Other as 0.00. The Total and Balance Due are 73.88.

On the receipt, an E will be next to each item that is exempt, and if all items’ taxes are removed, the order will be consider tax exempt.
An example of a receipt for Main Street Market, located on 3725 Middle Country Road in Calverton, Ohio, 11933. The phone number is 800-966-5520. This receipt is for Order # 3294 completed by Michael Smith on 11/08/24 at 2:54pm. The customer ordered one All American Burger, a Classic Blue Tie Dye Shirt, and a 20 Tumbler Teal. The shirt and tumbler are marked as tax exempt with an E next to the prices of each exempt item. Beneath the Item Total, the Tax total is $0.00. At the bottom of the receipt, TAX EXEMPT ORDER is located above the Item Count.

  • Tip! If the exempt indicator is not showing, then the Receipt Options in Printer Settings will need to have Print Exempt Indicator enabled. For more information about settings like this, see Print Settings.
    The Receipt Options tab in the Printer Settings. There is an arrow pointing from the Receipt Settings tab to the Exemption Indicator section of the screen, where the first option, Print Exempt Indicator, has a selected checkbox next to it. The checkbox next to Print Taxable Indicator is not selected.

Make a Customer/Company's Profile Tax Exempt

To set a customer/company’s profile to tax exempt., and thus remove taxes from further transactions, do the following:

  1. From Home, tap Customers and then Customer Details.

    • Note: If the customer already exists in the system, go to Customer List and select them from the list.
  2. In the Details tab, fill in all items with a red asterisk (*), any other applicable information, and the Tax ID. Make sure that the Tax Exempt toggle is enabled.
    The Details tab of the New Customer Screen. There is information filled in for LWB Fire Department, including phone number, email, city, state, zip code, tax ID, and tax exempt status. There are boxes and arrows around the required fields (First Name, Last Name, Telephone, and Email), as well as the Tax ID and Tax Exempt status indicator. This customer profile has the Tax Exempt toggle enabled.
  3. Tap Save.
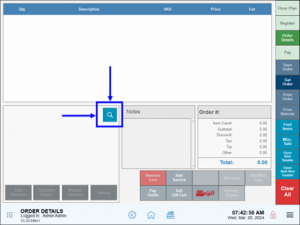
  4. From the Register screen, tap the Order Details tab and then tap the magnifying glass icon to add a customer to the order.
    The Order Details window. There is a blue box around the magnifying glass icon, which is in a box on the bottom left half of the screen. There are two arrows pointing to the top and left side of the icon, indicating that it should be selected.

When orders are complete with the selected customer, all taxes will be removed and the bottom of the receipt will be marked TAX EXEMPT ORDER.

Generate Tax Exempt Sales Report Information

To generate a sales report with all general tax exempt data, do the following:

  1. From Home, tap Reports and then Sales.
  2. Tap Taxes.
    The Sales Report screen. The Taxes button on the right side of the screen is enlarged, with a blue box around it with an arrow pointing at it from below.
  3. The general data for exempt transactions will appear in the Exempt column, and can be exported via Excel, PDF, or Word.
    An example of a Taxes sales report. The right-hand column, Exempt, has a blue box around it to call attention to it.

  • Tip! Merchants can reprint receipts to review previous tax-exempt orders by using the Reprint option in the Register Sub-Menu. For more information, see Reprint Receipts.

Popular With

Grocery/C-StoreLiquorQSR/DeliveryRetail

Ready to Update your Software?

Contact Technical Support to schedule your software update today!

Related Topics

  • Payment Processing
  • Custom Buttons
  • Printing Options
  • Tax Rate Setup
  • Promotions & Discounts
  • Reports

Related Articles

  • Custom Buttons

    Last Updated: February 13, 2025

  • Business Overview Reports

    Last Updated: June 18, 2024

  • Taxes Report

    Last Updated: May 7, 2024

  • Expanded Checkout Fee Tax Options

    Last Updated: April 25, 2024

  • Send Orders to the Kitchen

    Last Updated: December 12, 2023

How helpful was this article?

Your page rank:

How can we improve this information for you? Cancel Reply

Registered internal users can comment. Merchants, have a suggestion? Tell us more.

Software Update Request

Software Update Request Form

  •  
  • Check Your Exatouch Version Number
  • MM slash DD slash YYYY
  • This field is for validation purposes and should be left unchanged.
Questions? Suggestions? We're here to help! Contact our 24/7 Technical Support Team today!