Merchants will love a quicker checkout when they customize their register with custom buttons! Custom buttons can be configured to execute functions, quickly add items or services to an order, and apply discounts.
This article displays a map of five locations at the Register, where you can add/remove custom buttons. Also included in this article are instructions on how to add, move, and remove custom buttons.
Accessing Custom Button Settings
- From Home, navigate to Settings > Register Preferences.

- Tap the Custom Buttons tab.
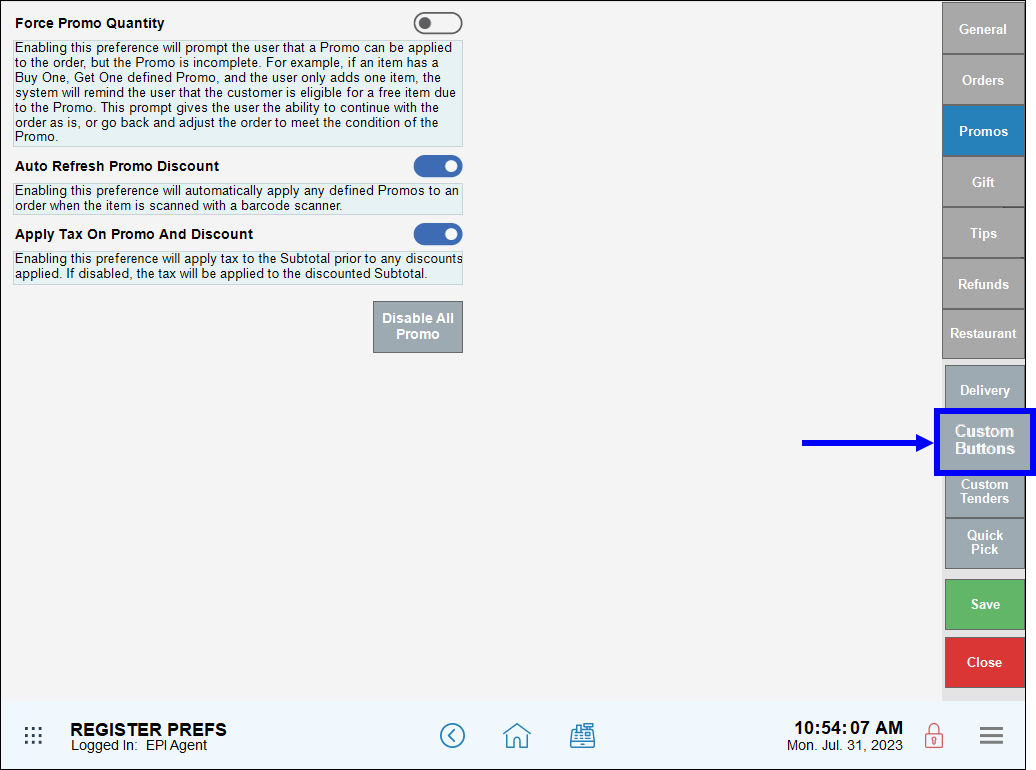
- View the Custom Buttons settings screen.
High Level Functions
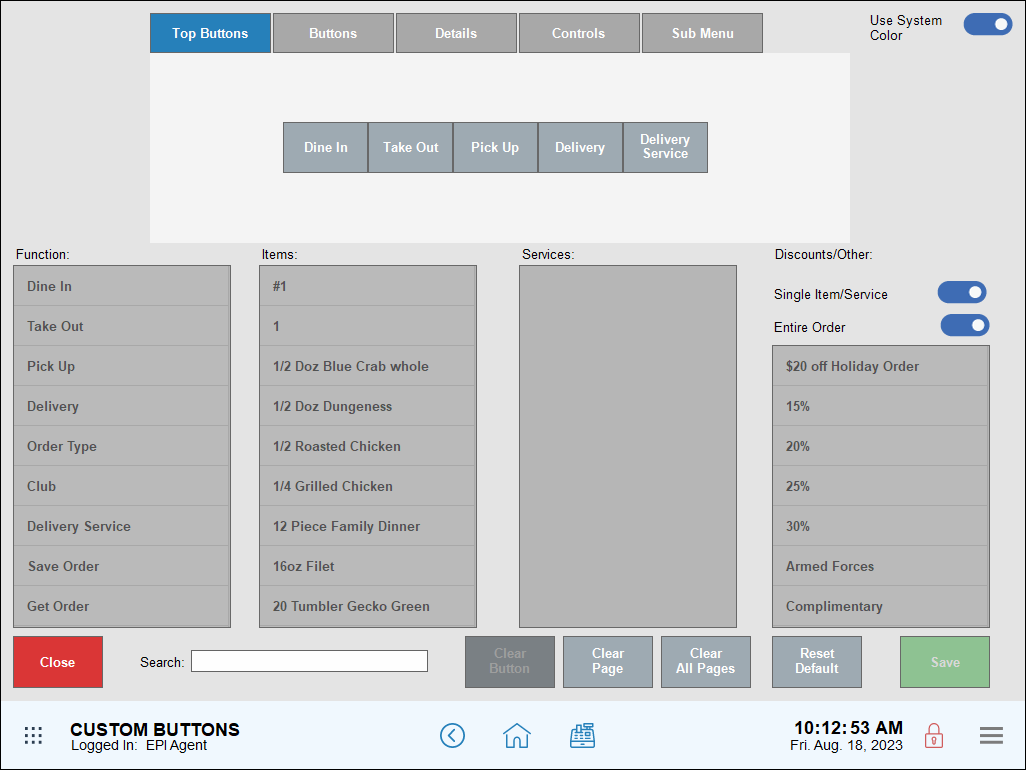
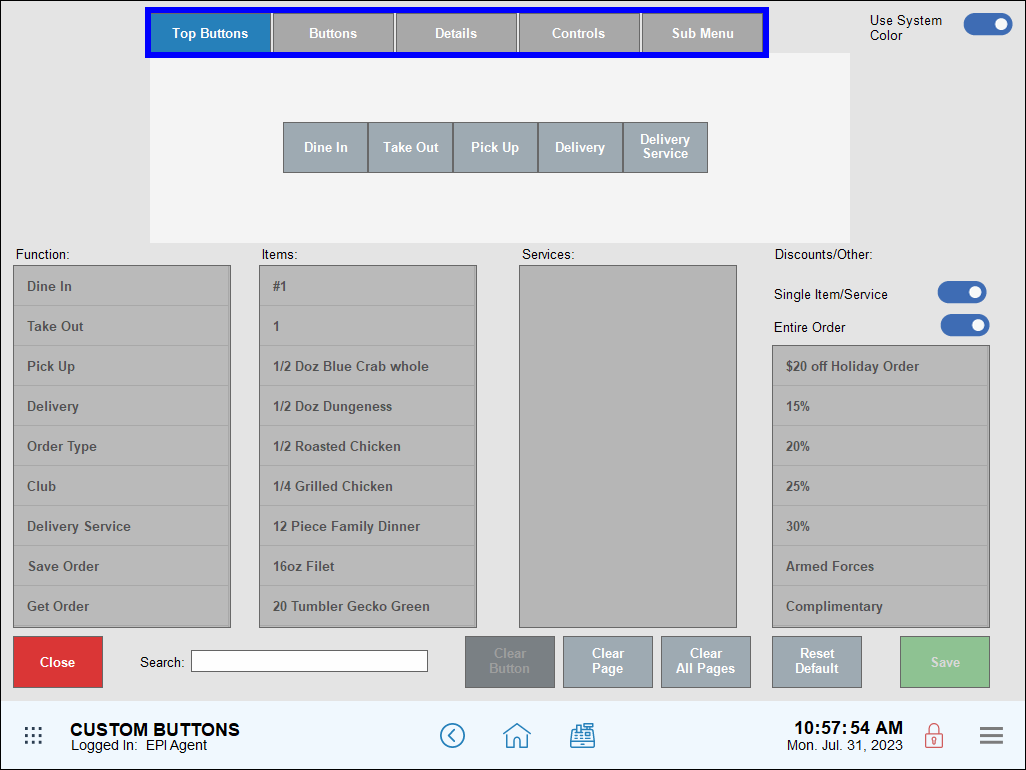
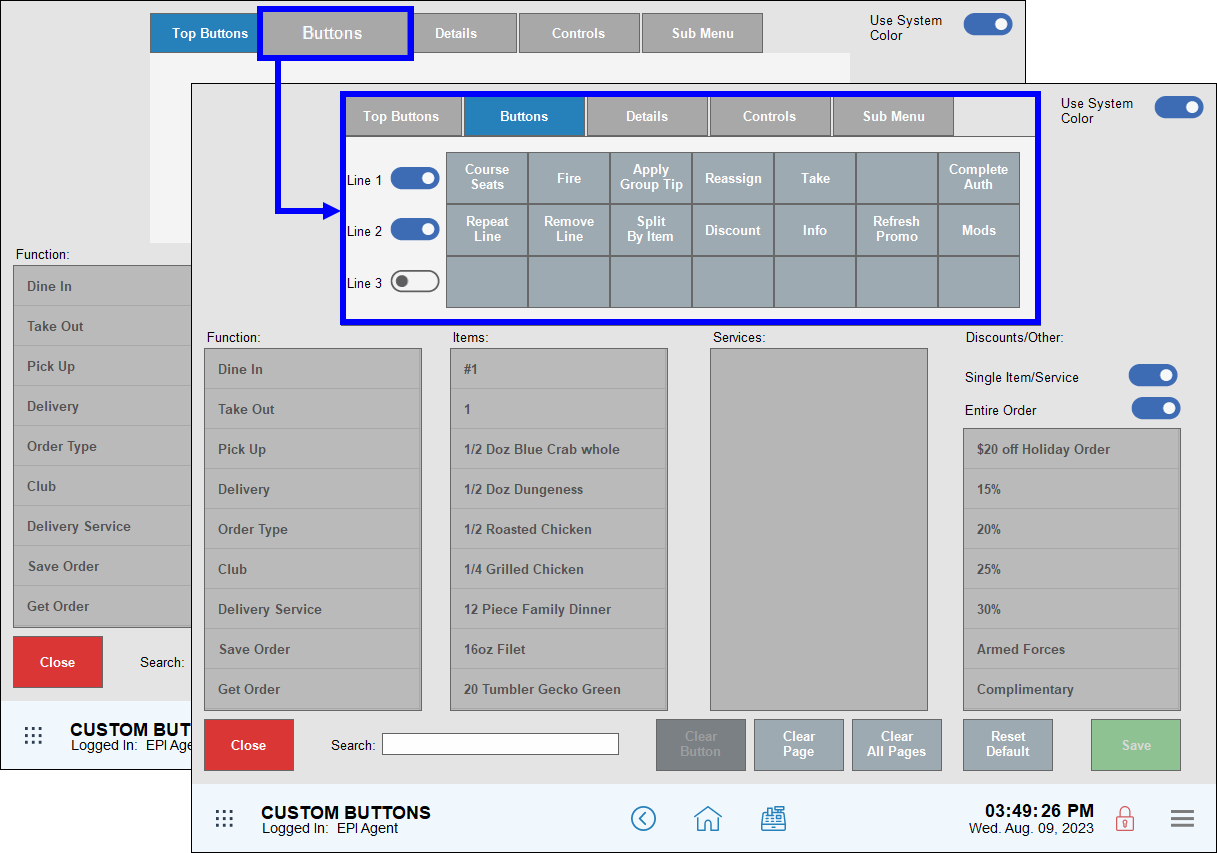
- The Custom Buttons screen features five tabs that control basic custom button settings. Each register area corresponds to a tab within the following custom button settings: Top Buttons, Buttons, Details, Controls, and Sub Menu.
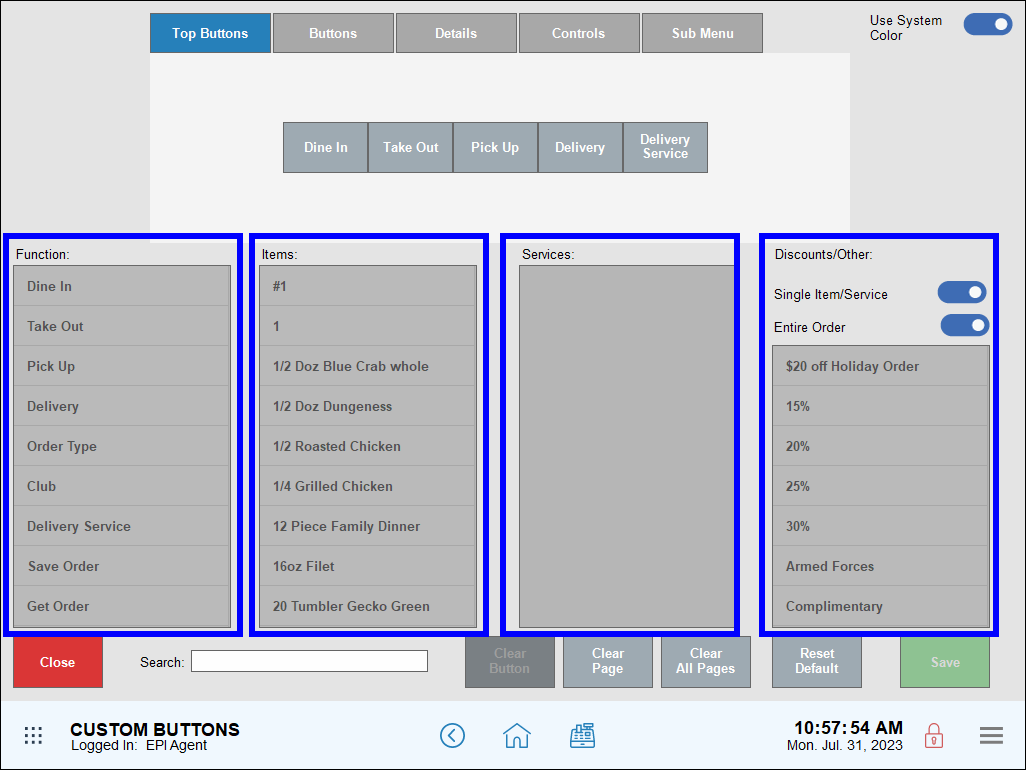
- Custom buttons control one of the following categories: Function, Items, Services, Discounts/Other.
Top Buttons Tab
For restaurants, custom buttons found on the Top Buttons tab correspond to default order types found on the Register.
- Order types include Dine In, Take Out, Pickup and Delivery.
- Order types can be customized to meet business needs. For example, a quick service restaurant can apply the following custom button order types: Window 1, Window 2, Dine In, and Delivery.
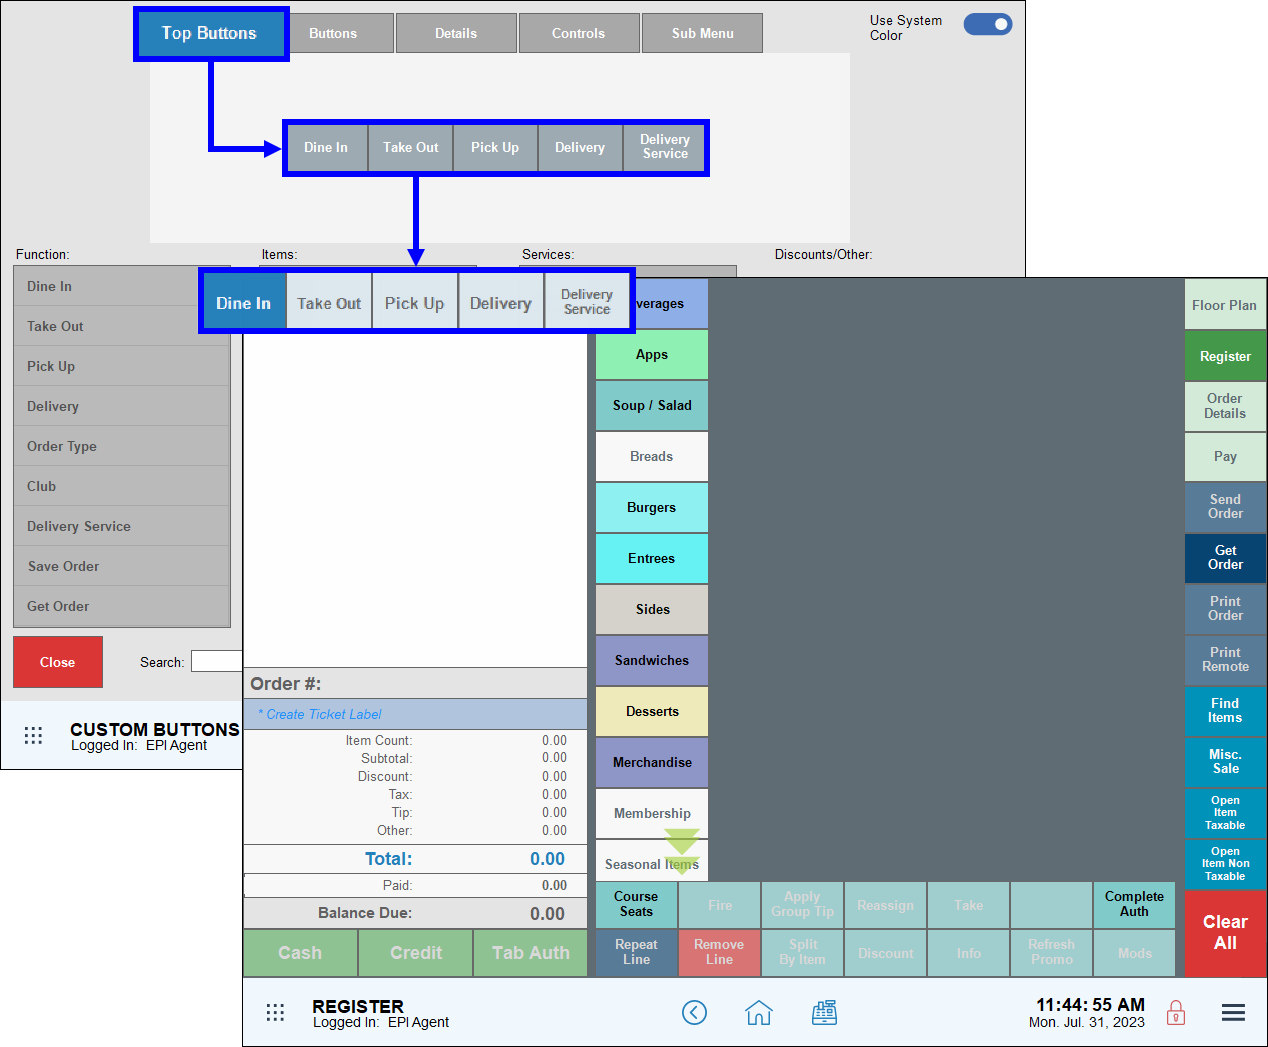
- Note: The Top Buttons tab does not display by default, though retailers can remove/clear these buttons in custom button settings.
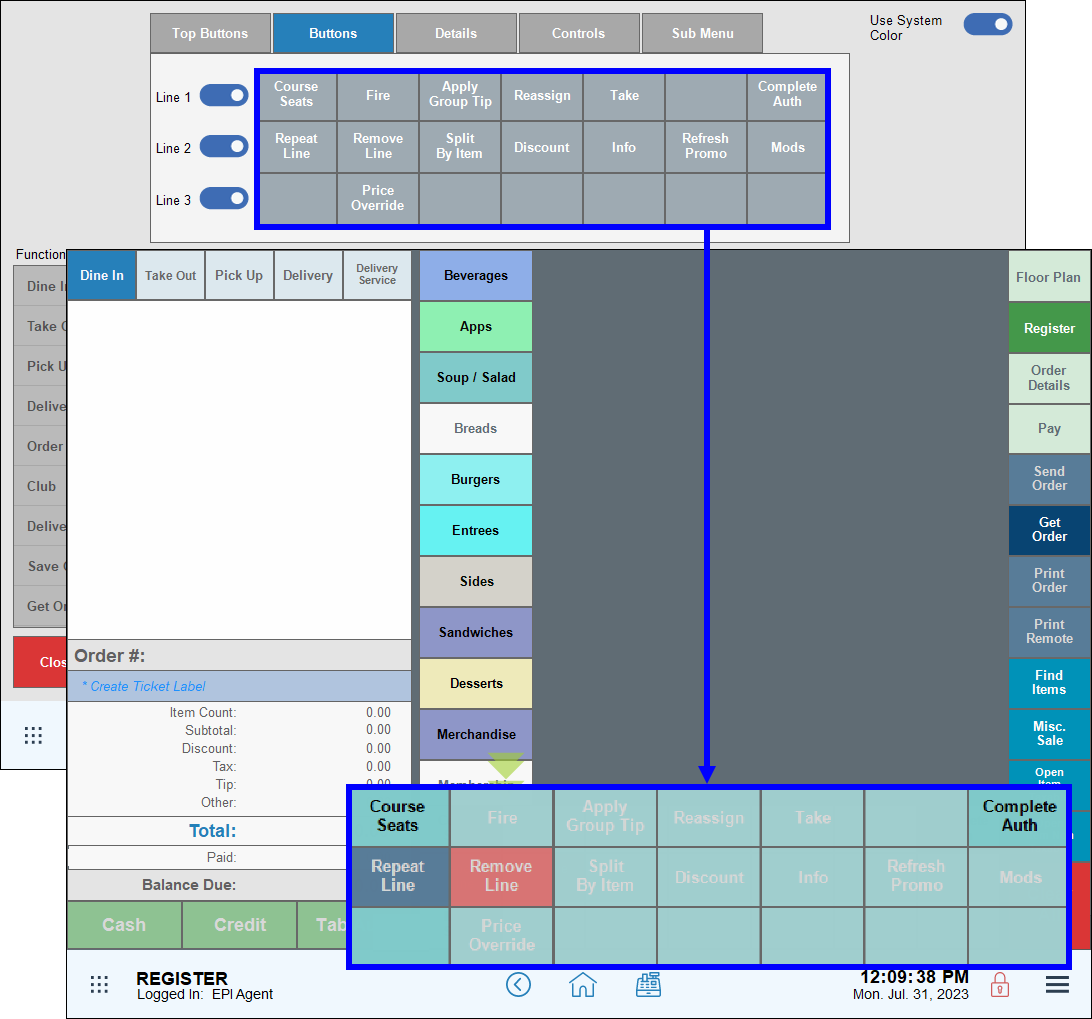
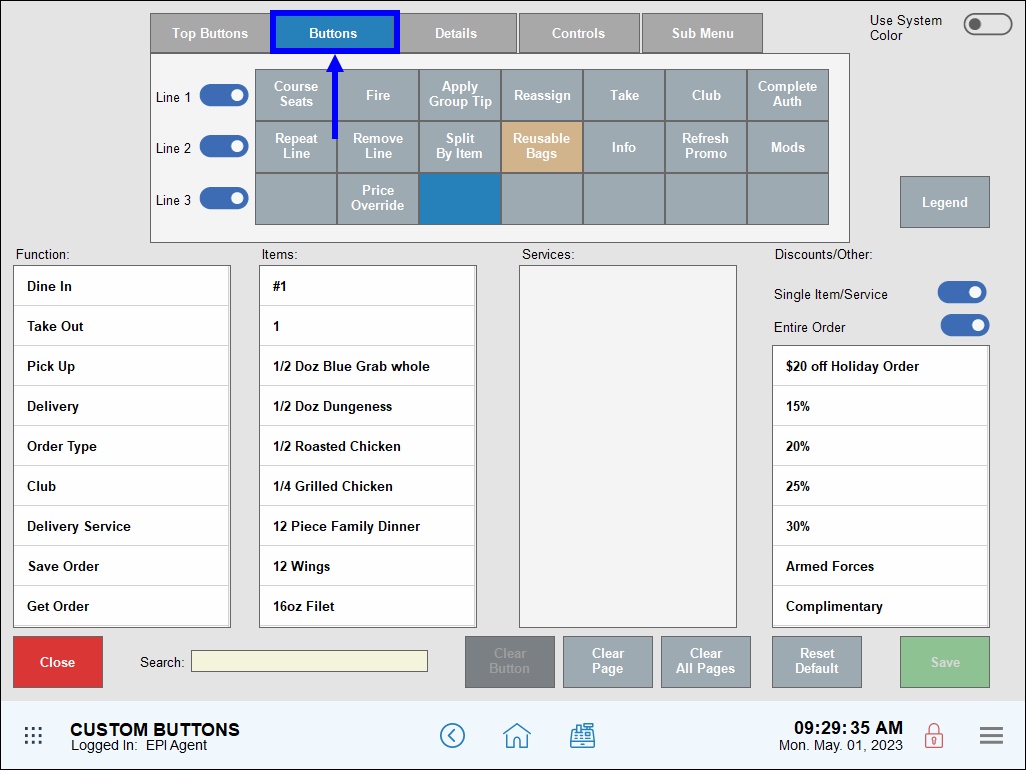
Buttons Tab
Buttons listed under the Buttons tab correspond to the red and grey default buttons on the Register. Default functions observe the following rules:
- Buttons tab custom buttons display at the bottom of the Register by default.
- Default functions in the red and grey rows vary by business type.
- Example: Restaurants display a Tab Auth button by default.
- Example: For faster processing, retailers may add a Customer Payout button or Quick Pay button, such as Lotto, Scratch-Off, or Money Order. See: Set Up Quick Payouts.
- Restaurants, pizzerias, and quick service restaurants have two custom button lines enabled by default. Retailers have one line enabled by default.
- Restaurants, and retailers can enable up to three custom button lines.
Details Tab
Buttons found on the Details tab correspond to default functions found on the Register’s Order Details tab. Any of these functions can be moved to a different tab or removed.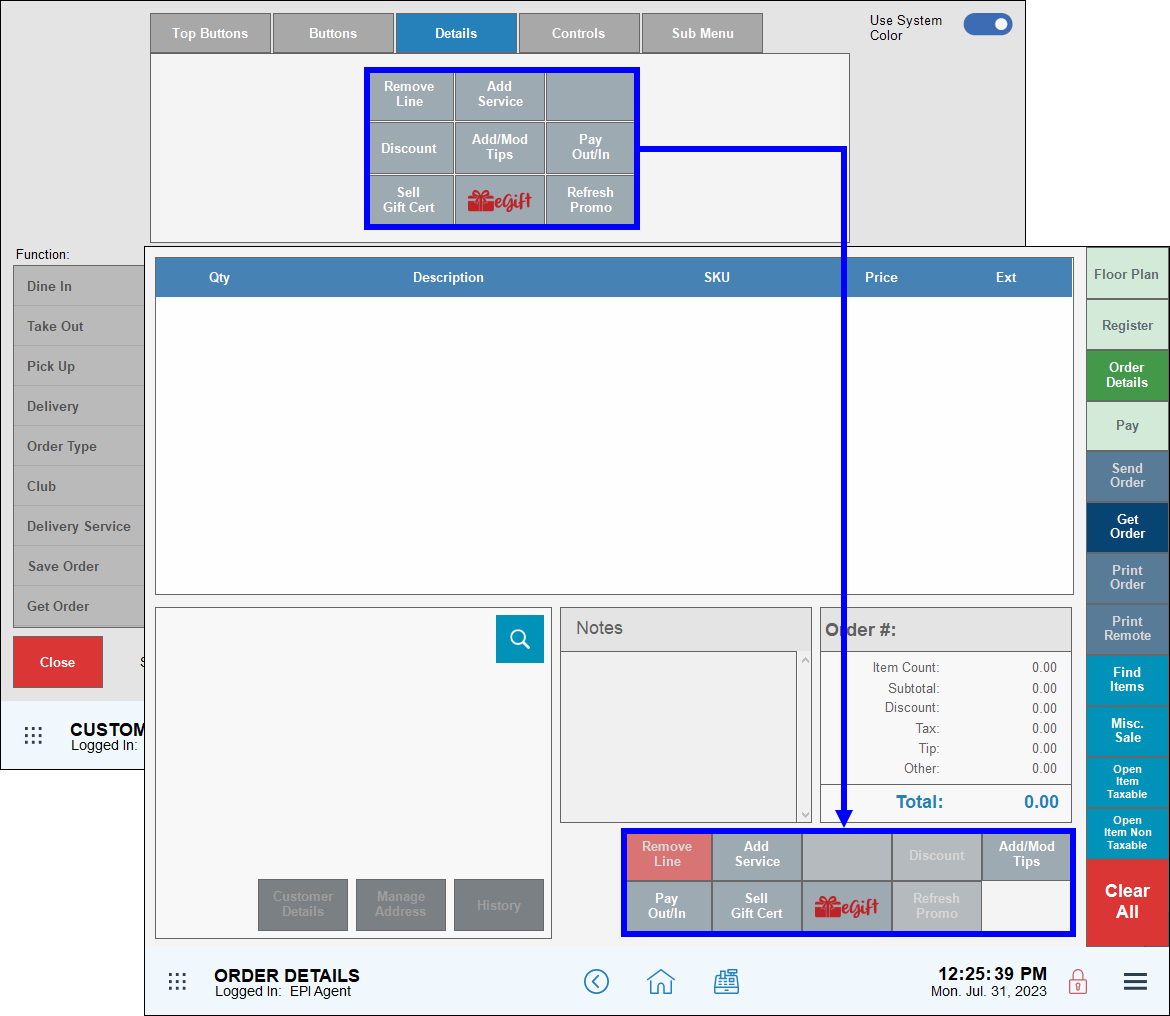
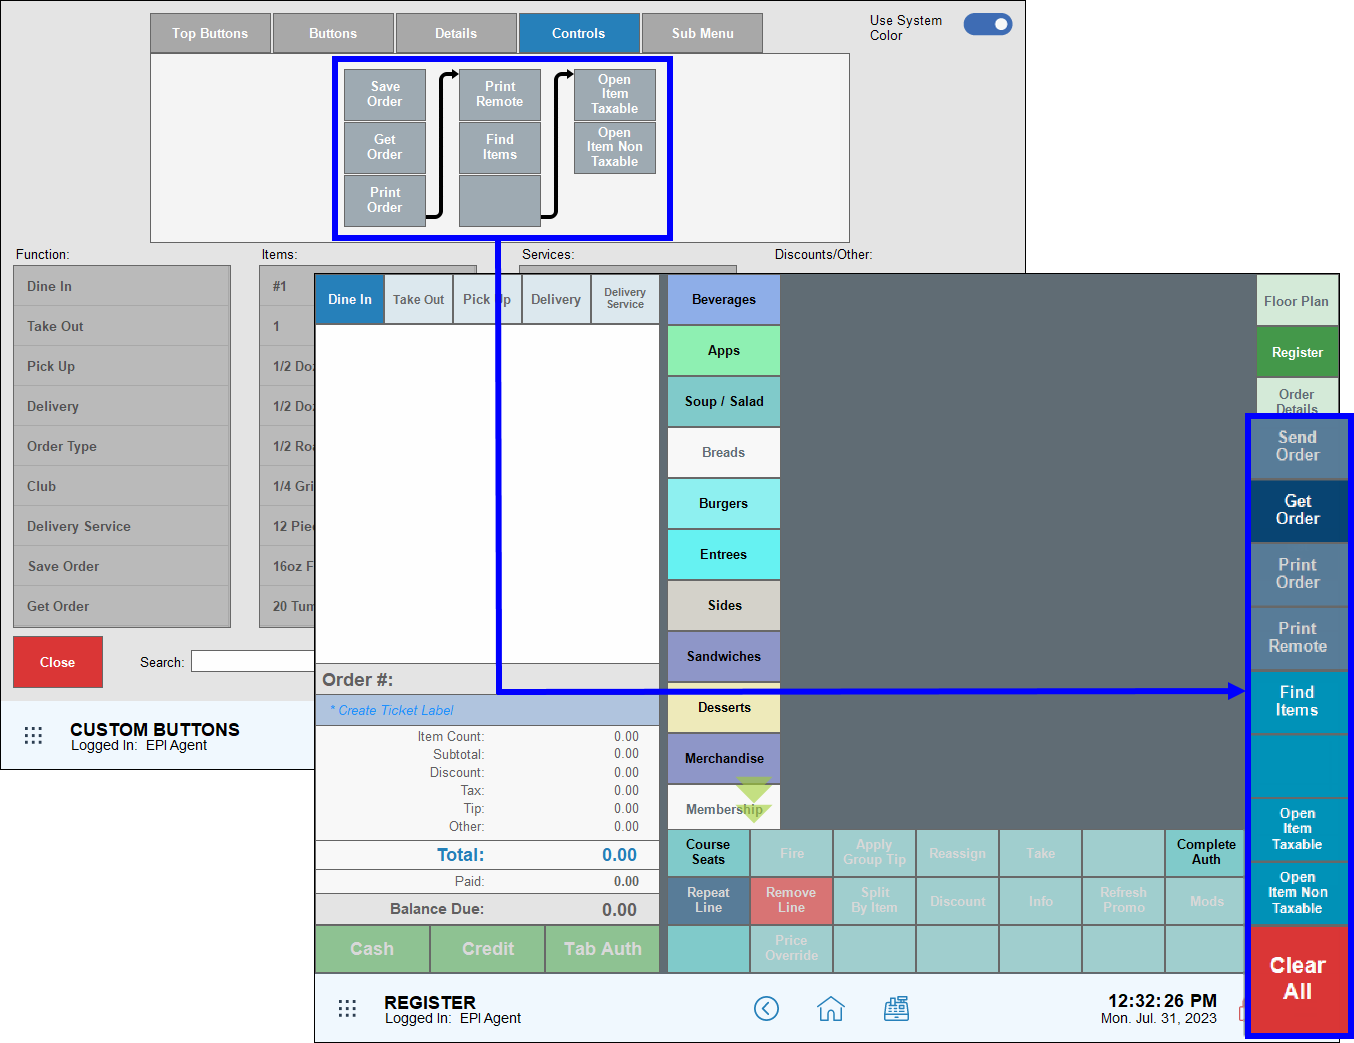
Controls Tab
Buttons found on the Controls tab correspond to the default control functions found on the Register. The Controls tab observes the following rules:
- Control functions display on the Register regardless of the tab selected.
- Any control function can be moved to a different tab or removed.
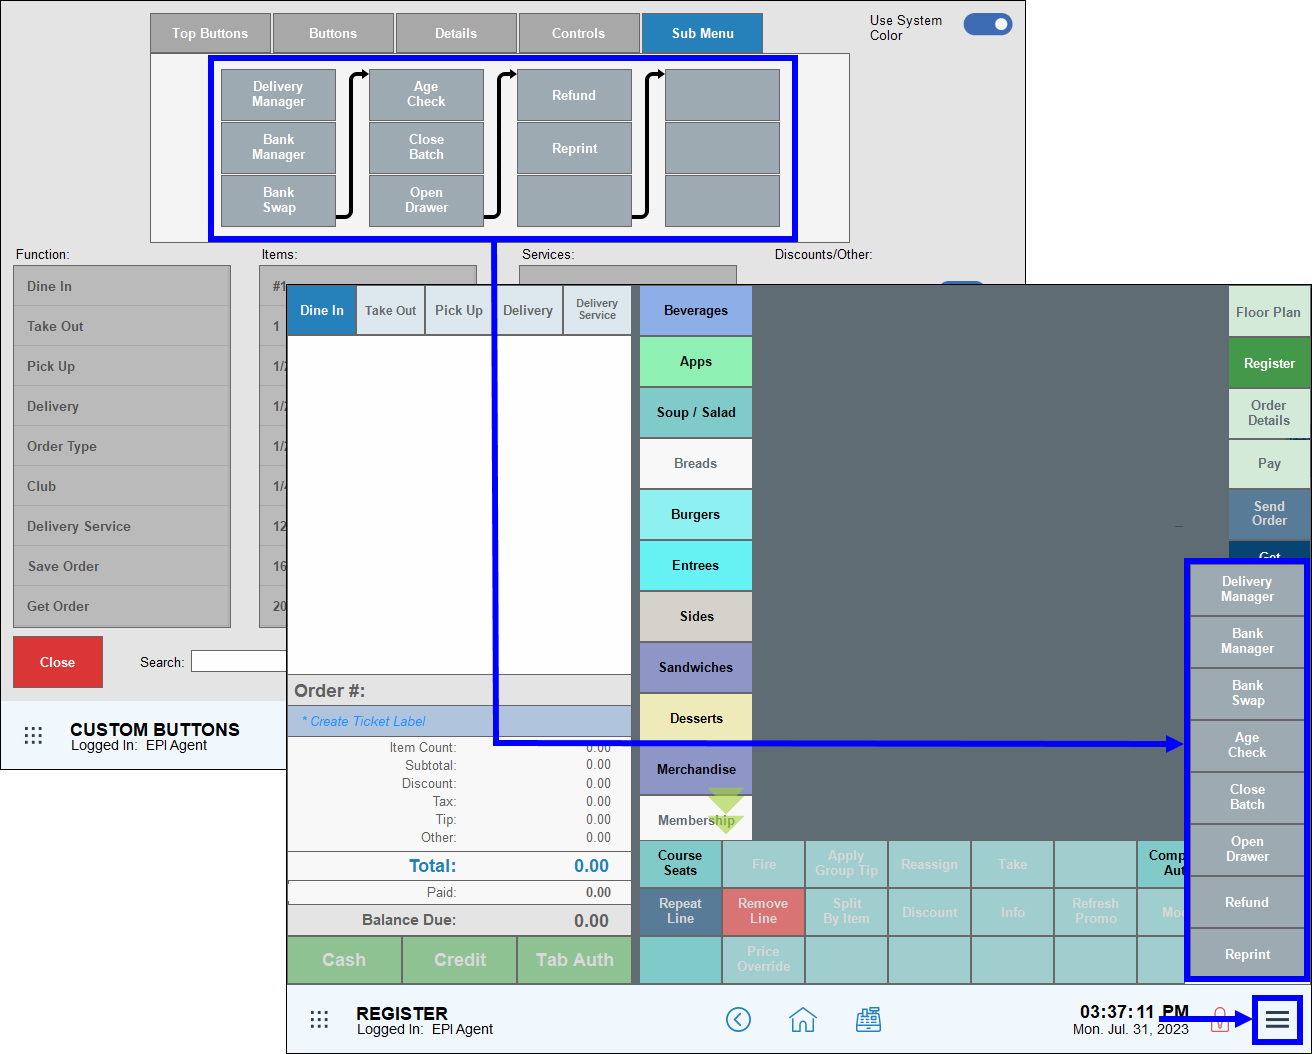
Sub Menu Tab
The Sub Menu tab and functions within correspond to the default functions found in the Register’s Sub Menu. The Sub Menu tab observes the following rules:
- Functions display at the register when you tap the Sub Menu icon in the lower right-hand corner of the Register.
- Any Sub Menu function can be moved to a different custom button or removed.
Custom Button Options
Custom button options include the following: Function, Items, Services, and Discounts/Other.
Functions
Any function that can be moved, added, or removed from the Register is found in the Function list. Functions may vary by restaurant or retailer type.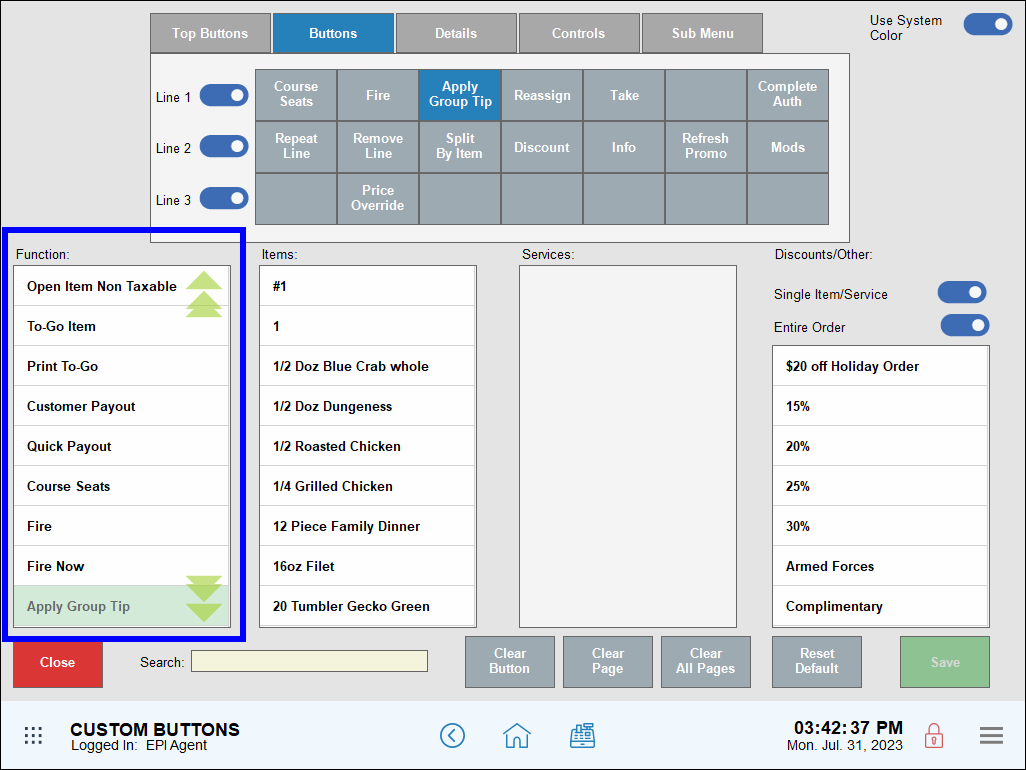
The complete list of special functions includes the following. Note that some functions are exclusive to restaurants while others are exclusive to retail:
- Dine In (Restaurant Only)
- In Store (Retail Only)
- Take Out
- Pick Up
- Delivery
- Order Type
- Club
- Delivery Service
- Save Order
- Get Order
- Print Order
- Print Remote
- Find Items
- Misc. Sale
- Open Item Taxable
- Open Item Non Taxable
- To-Go Item
- Print To-Go
- Customer Payout
- Quick Payout
- Course Seats (Restaurant Only)
- Fire (Restaurant Only)
- Fire Now (Restaurant Only)
- Apply Group Tip (Restaurant Only)
- Complete Auth (Restaurant Only)
- Reassign
- Take
- Repeat Line
- Remove Line
- Split by Item
- Discount
- Info
- Refresh Promo
- Mods
- Price Override
- Tax Exempt Item
- Find Customer
- Add Service
- Add/Mod Tips
- Pay Out/In
- Sell Gift Cert
- eGiftSolutions
- Check Balance
- Exchange Item
- Bottle Calculator
- Delivery Manager
- Bank Manager
- Bank Swap
- Age Check
- Close Batch
- Open Drawer
- Refund
- Note: Special functions unavailable at the Register by default can be added via custom buttons. Special functions include Order Type, Club, To-Go Item, Print To-Go, Quick Payout, Price Override, and Tax Exempt Item.
Items
Items can be added to the Register for quick access. All items that are active in the merchant’s inventory can be found on the Items list. The items available on this list are unique to this merchant: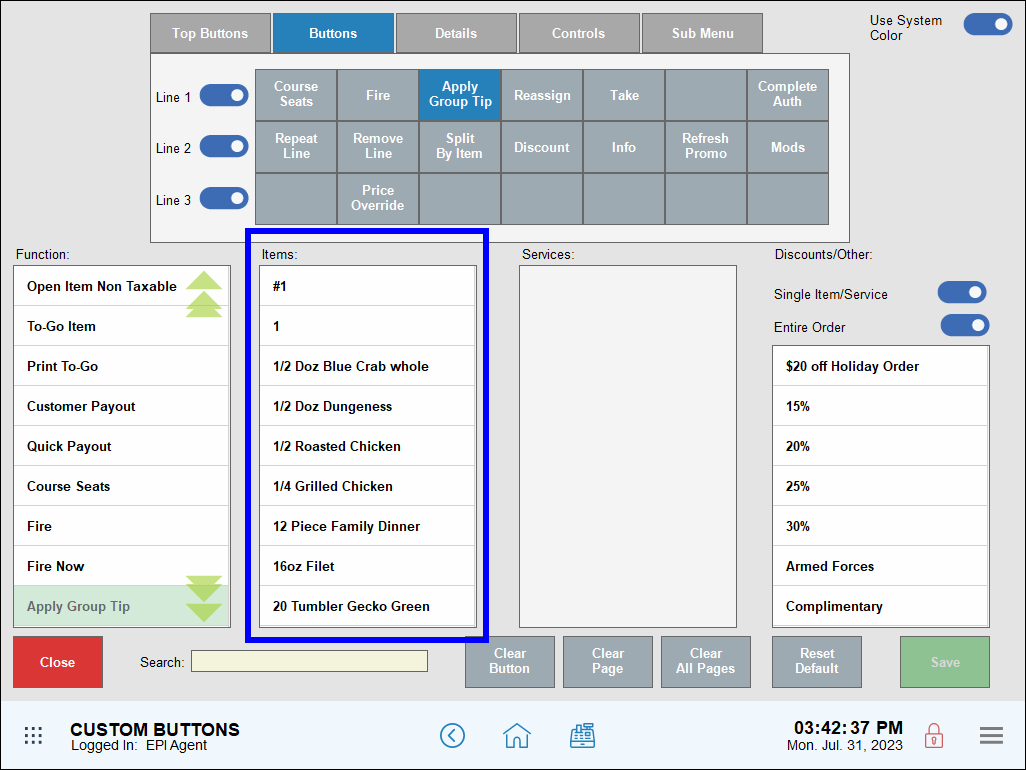
Services
Services can be added to the Register for quick access. All services that are active in the merchant’s inventory can be found on the Services list. Services vary by merchant.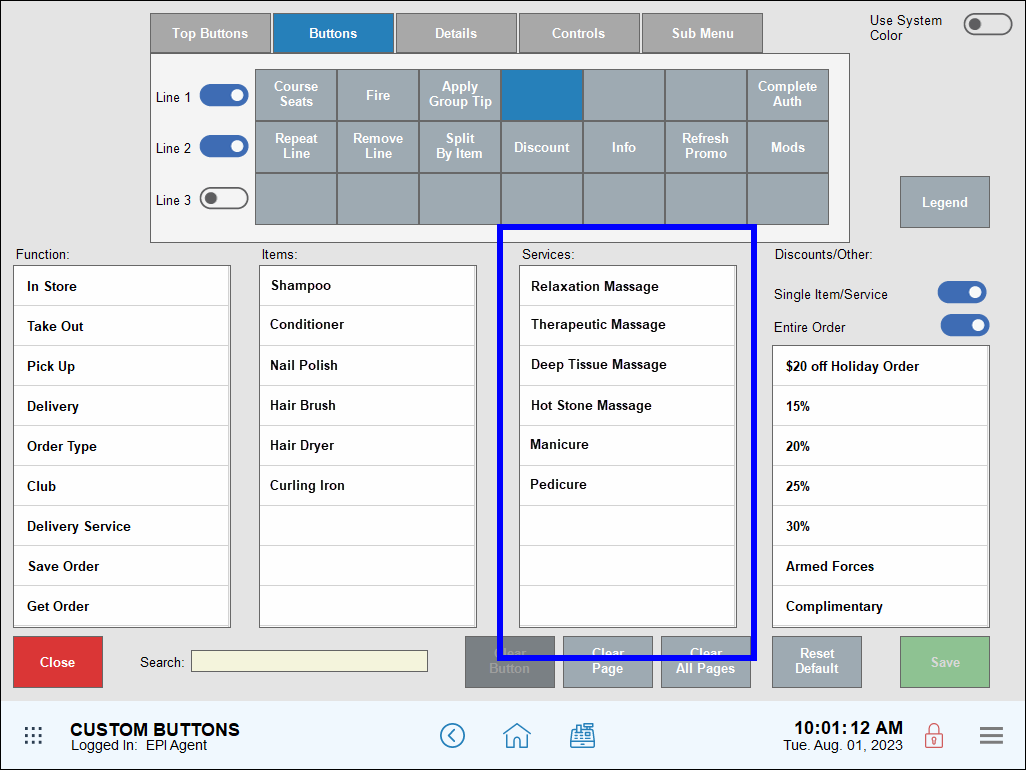
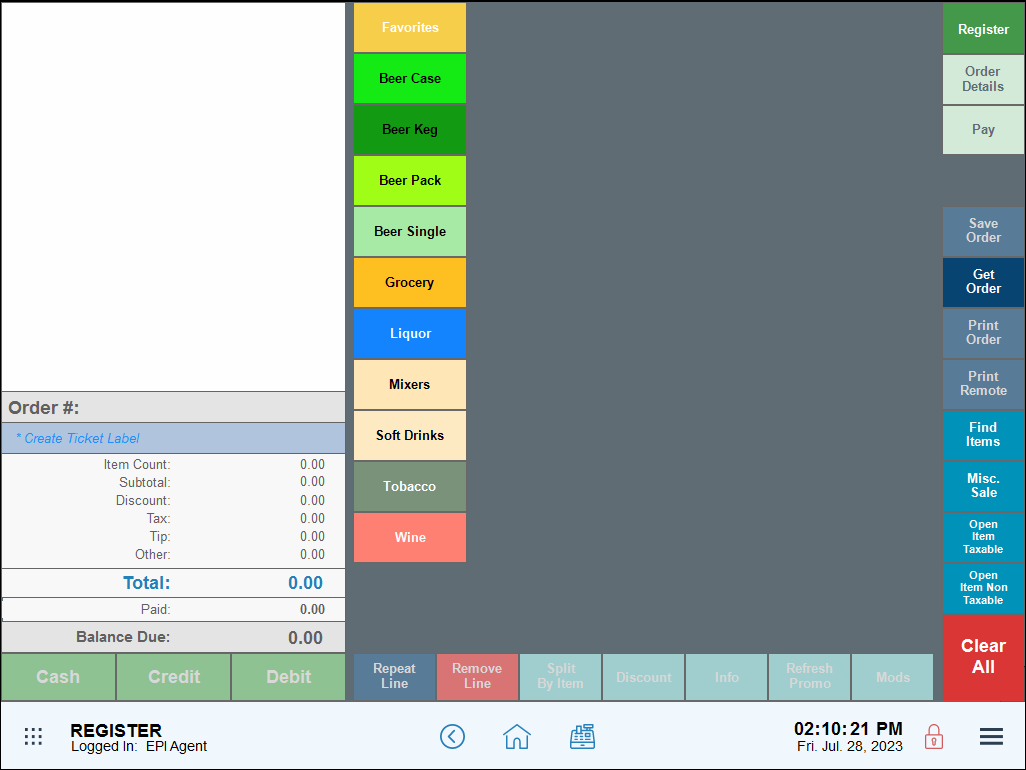
Discounts/Other
All whole order discounts, promos, service charges, and single line discounts are available on the Discounts/Other list. The following image illustrates a sample Discounts/Other list for a merchant: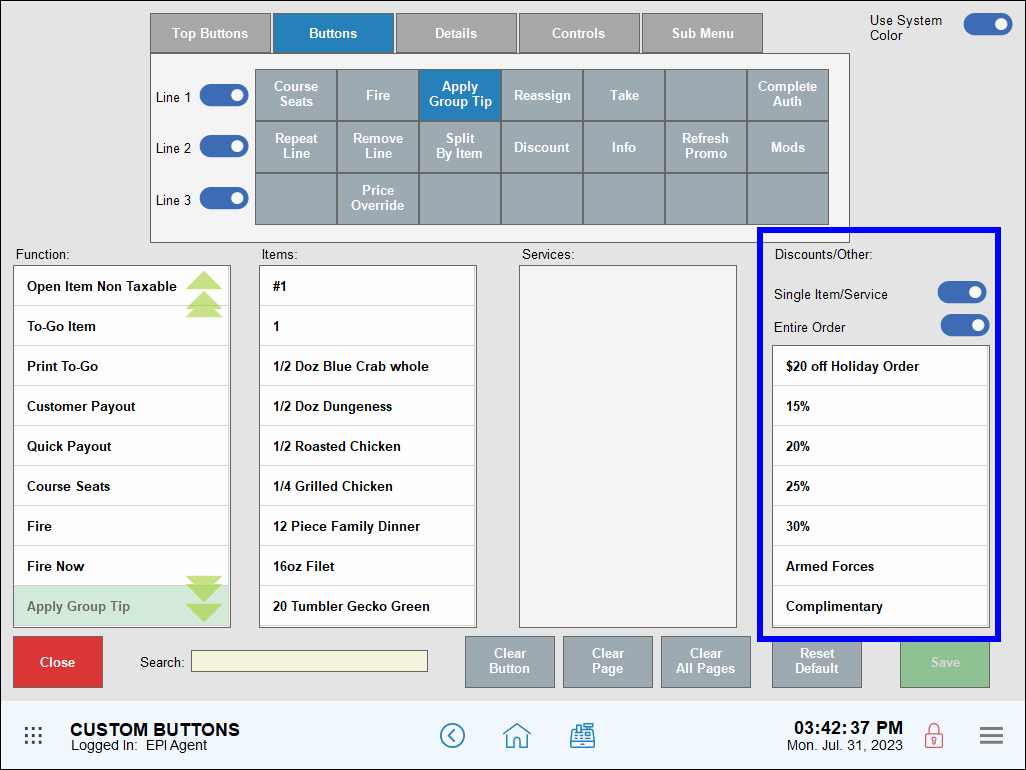
Merchants can create a custom button for any item or service in their database to the register for quick and easy access.
- Example: A diner’s famous Aloha Burger is its most ordered item! For quick access, they add Aloha Burger directly to the register as a custom button.
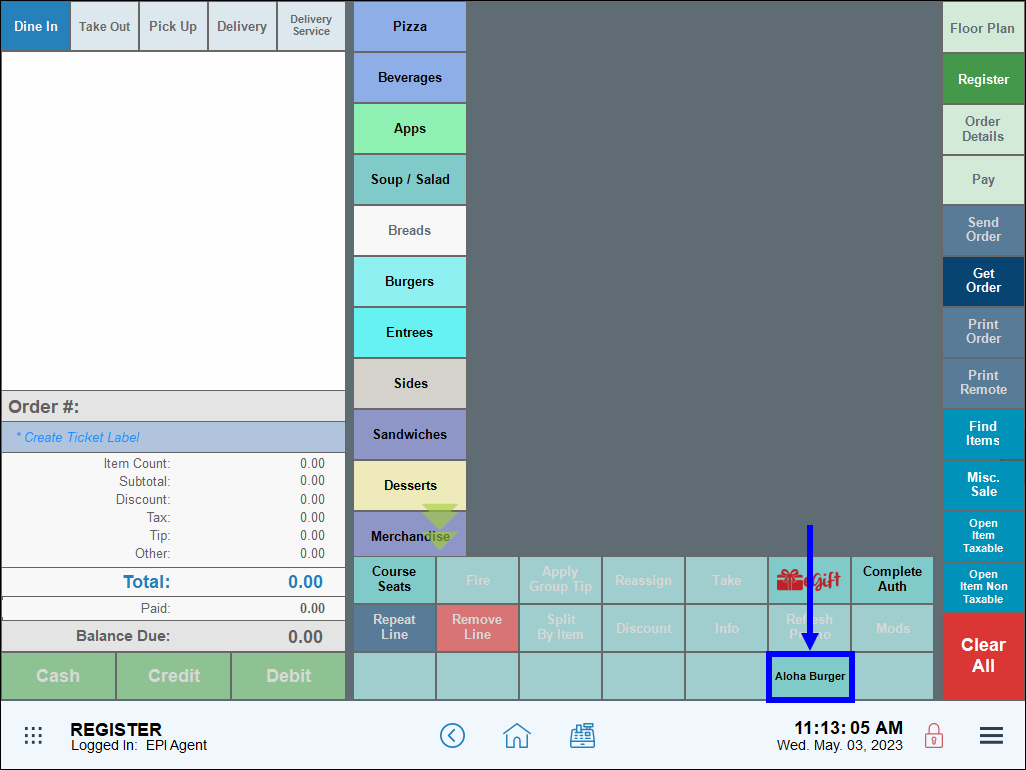
Add an Item or Service via Custom Buttons
Navigate to the Custom Button screen and perform the following to add an Aloha Burger custom button to the Register.
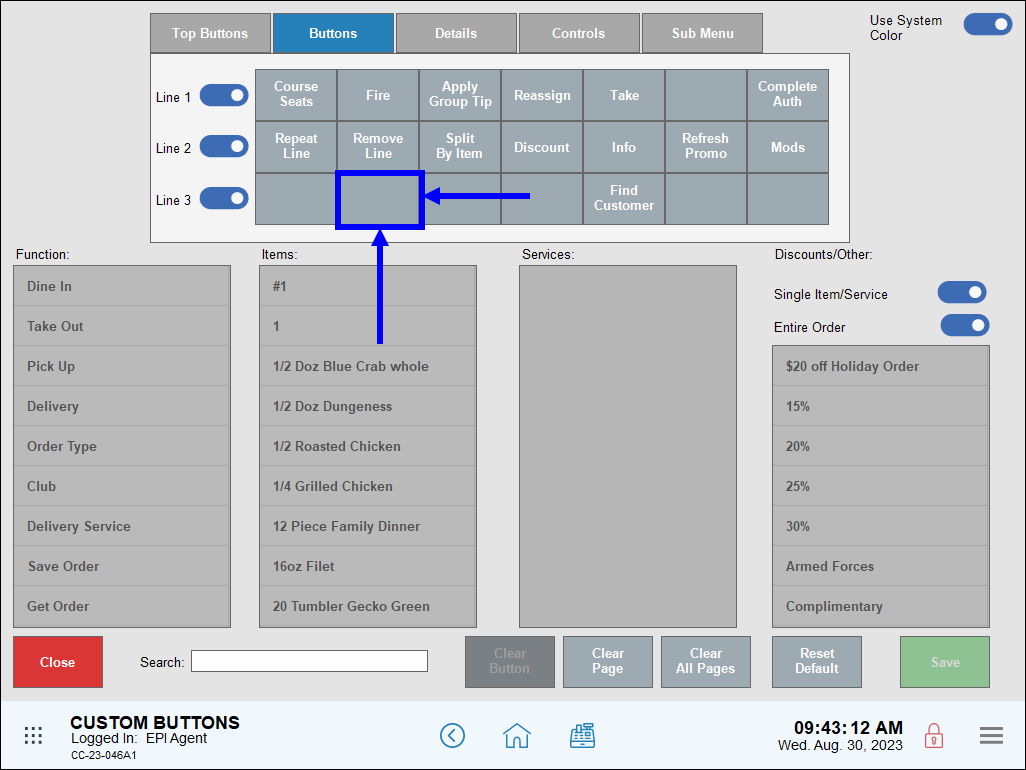
- On the Custom Button screen, tap Buttons.
- Select an available button from the grid. Available buttons are blank. Buttons can be cleared to make room for another function.
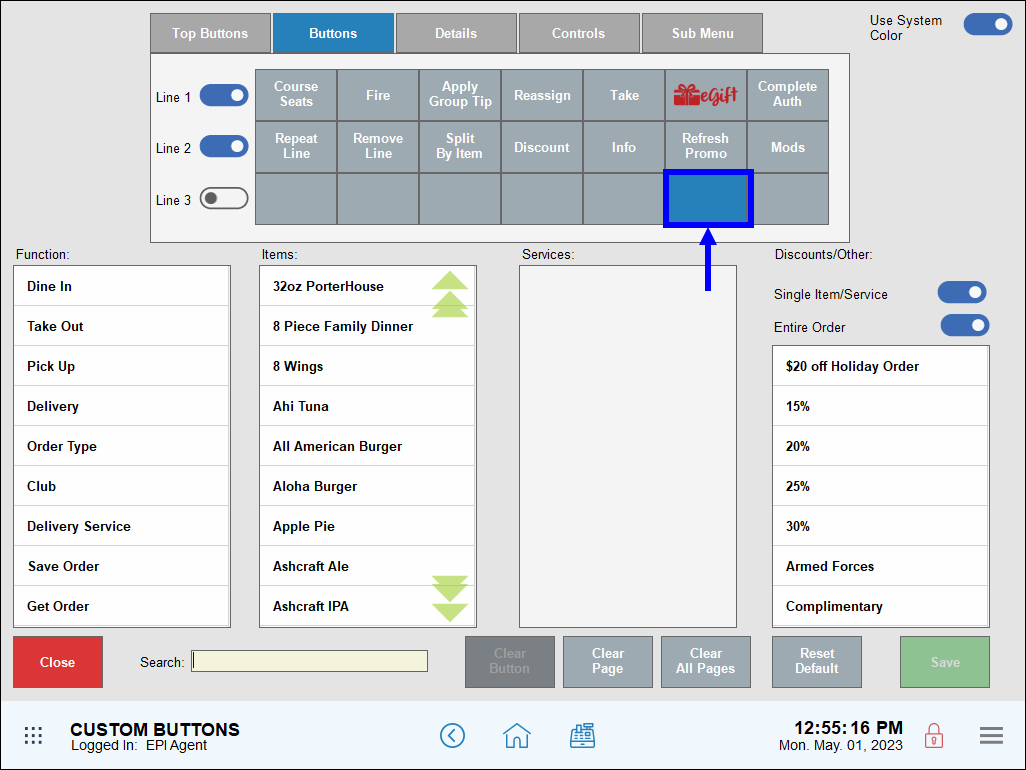
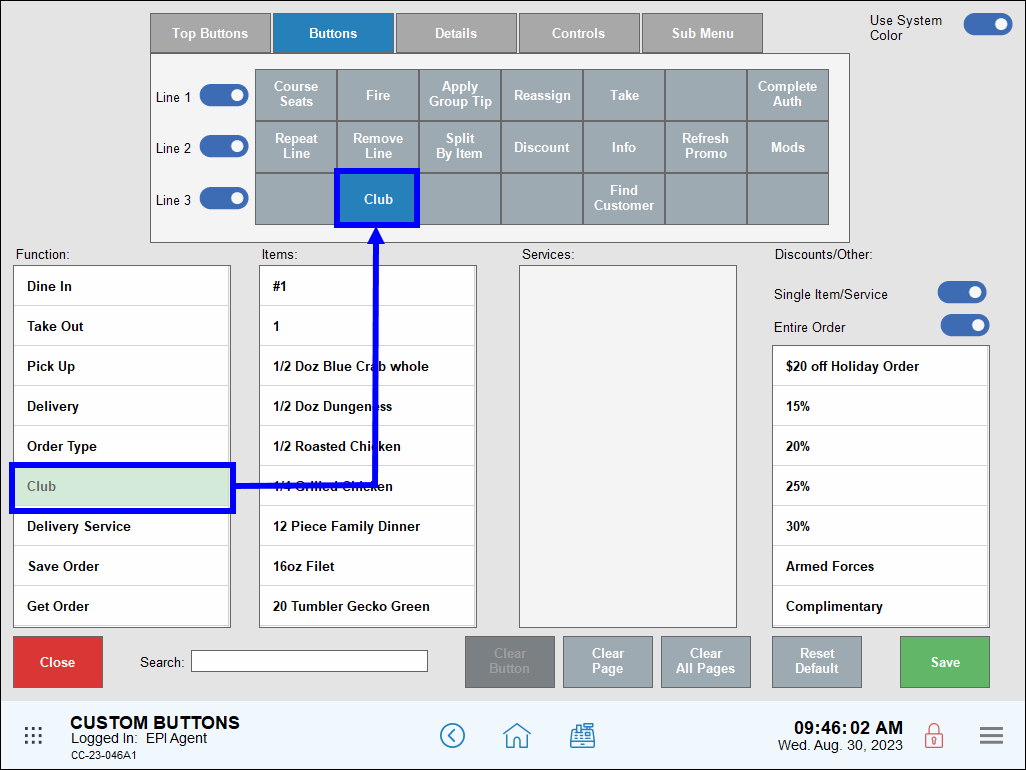
- From the Items list, select Aloha Burger. Scroll or enter keywords into the Search field.
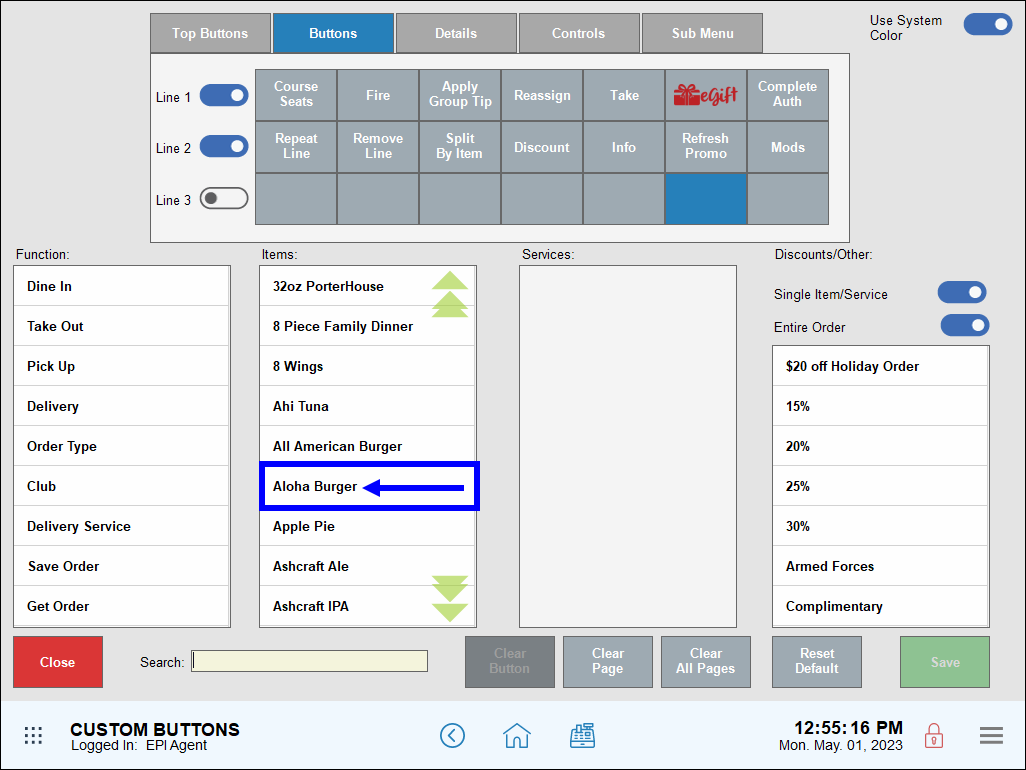
- Note: Services can be added to the Register by selecting from the Services list.
- Verify the assignment of Aloha Burger to the new location.
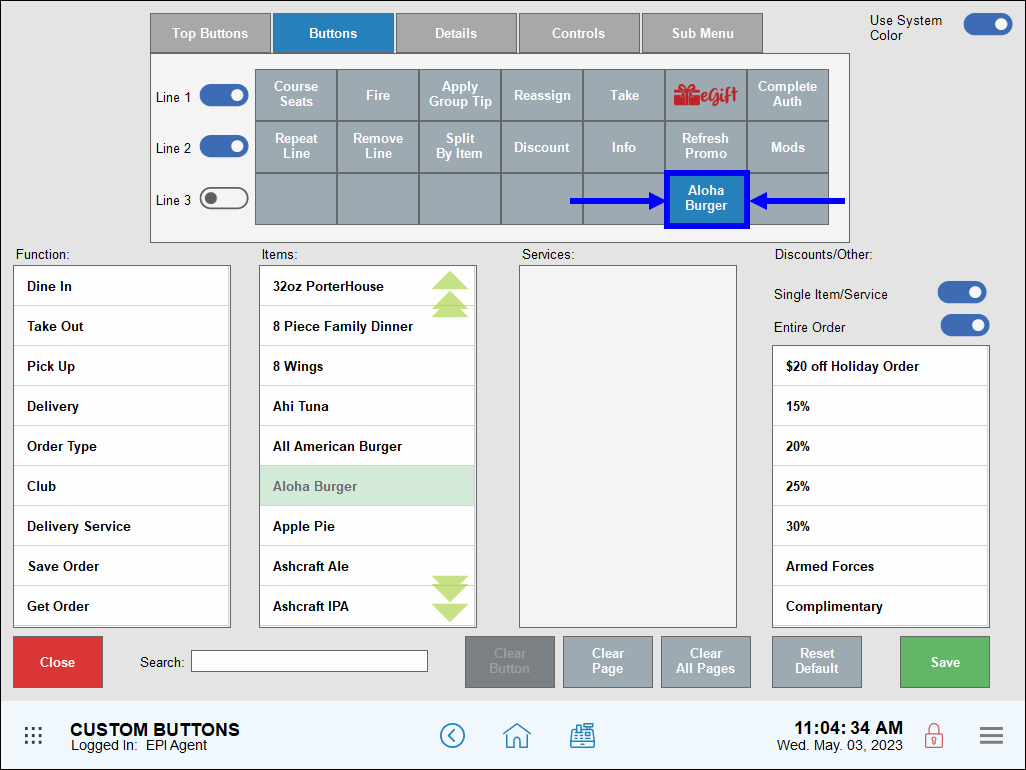
- Tap Save.
- Tip! Check your work! Navigate to the Register to view Aloha Burger in the custom buttons section.
Customize your register by using custom buttons to add Special Function buttons. Special Functions include options such as: order types, Club, To-Go Item, Print To-Go, Quick Payout, Price Override, Tax Exempt Item, and more.
Adding Special Function Buttons
Special Functions are not available on the Register app by default. Add them easily from the Custom Buttons screen.
- On the Custom Buttons screen, tap Buttons to display the Register buttons grid.
- Select an available button.
- Select a special function from the Function list.
- Tap Save.
Custom Buttons Mapping
Custom buttons can be added to different work areas of the Register app.
Register: Order Work Area – Top Buttons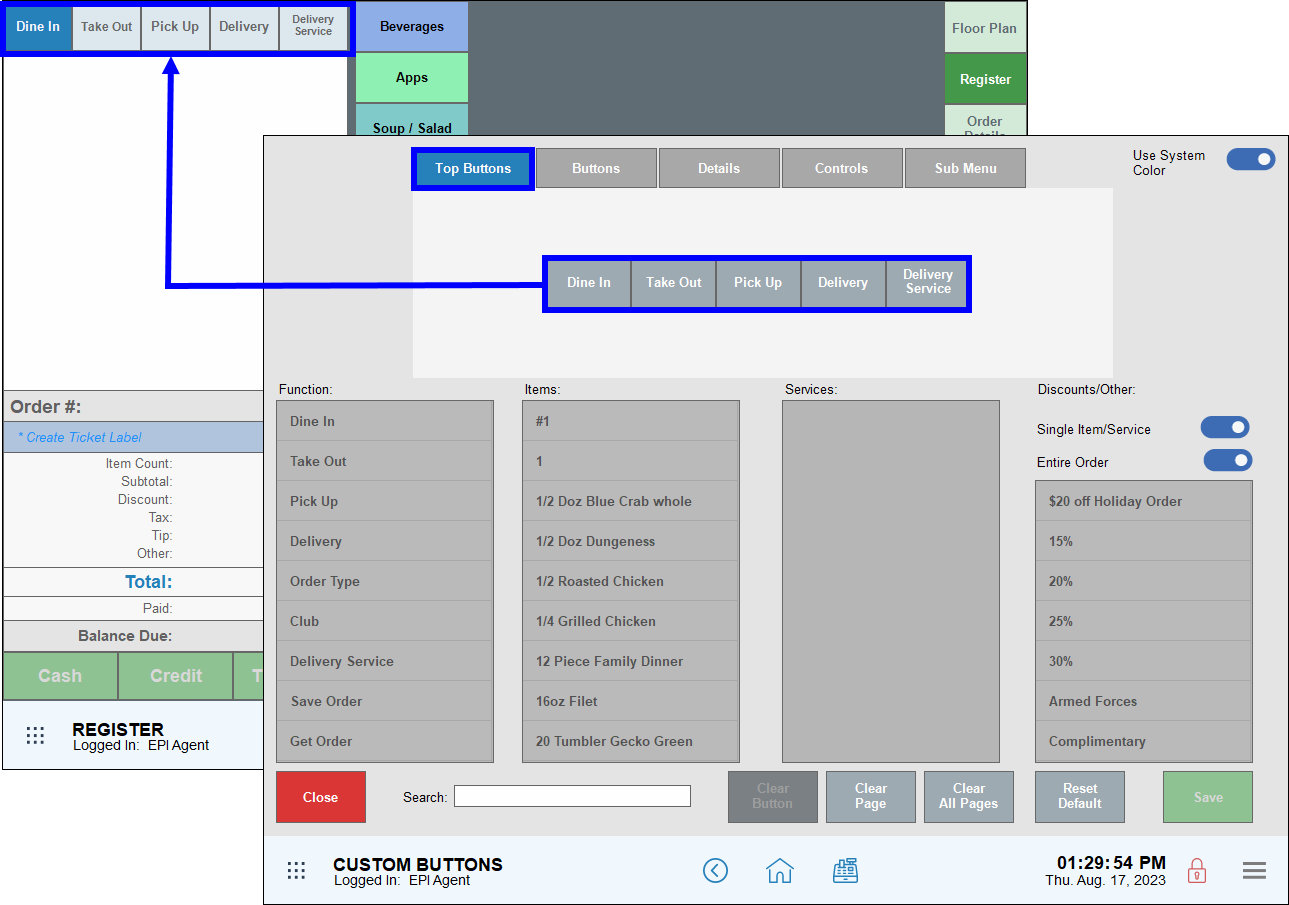
Register: Buttons Grid – Buttons Tab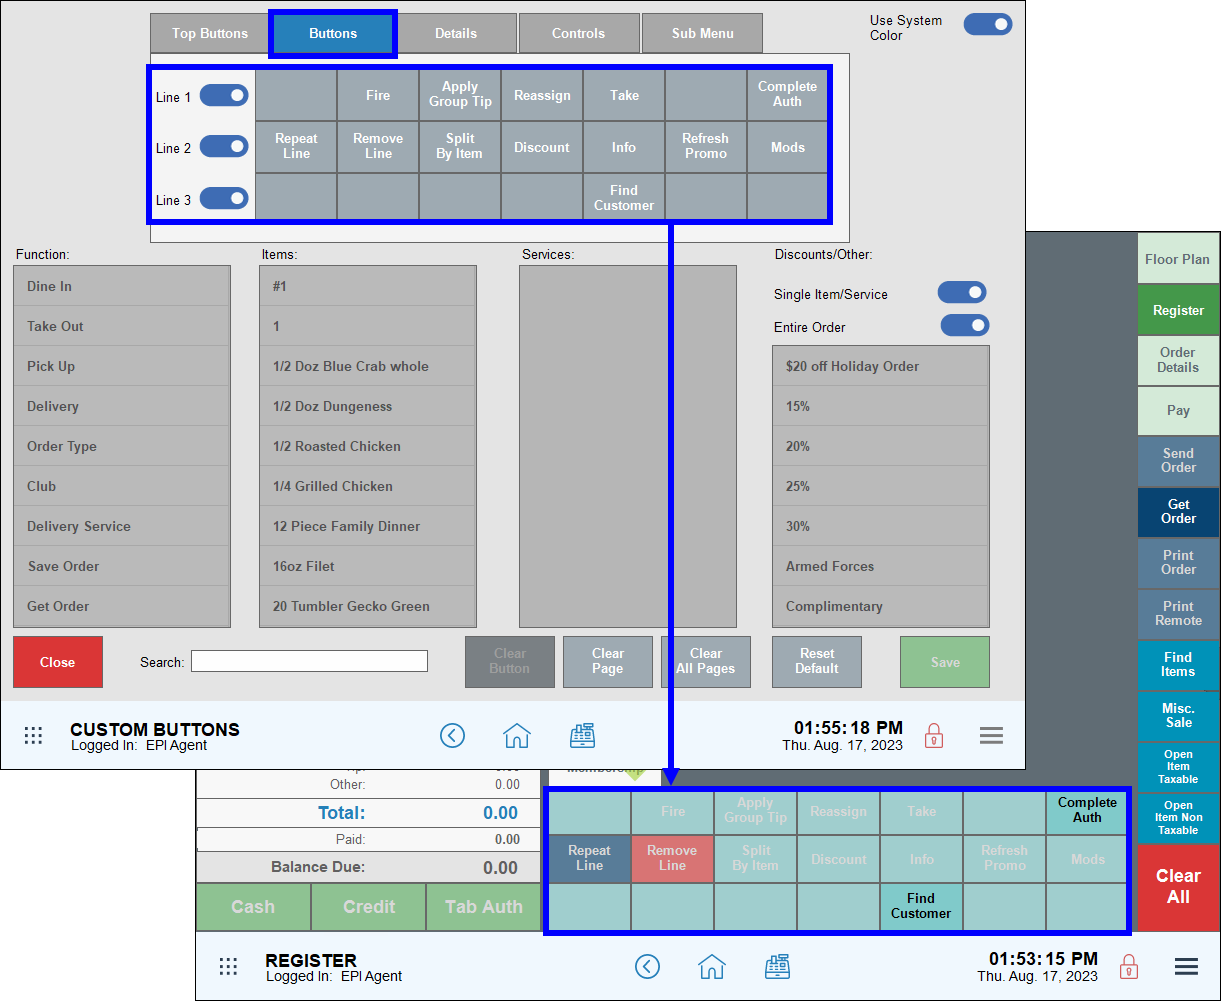
Register: Order Buttons – Controls Tab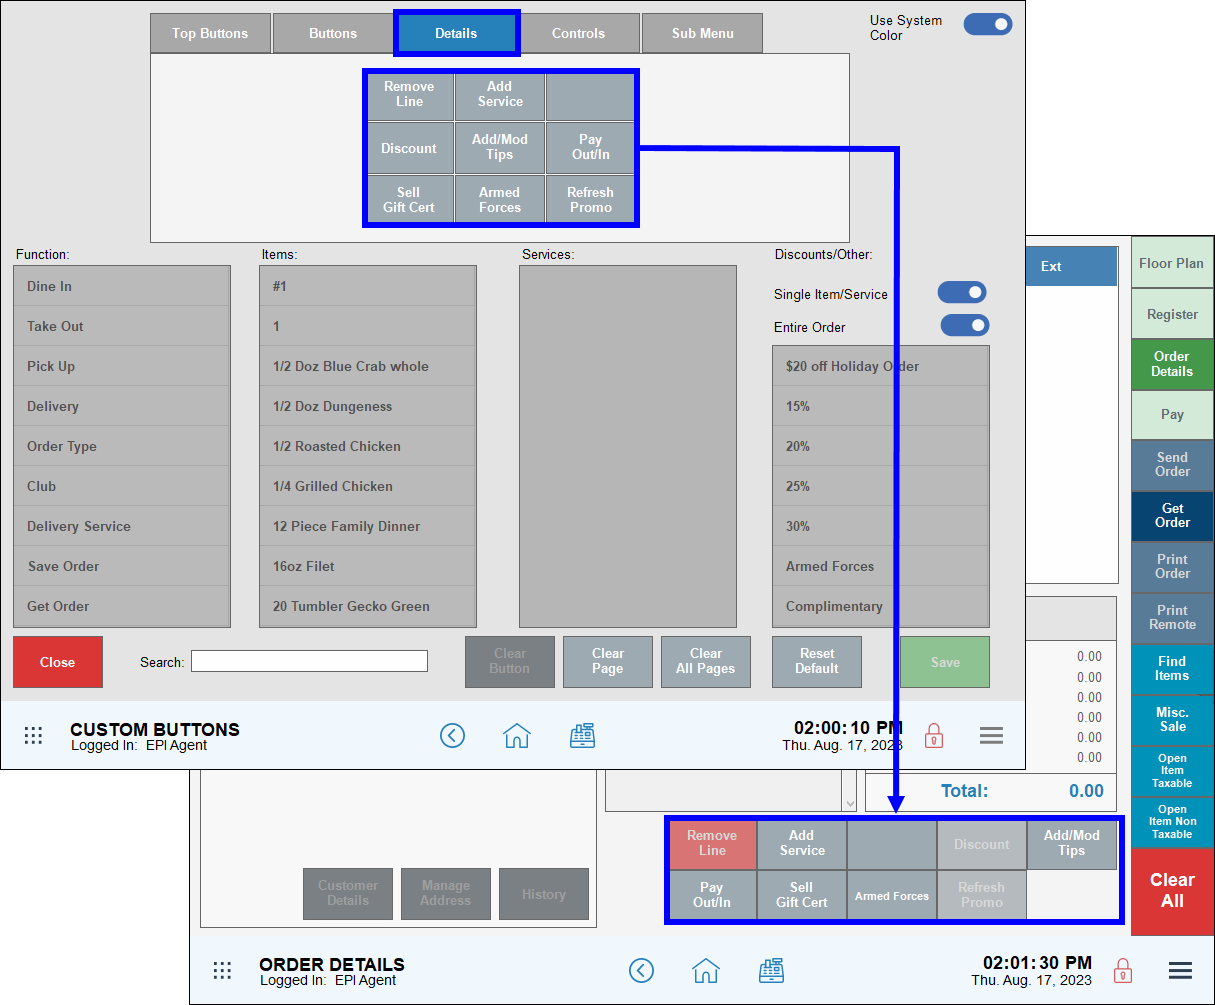
Register: Sub Menu Functions – Sub Menu Tab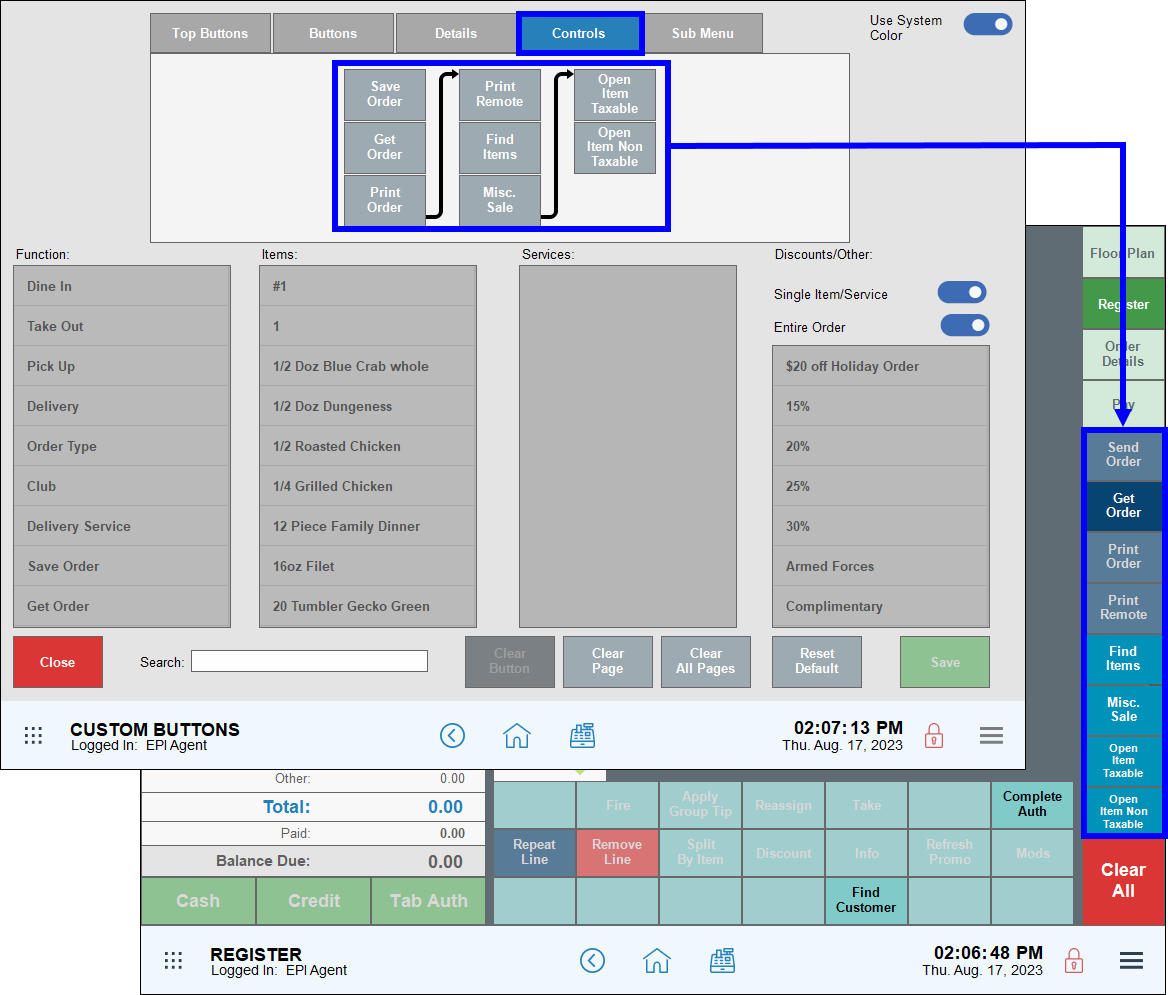
Customize your workflow by moving frequently used functions to a prominent location on your register.
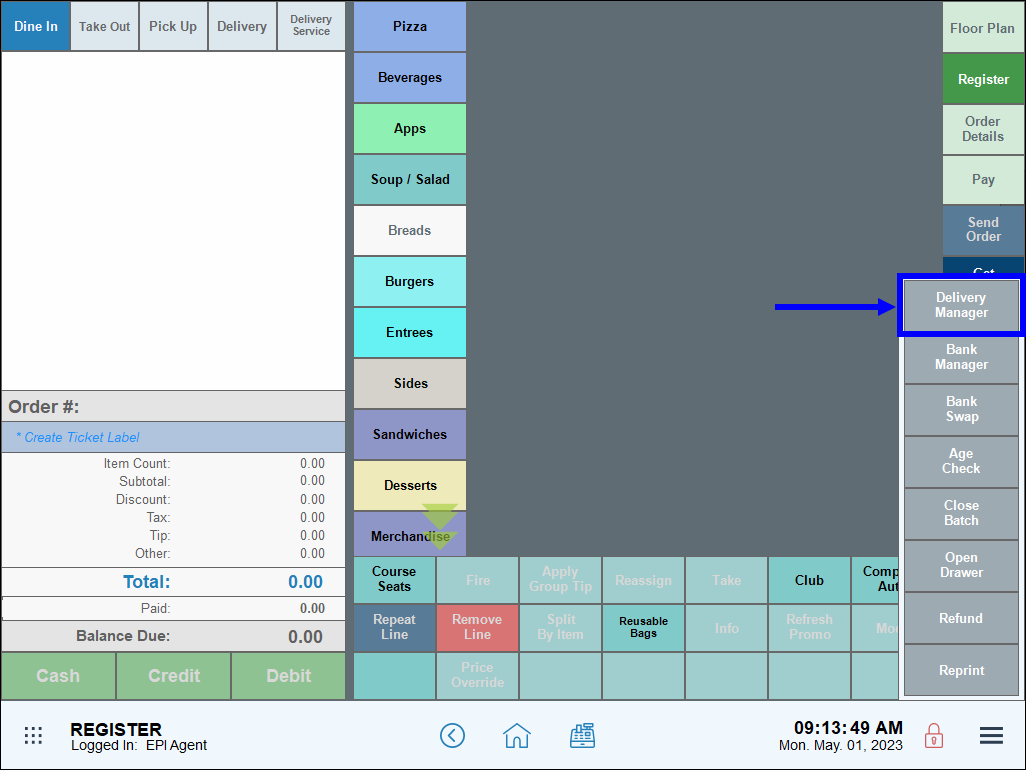
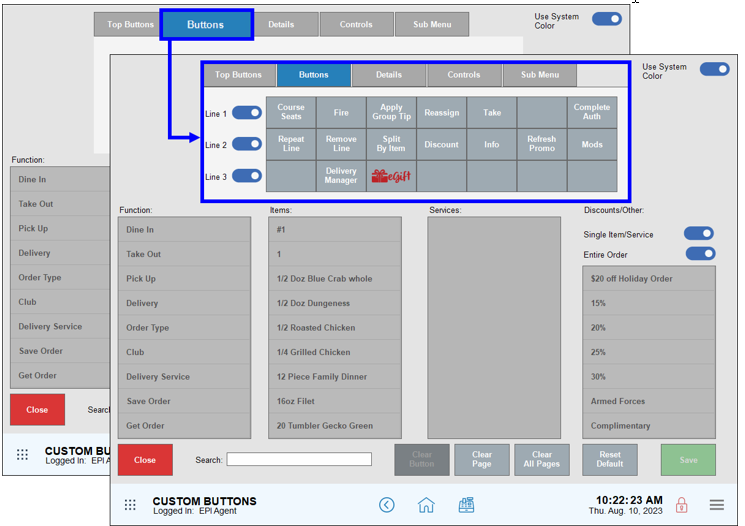
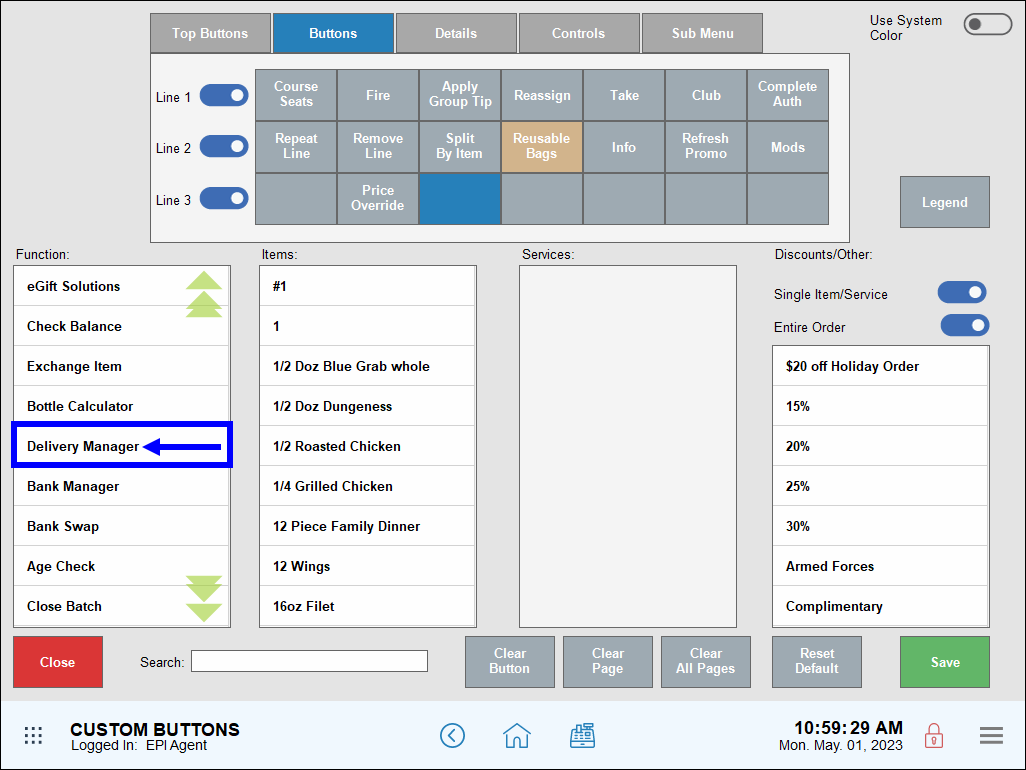
- Example: A pizzeria with a booming delivery business moves its Delivery Manager button to a more prominent location on their register. Delivery Manager can be moved from the sub-menu to a button on the Register tab. The Delivery Manager default location is on the Sub Menu:
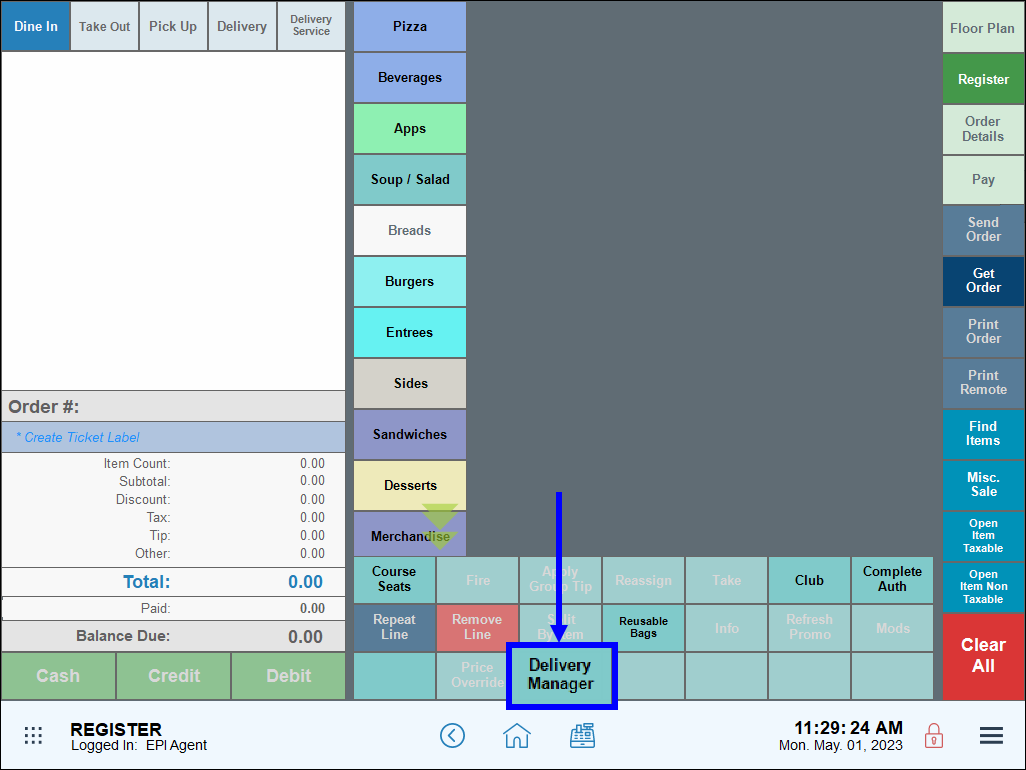
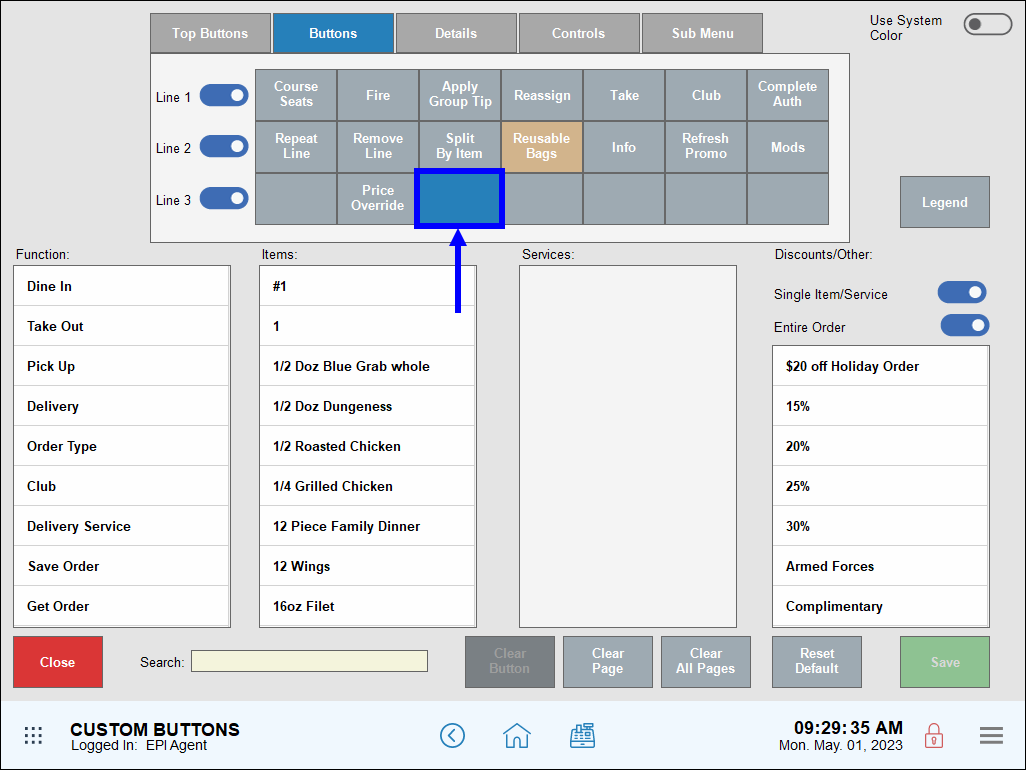
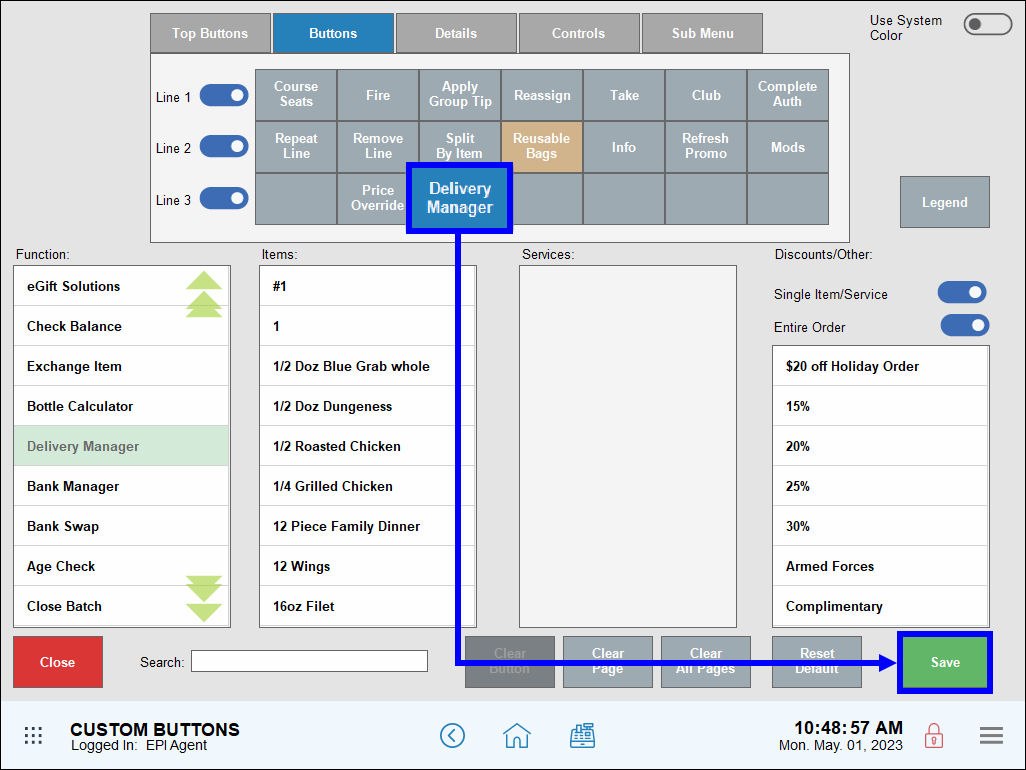
Delivery Manager after moving to the Register tab:
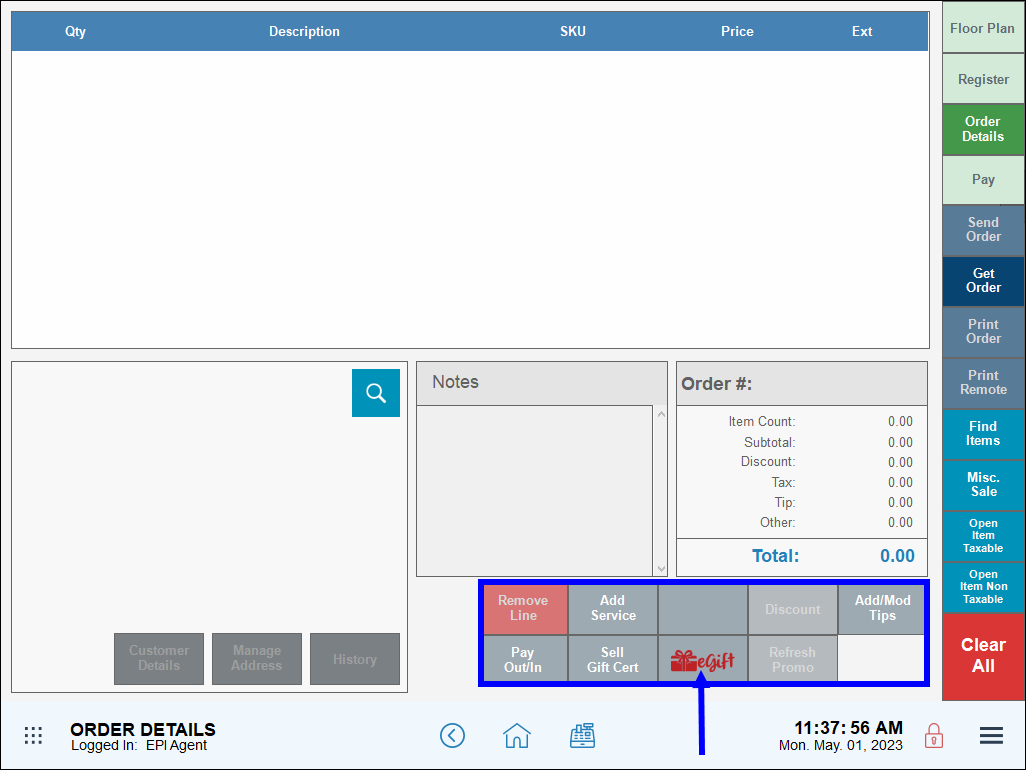
- Example: During the holiday season, merchants who use eGift cards frequently move the eGift function from the Order Details tab to the Register tab for quicker access. By default, the eGiftSolutions button is located on the Order Details tab:
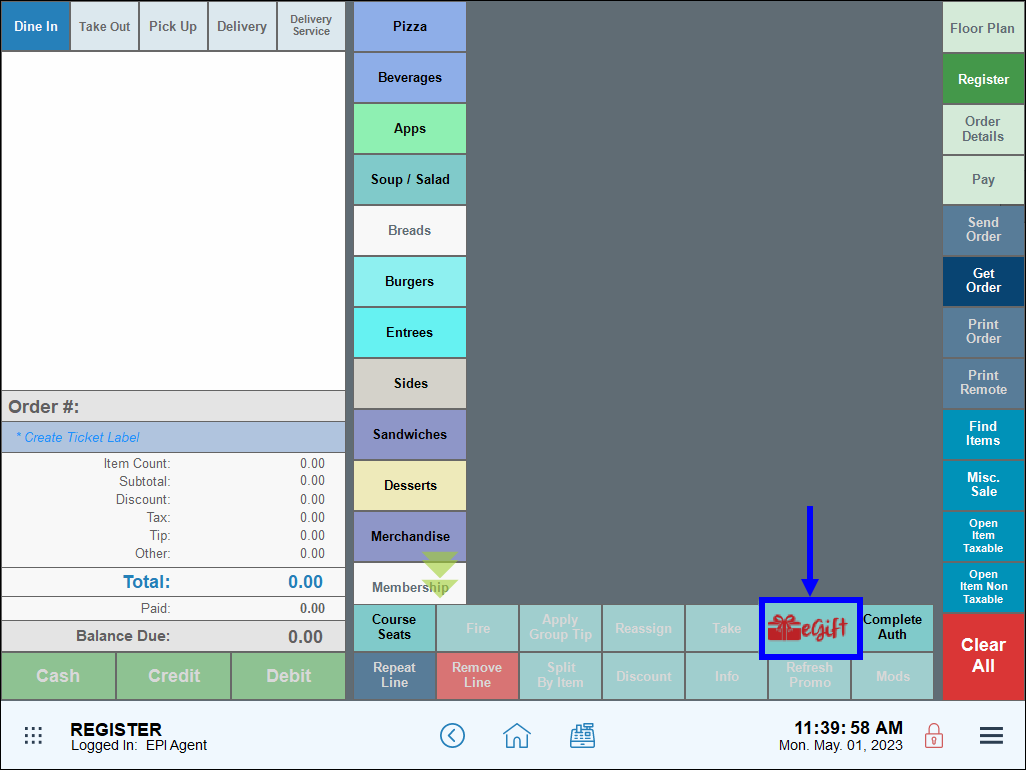
In this example, the eGiftSolutions button has been moved to the Register tab:
Move a Function via Custom Buttons
Perform the following to move the Delivery Manager button from the Sub Menu to the Register tab:
- On the Custom Buttons screen, tap the Buttons tab.
- Select an available button.
- From the Function list, select Delivery Manager.
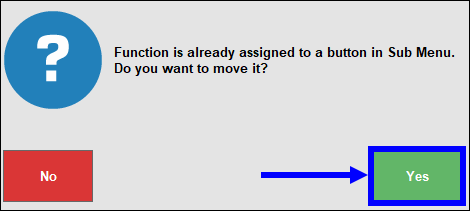
- On the pop-up screen, tap Yes.
- When the Delivery Manager custom button displays, tap Save.
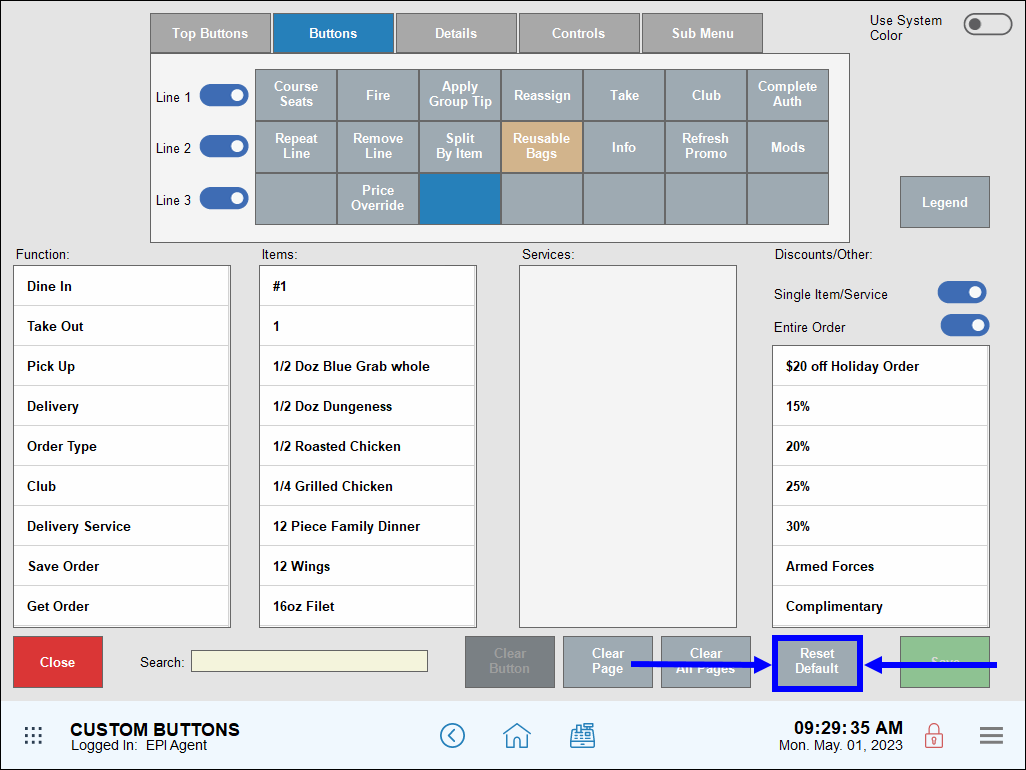
- Note: Tap Reset Default to restore default button locations.
Users can remove a previously added custom button from the register.
- Example:
A restaurant has course firing available as a feature, but does not wish to use it. The restaurant can remove the Course Seats custom button from the Register.
Before removing the Course Seats custom button:

After removing the Course Seats custom button:
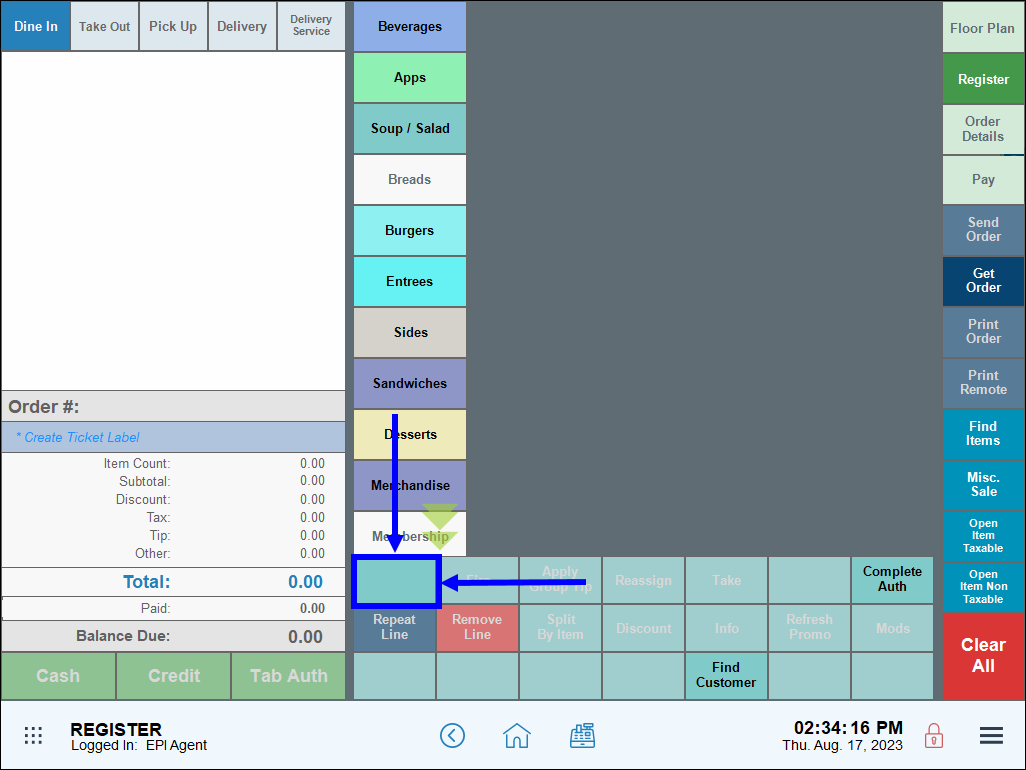
Removing Custom Buttons from the Register
Perform the following to remove a function from the Register:
- On the Custom Buttons screen, tap Buttons to display the Register buttons grid.
- Select a custom button to remove, then tap Clear Button.
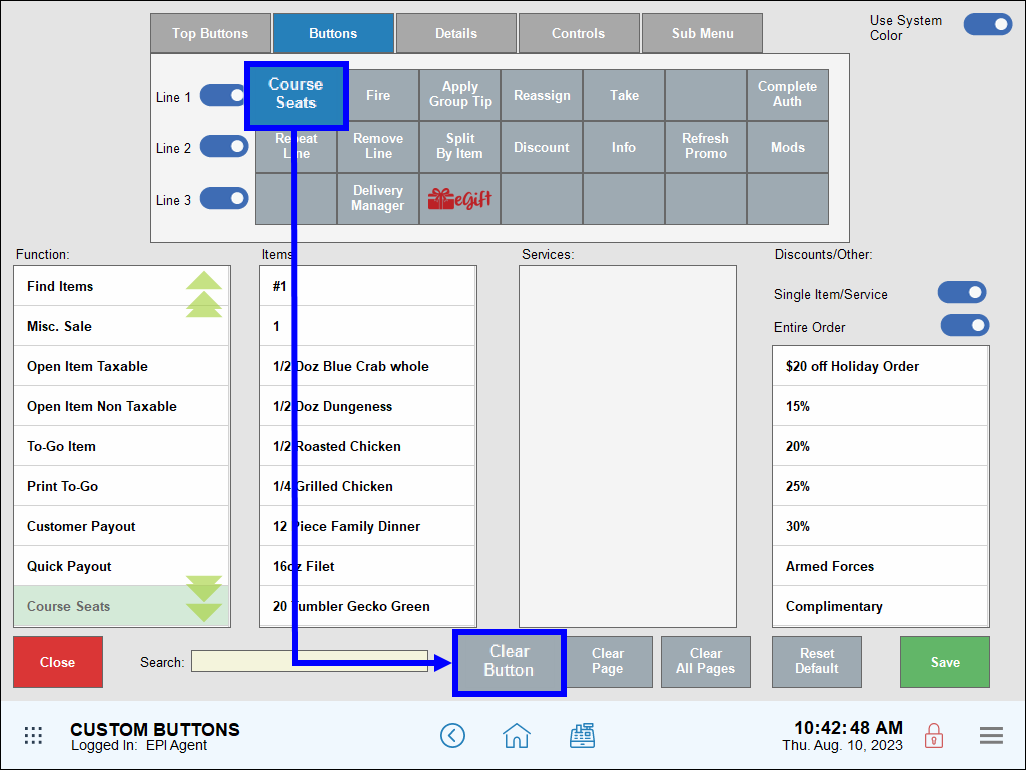
- Caution: Avoid tapping Clear Page by Mistake. Clearing the page clears all buttons at once.
- The Course Seats button displays as blank.
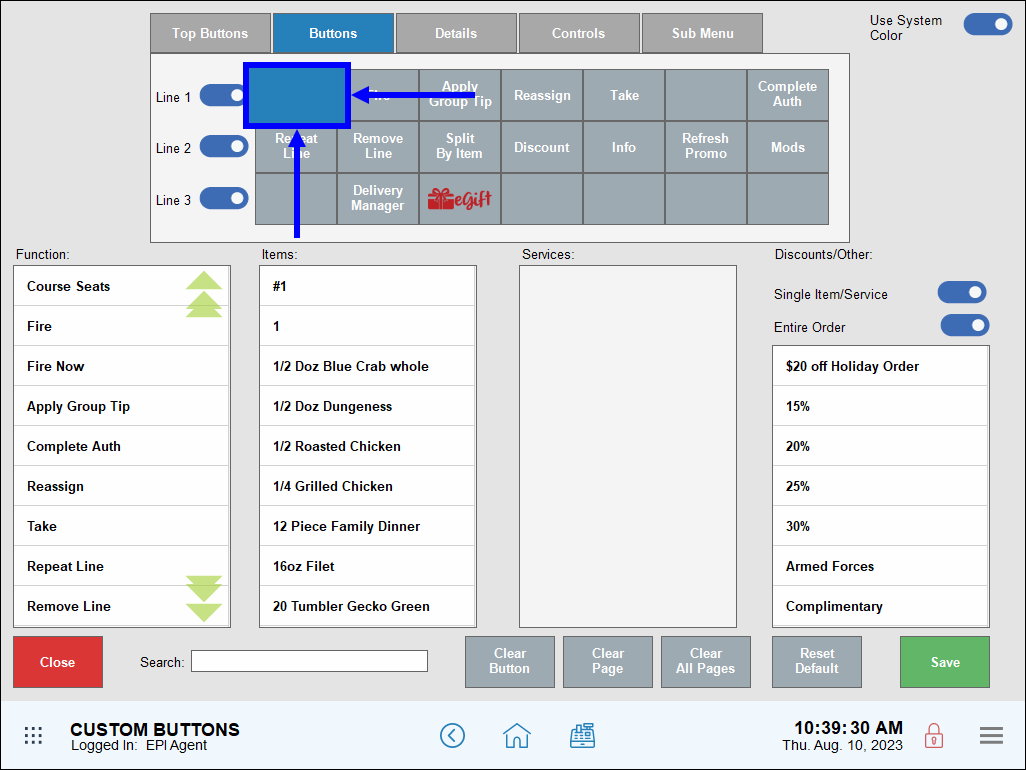
- Tap Save.
How can we improve this information for you?
Registered internal users can comment. Merchants, have a suggestion? Tell us more.