Setting up pizza toppings as modifiers is essential to customer satisfaction, successful inventory maintenance, and a healthy bottom line.
Building an entire pizza from scratch in Exatouch ensures that pizzas and toppings are priced correctly, and that employees can quickly customize them at the register.
Setting up categories correctly is vital for success, as categories are the foundation for toppings, pricing, and other modifications. Before anything else, set up new categories for both Pizza and Modifiers (toppings).
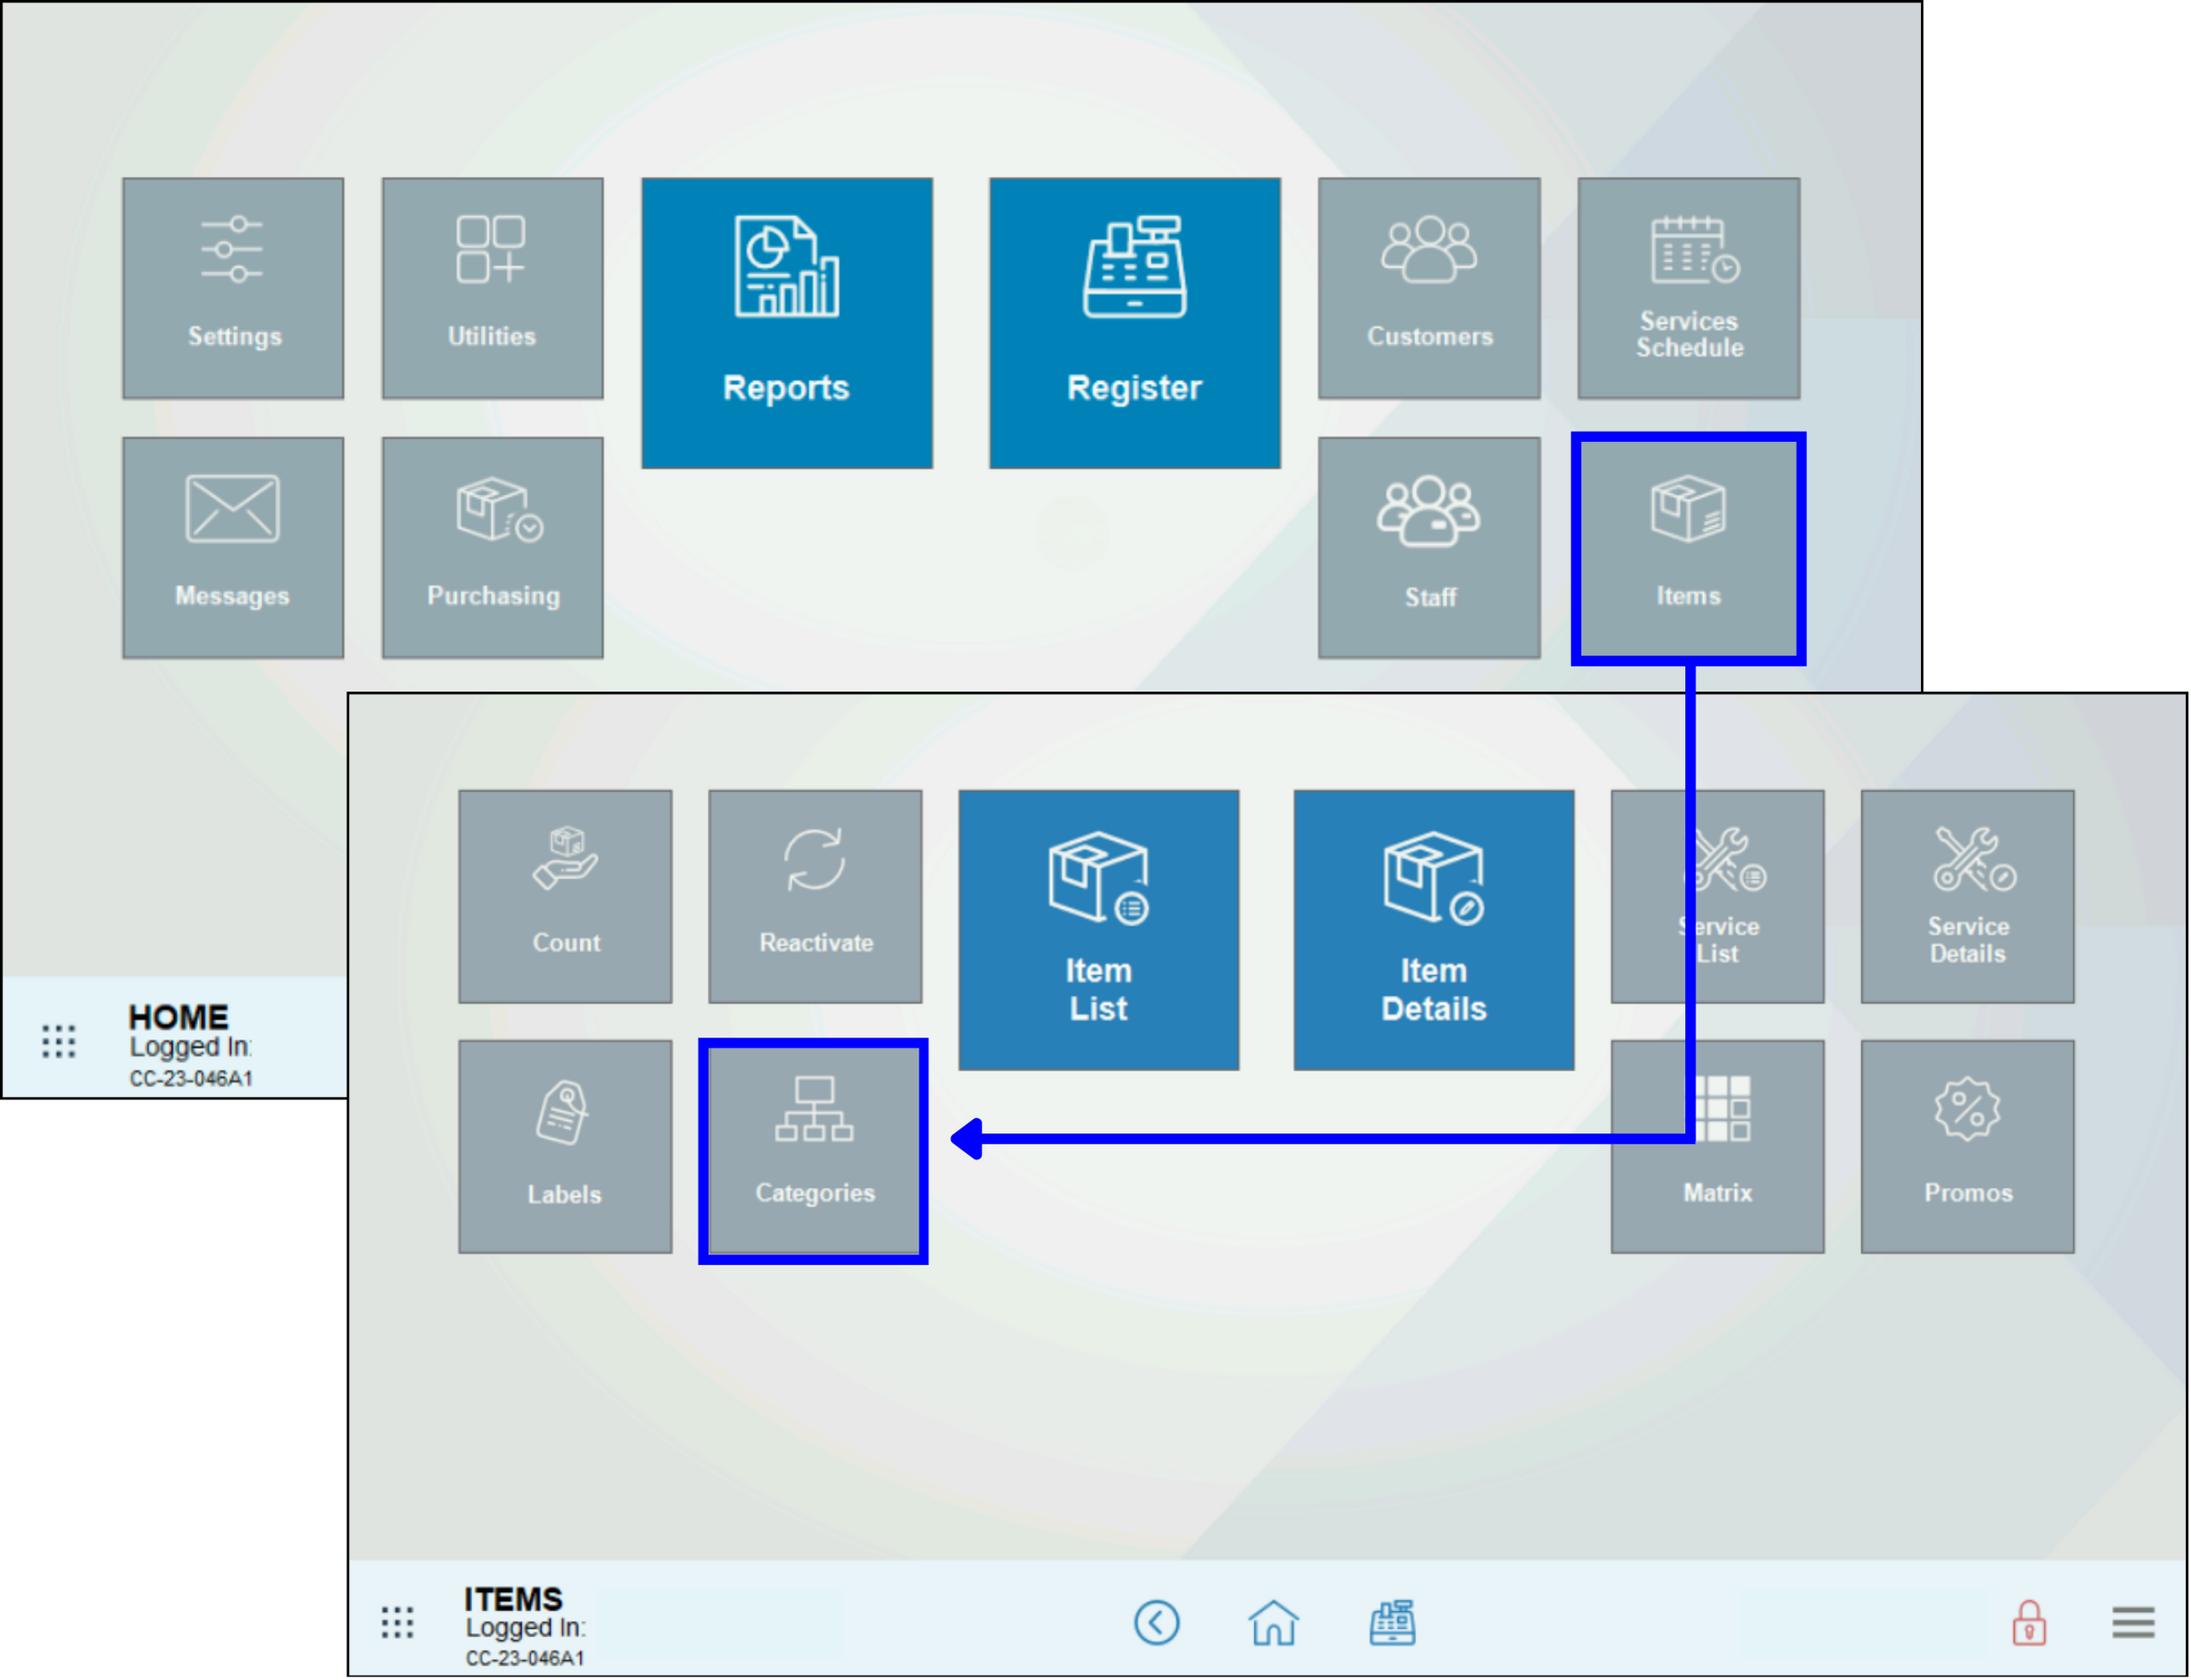
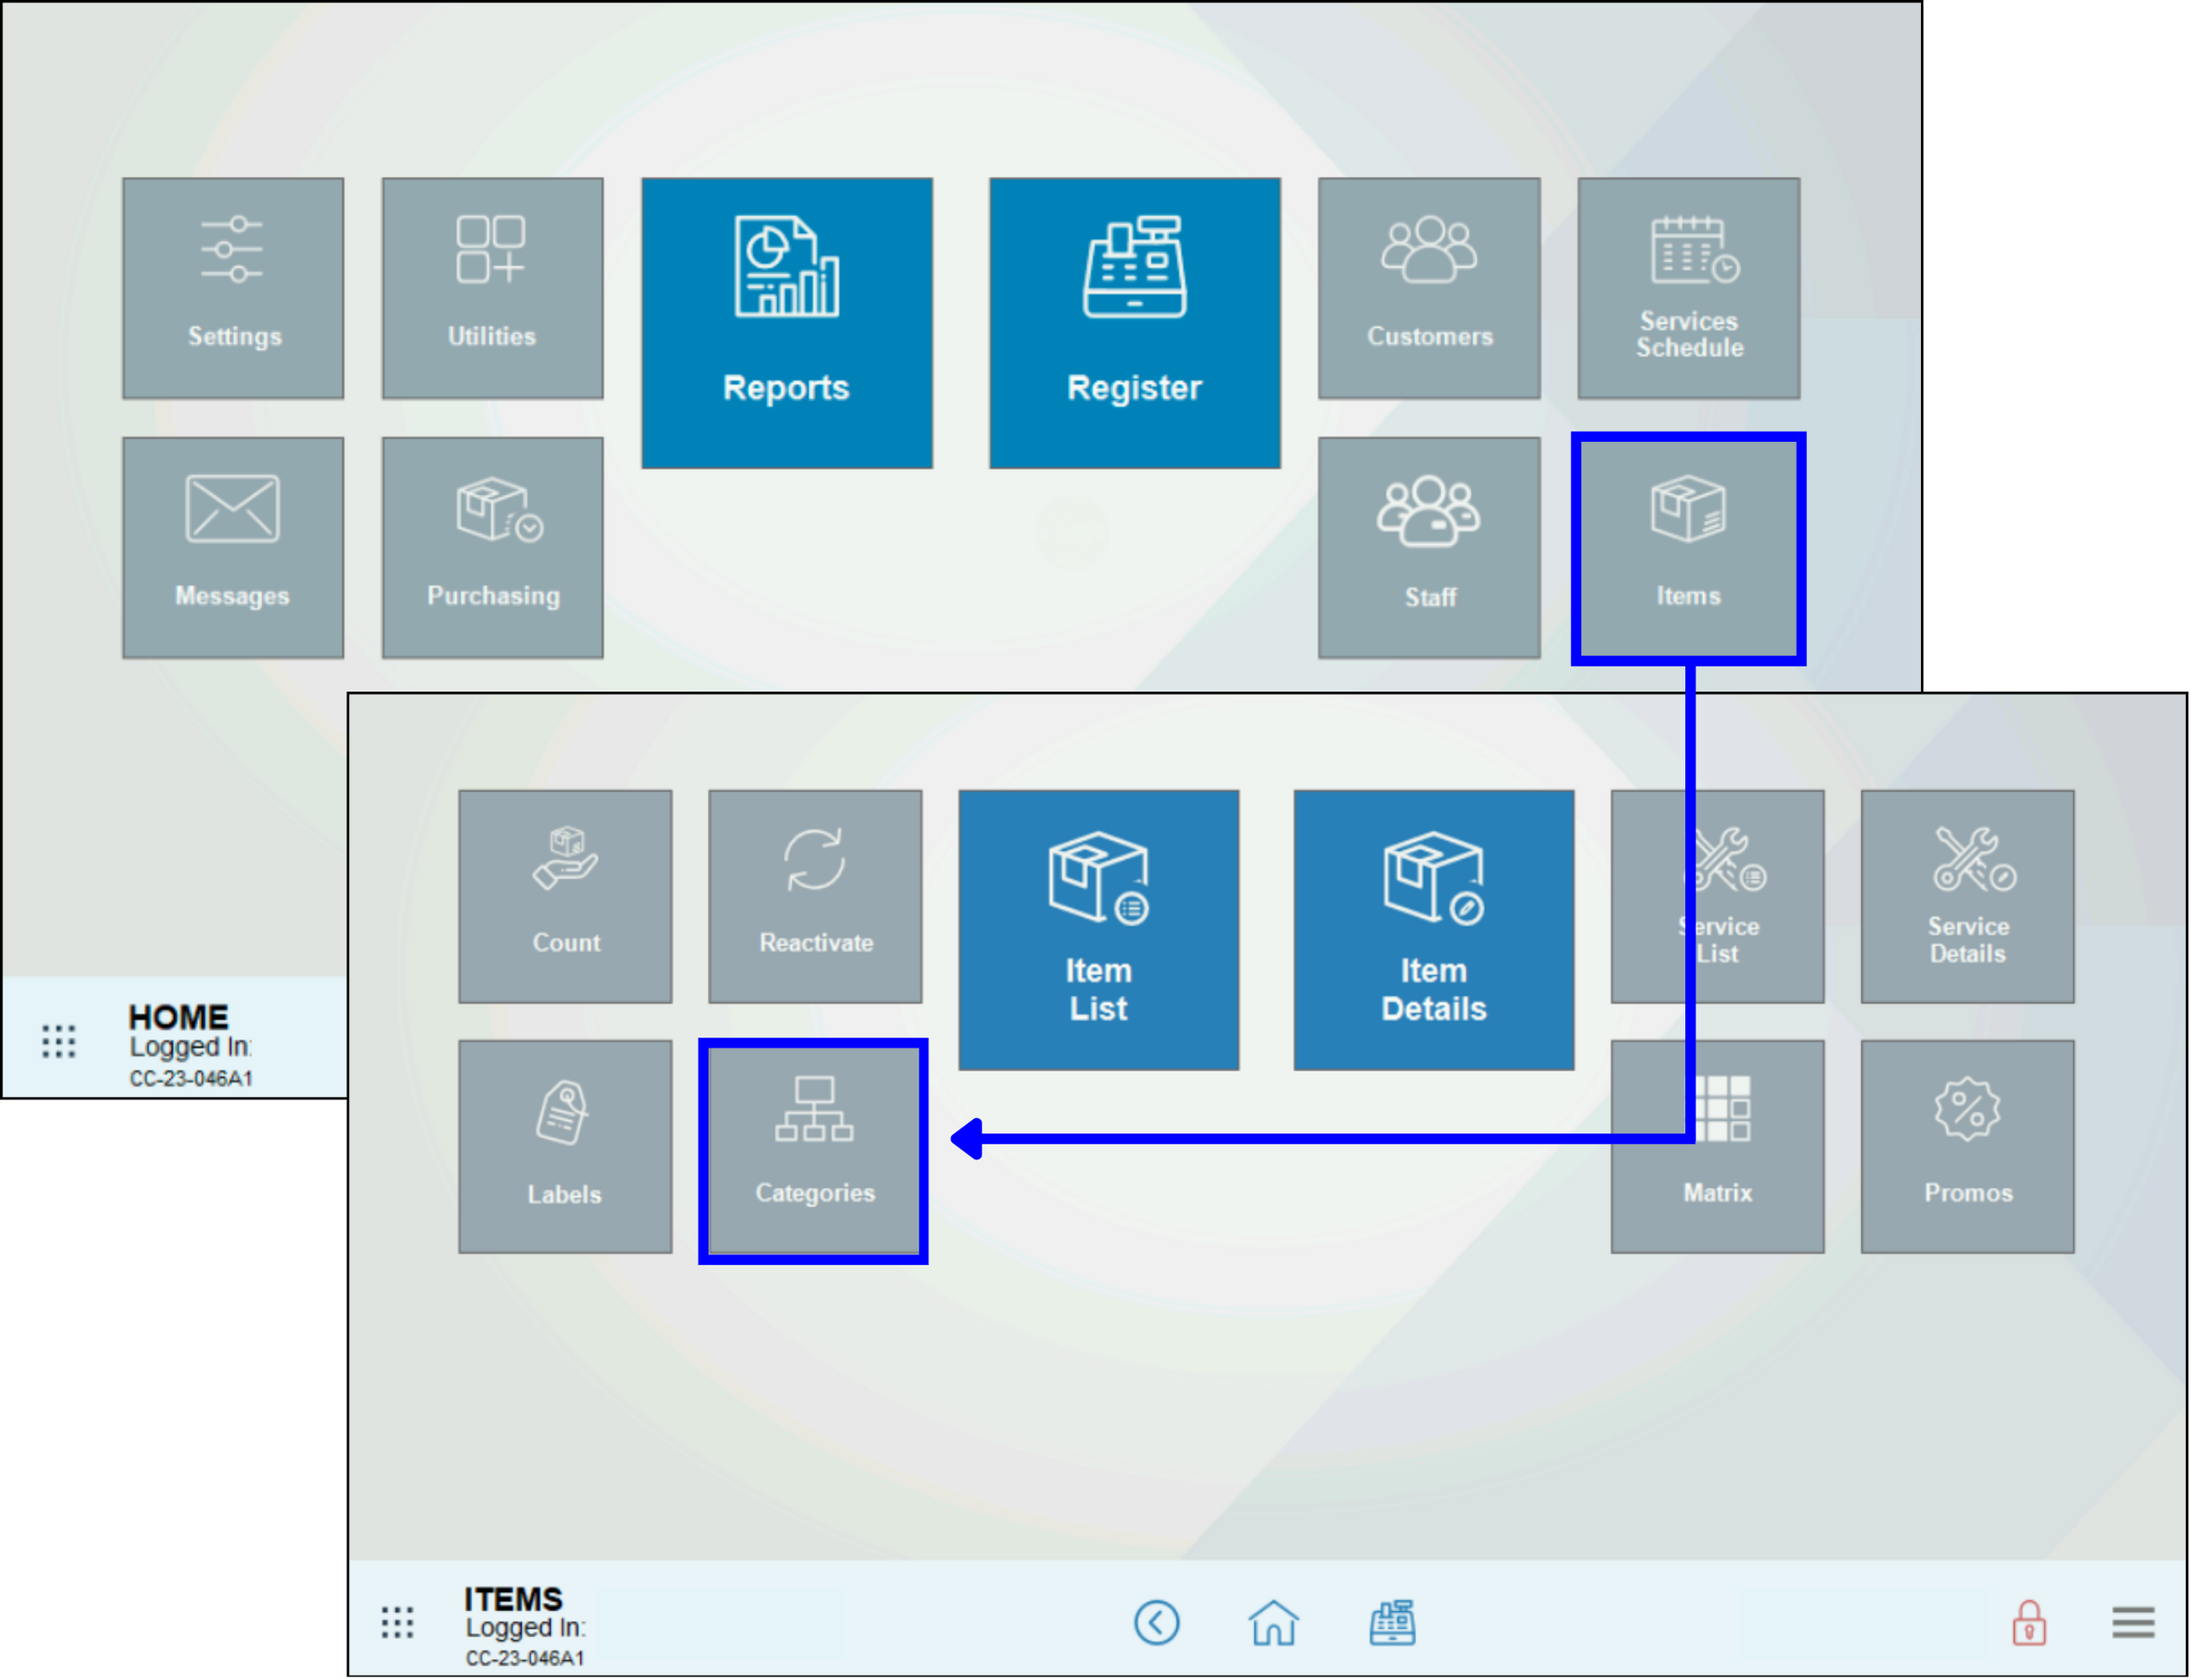
- Go to Home > Items > Categories.
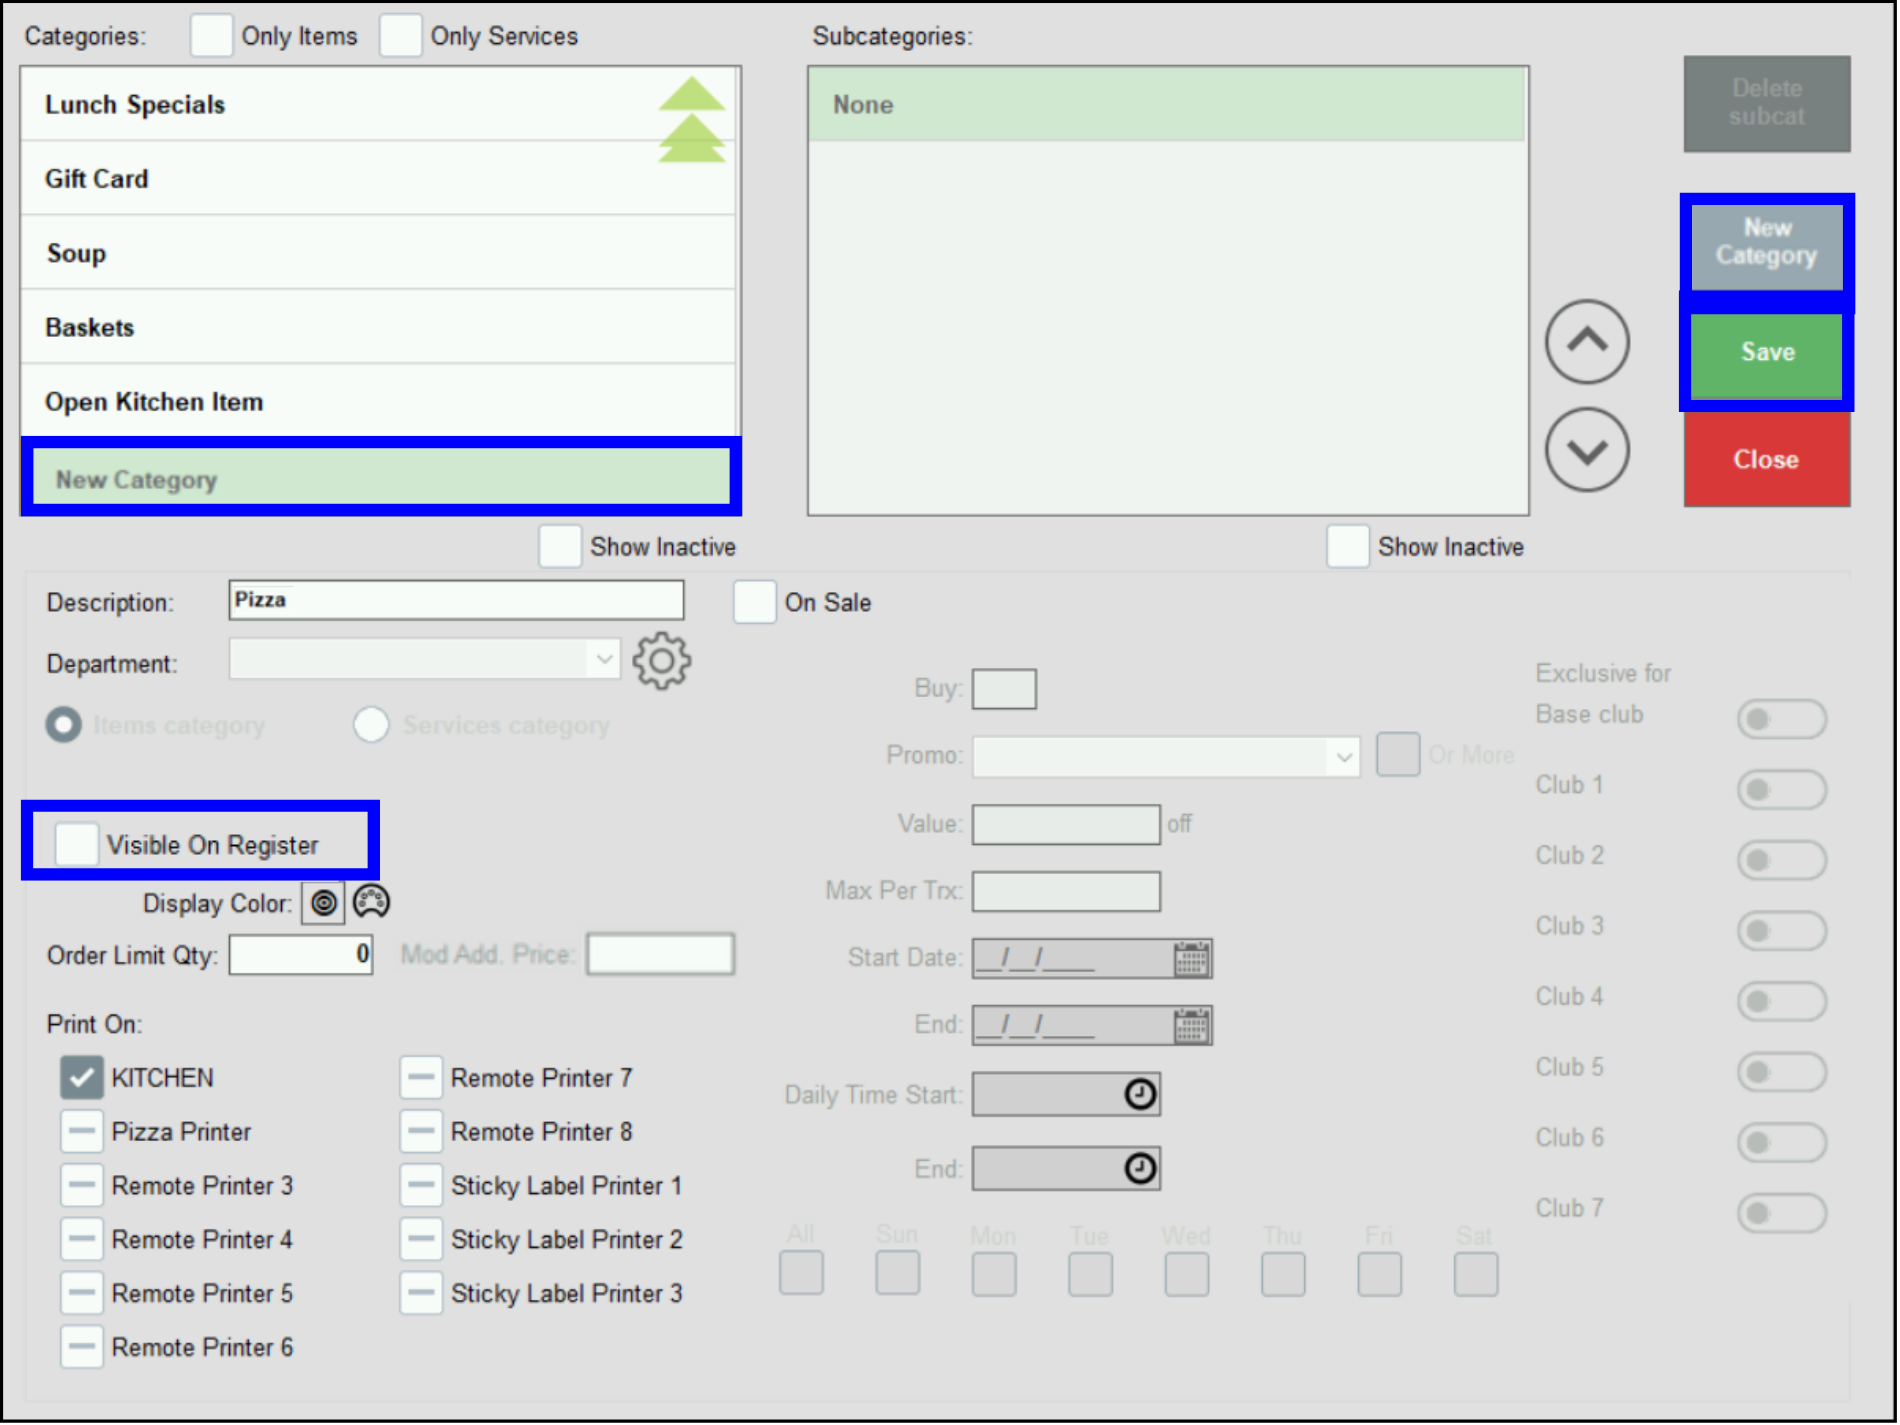
- To make a Category for Pizza:
- Click New Category. You will see “New Category” appear in green in the Categories listing.
- Enter the name of the new category in the Description field. The example is “Pizza.”
- Click Save.
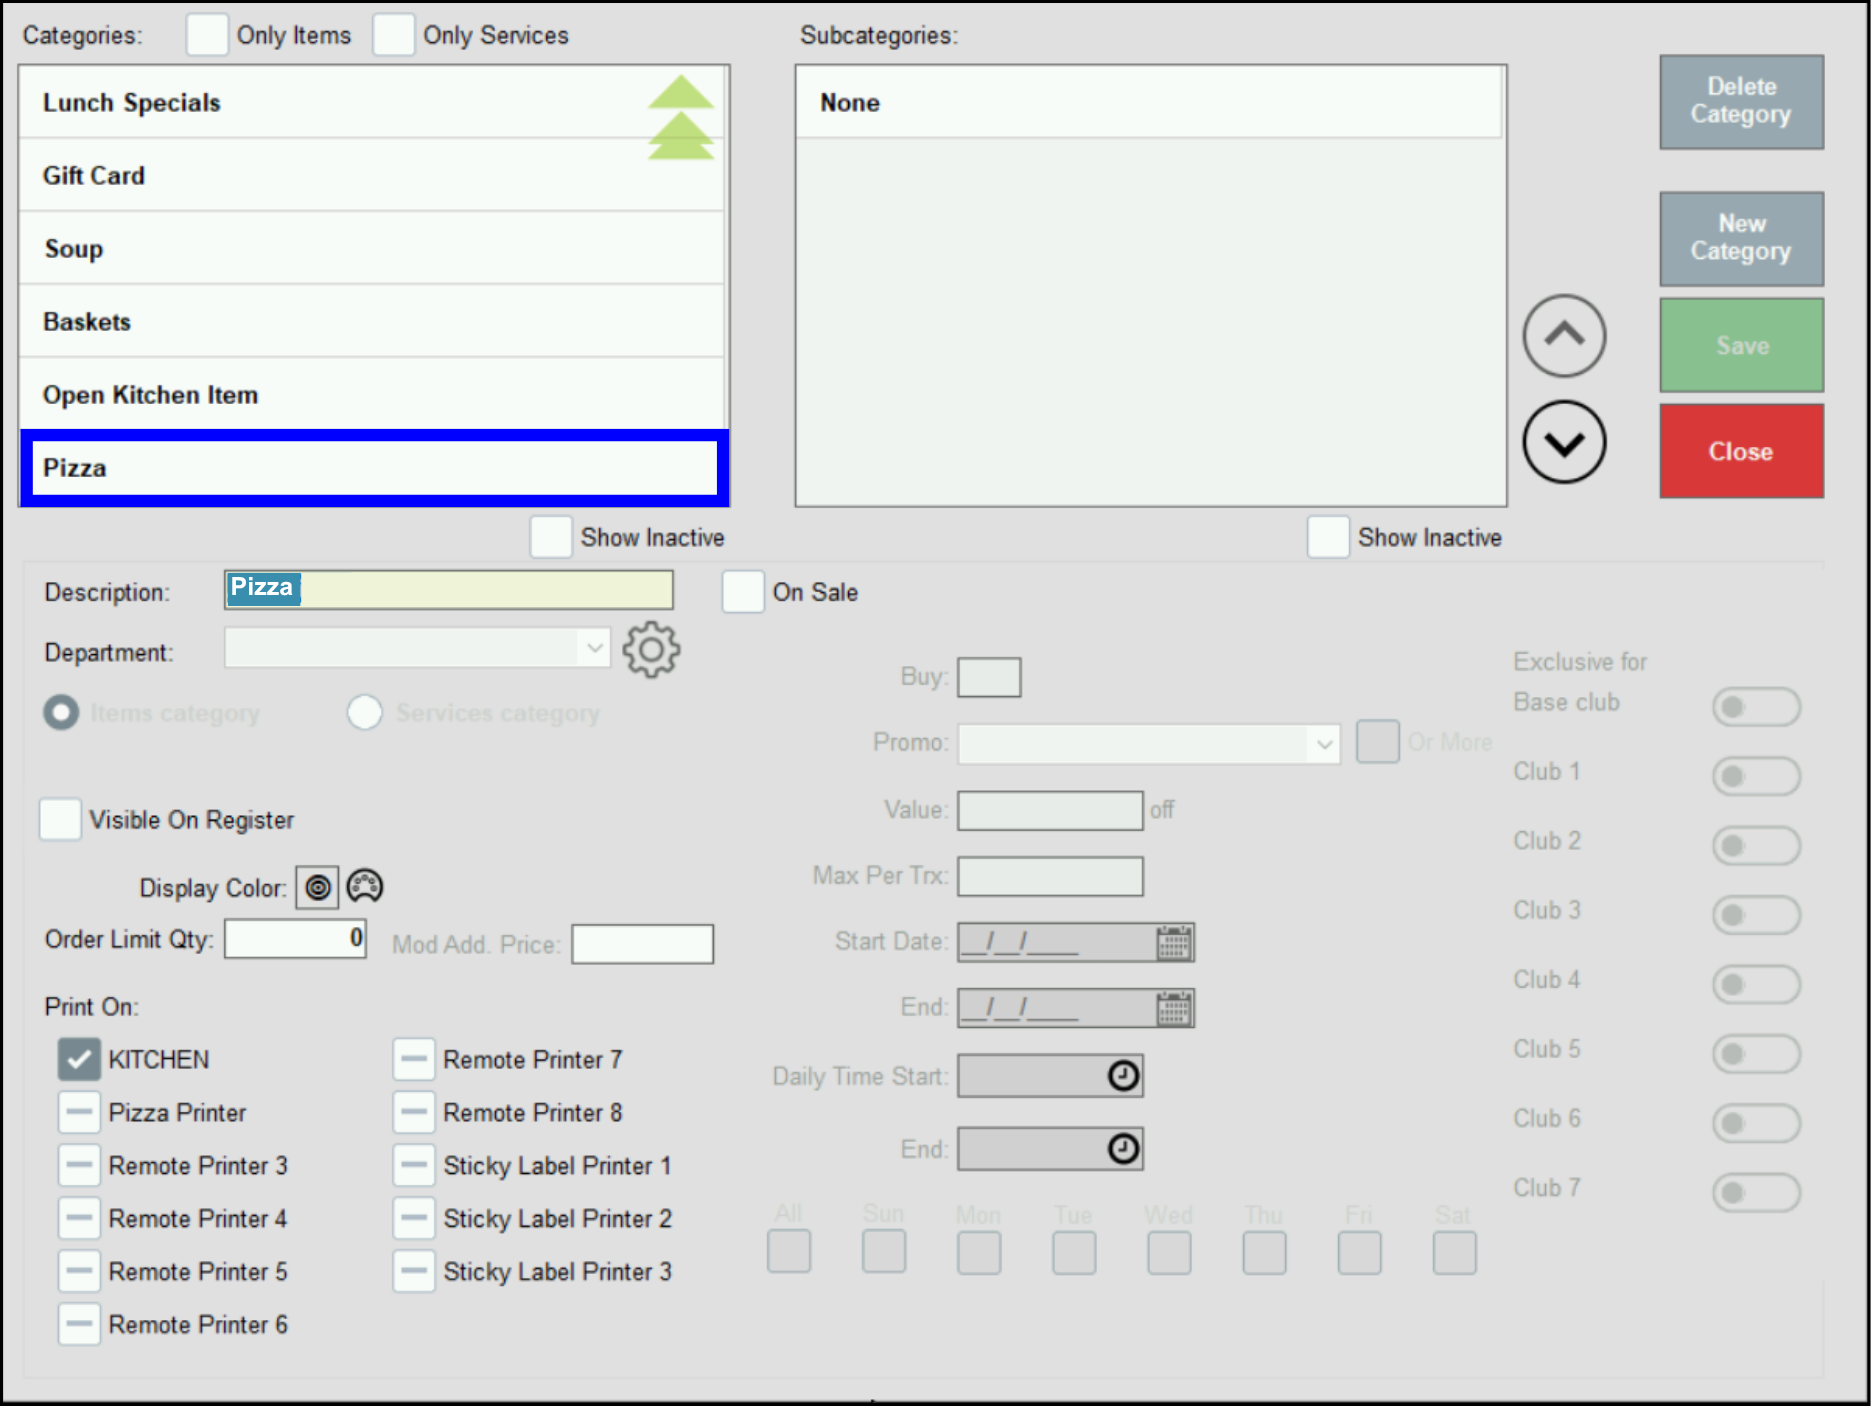
- Pizza is now a Category.
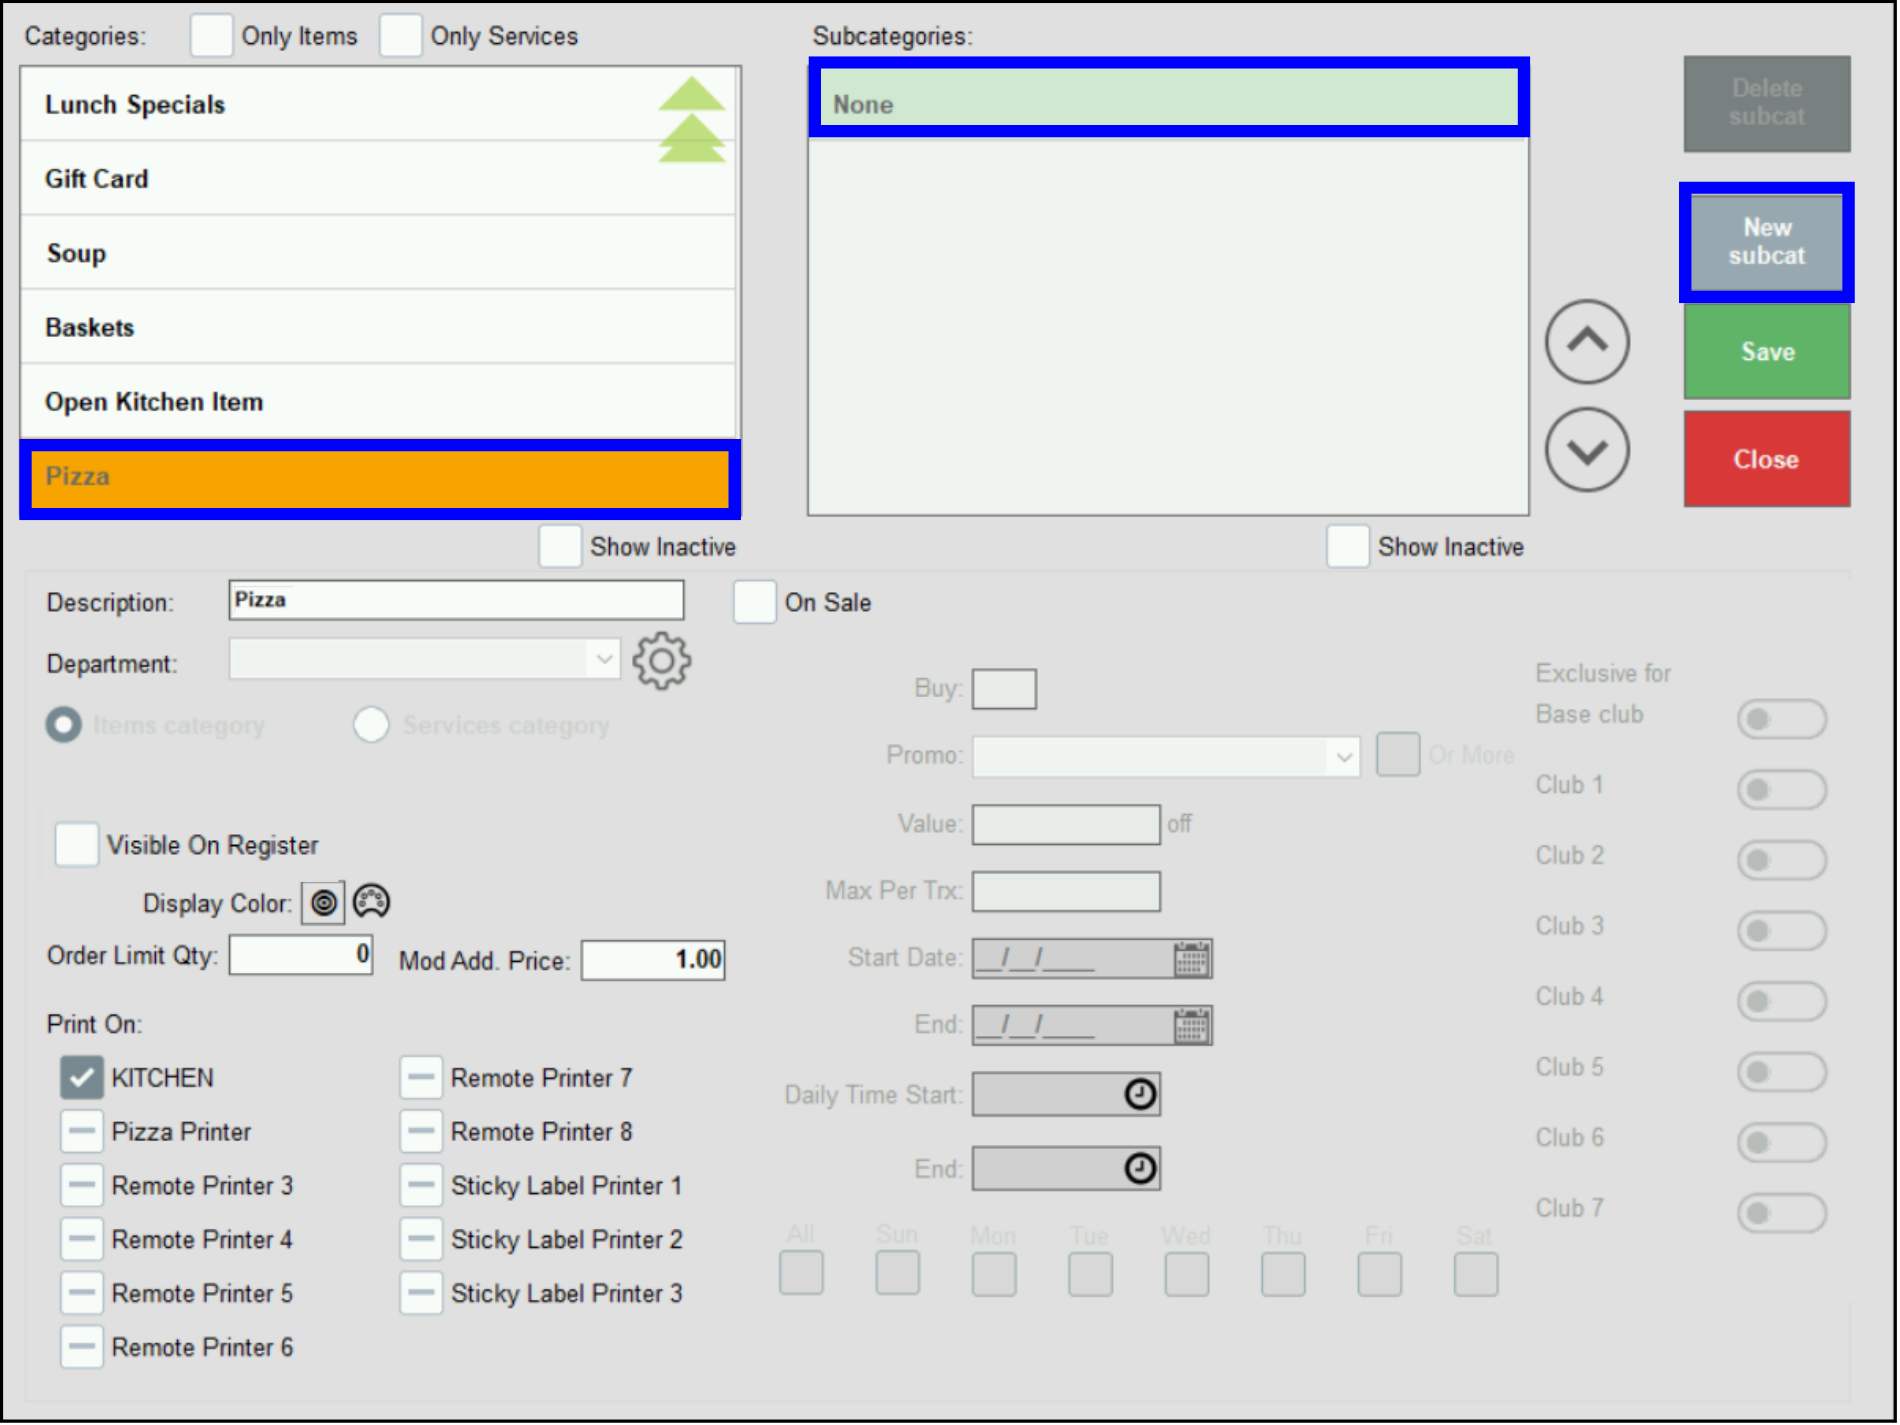
- To make a Subcategory for the Pizza category:
- Select Pizza from the Categories list.
- Click None at the top of the Subcategories list.
- Click New Subcat. You will see “New subcategory” appear in green in the Subcategories listing.
- Tip! Subcategories can help further describe your item. For example, use Subcategories for pizza sizes.
- Enter the name of the new subcategory in the Description field. The example is “Small.”
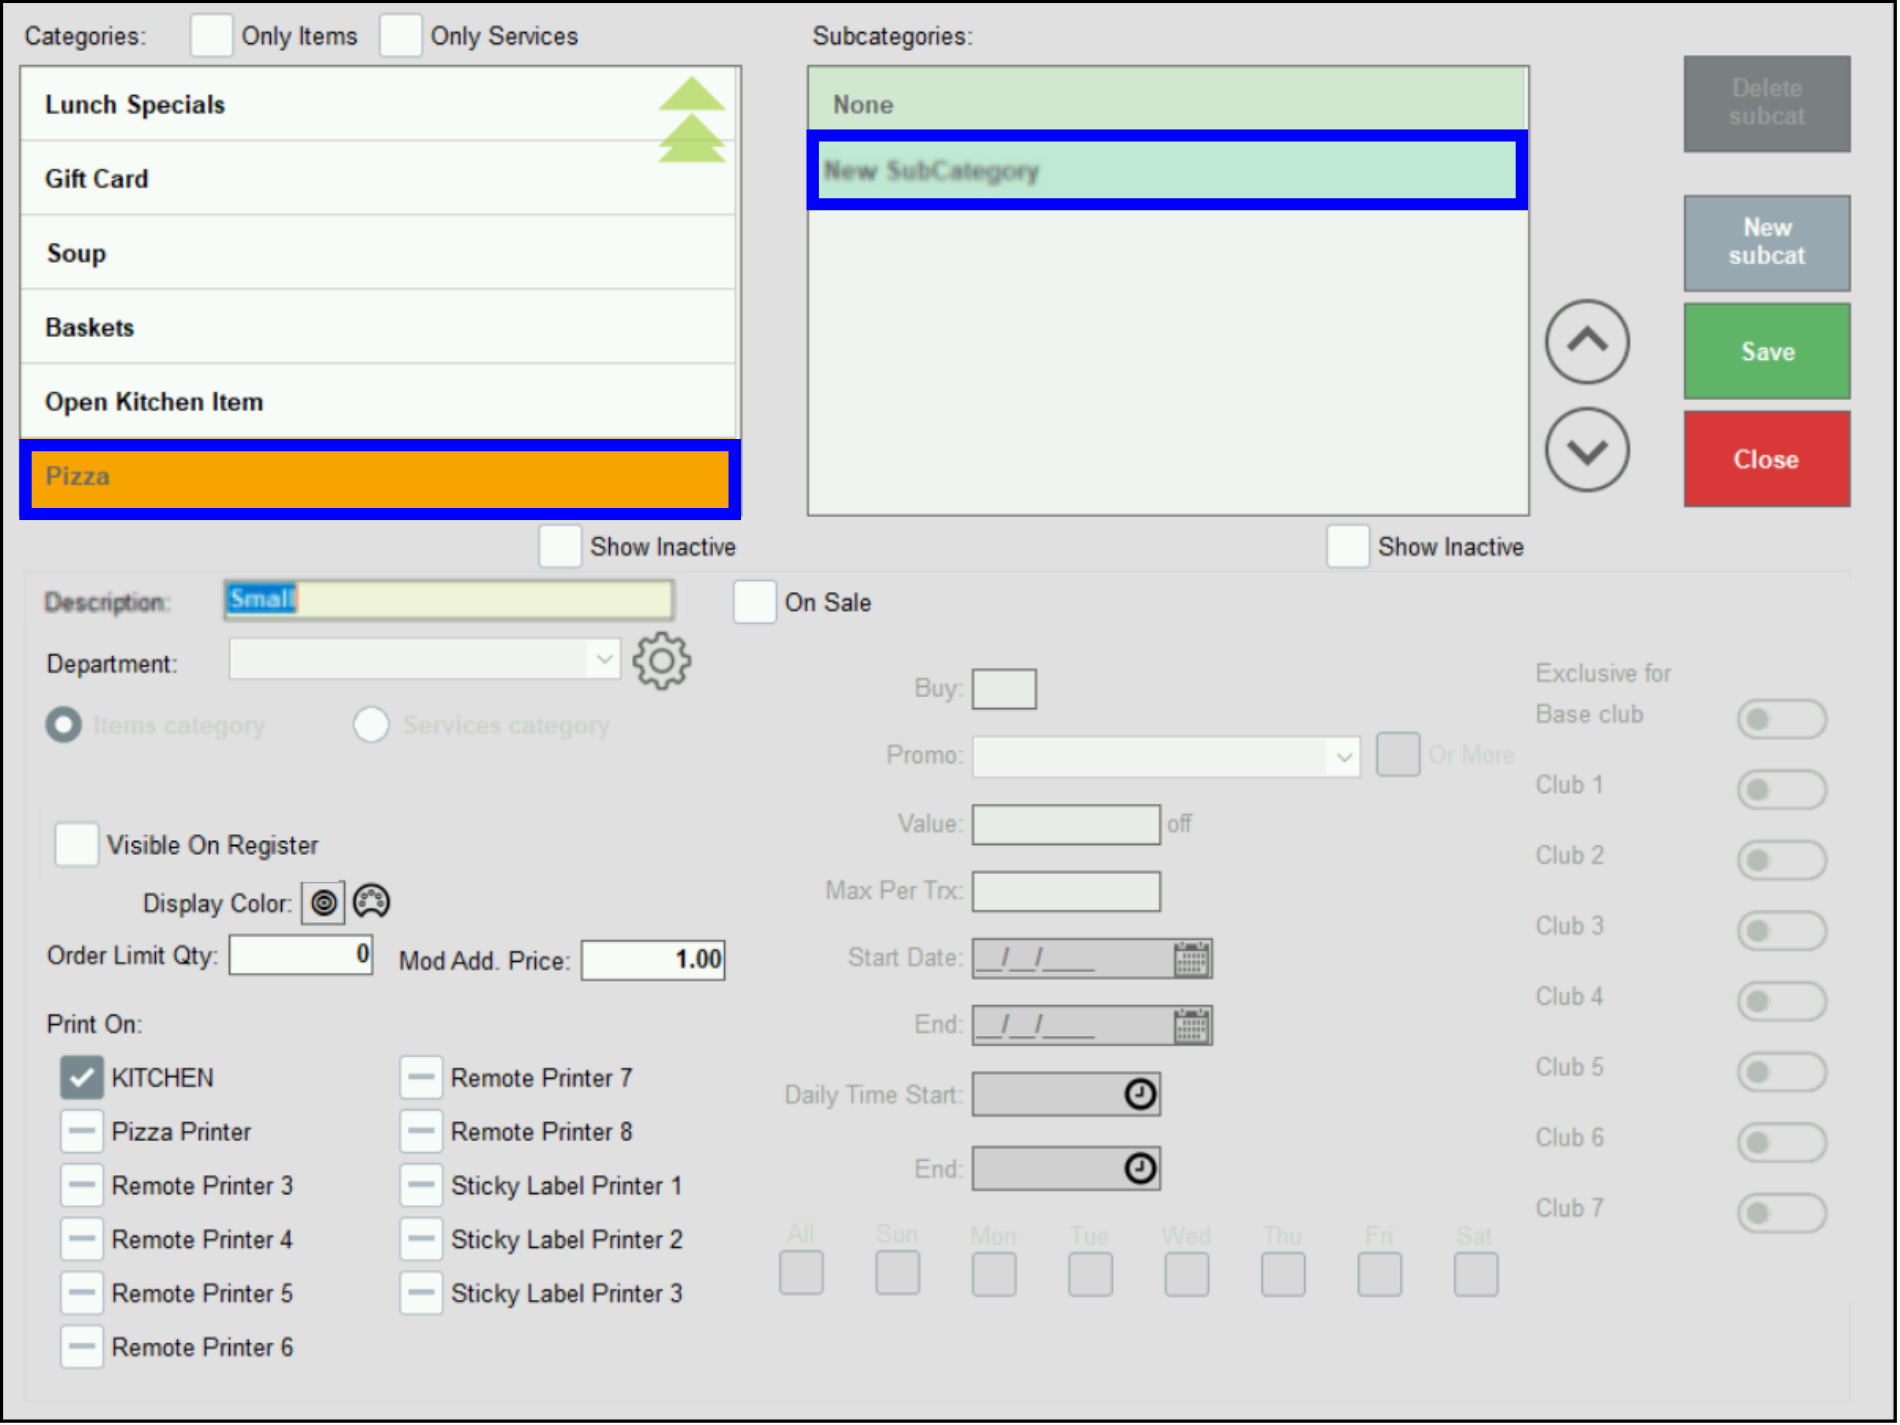
- Click Save. The screen automatically closes.
- Click Categories. The subcategory “Small” is now active.
- Repeat steps 4a-4f for each pizza size on the menu.
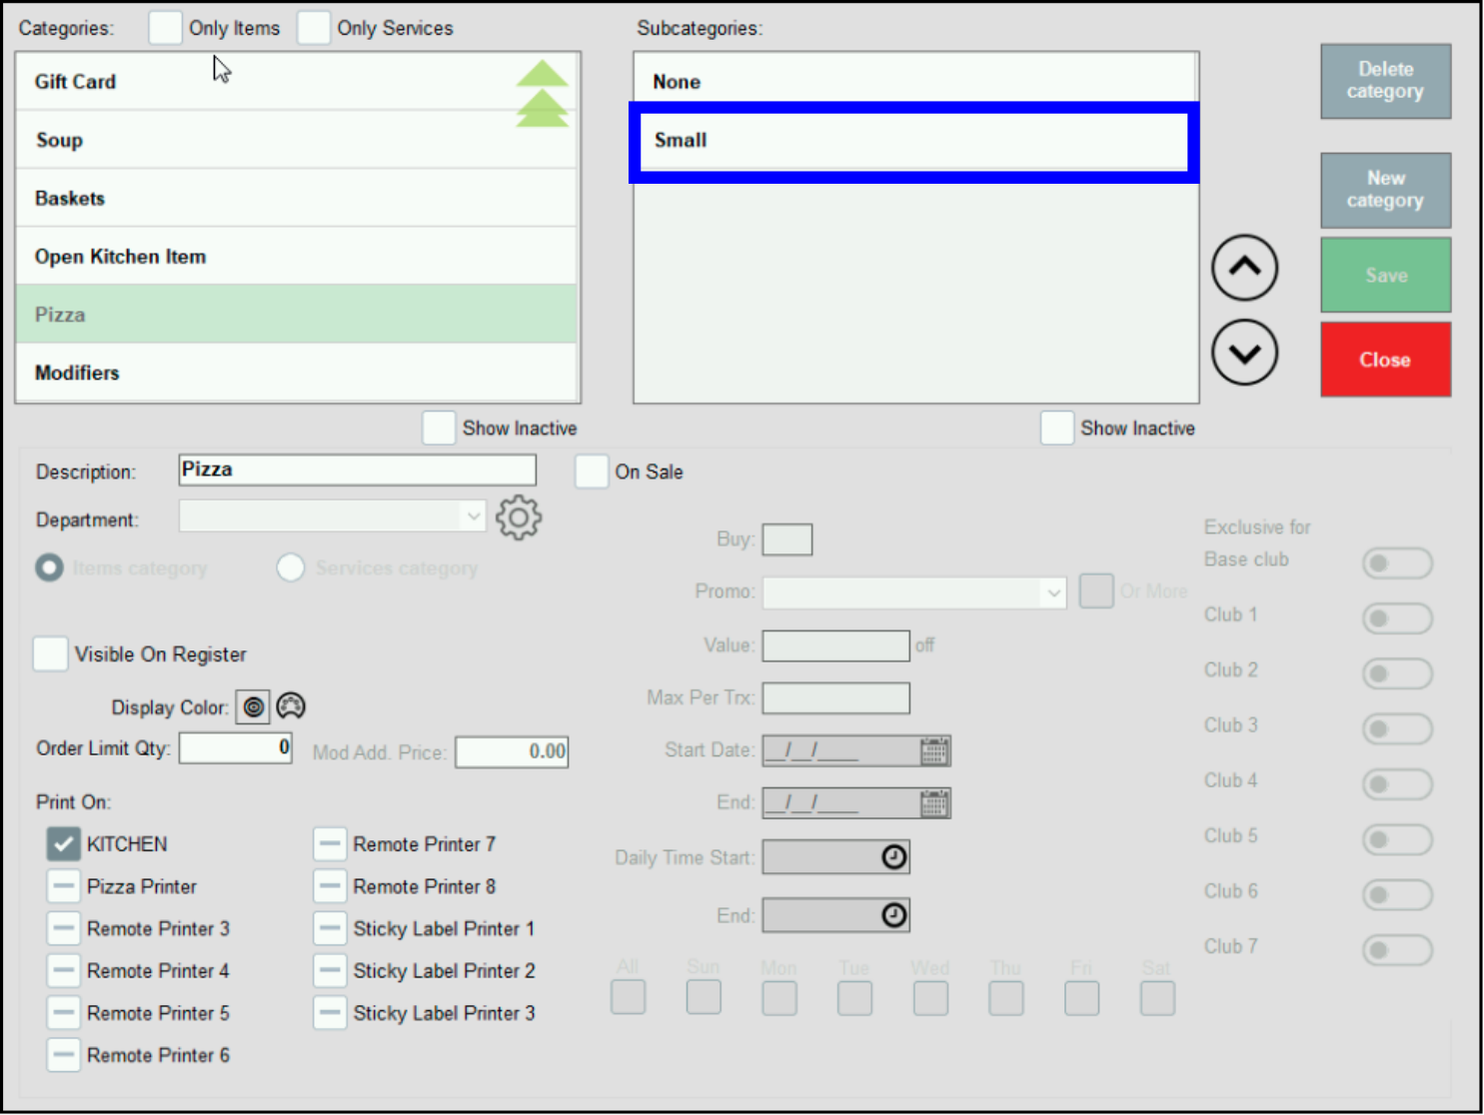
- Tip! Clicking Save between each additional subcategory is not necessary. Click New subcat after entering each subcategory, then click Save at the end.
- To make a Category for Modifiers (Toppings):
- Click New Category.
- Enter the name of the new category in the Description field. The example is “Modifiers.”
- Ensure the Visible On Register checkbox is NOT checked. (Only do this for the Modifiers category.)
- Click Save.
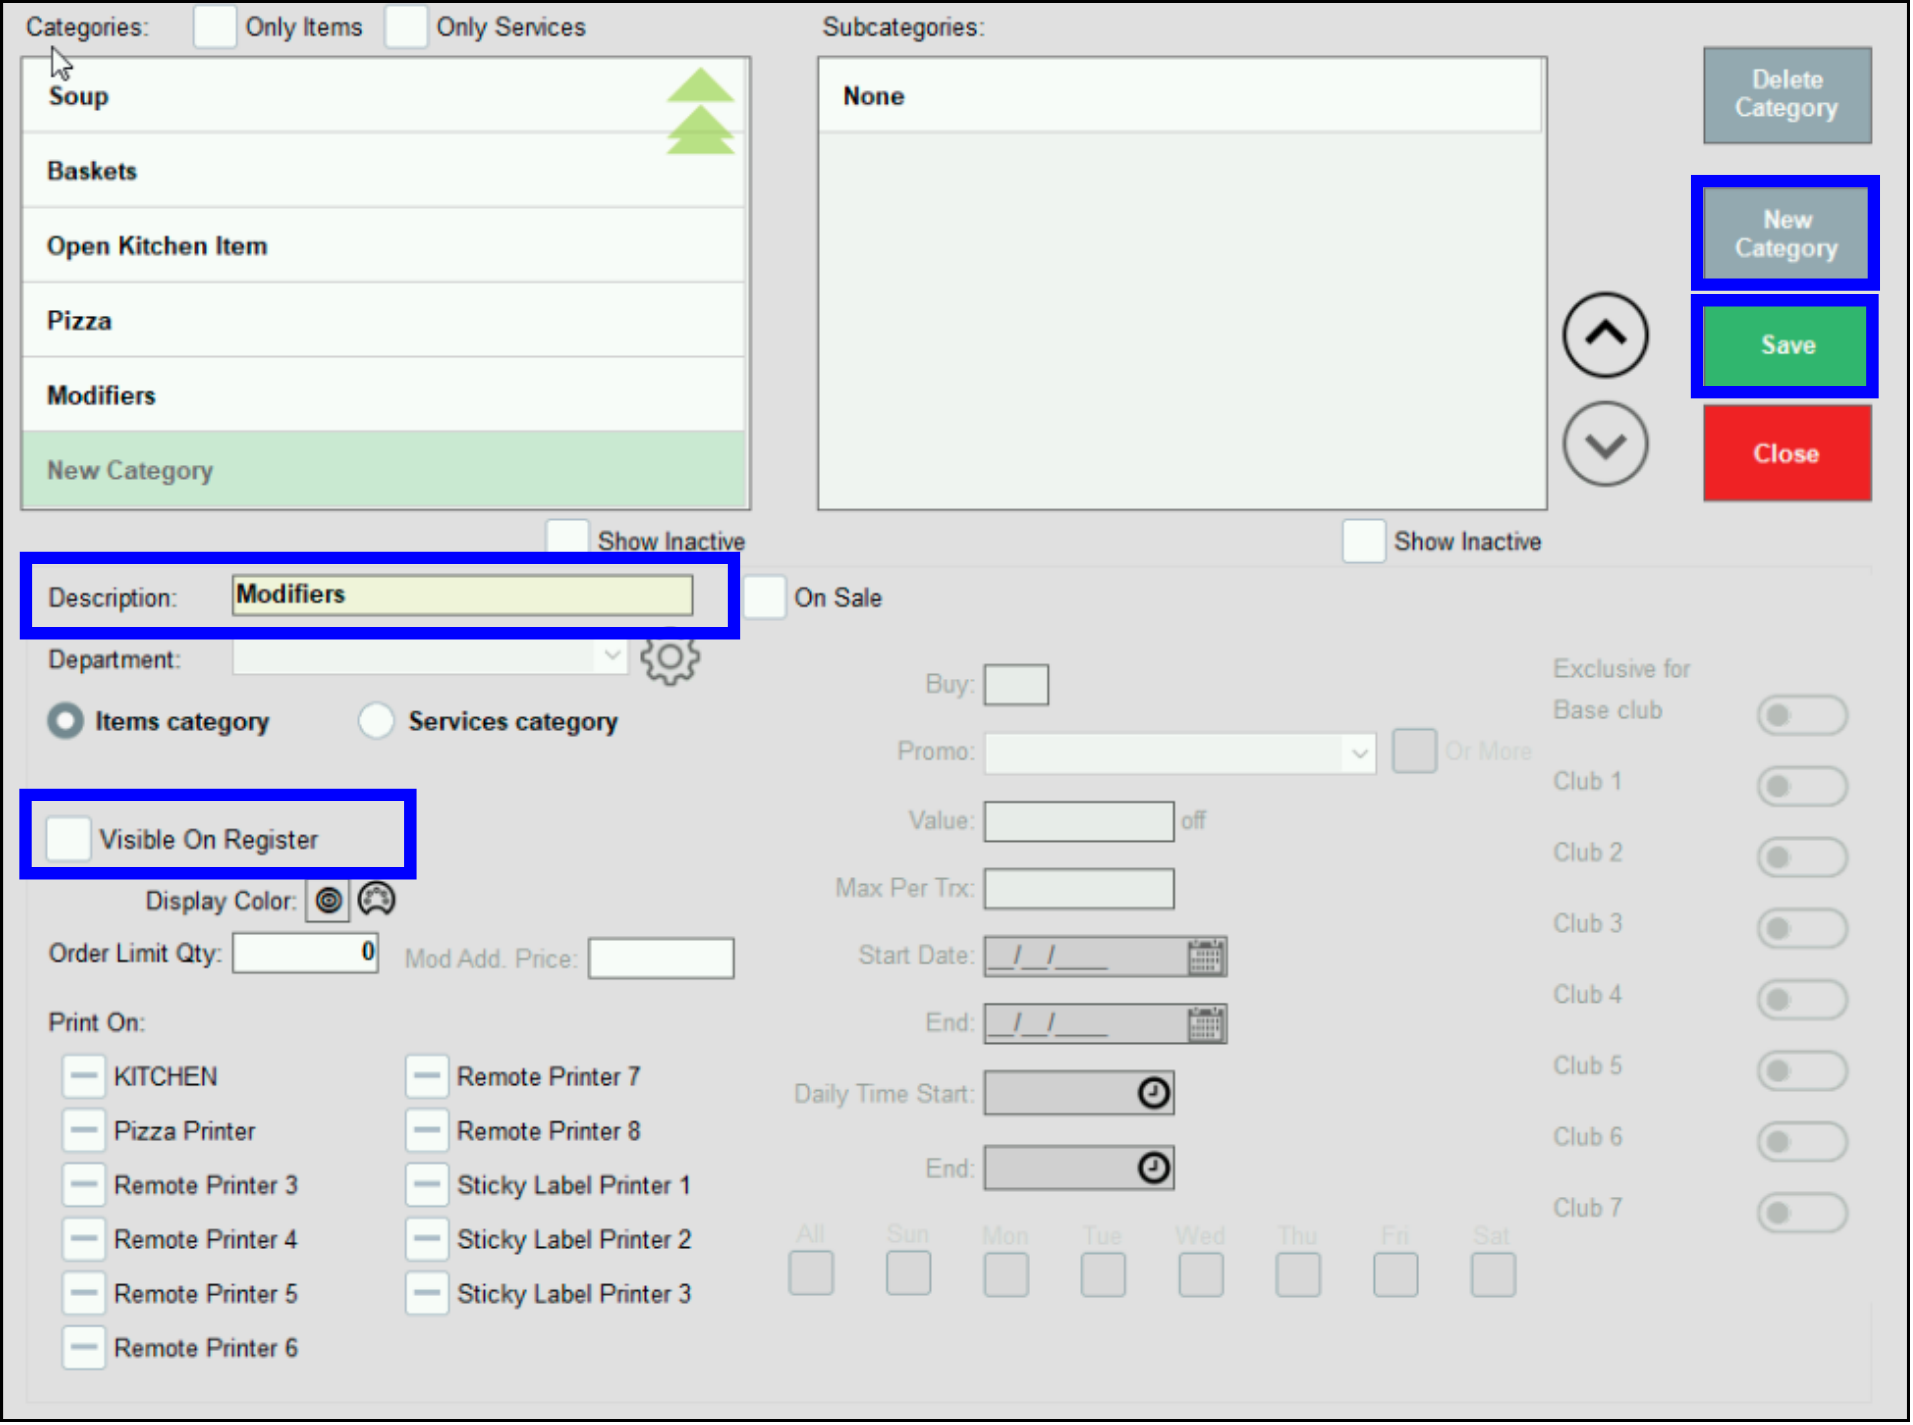
- Modifiers is now a Category.
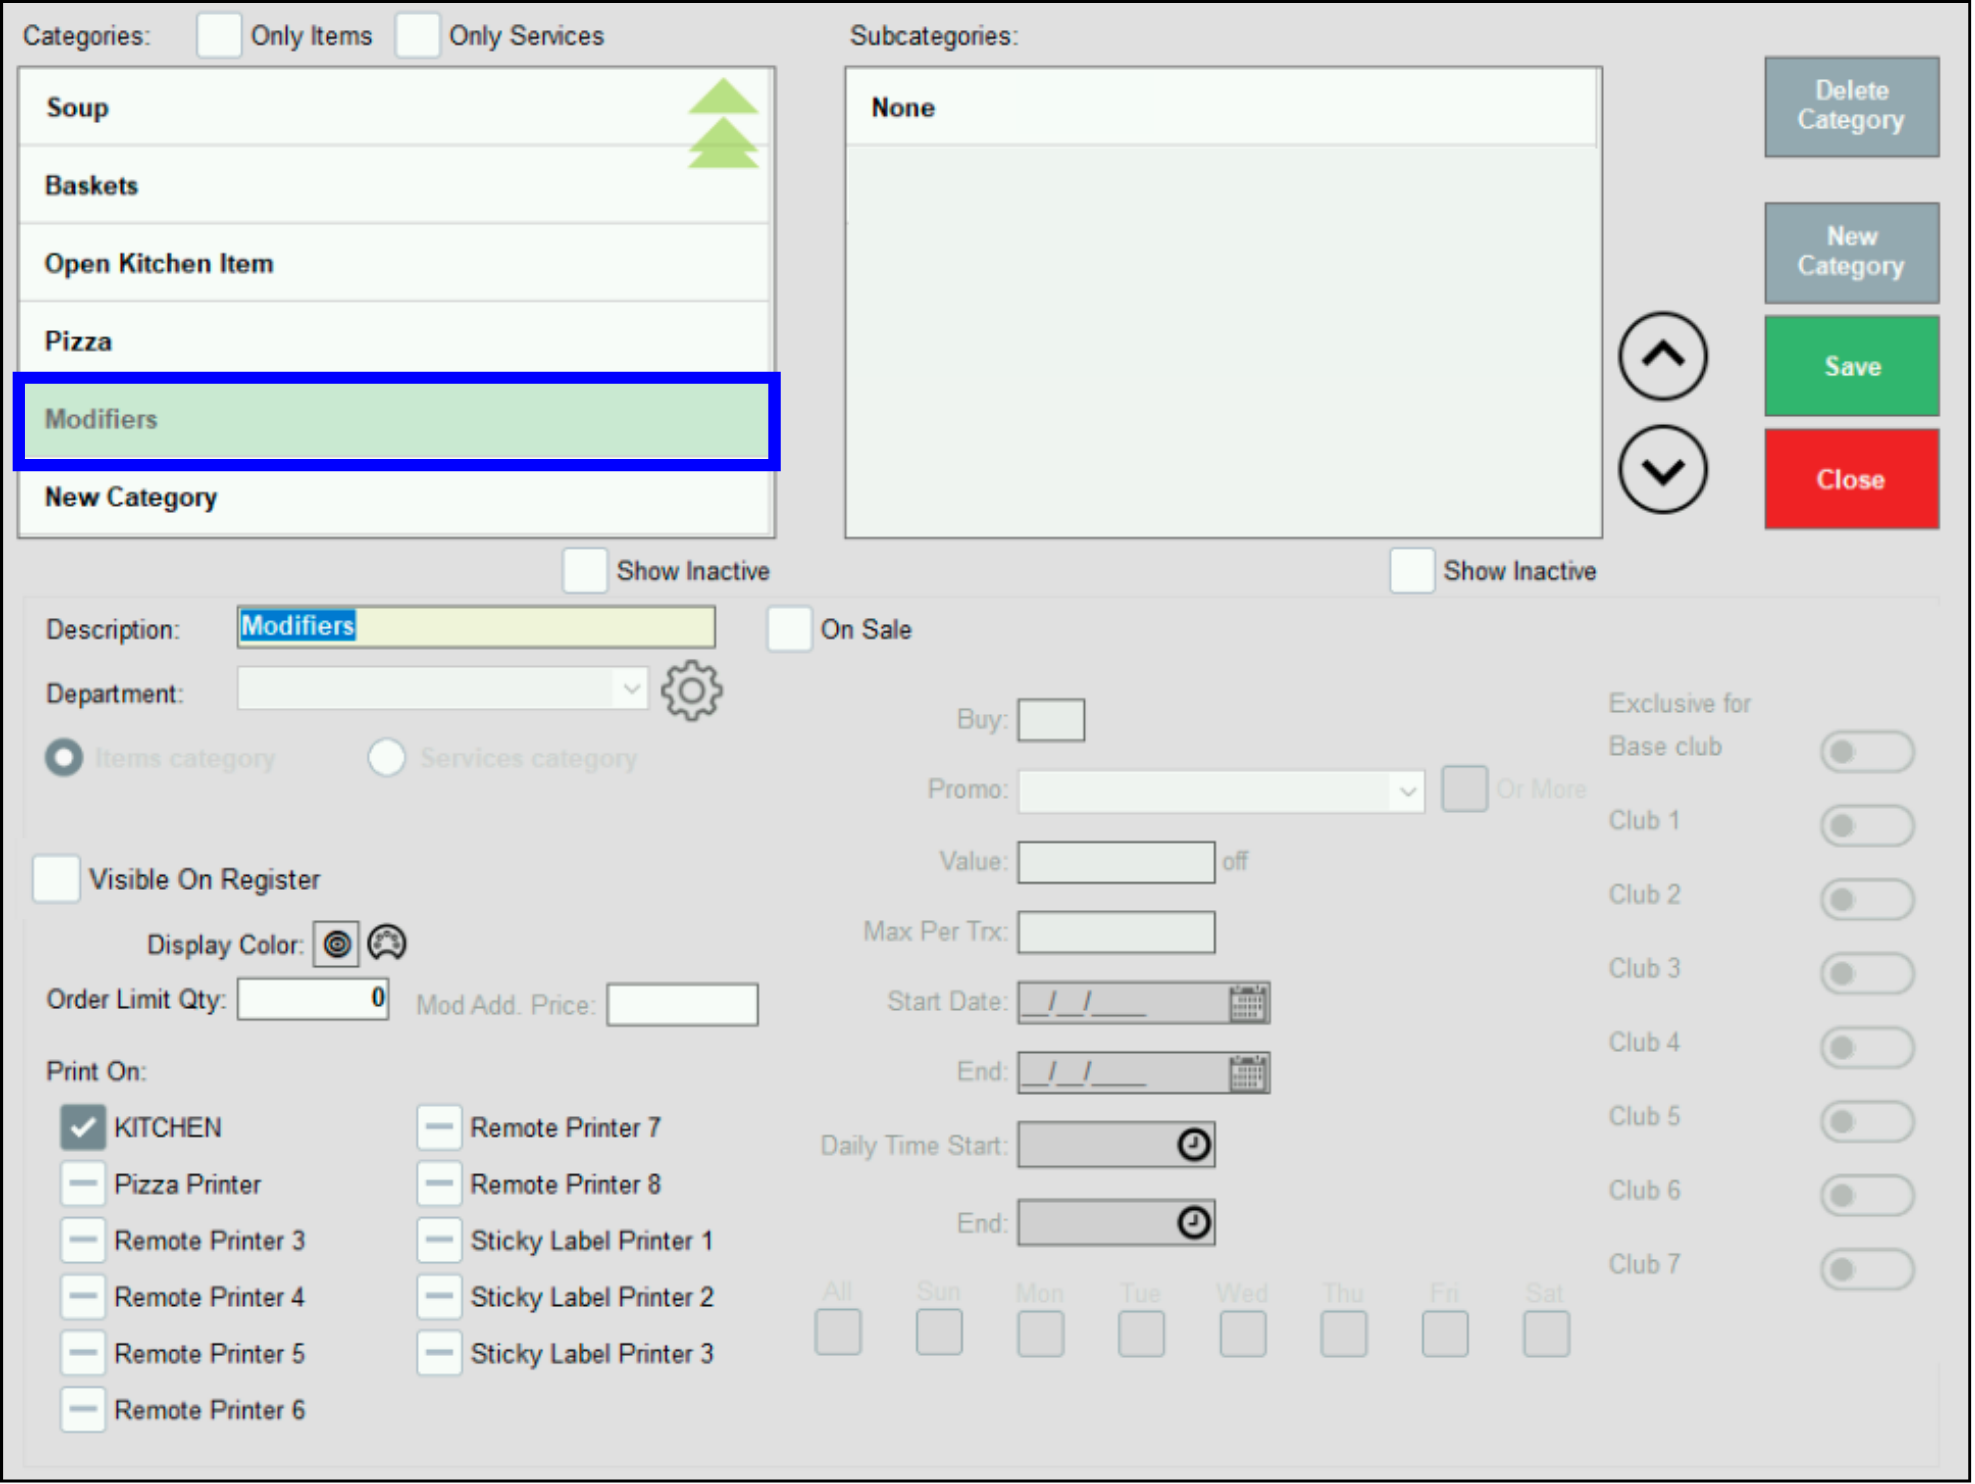
- To make a Subcategory for the Modifiers category:
- Select Modifiers from the Categories list.
- Click None at the top of the Subcategories list.
- Click New Subcat. You will see “New subcategory” appear in green in the Subcategories listing.
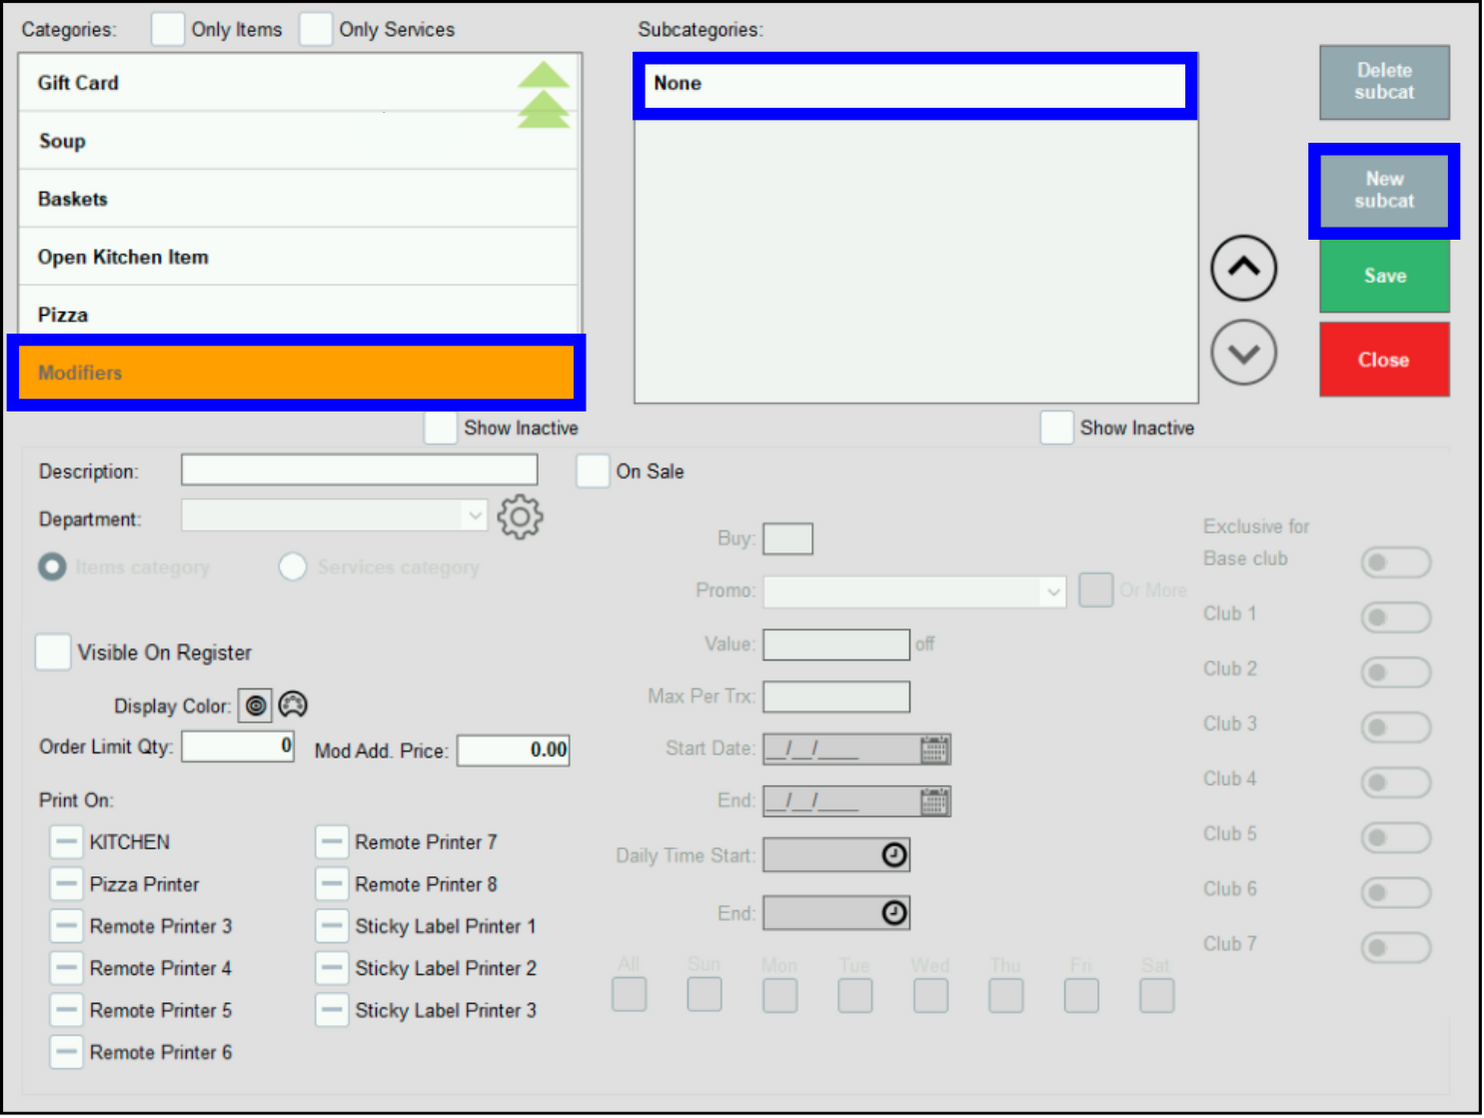
- Enter the name of the new subcategory in the Description field. The example is “Pizza Toppings.”
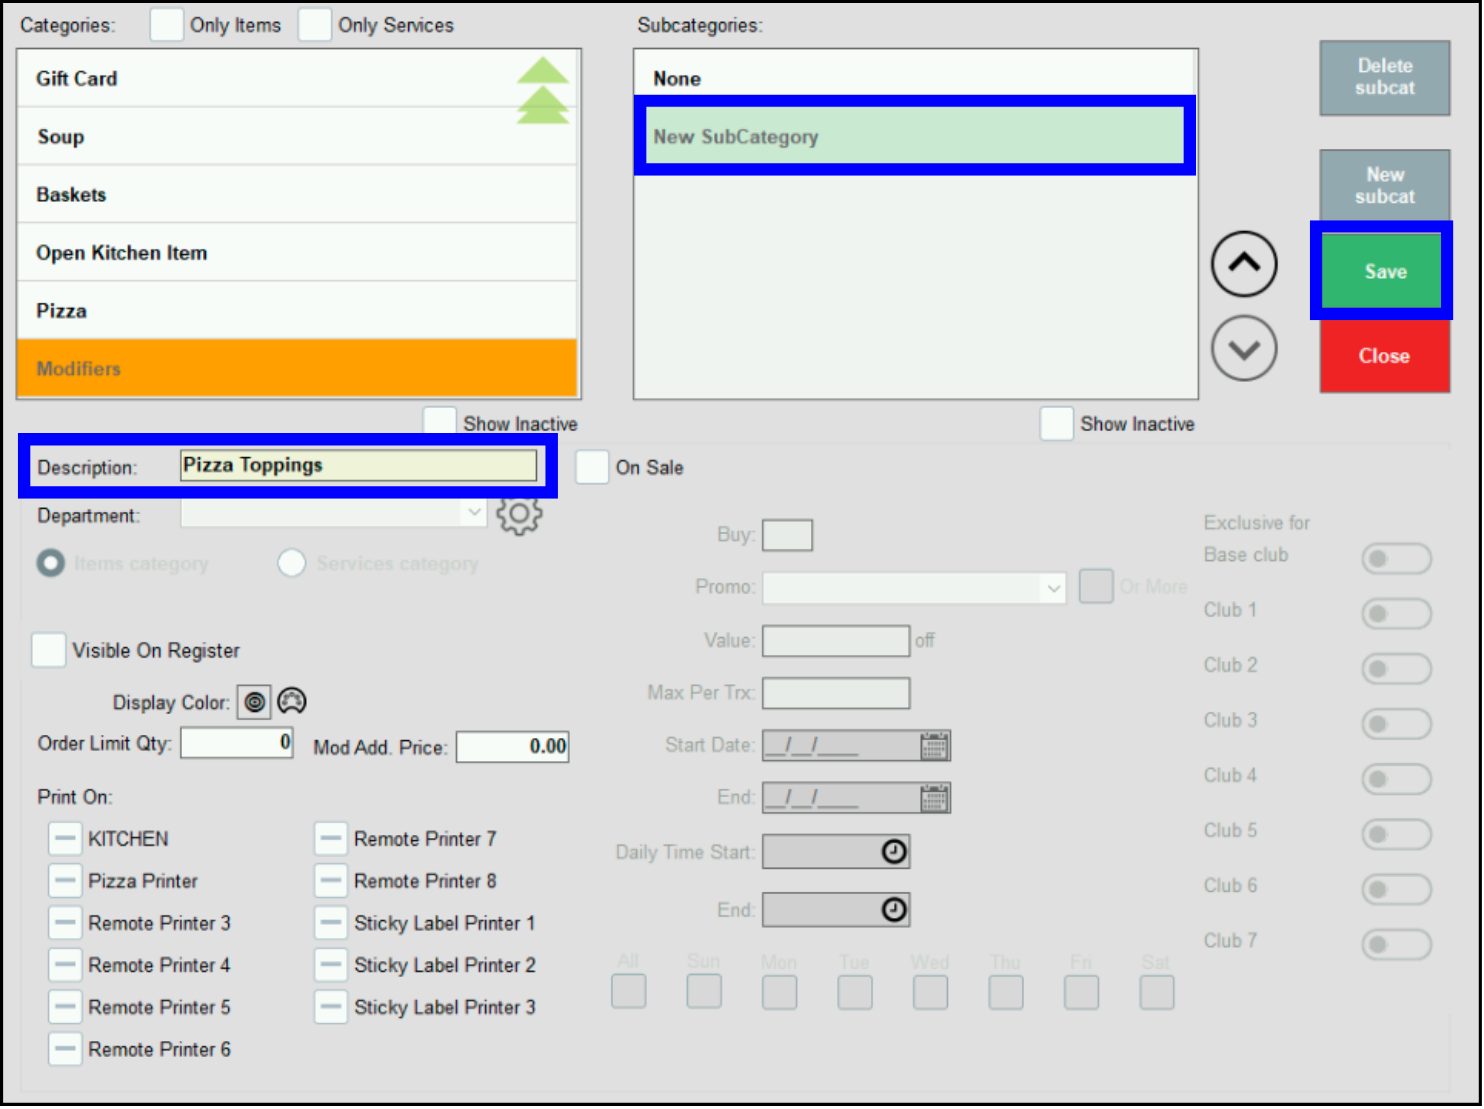
- Click Save. The screen automatically closes.
- Click Categories. The subcategory “Pizza Toppings” is now active.
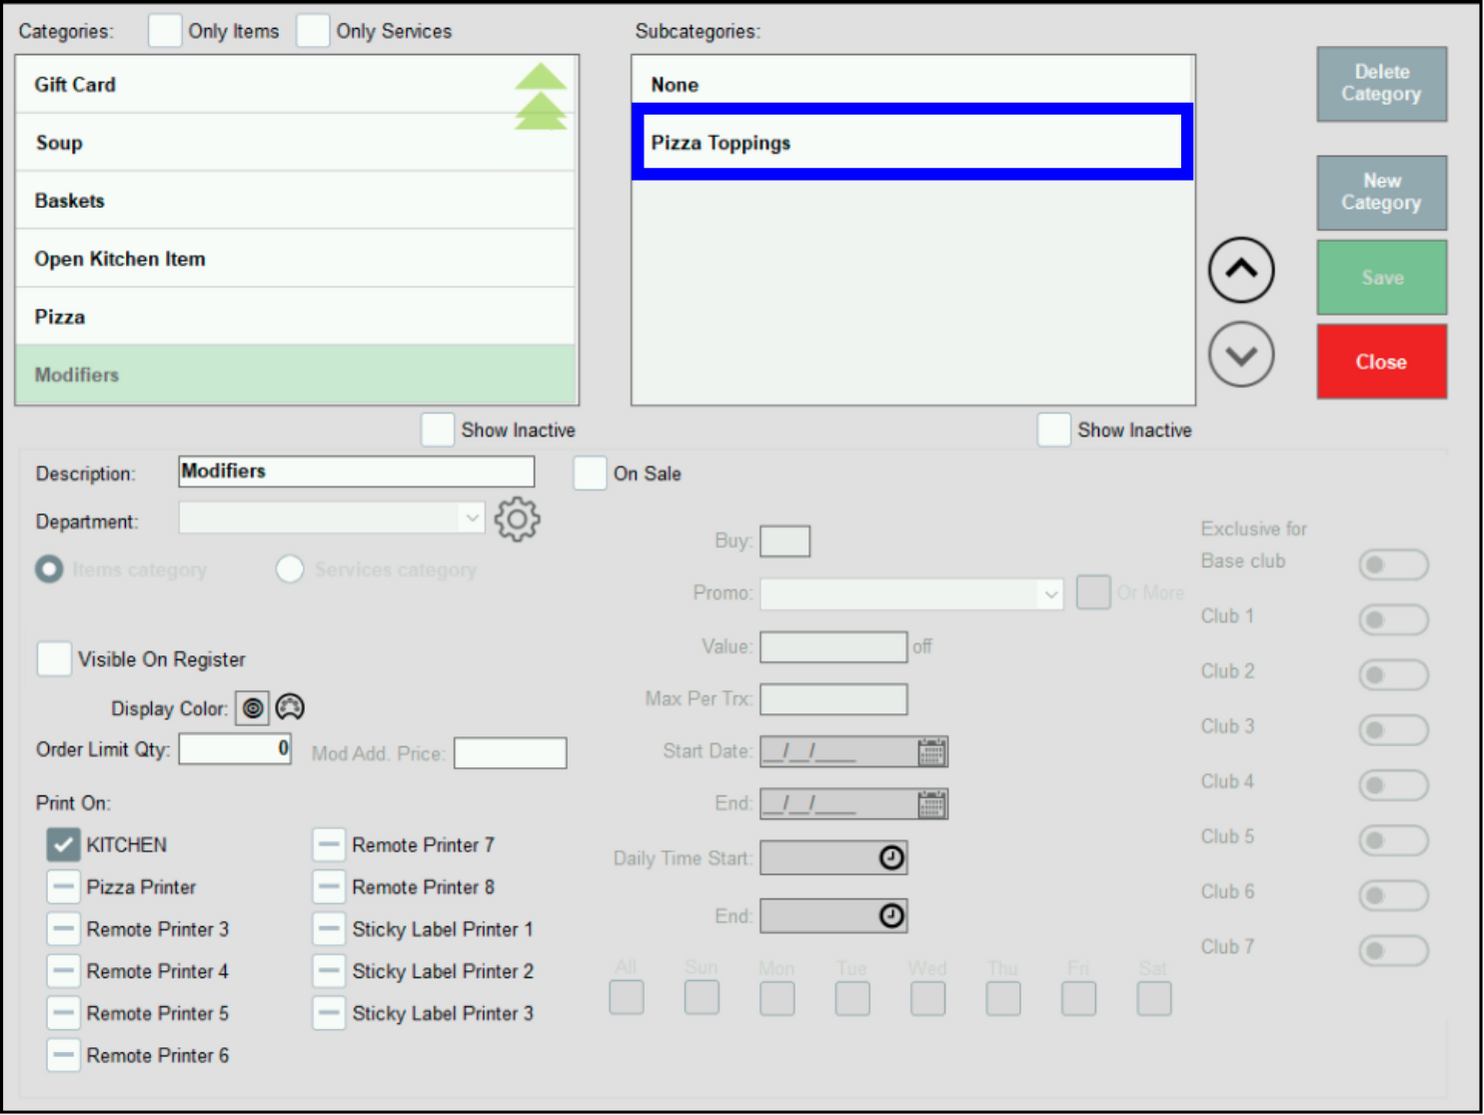
- Tip! Remember to select the correct remote printer if orders are printed or displayed in the kitchen. To configure printers, see Print Settings.
The next step is to create Pizza as an Item, which is required for attaching toppings (modifiers).
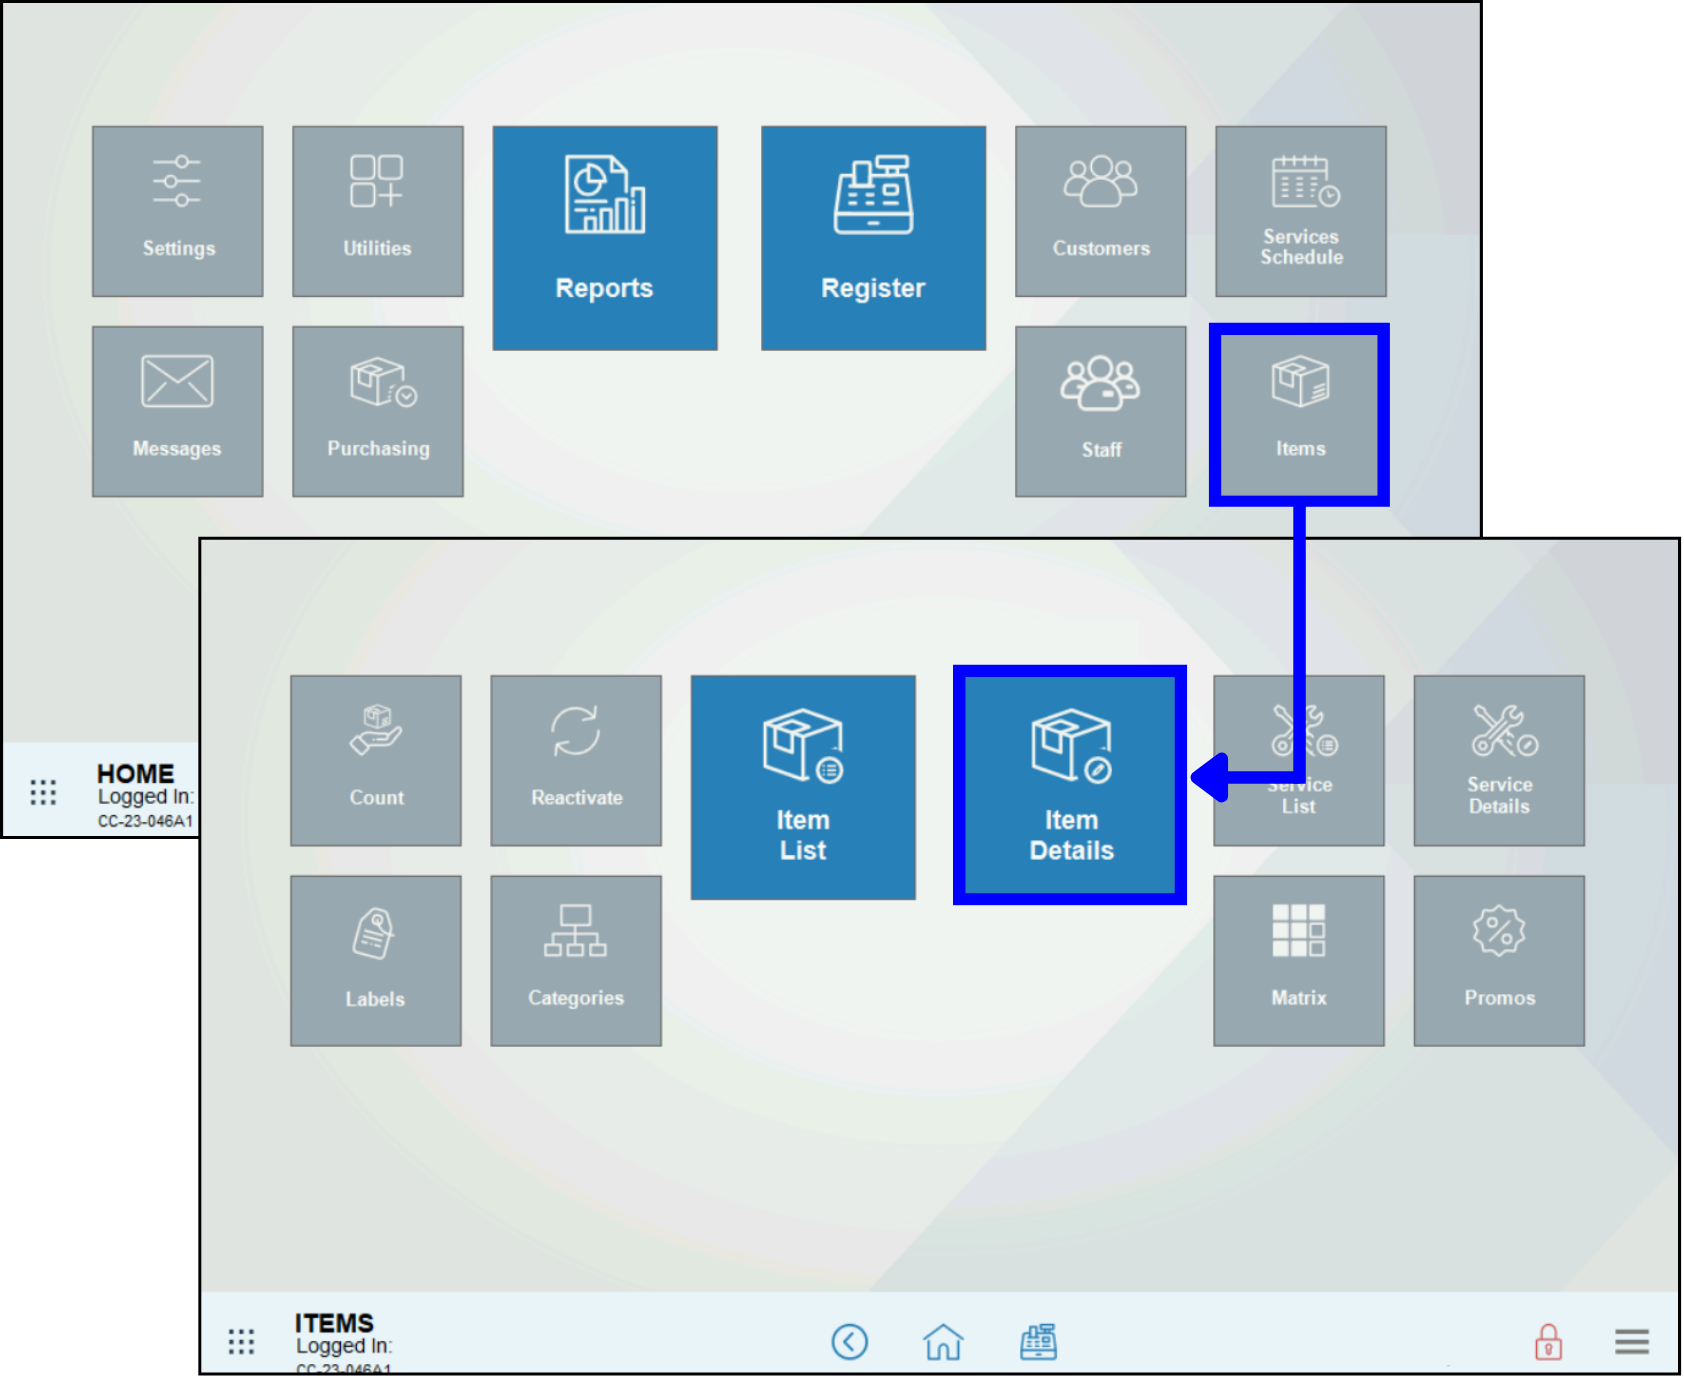
- Go to Home > Items > Item Details.
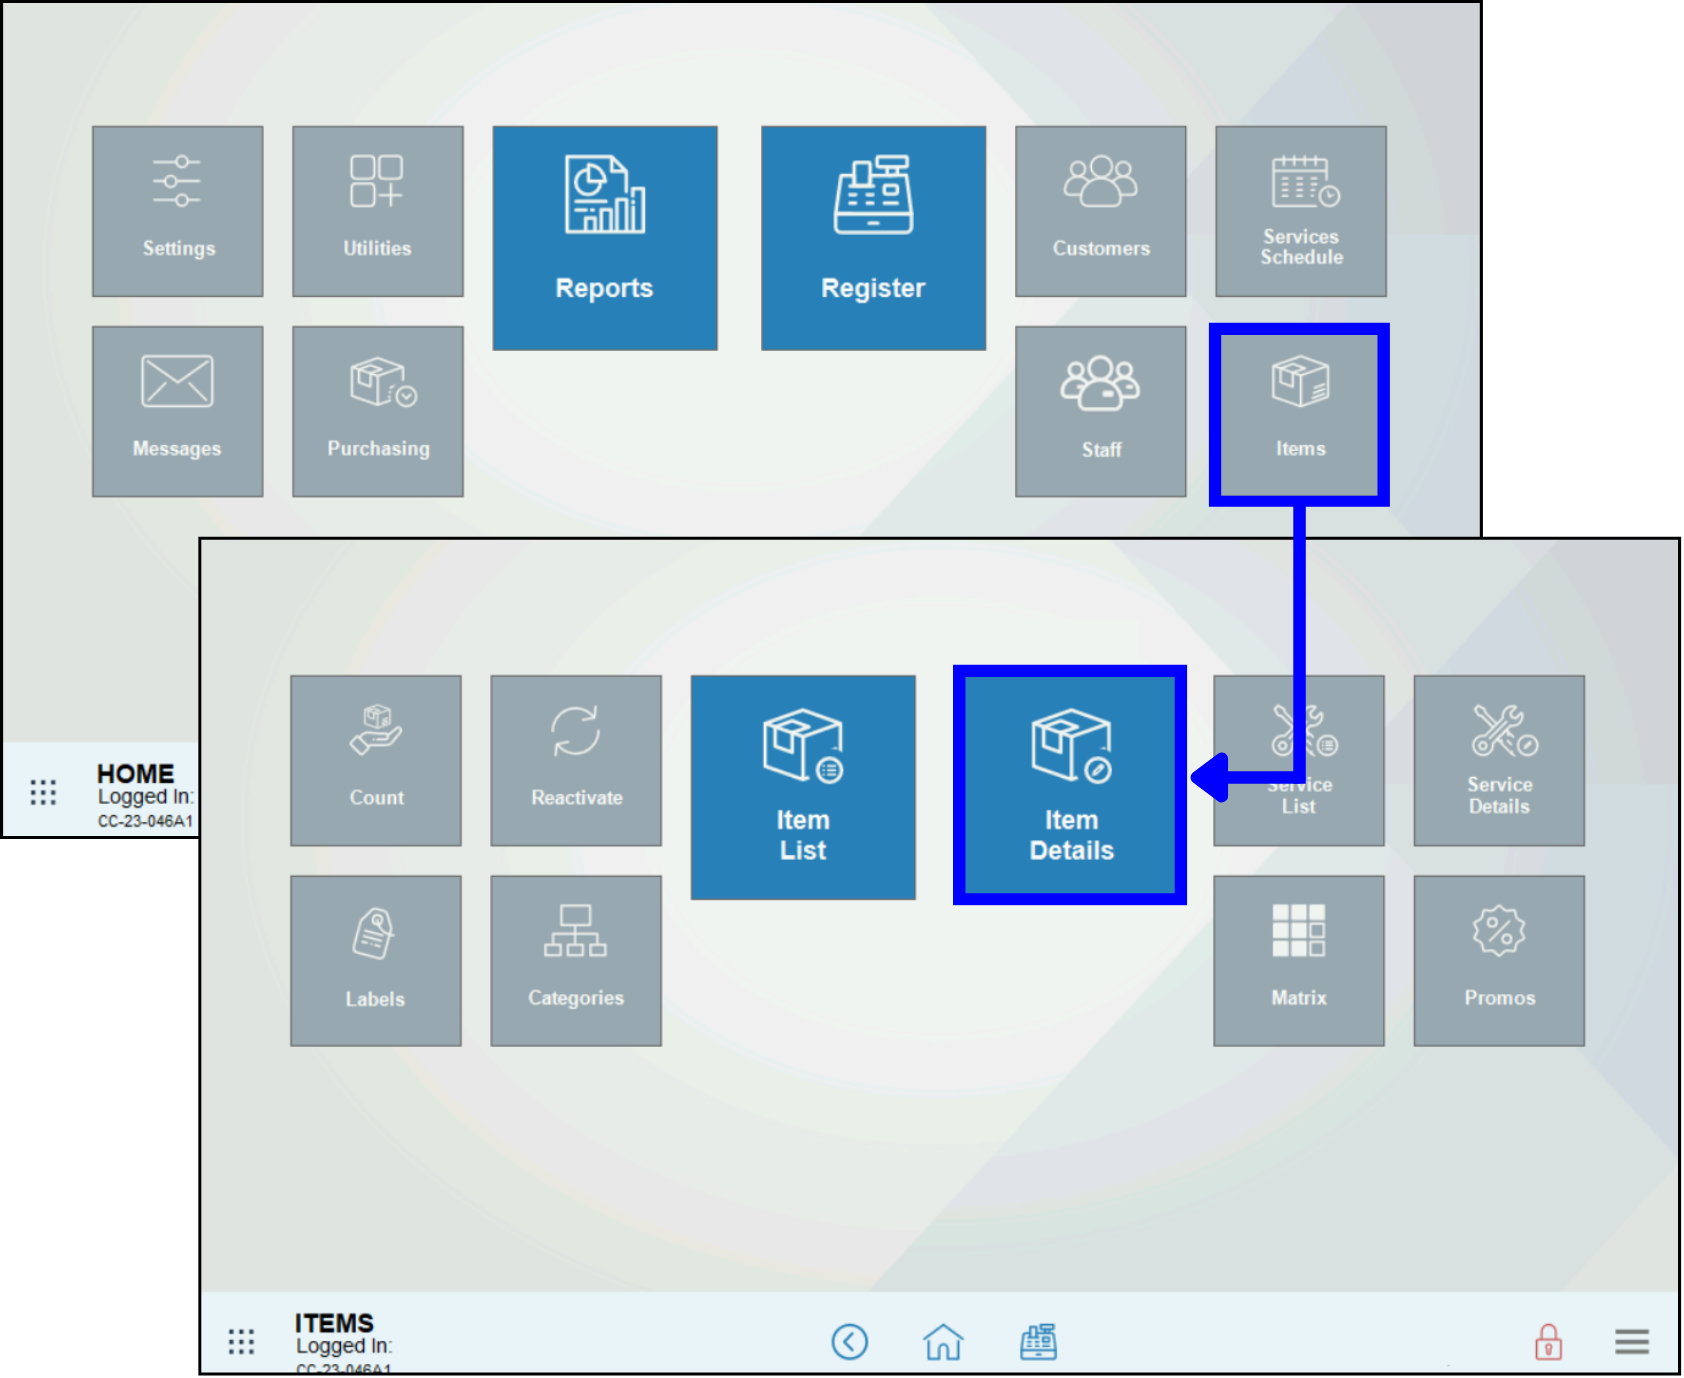
- Create a new Item.
- Click New tab at bottom right.
- Click the barcode icon to automatically populate the SKU field.
- Add Item Name and Price. The example uses “Small Pizza Pie” and “15.00”.
- Select “Pizza” from the Category dropdown near the bottom.
- Select “Small” from the Subcategory dropdown near the bottom.
- Click Save.
- Repeat steps 2a-2f for each size needed.
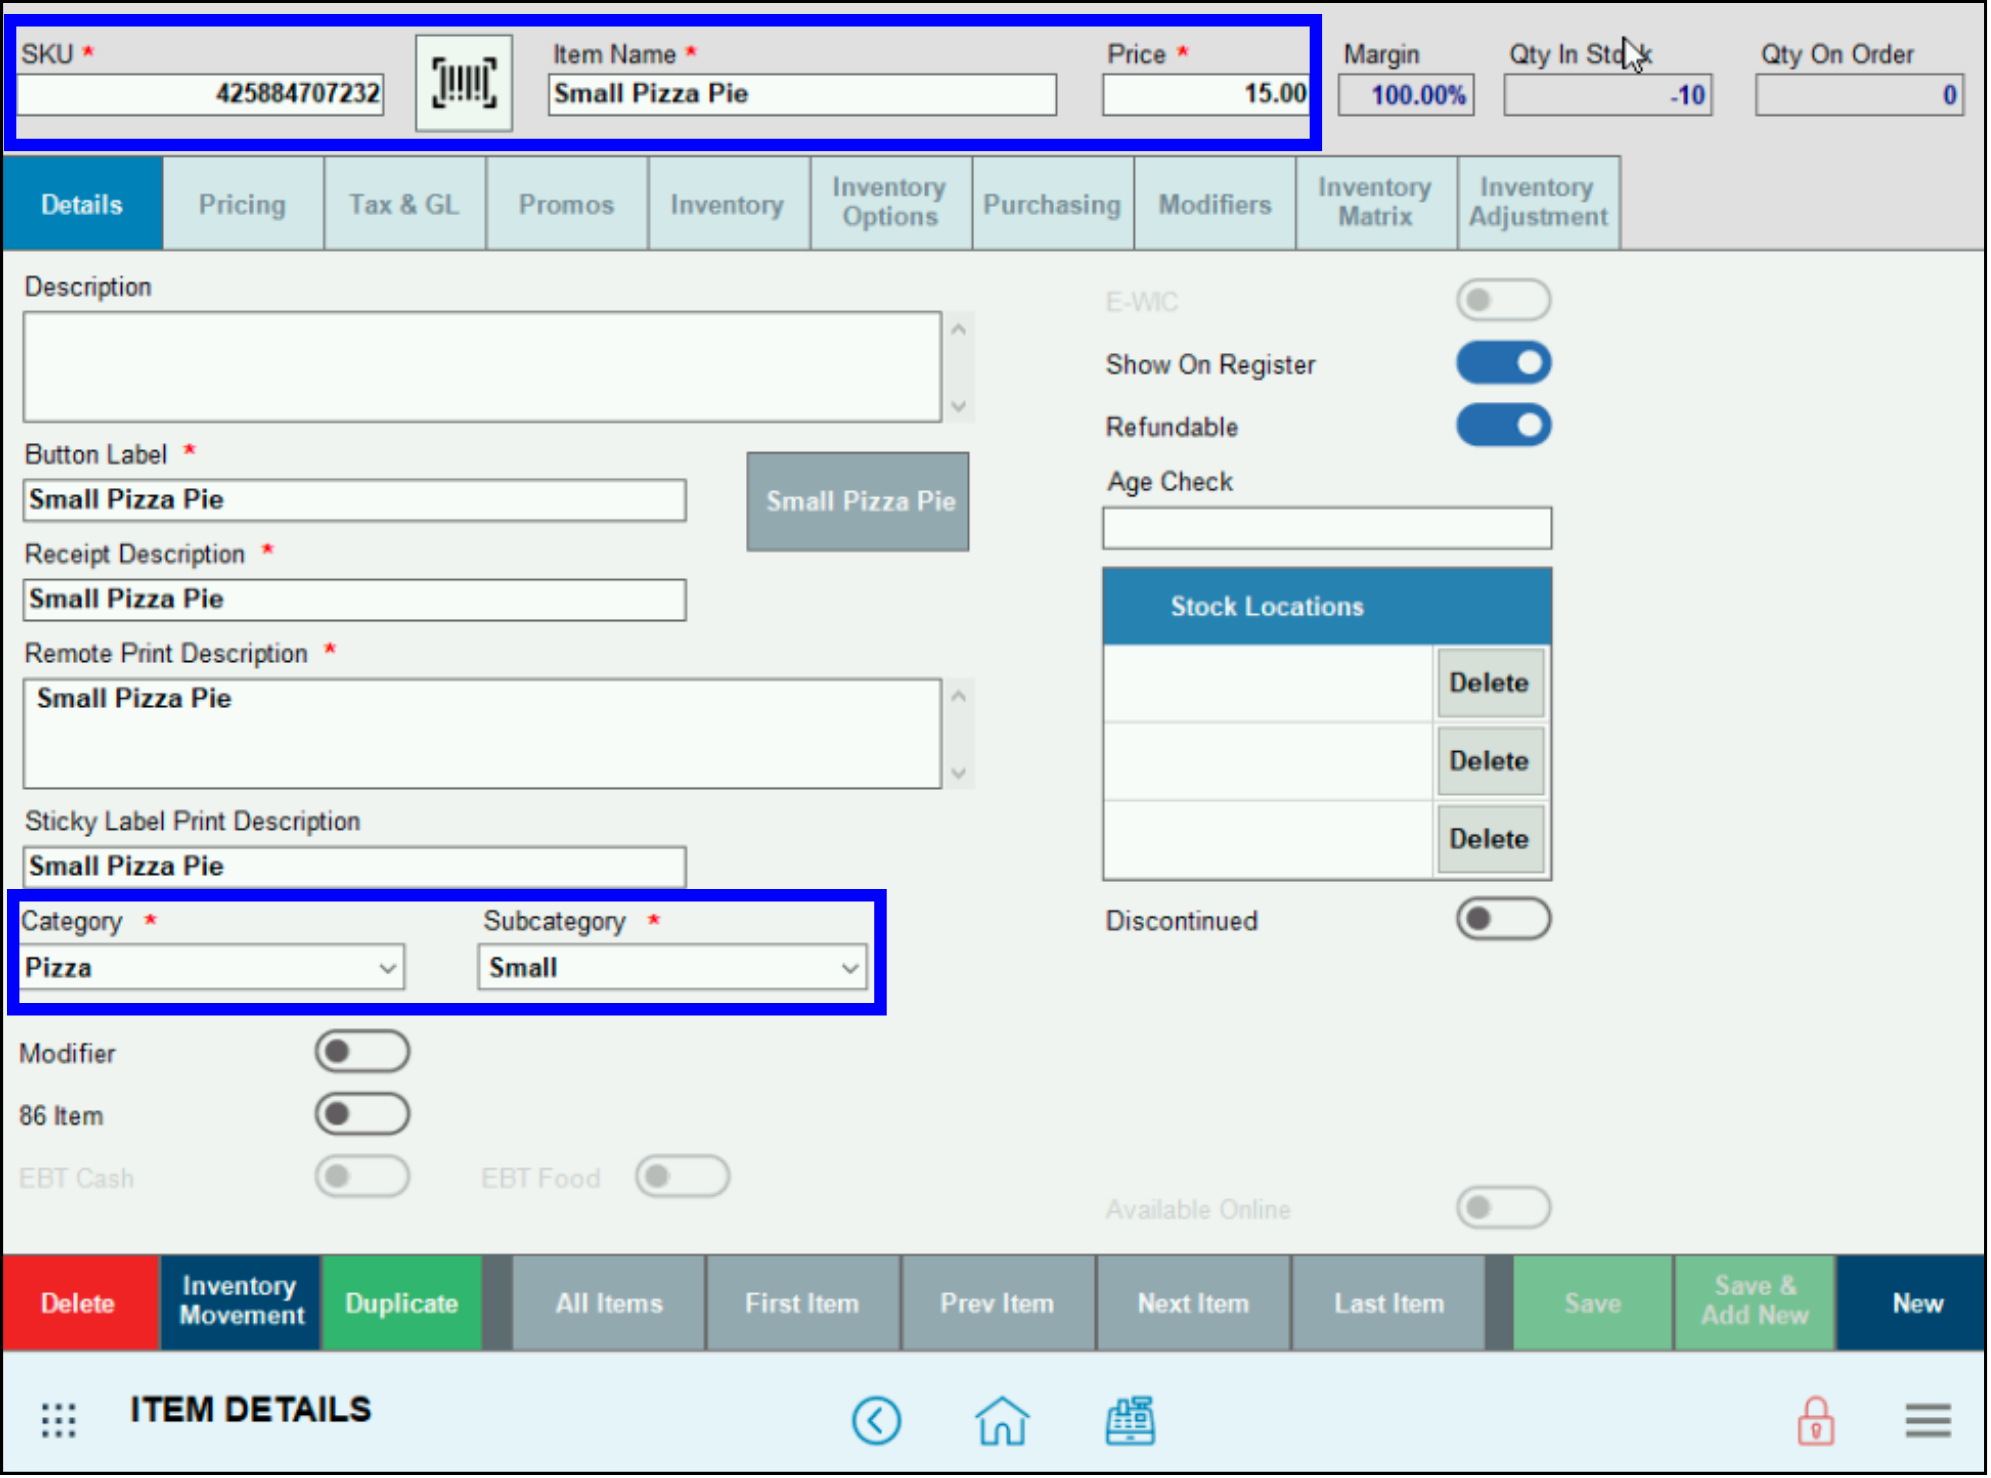
- Note: Assigning the appropriate price for each size pizza ensures the customer neither pays too much nor too little. The small pizza in the example is $15.00, a medium might be $18.00. Including the size in the Item Name is ideal for organization.
Properly setting up toppings (modifiers), the ratios (whole pizza, half pizza), and standard vs. premium pricing ensures that customers pay the appropriate price for their pizzas, while maintaining consistency and clarity for staff both at the register and in the kitchen.
- Go to Home > Settings > Preferences.
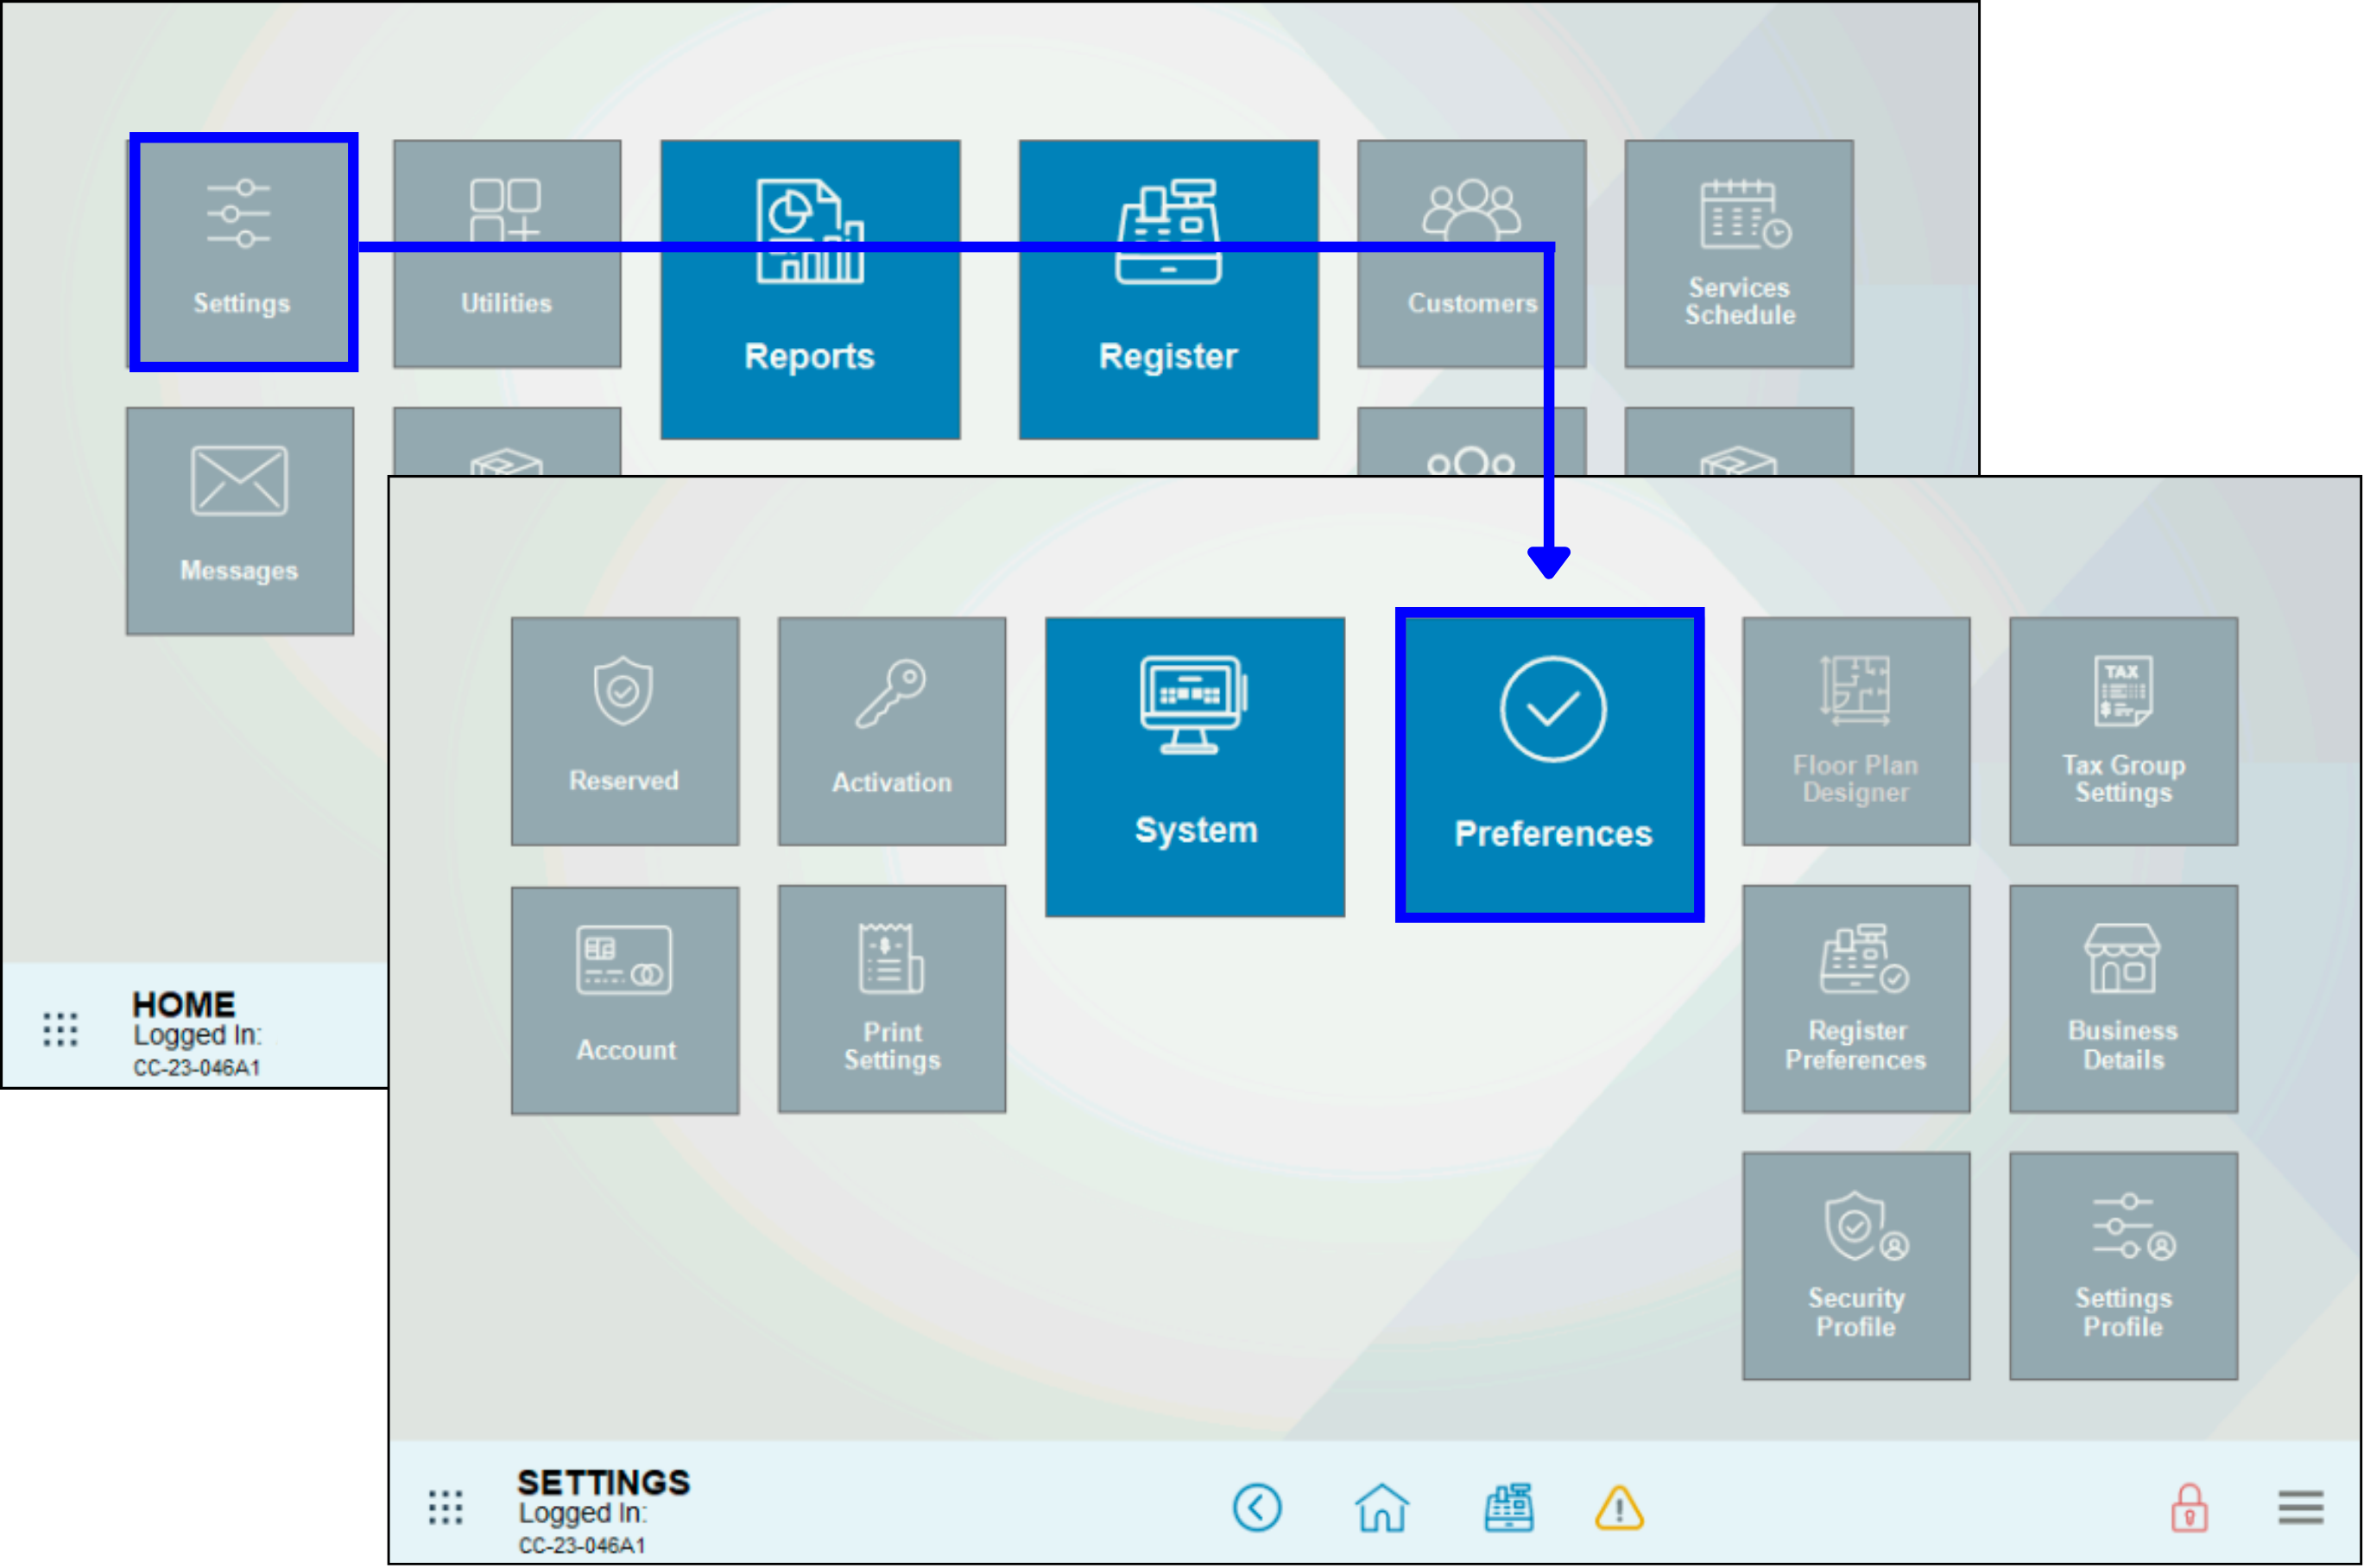
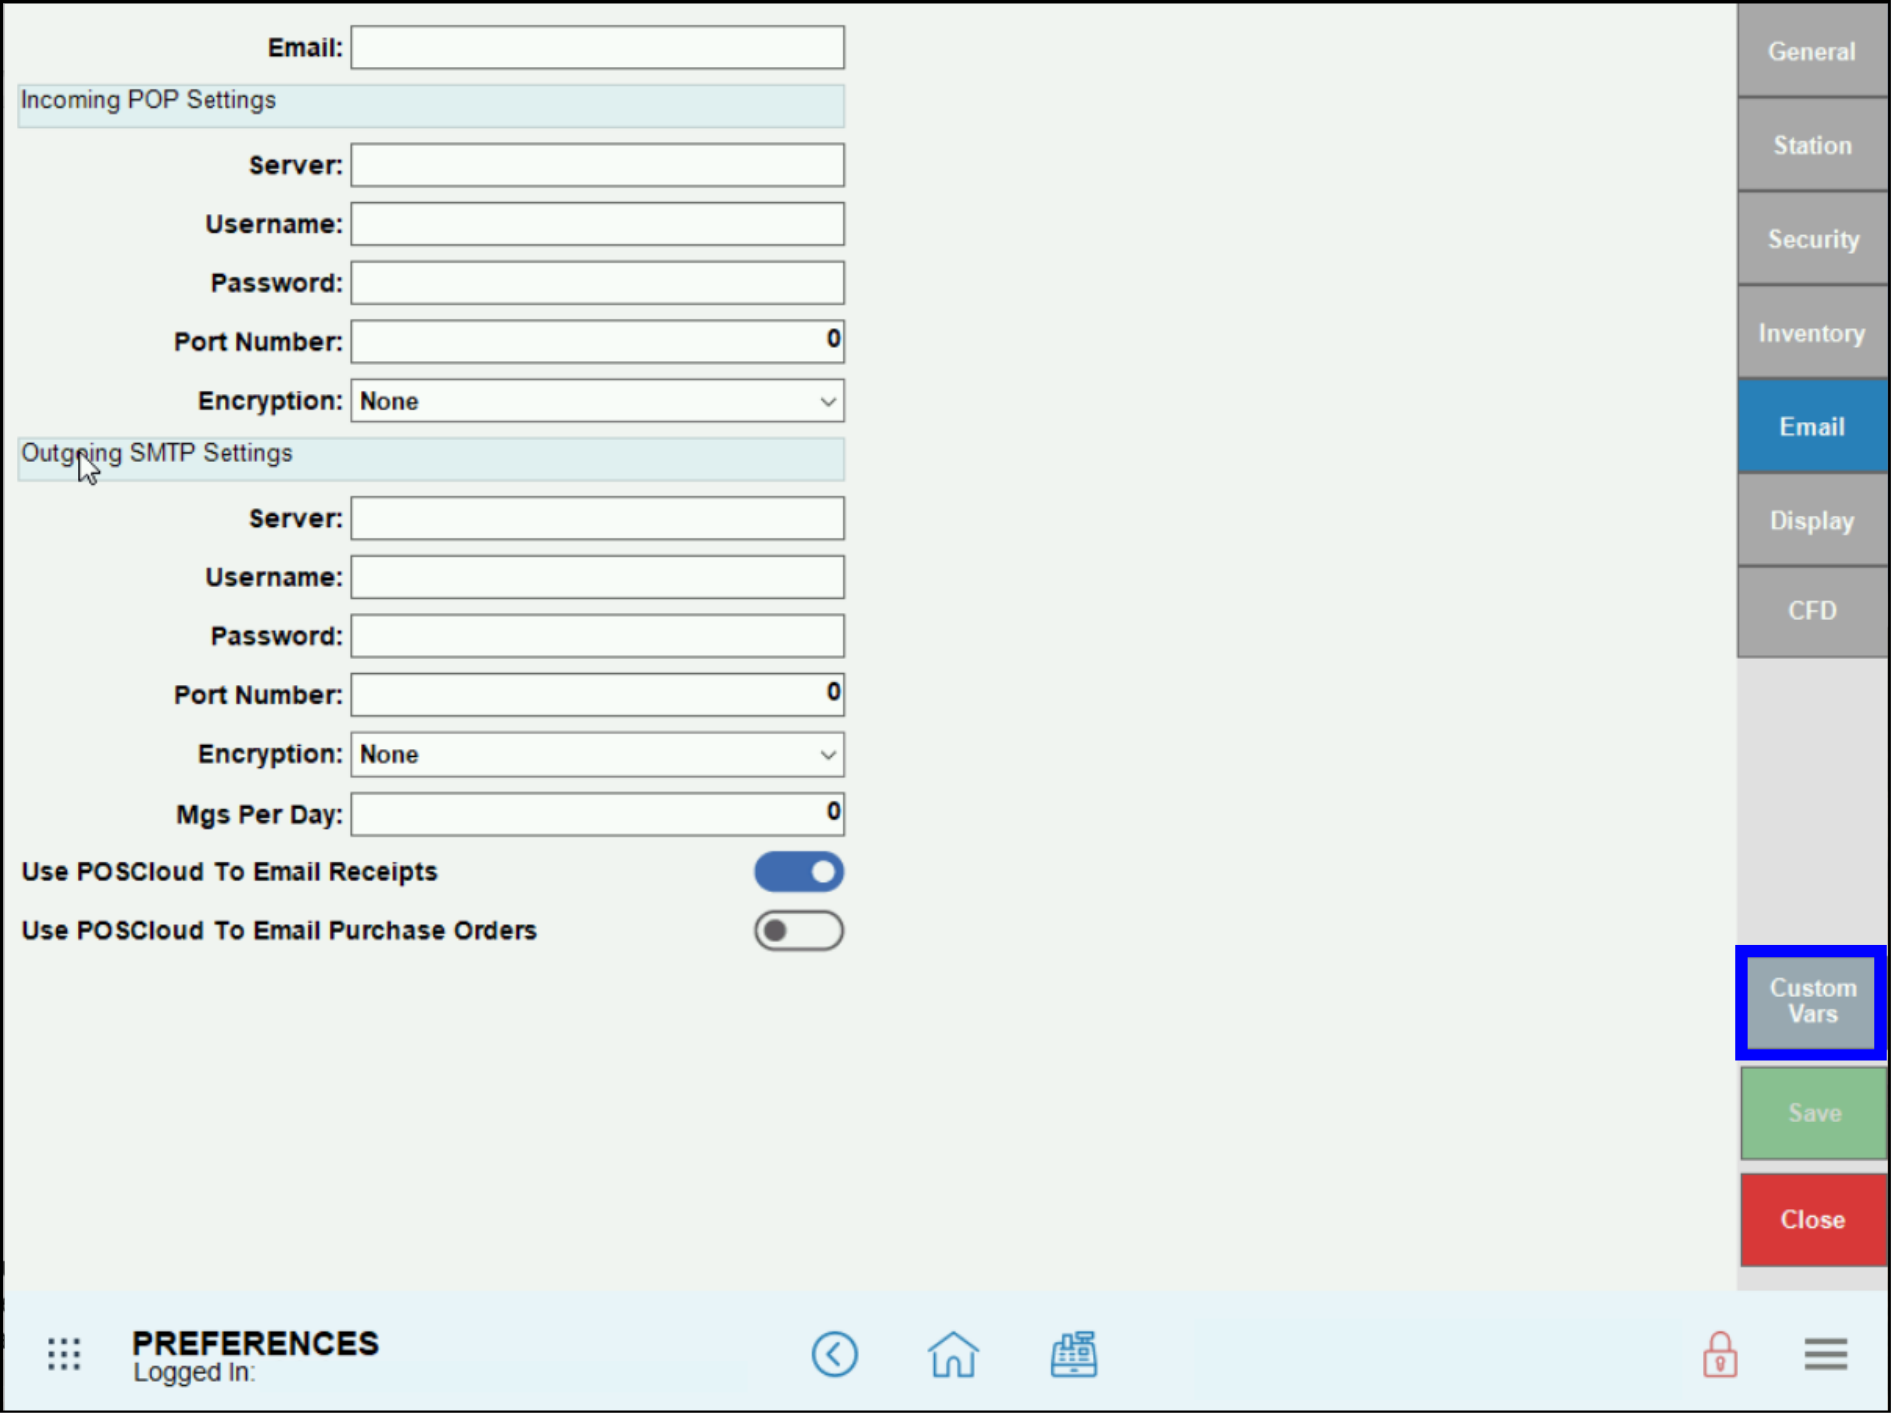
- Click the Custom Vars tab on the right.
- Select Modifiers Page from the Type menu on the left.
- Set up Modifier pages for each variant, e.g., Whole Pizza, 1st Half Pizza, 2nd Half Pizza.
- Edit the Descriptions on the right so they display what you want to show on the Register and on receipts.
- Edit the Ratio field to match the description: a whole pie is 100, and each half pie is 50.
- Activate the sliders only for the edited Modifier pages.
- Click Save.
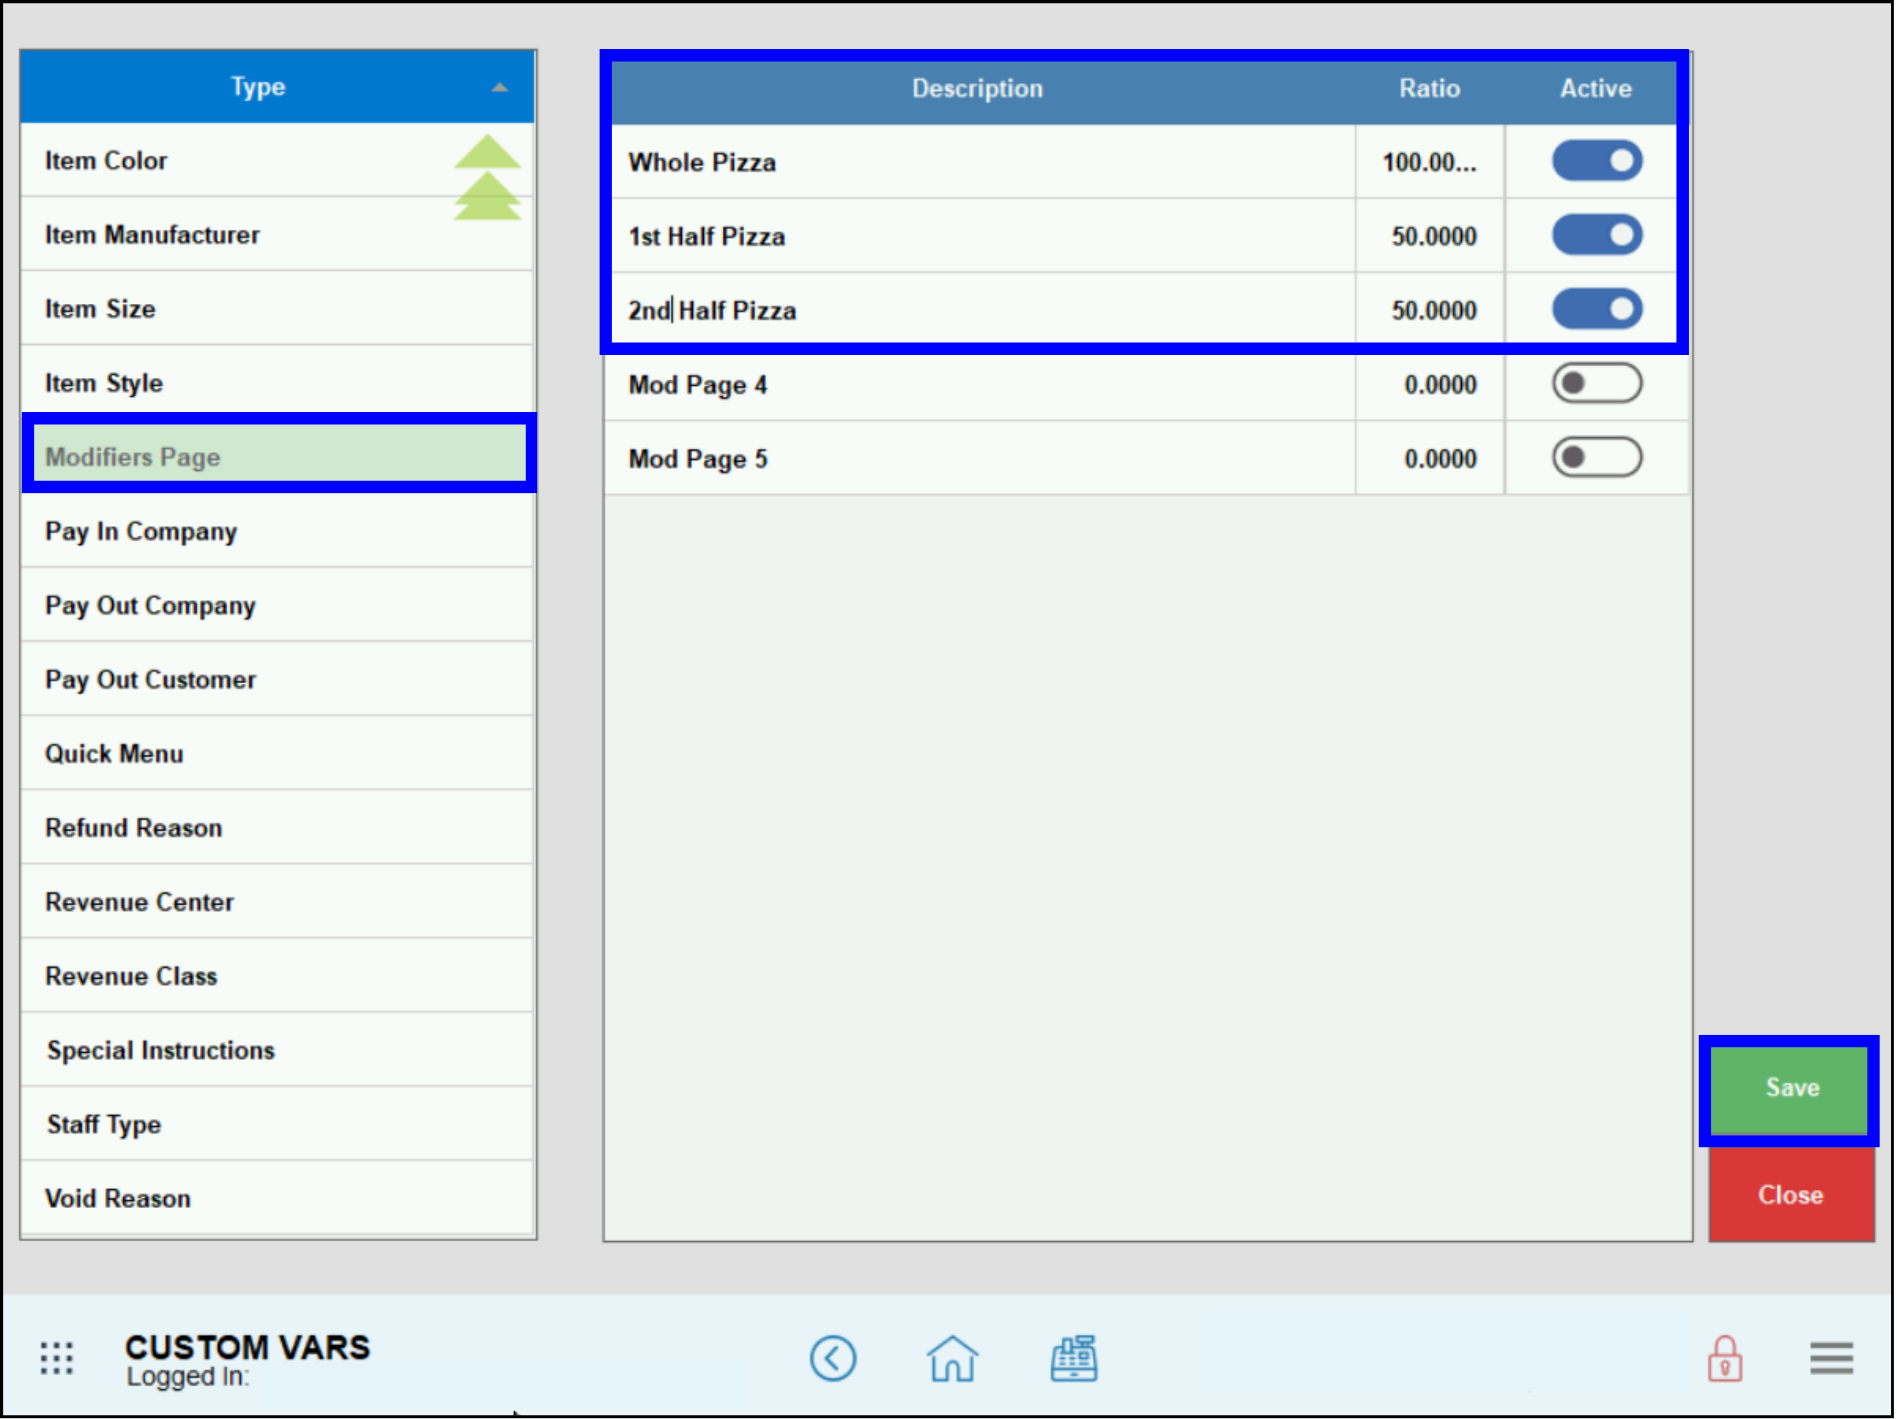
- Note: You will also see default modifier pages (e.g., Mod Page 4, Mod Page 5) if you are not using at least five modifier pages. However, if Modifier pages are not activated, they will not appear on the register or on tickets/receipts. We recommend only activating necessary modifier pages.
- Go to Home > Items > Categories.
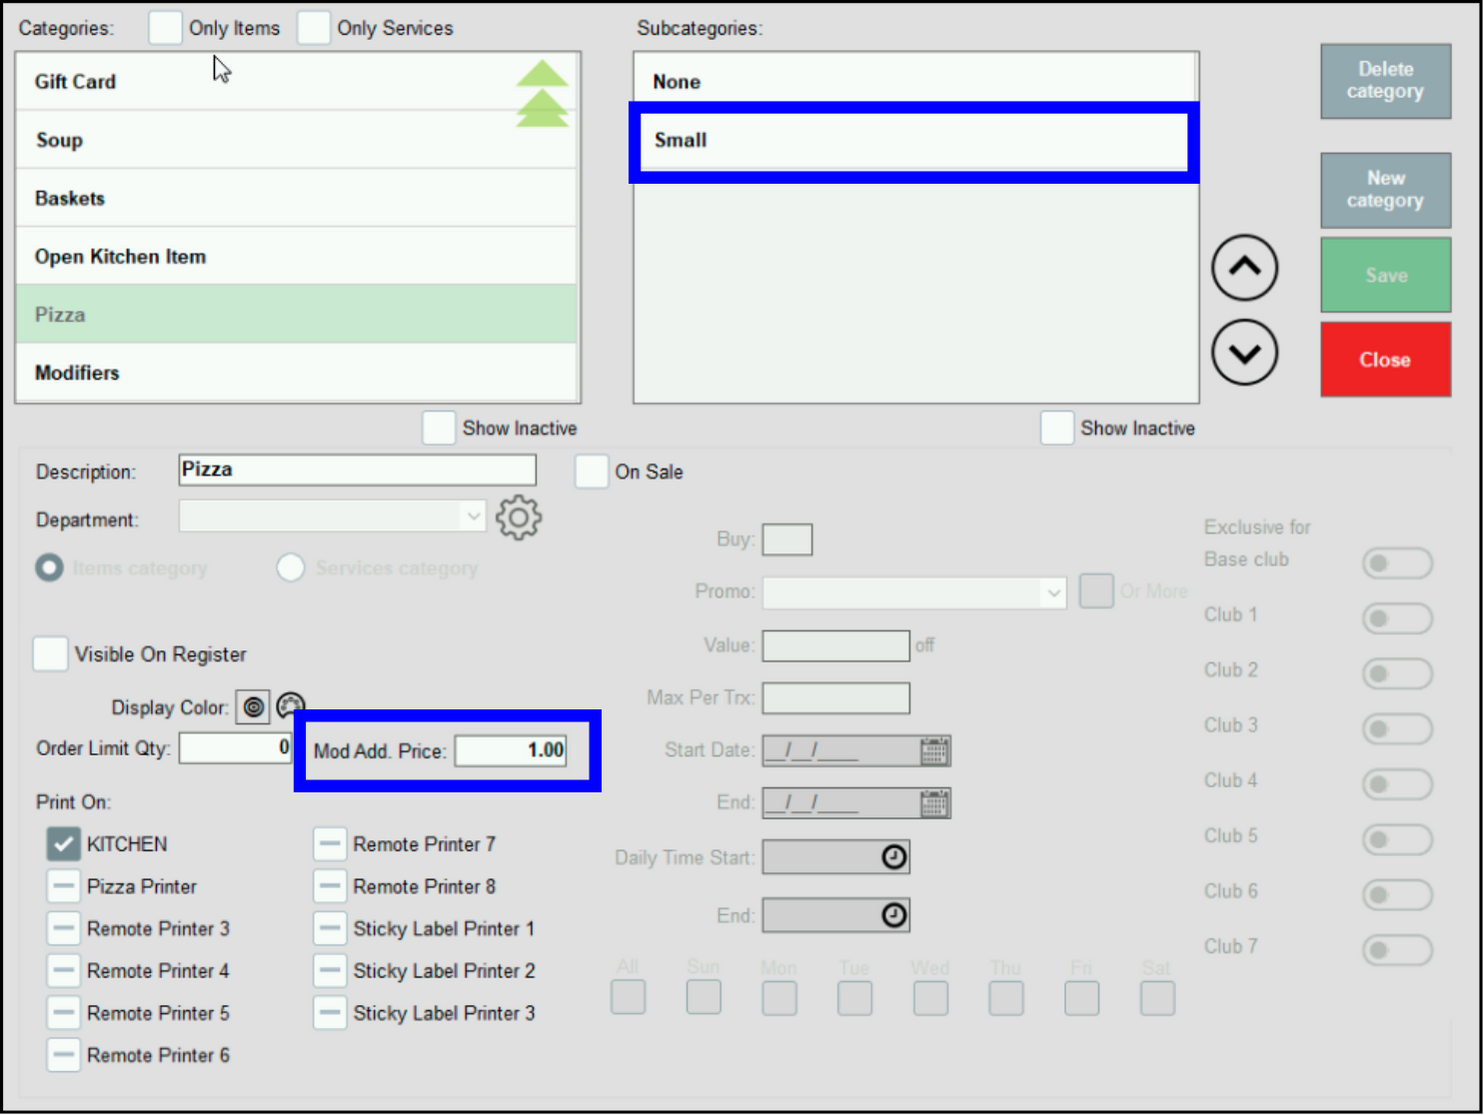
- In the Categories list, select Pizza, then click on desired item on the Subcategories list. The example uses the Small subcategory.
- Note: Clicking on a Subcategory list is required to activate the Mod Add. Price field.
- Enter the price in Mod Add. Price. The example uses “1.00”.
- Note: The Mod Add. Price is adjusted based on the ratios defined in the Modifier Page. Use the modifier page button when using the register. For example, where Whole = 100%, 1st Half = 50%, 2nd Half = 50%, a $1.00 Mod Add. Price will apply proportionally based on the selected portion. On the register, when you select Whole it will change $1.00 and when you select Half it will charge $0.50.
- Click Save.
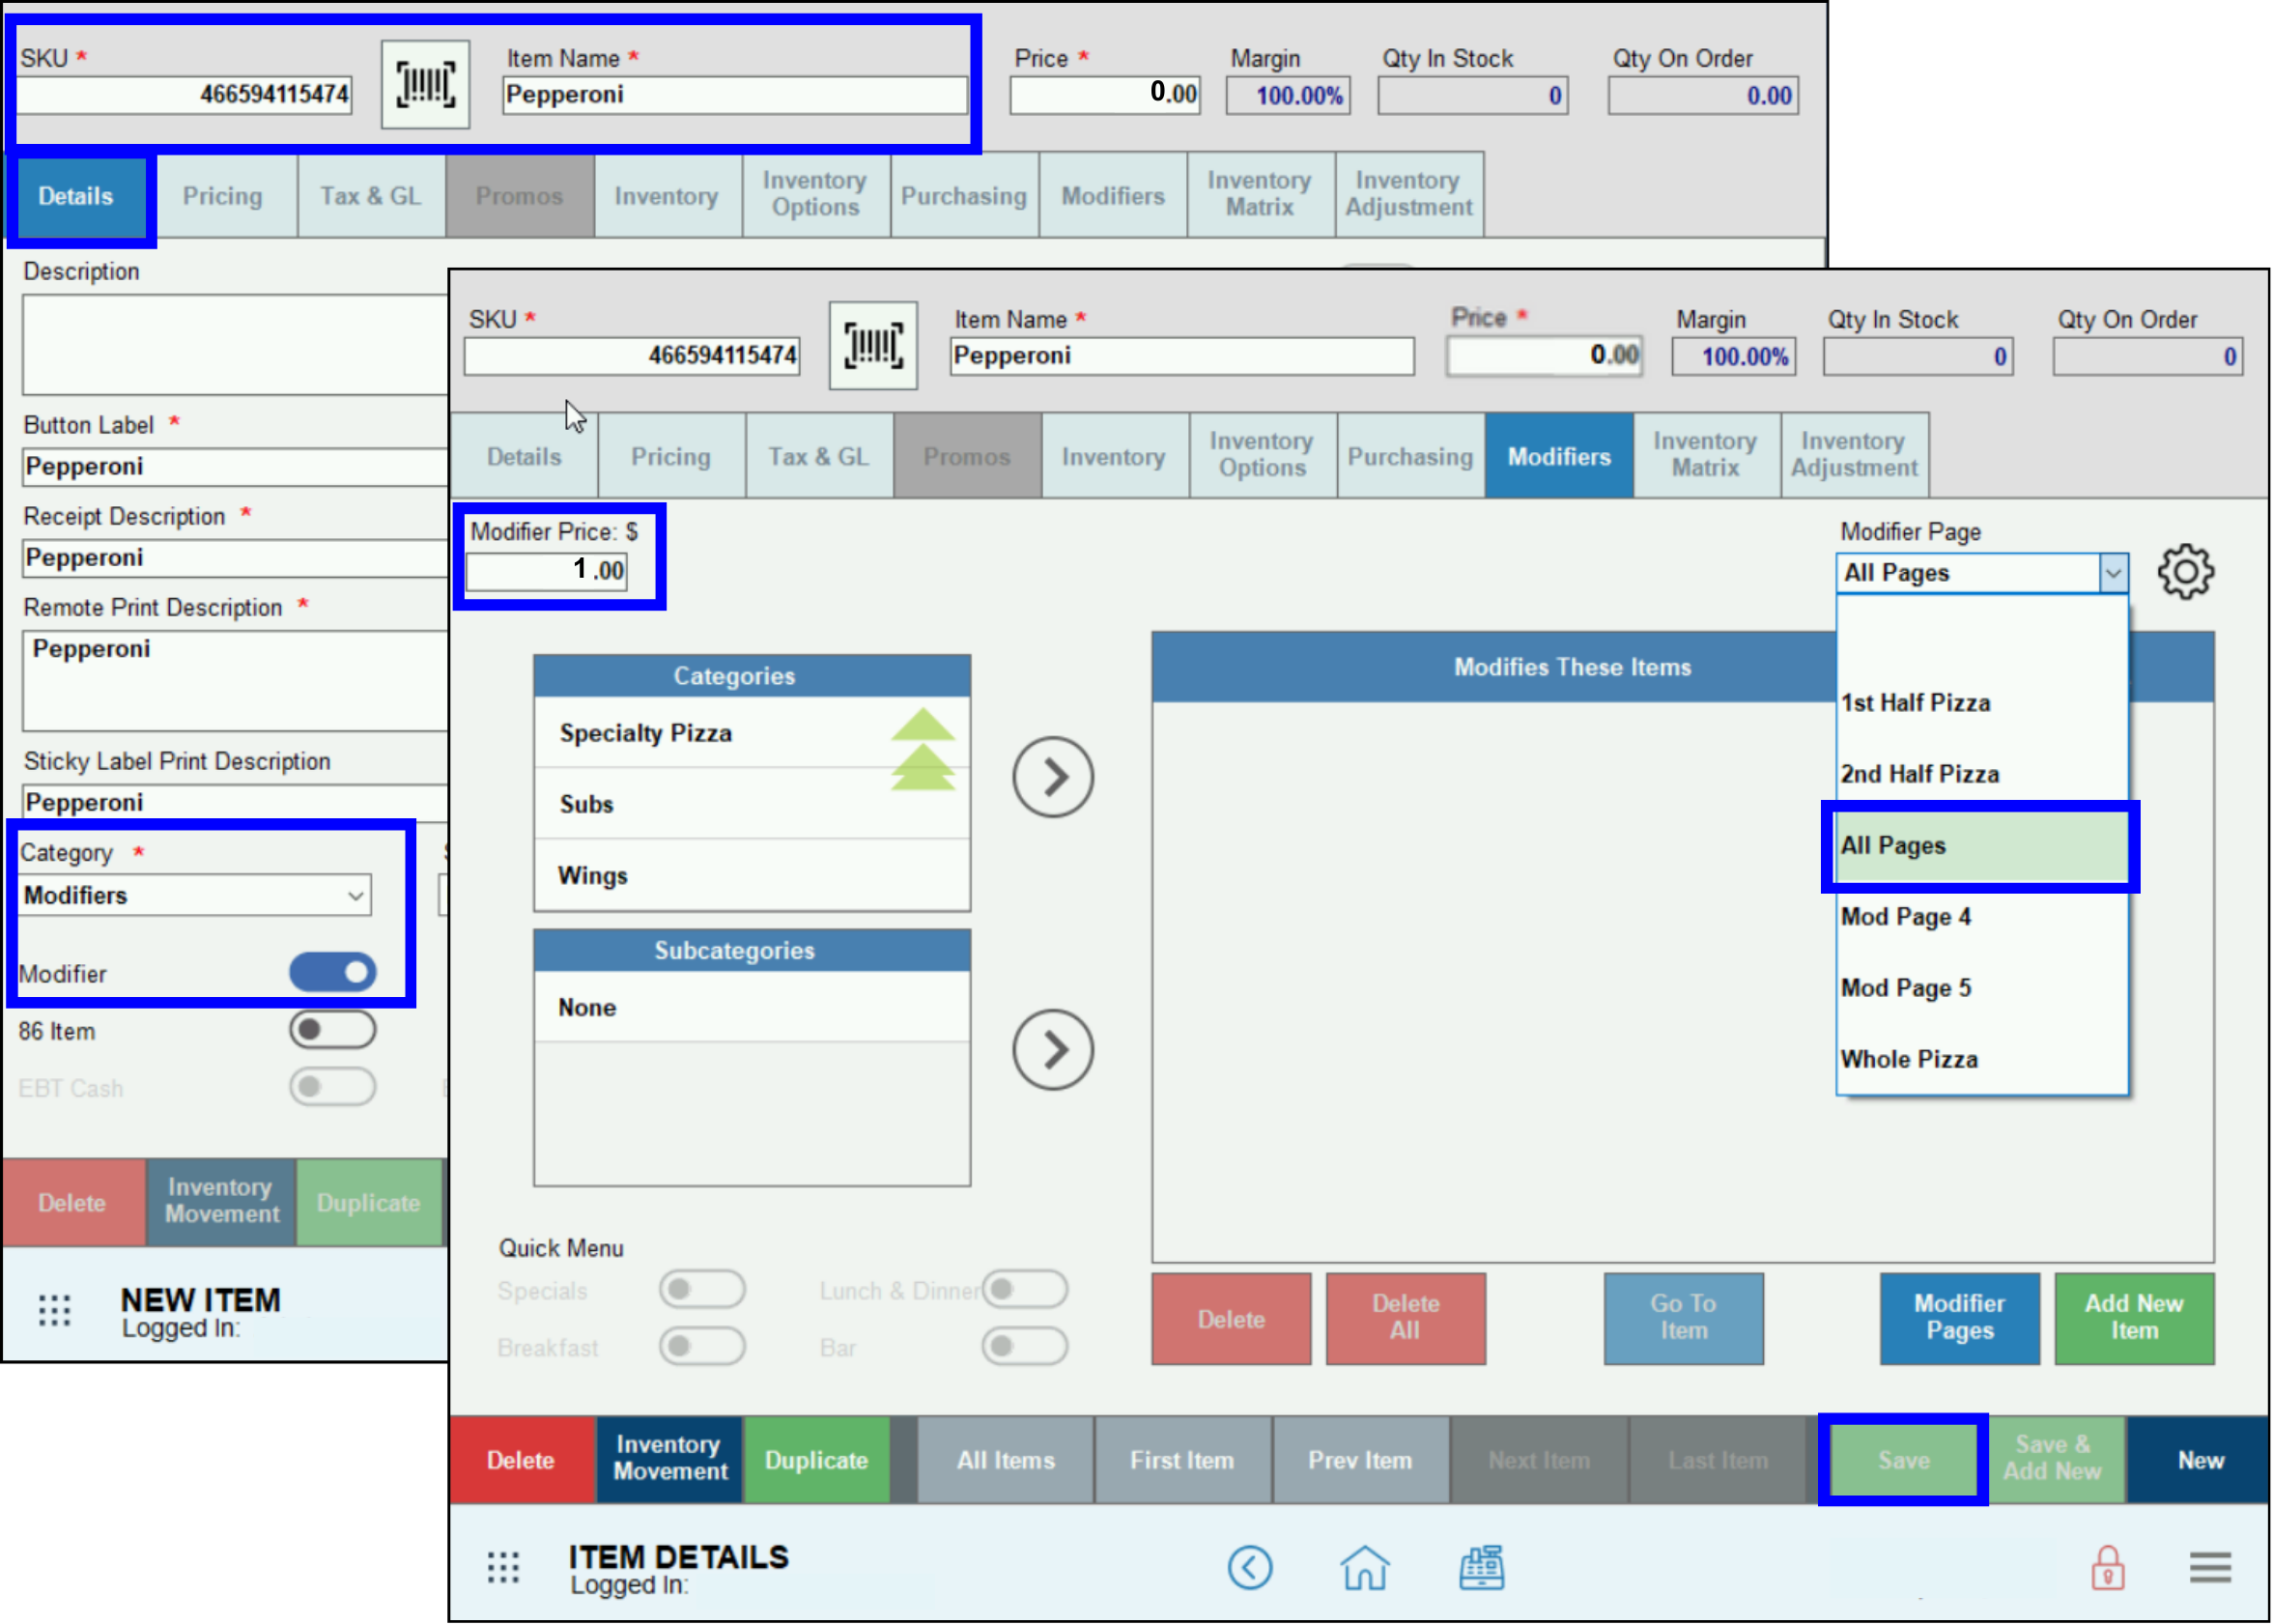
Add all standard toppings (modifiers) available for pizzas. The definition of standard toppings will vary according to merchant preference.
- Note: Standard toppings will provide the “base price” for premium toppings. However, do not add premium toppings at this time, as the setup is slightly different.
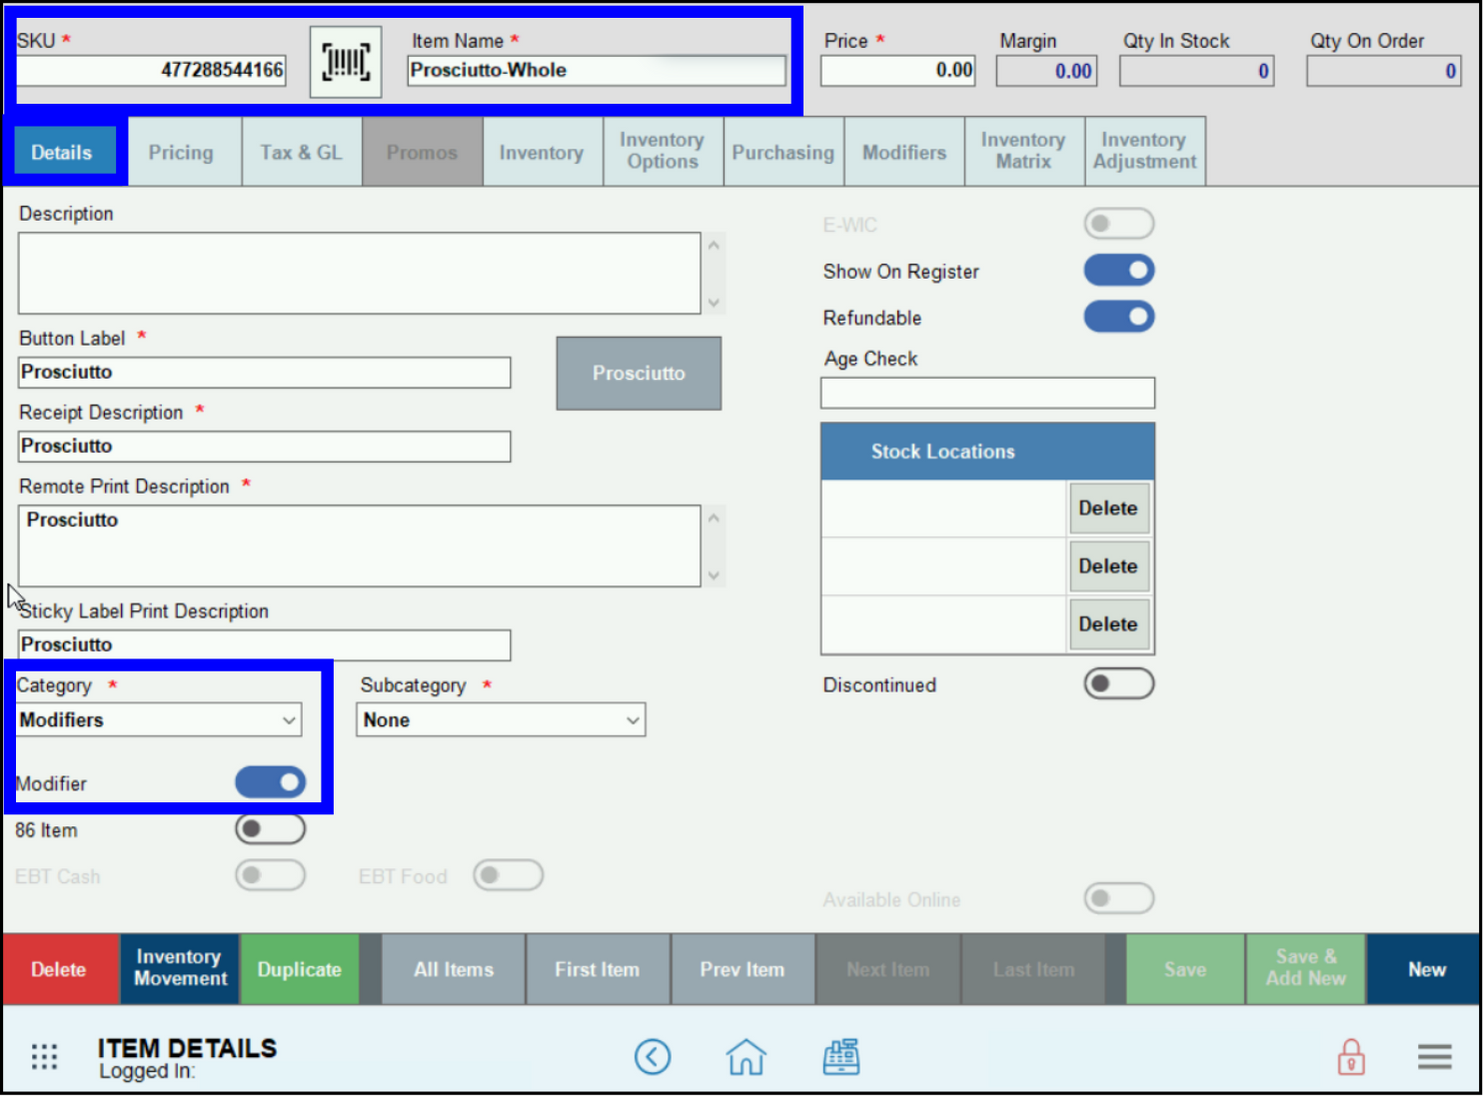
- Go to Home > Items > Item Details.
- Click the New tab.
- Click the barcode icon to populate the SKU field.
- Enter information into the Item Name field. In this example, it’s “Pepperoni”.
- Click the Details tab.
- In the Category dropdown near the bottom, select Modifiers.
- Click the Modifier slider by sliding it to the right.
- Tip! Using subcategories for modifiers can help with organization. For example, create separate subcategories for standard toppings and premium toppings.
- Click on the Modifiers tab.
- Ensure the Price field at the top is set to $0.00.
- Select All Pages from the Modifiers Page dropdown.
- Click Save.
- Tip! Try using the Duplicate button to easily finish creating modifiers. For more information, see Duplicate Items and Modifiers.
- Note: Determine the topping (modifier) pricing by calculating the charge for the least expensive topping on a whole pizza. Use that price for your Modifier Price. In the example, it’s $1.00.
- Go to Home > Items > Item List.
- Enter “pizza” into the Search bar to ensure it is listed, then click on Pizza Pie in the listing.
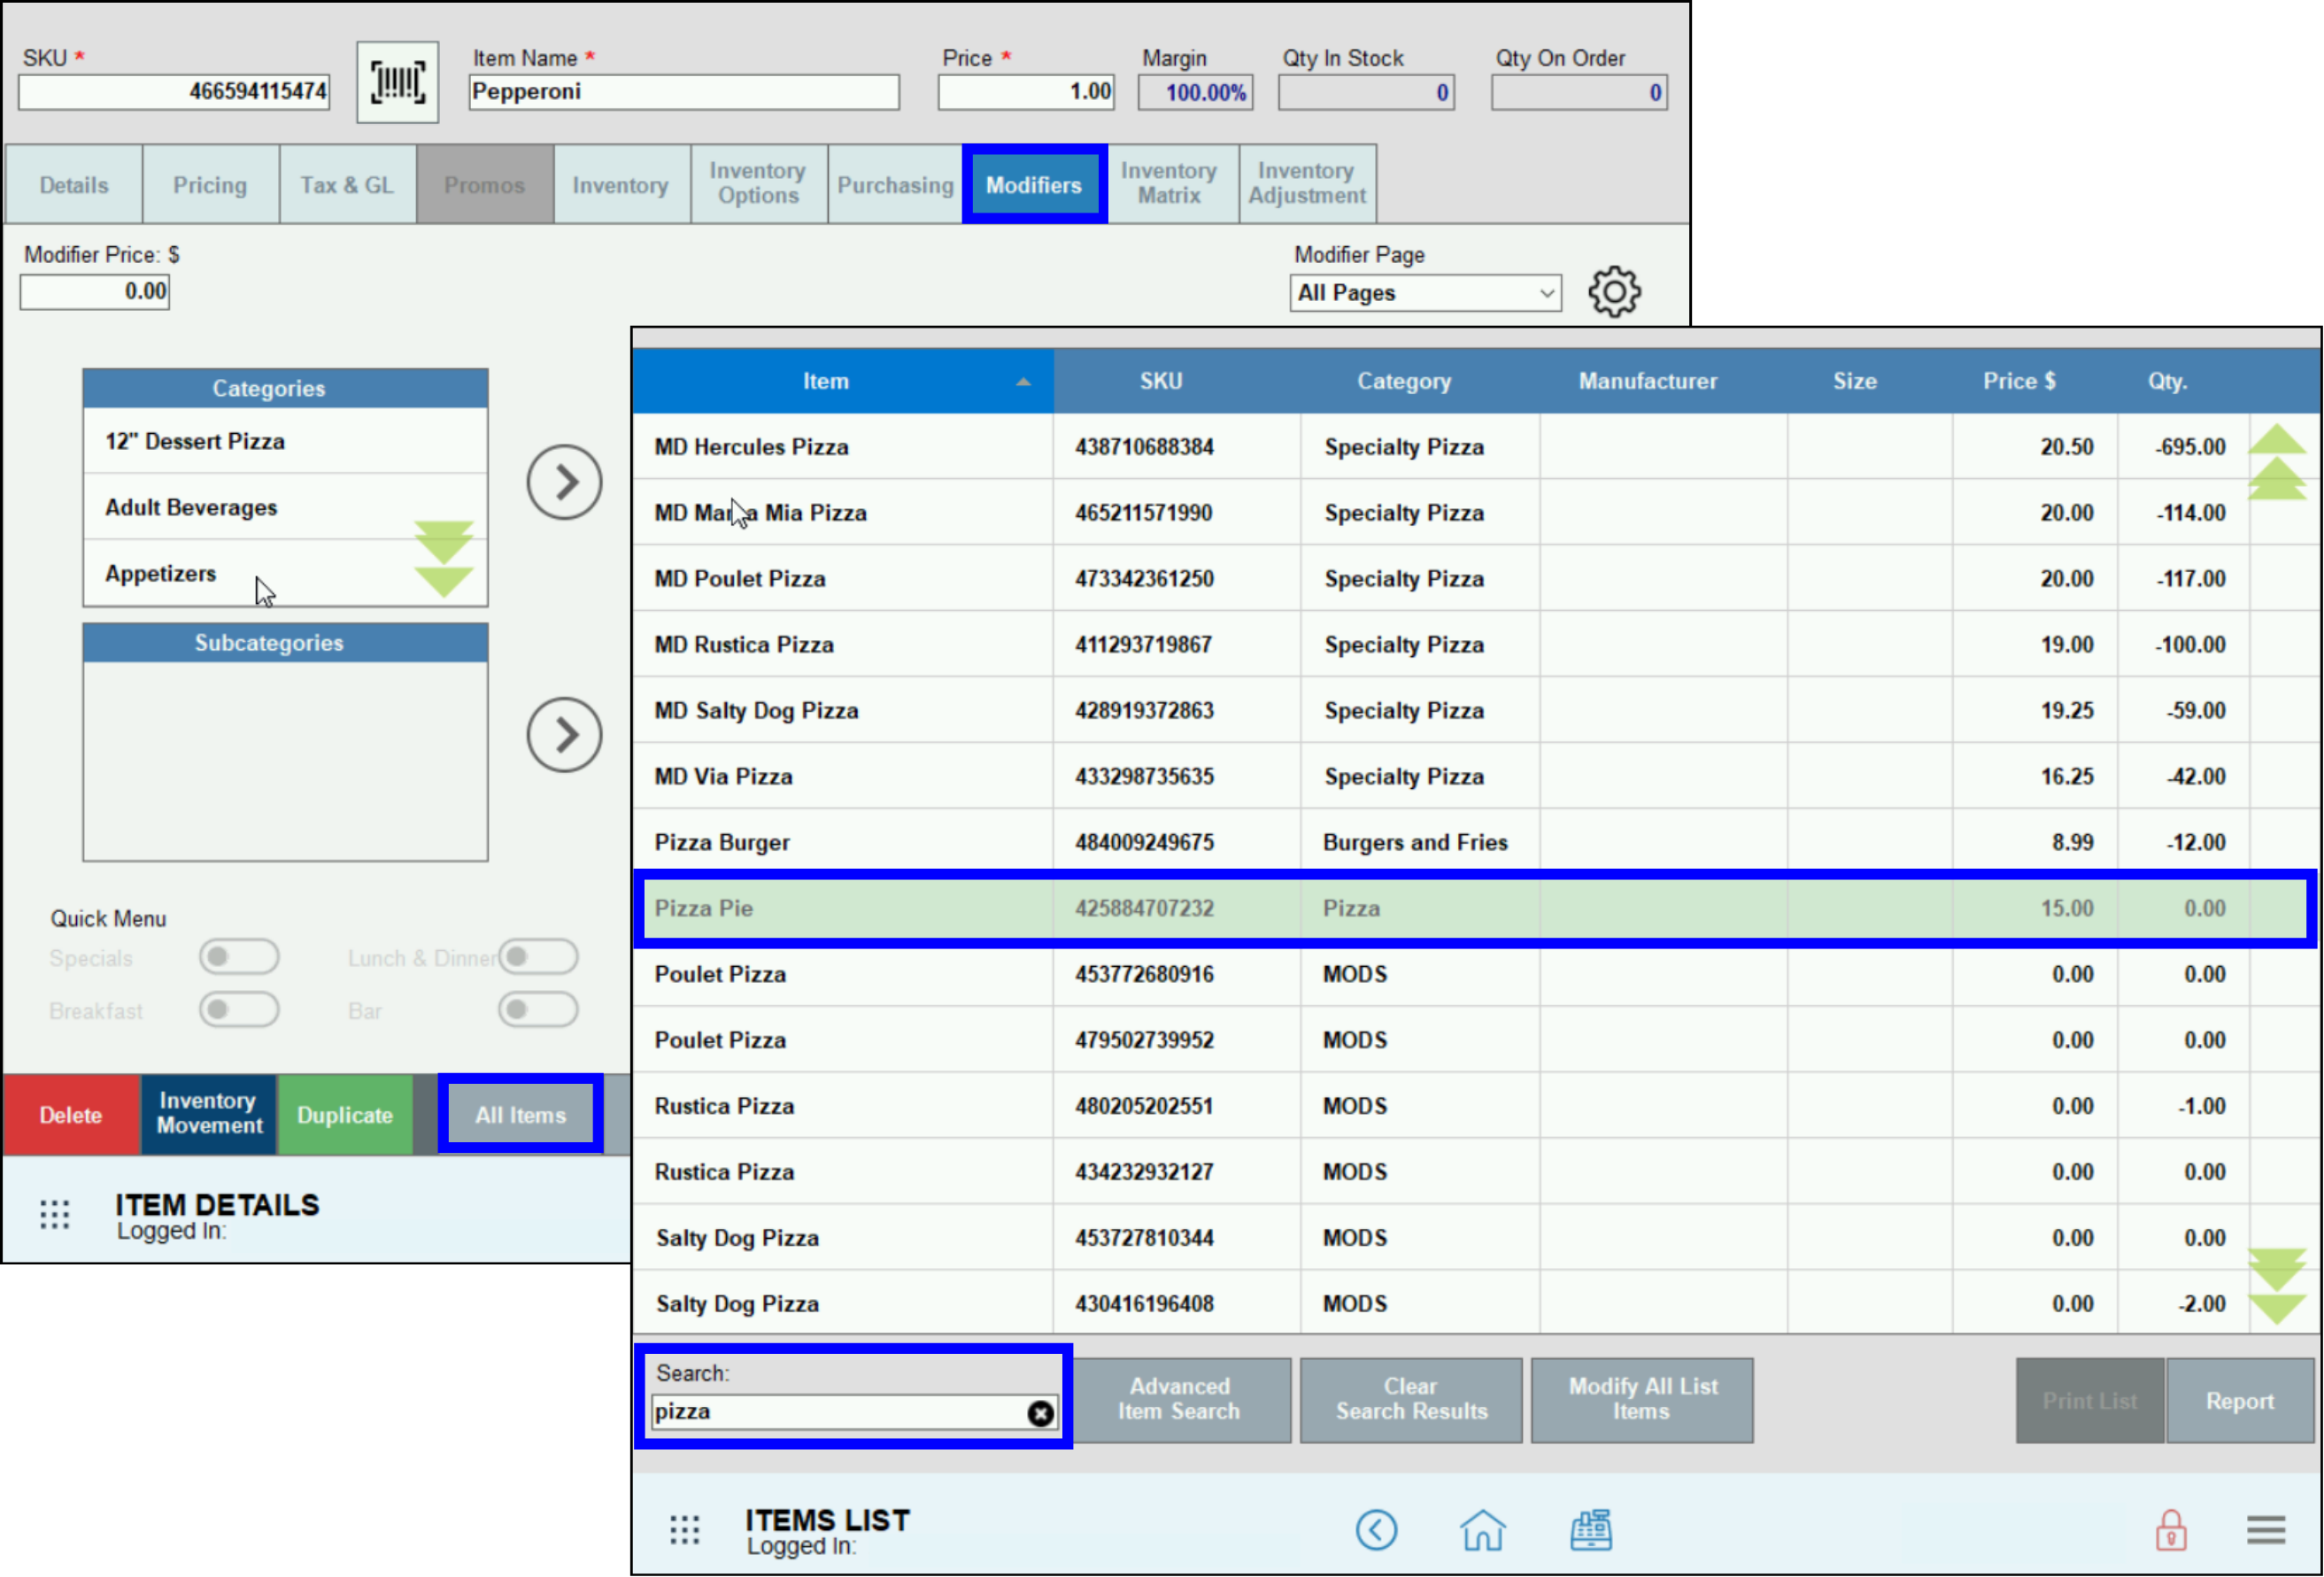
- Click Modifiers tab, then select Modifiers from the Categories list.
- Select Pizza Toppings from the Subcategories dropdown.
- Click the right arrow > button by Subcategories to add all modifiers to the table on the right.
- Select Whole Pizza as your default Modifier page.
- Click Save.
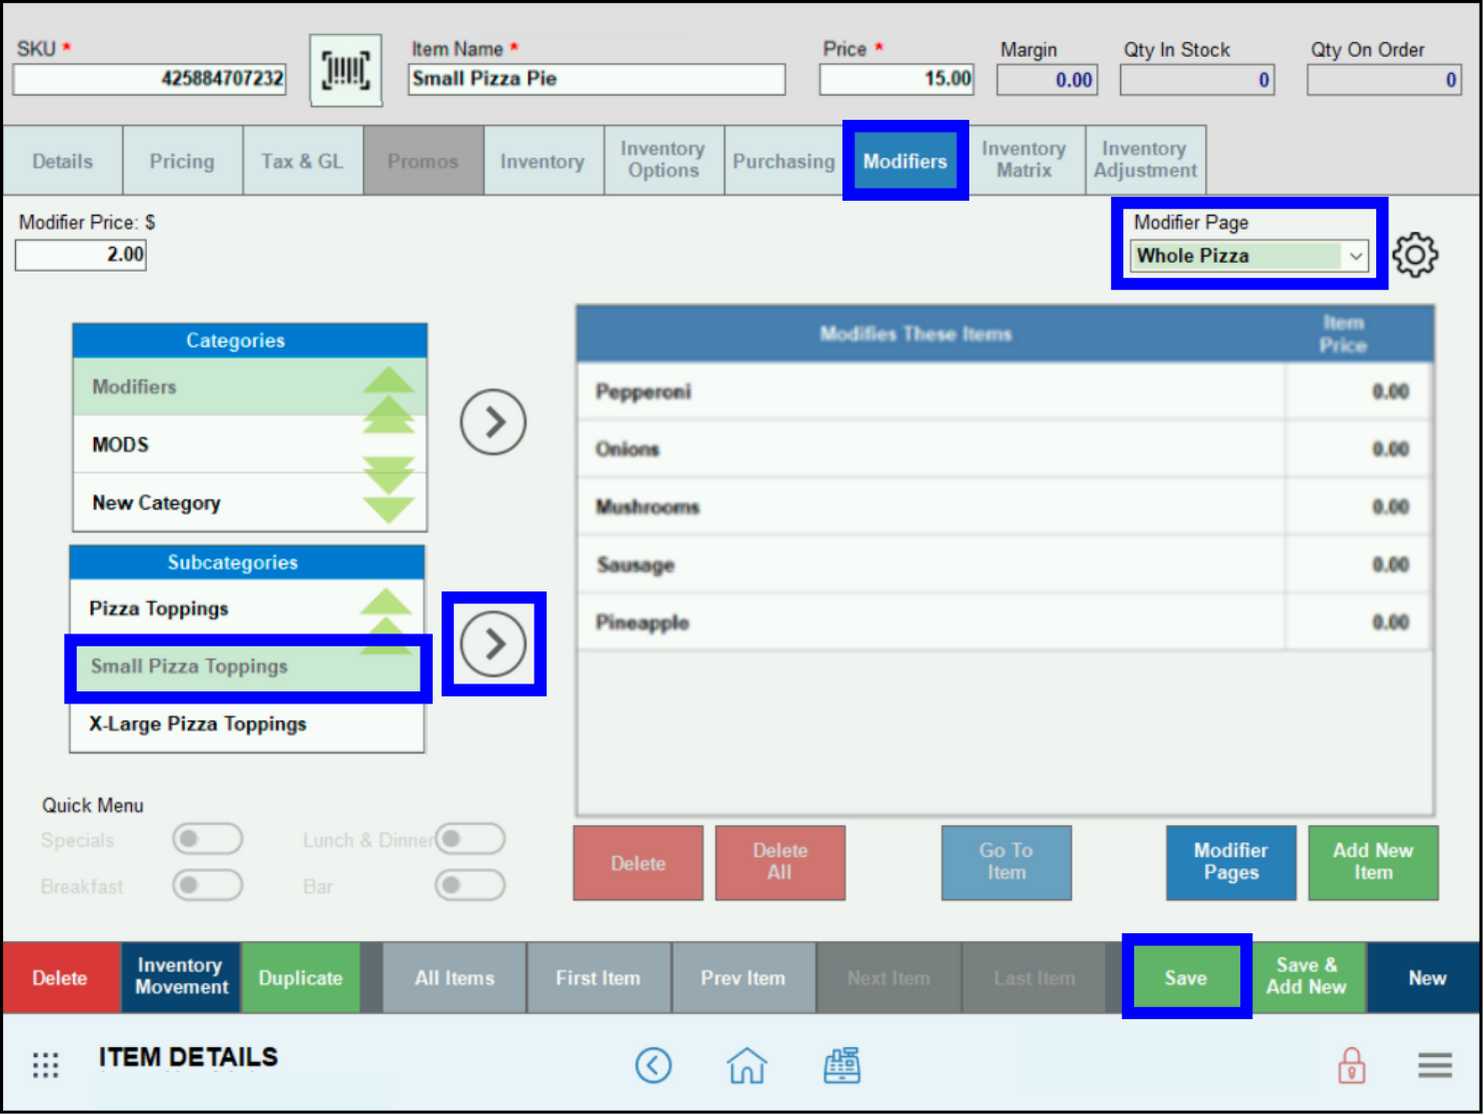
- Note: Selecting Whole Pizza as the default Modifier page for toppings will help avoid pricing mistakes at the Register. Otherwise, it will be easy to inadvertently not charge for toppings.
Employees must accurately enter customized pizzas into the register to ensure proper pricing and that the kitchen staff understands exactly what each customer requires.
- Go to Home > Register.
- Select Pizza from the listing.
- Click Small Pizza Pie.
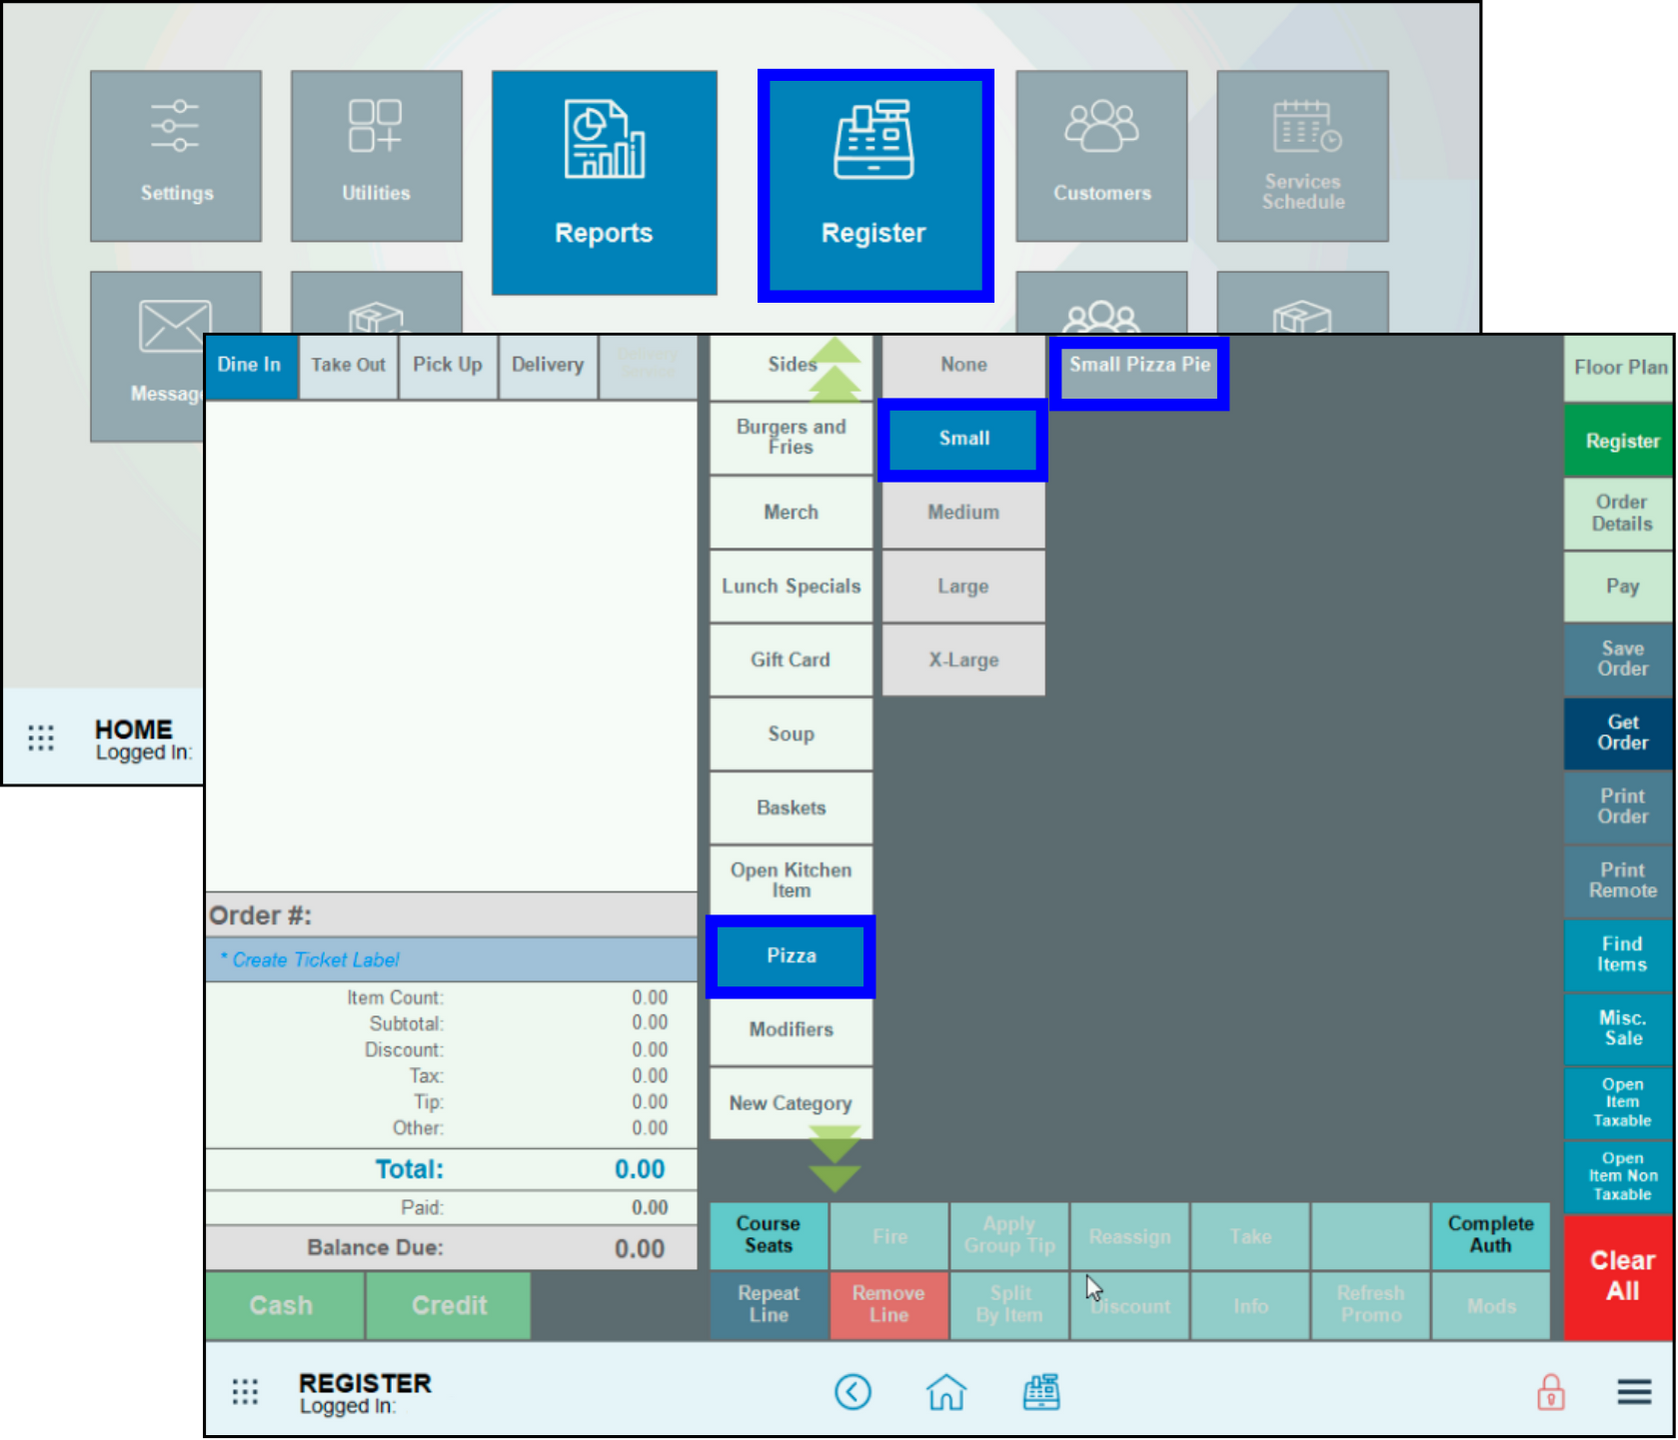
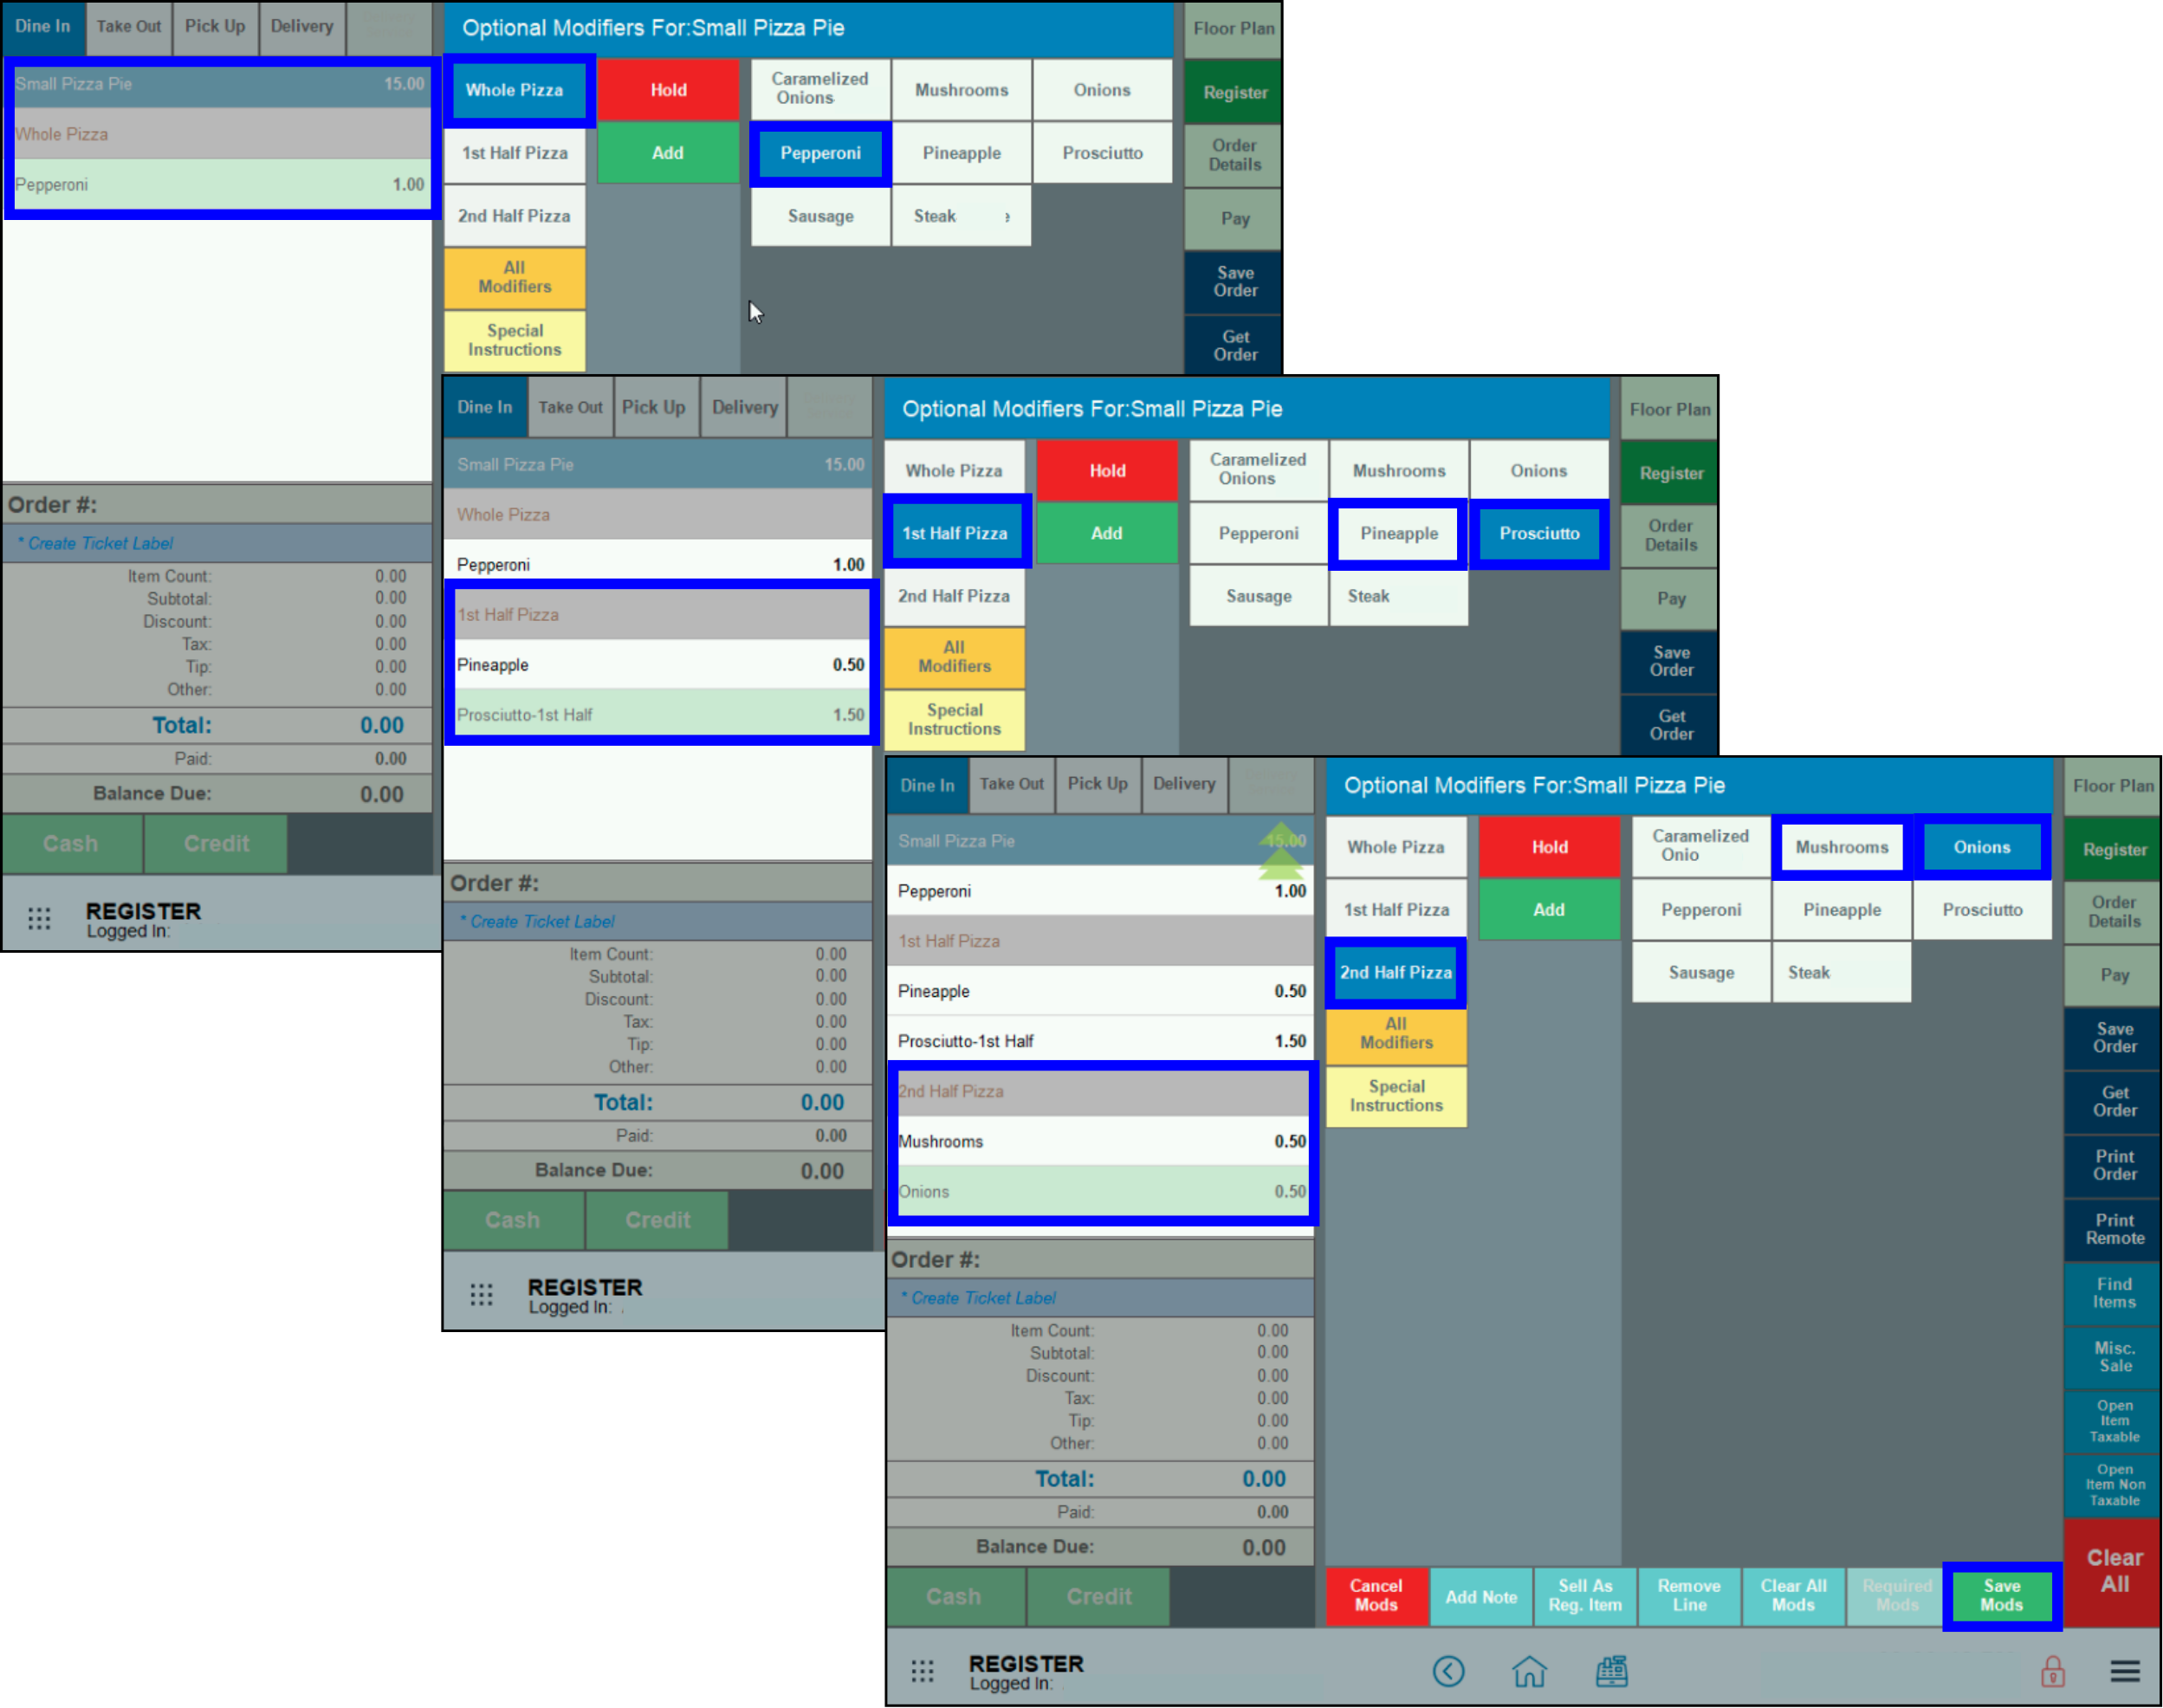
- The first pizza has Pepperoni on the Whole Pizza, Pineapple and Prosciutto on the 1st Half, and Mushrooms and Onions on the 2nd Half.
- Click Whole Pizza, then the modifier(s). In this example, it’s Pepperoni.
- Click 1st Half Pizza and add Pineapple and Prosciutto.
- Note: Prosciutto is a premium topping, so staff should ensure the price is different from standard toppings.
- Click 2nd Half Pizza and add Mushrooms and Onions.
- Click Save Mods in lower right corner.
- The second pizza has Caramelized Onions on everything, Steak on one half, and Mushrooms and Prosciutto on the other half.
- Click Whole Pizza, then Caramelized Onions.
- Click 1st Half Pizza to add Steak, then 2nd Half Pizza to add Mushrooms and Prosciutto.
- Click Save Mods in lower right corner.
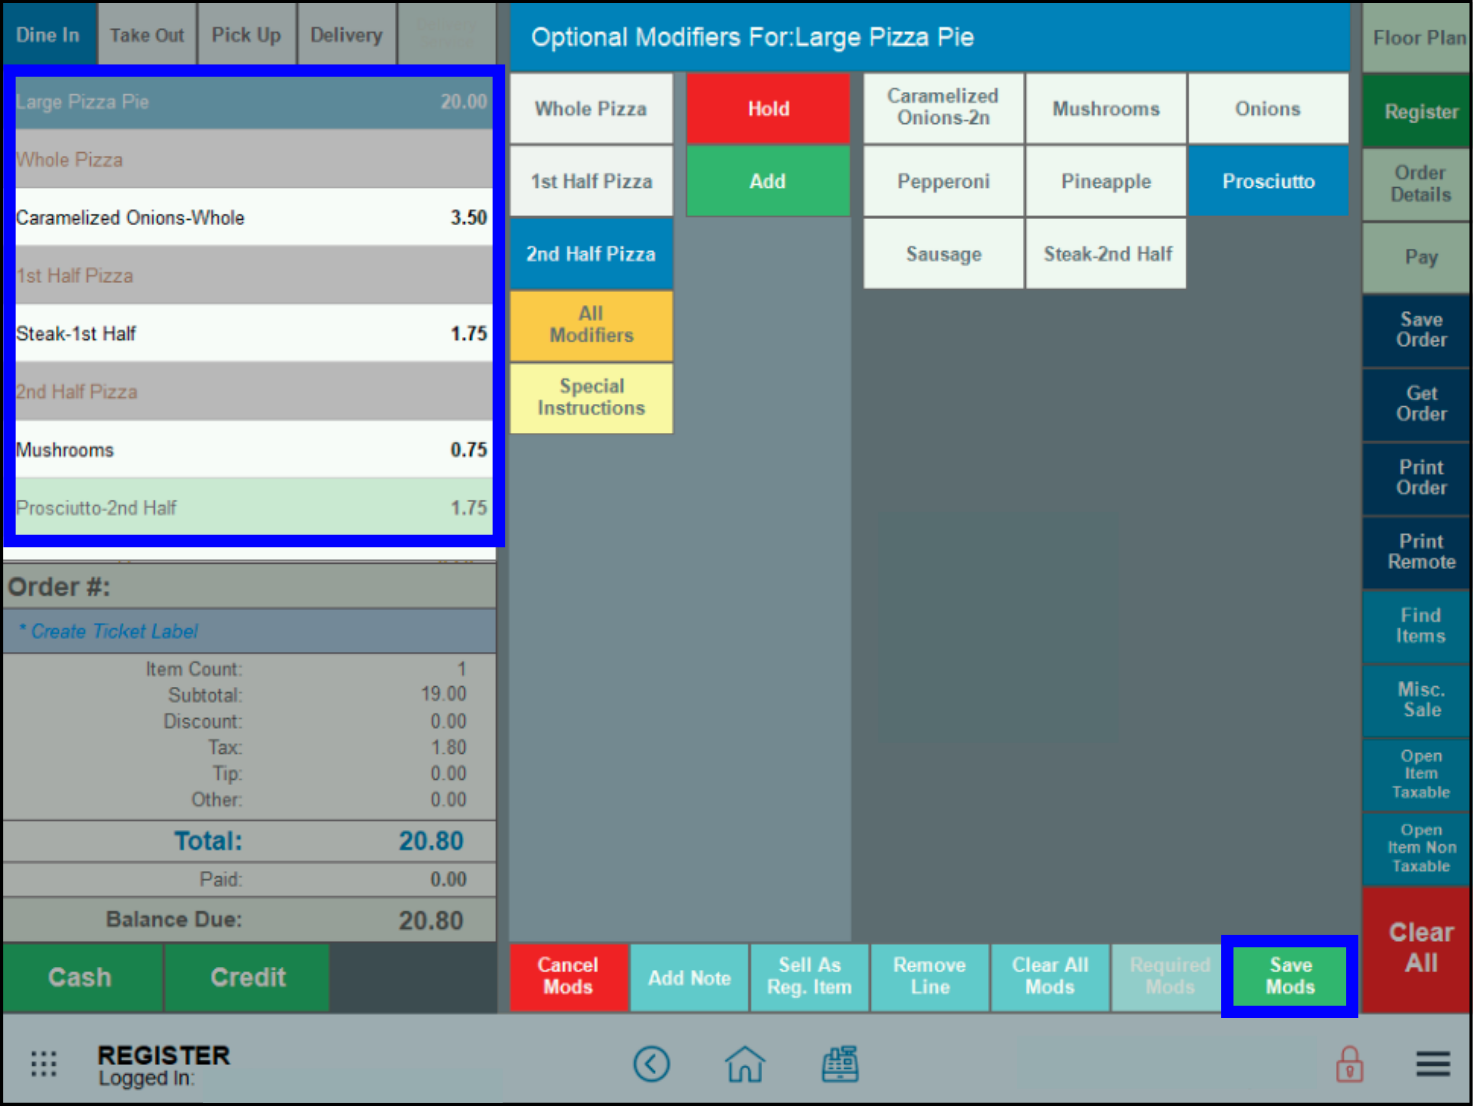
- When the order is complete, click Print Remote to send the ticket to the Kitchen.
Sometimes customers have very specific instructions or wish to add toppings not listed as a modifier. For example, a customer may want Funyuns crushed over their pizza. Do this by adding a note to the order.
- After entering an order but before clicking Save Mods, click the Add Note button.
- Enter a clear and concise message (maximum 100 characters) in the Order Notes / Special Instructions field, then assign a price in the Add Price field.
- Click OK.
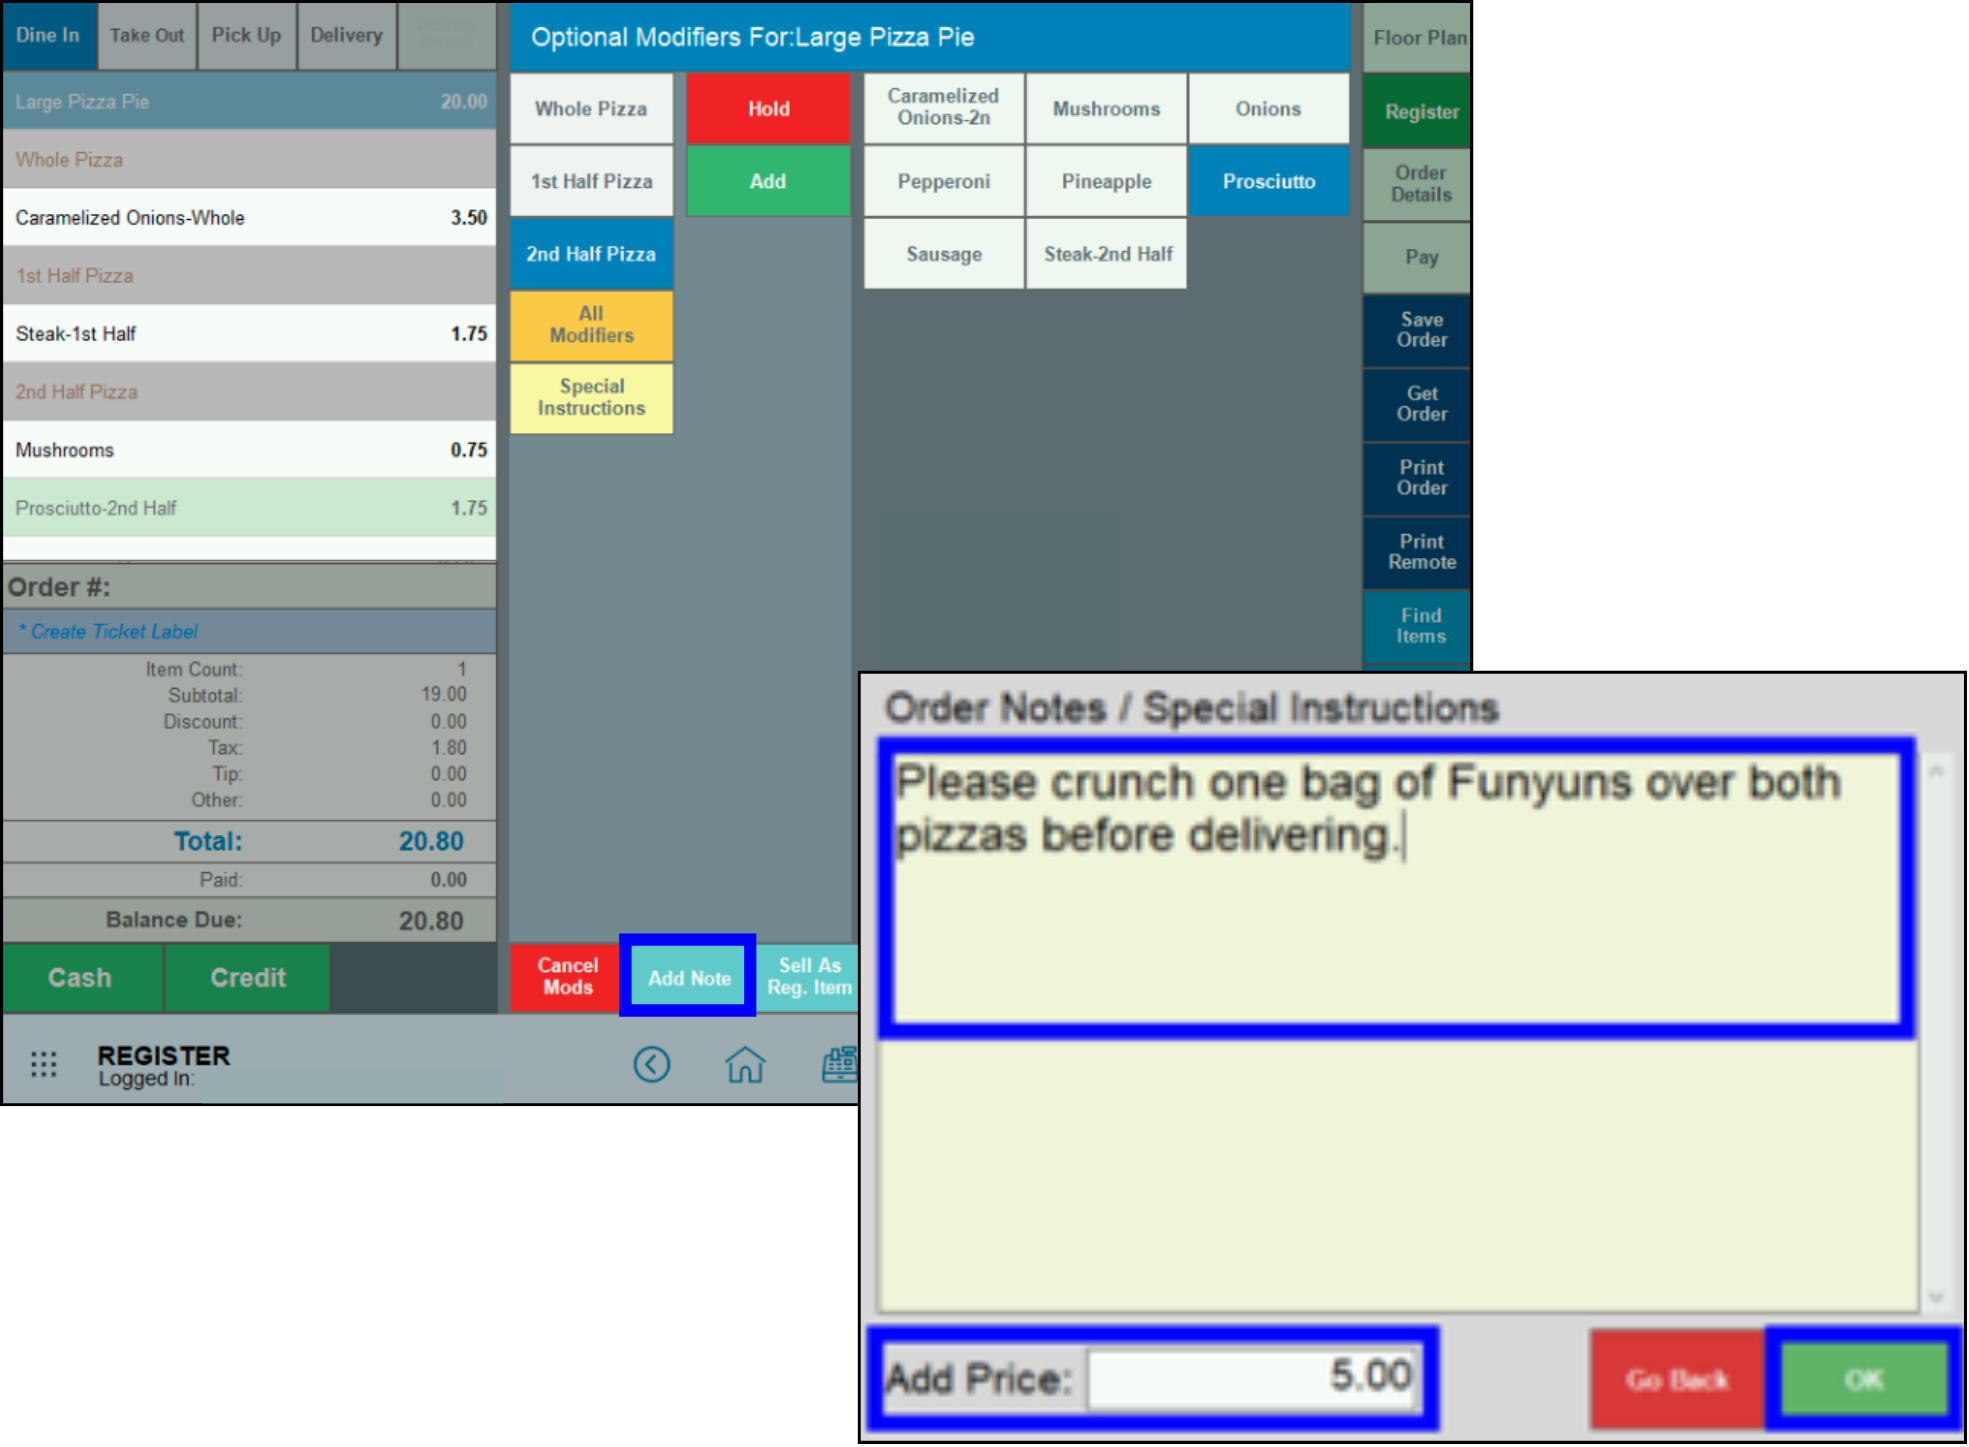
- When the order is complete, click Print Remote to send the ticket to the Kitchen. The note will display at the bottom of the ticket.
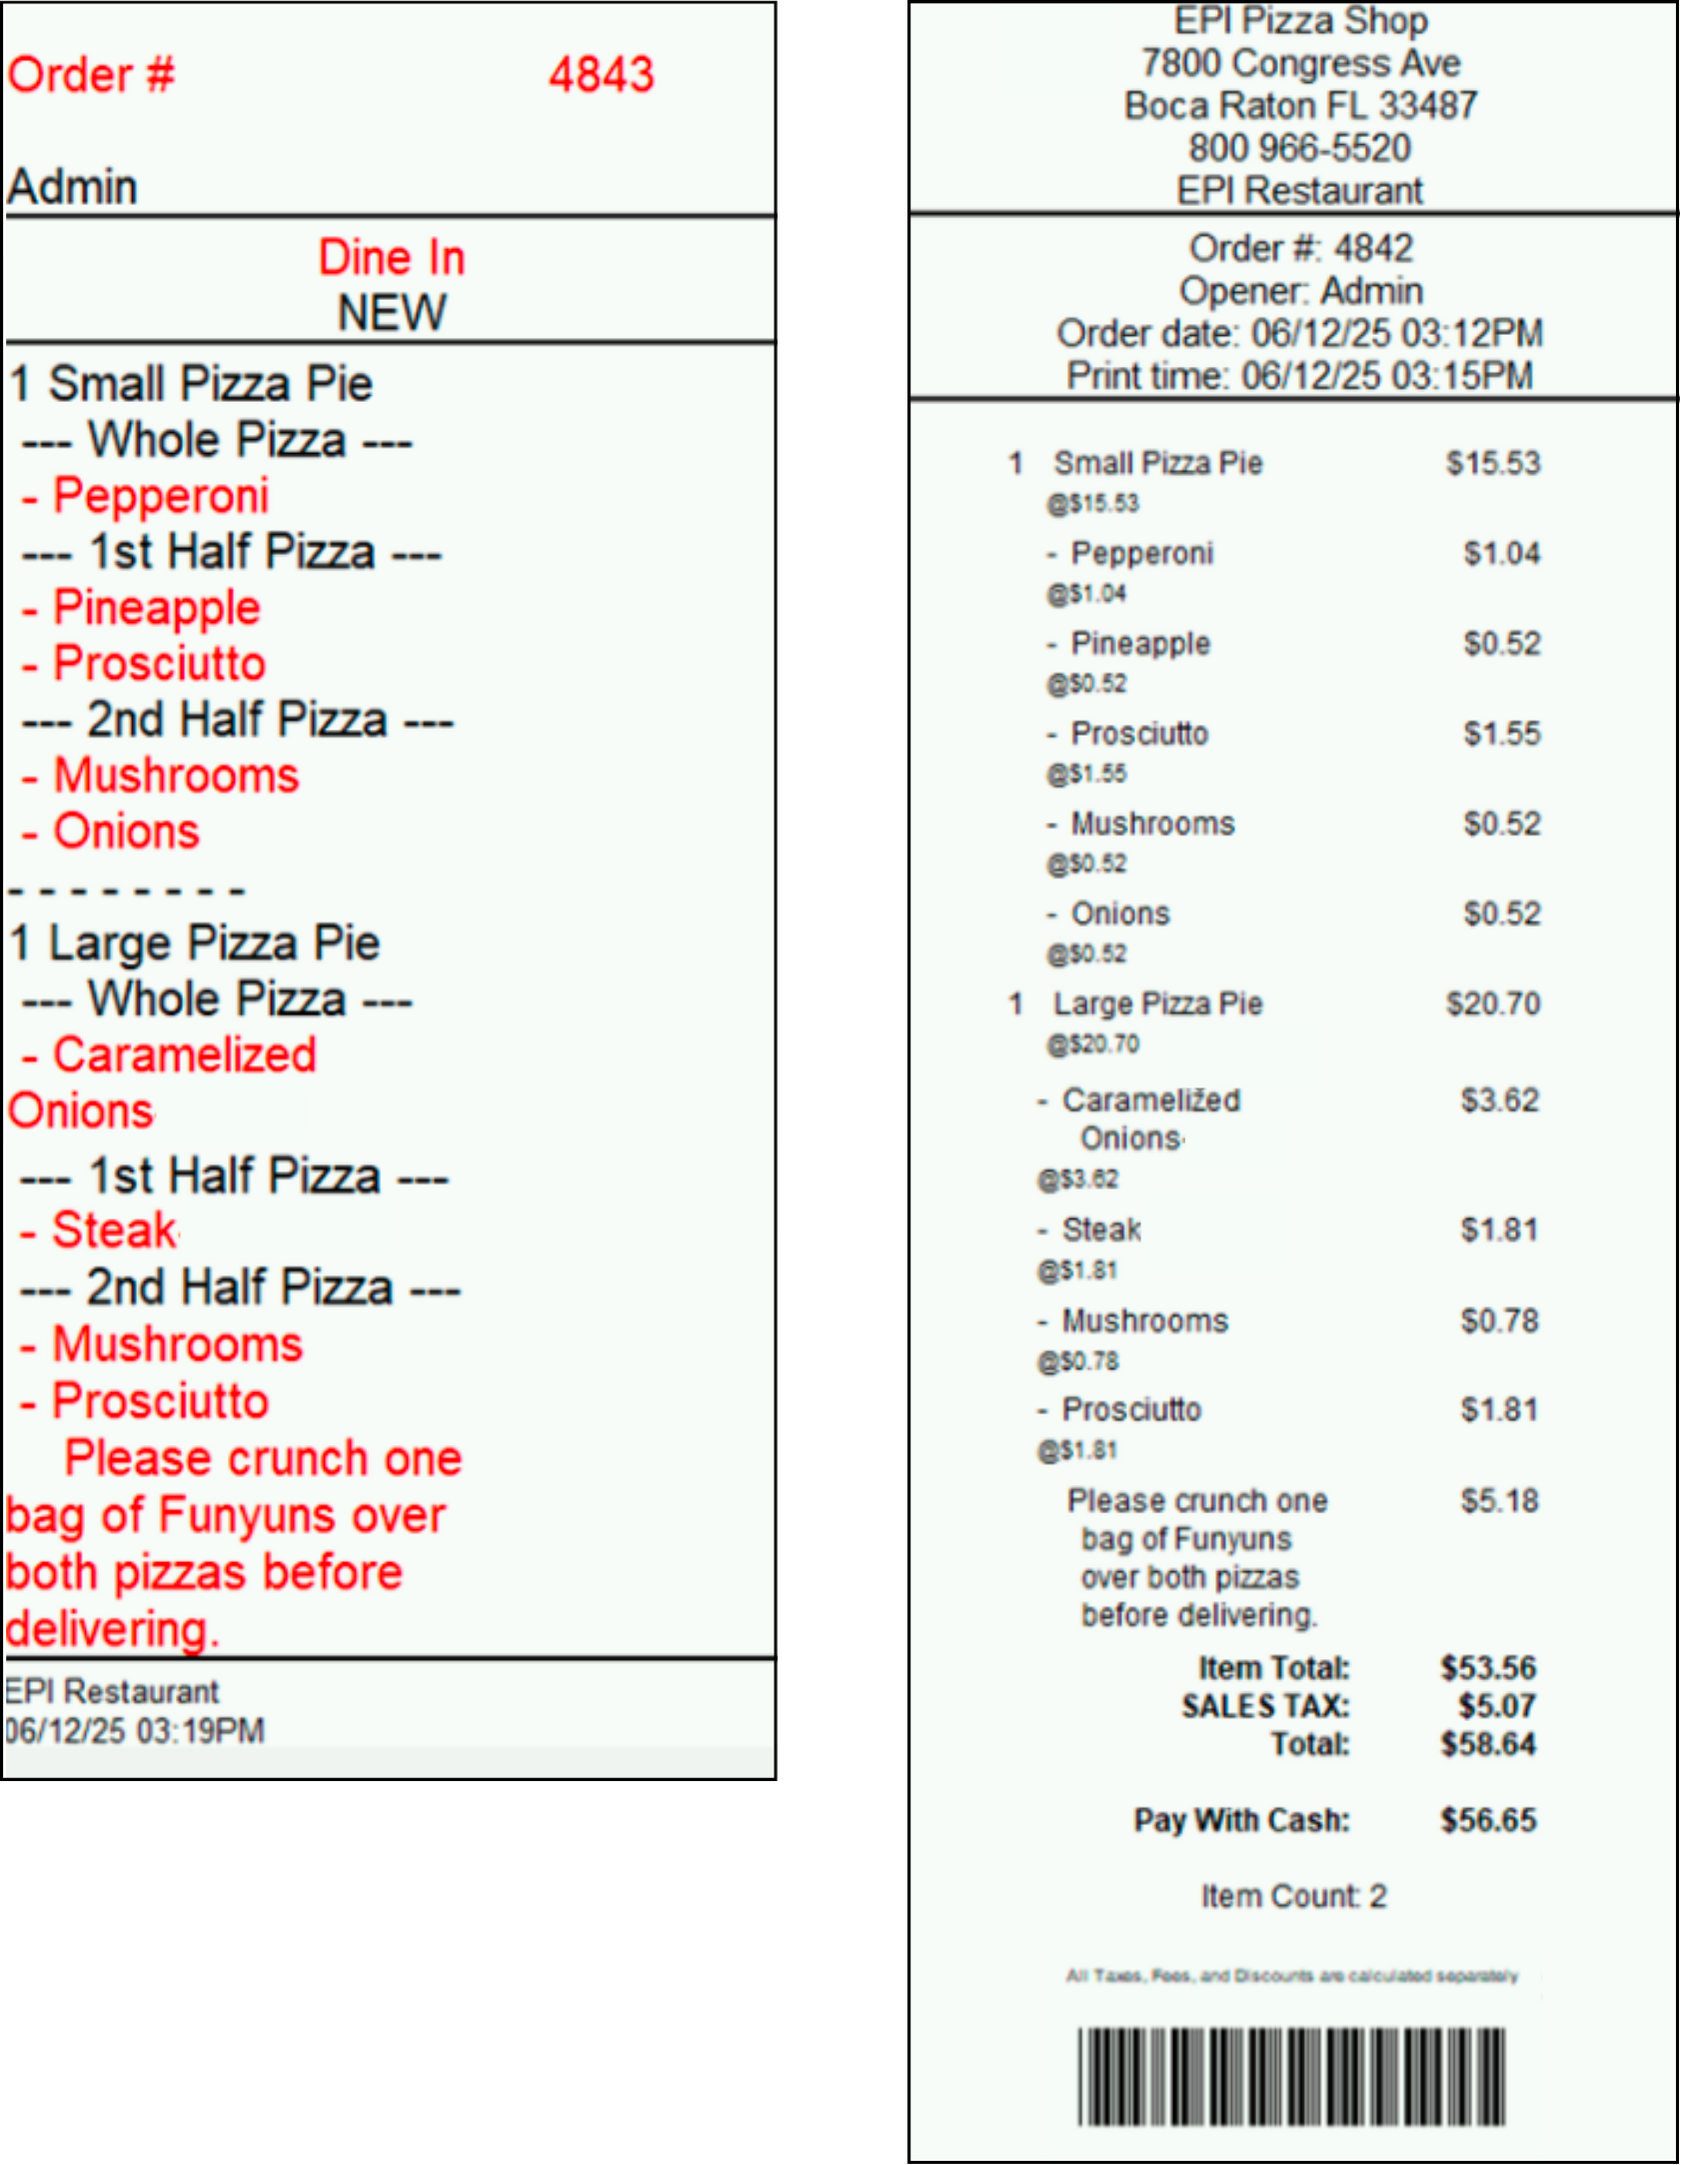
- Important: There is an option of adding a price to the note, but Exatouch does NOT automatically remove these special order items from inventory.



How can we improve this information for you?
Registered internal users can comment. Merchants, have a suggestion? Tell us more.