This article includes an archive of Release Notes from 2020.
Release Notes 8.316
We’ve expanded remote printer options to help your staff pull together full orders generated at multiple stations, as well as added visible Open Batch alerts to help keep you on top of your daily batch settlements.
Closing your daily batch (settling your credit card transactions) is an important part of keeping your cash flow moving. We’ve added an open batch alert to ensure you remember to take this important step at least once a day.
The open batch message shows up for all users after a batch with online transactions, offline transactions, or both, has been left open more than 24 hours. This bright alert displays in several places:
- The lock screen of your Exatouch stations. (Yellow with red lettering.)
- The Home work area when a user is logged in to Exatouch. (Red lettering.)
- The Register task bar. (Yellow with black lettering.) If you tap the task bar warning, a message pops up, instructing you to call Support for assistance if needed.
You can settle the batch immediately, or contact Support for assistance in settling the batch.
You can also send an alert via email to your designated support contact. Set up your Support Contact by navigating from Home to > Settings > Business Details. Provide a Support Contact Name, Phone #, and Email address.
Once you have settled the batch for all outstanding transactions, the message disappears until the next time the batch remains open for more than 24 hours.
Keep track of orders split across multiple workstations at a glance using the remote print option, Print Remote Printer Names. Enabled by default, this setting adds the printer names to remote order tickets. These names help your staff pick up the balance of the order from the appropriate station.
- Example: An order split between the Bar, Grill Station, and Salad stations generates three tickets.
- At the Bar, *Grill Station and *Salad print on the ticket to alert staffers to collect the balance of the order from those stations.
- At the Grill Station, *Bar and *Salad print on the ticket to alert staffers to collect the balance of the order from those stations.
- At the Salad, *Bar and *Grill Station print on the ticket to alert staffers to collect the balance of the order from those stations.
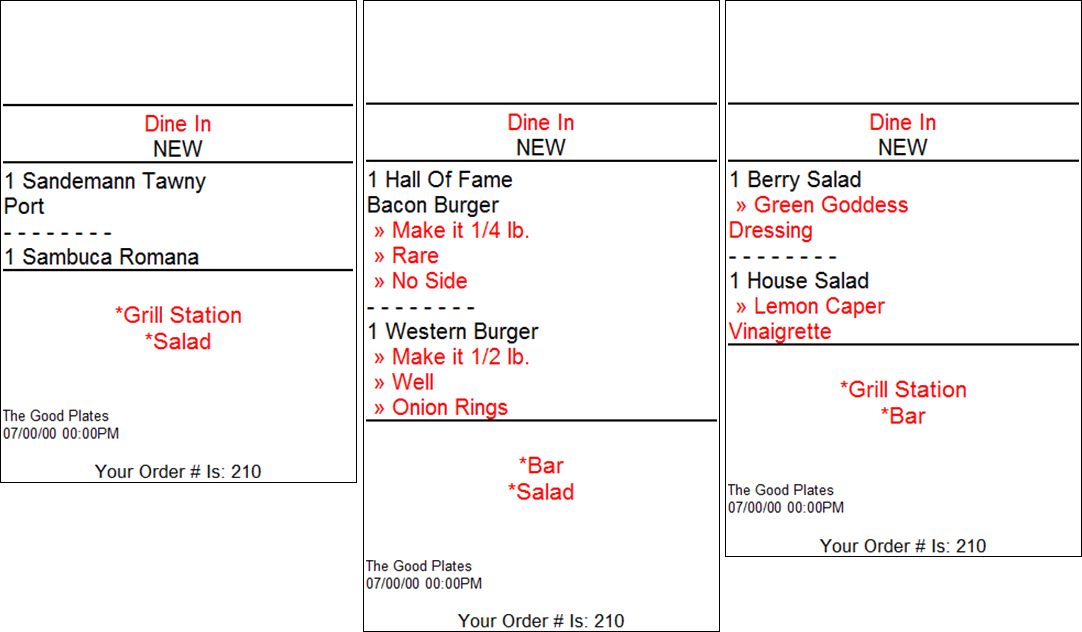
This setting is enabled by default. To disable this setting or adjust other remote print options, navigate from Home to > Settings > Print Settings > Remote Options tab to make needed changes.
- Ready to Upgrade?: Contact Technical Support at 800-966-5520 – Option 3.
Release Notes 8.313
We’ve added an optional Convenience Fee for DeliverMe orders placed online, and updated various reports to facilitate accounting for this fee.
We’ve added a new, optional flat-rate Convenience Fee in your Exatouch Point of Sale system you can apply to prepaid orders placed using DeliverMe. This fee helps you cover costs incurred by offering online ordering, pickup, and delivery services. This fee does not apply to or affect orders placed directly in your Exatouch POS.
- Note: If you have set up a Checkout Fee in your Exatouch POS, the Checkout Fee is not applied to orders placed using DeliverMe that incur a Convenience fee.
- From Home, navigate to Settings > Register Preferences > Delivery tab.
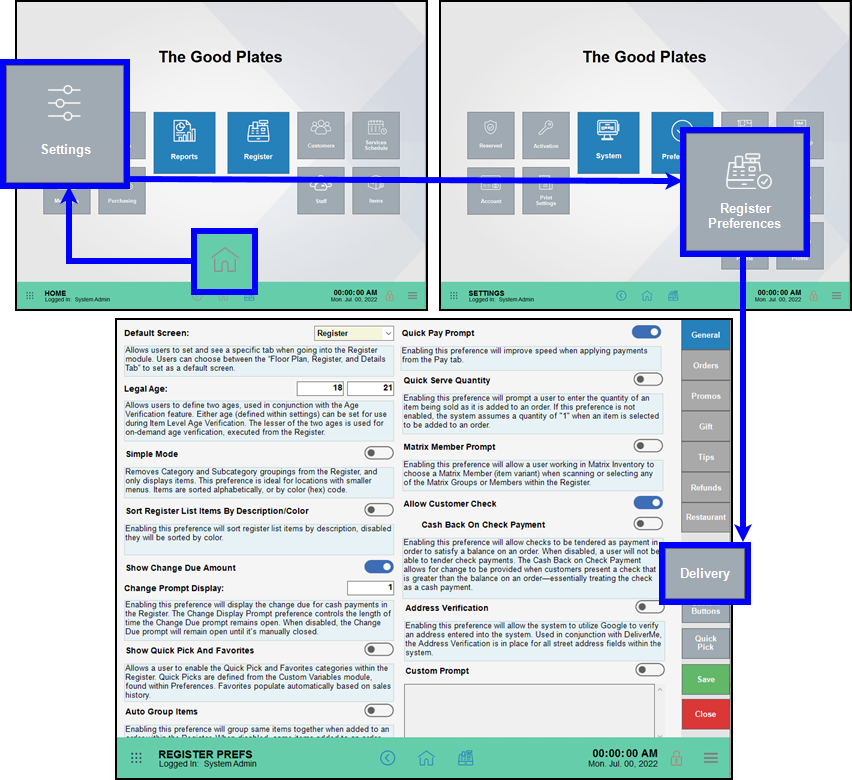
- Enter a Convenience Fee. This is a flat dollar amount, not a percentage amount.
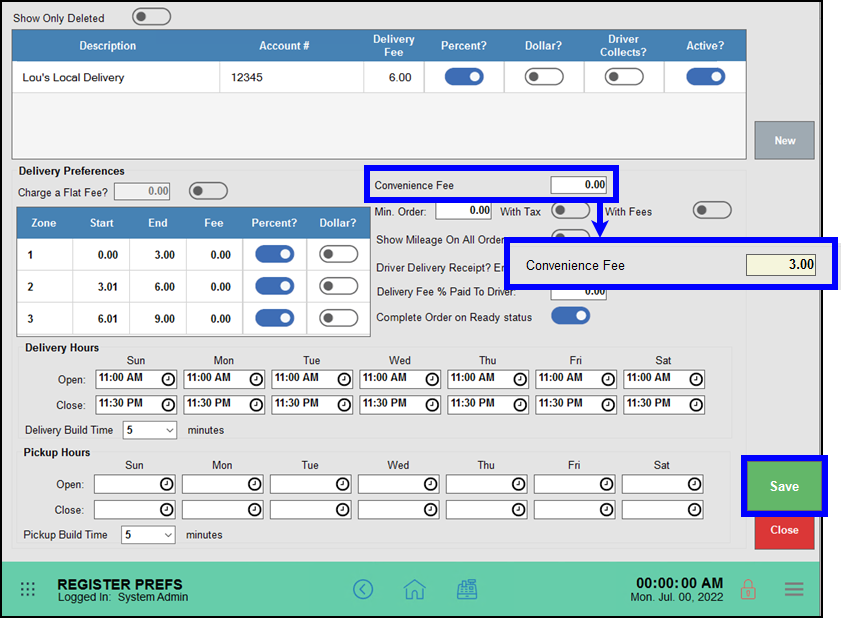
- Tap Save to save your changes.
Prepaid orders placed using DeliverMe are charged a Convenience Fee. Orders placed for delivery using Exatouch are charged a Checkout Fee, if set.
- Ready to Upgrade?: Contact Technical Support at 800-966-5520 – Option 3.
- Warning: Exatouch versions 8.367 and earlier may not fully comply with recently implemented card brand requirements. Electronic Payments, Inc. strongly recommends you update to the latest version of Exatouch to meet these requirements.
The new Convenience Fee for DeliverMe orders has been added to several reports.
- A Convenience Fee column been added to the Tender Disc and Fees report (formerly Tender Disc & Checkout Fee report).
- Convenience Fee information has been added to the Daily Business Overview (DBO) report, and the Snapshot (in the Order Summary section of the Checkout Fee column).
- Ready to Upgrade?: Contact Technical Support at 800-966-5520 – Option 3.
Release Notes 8.311
We’ve added new options that give you flexibility for collecting taxes in a manner appropriate to your jurisdiction when you use Checkout Fees, as well as enhanced the contrast of custom buttons in the Register app buttons grid.
We’ve added two new settings you can use to determine how and when to collect taxes when you use an Admin Fee.
Fee is Taxable: When enabled, taxes are calculated on the admin fee and the subtotal. Both the admin fee and subtotal are taxed.
Apply Fee to Taxes: When enabled, taxes are calculated only on the subtotal. Both the subtotal and the taxes are used to calculate the admin fee. Taxes are not applied to the admin fee.
If both Fee is Taxable and Apply Fee to Taxes are disabled, taxes are calculated on the pre-tax subtotal. The admin fee is calculated on the pre-tax subtotal and is added in to calculate the final total.
Enable Admin Fee Tax Settings
- From Home, navigate to Settings > Account > Admin Fee tab.
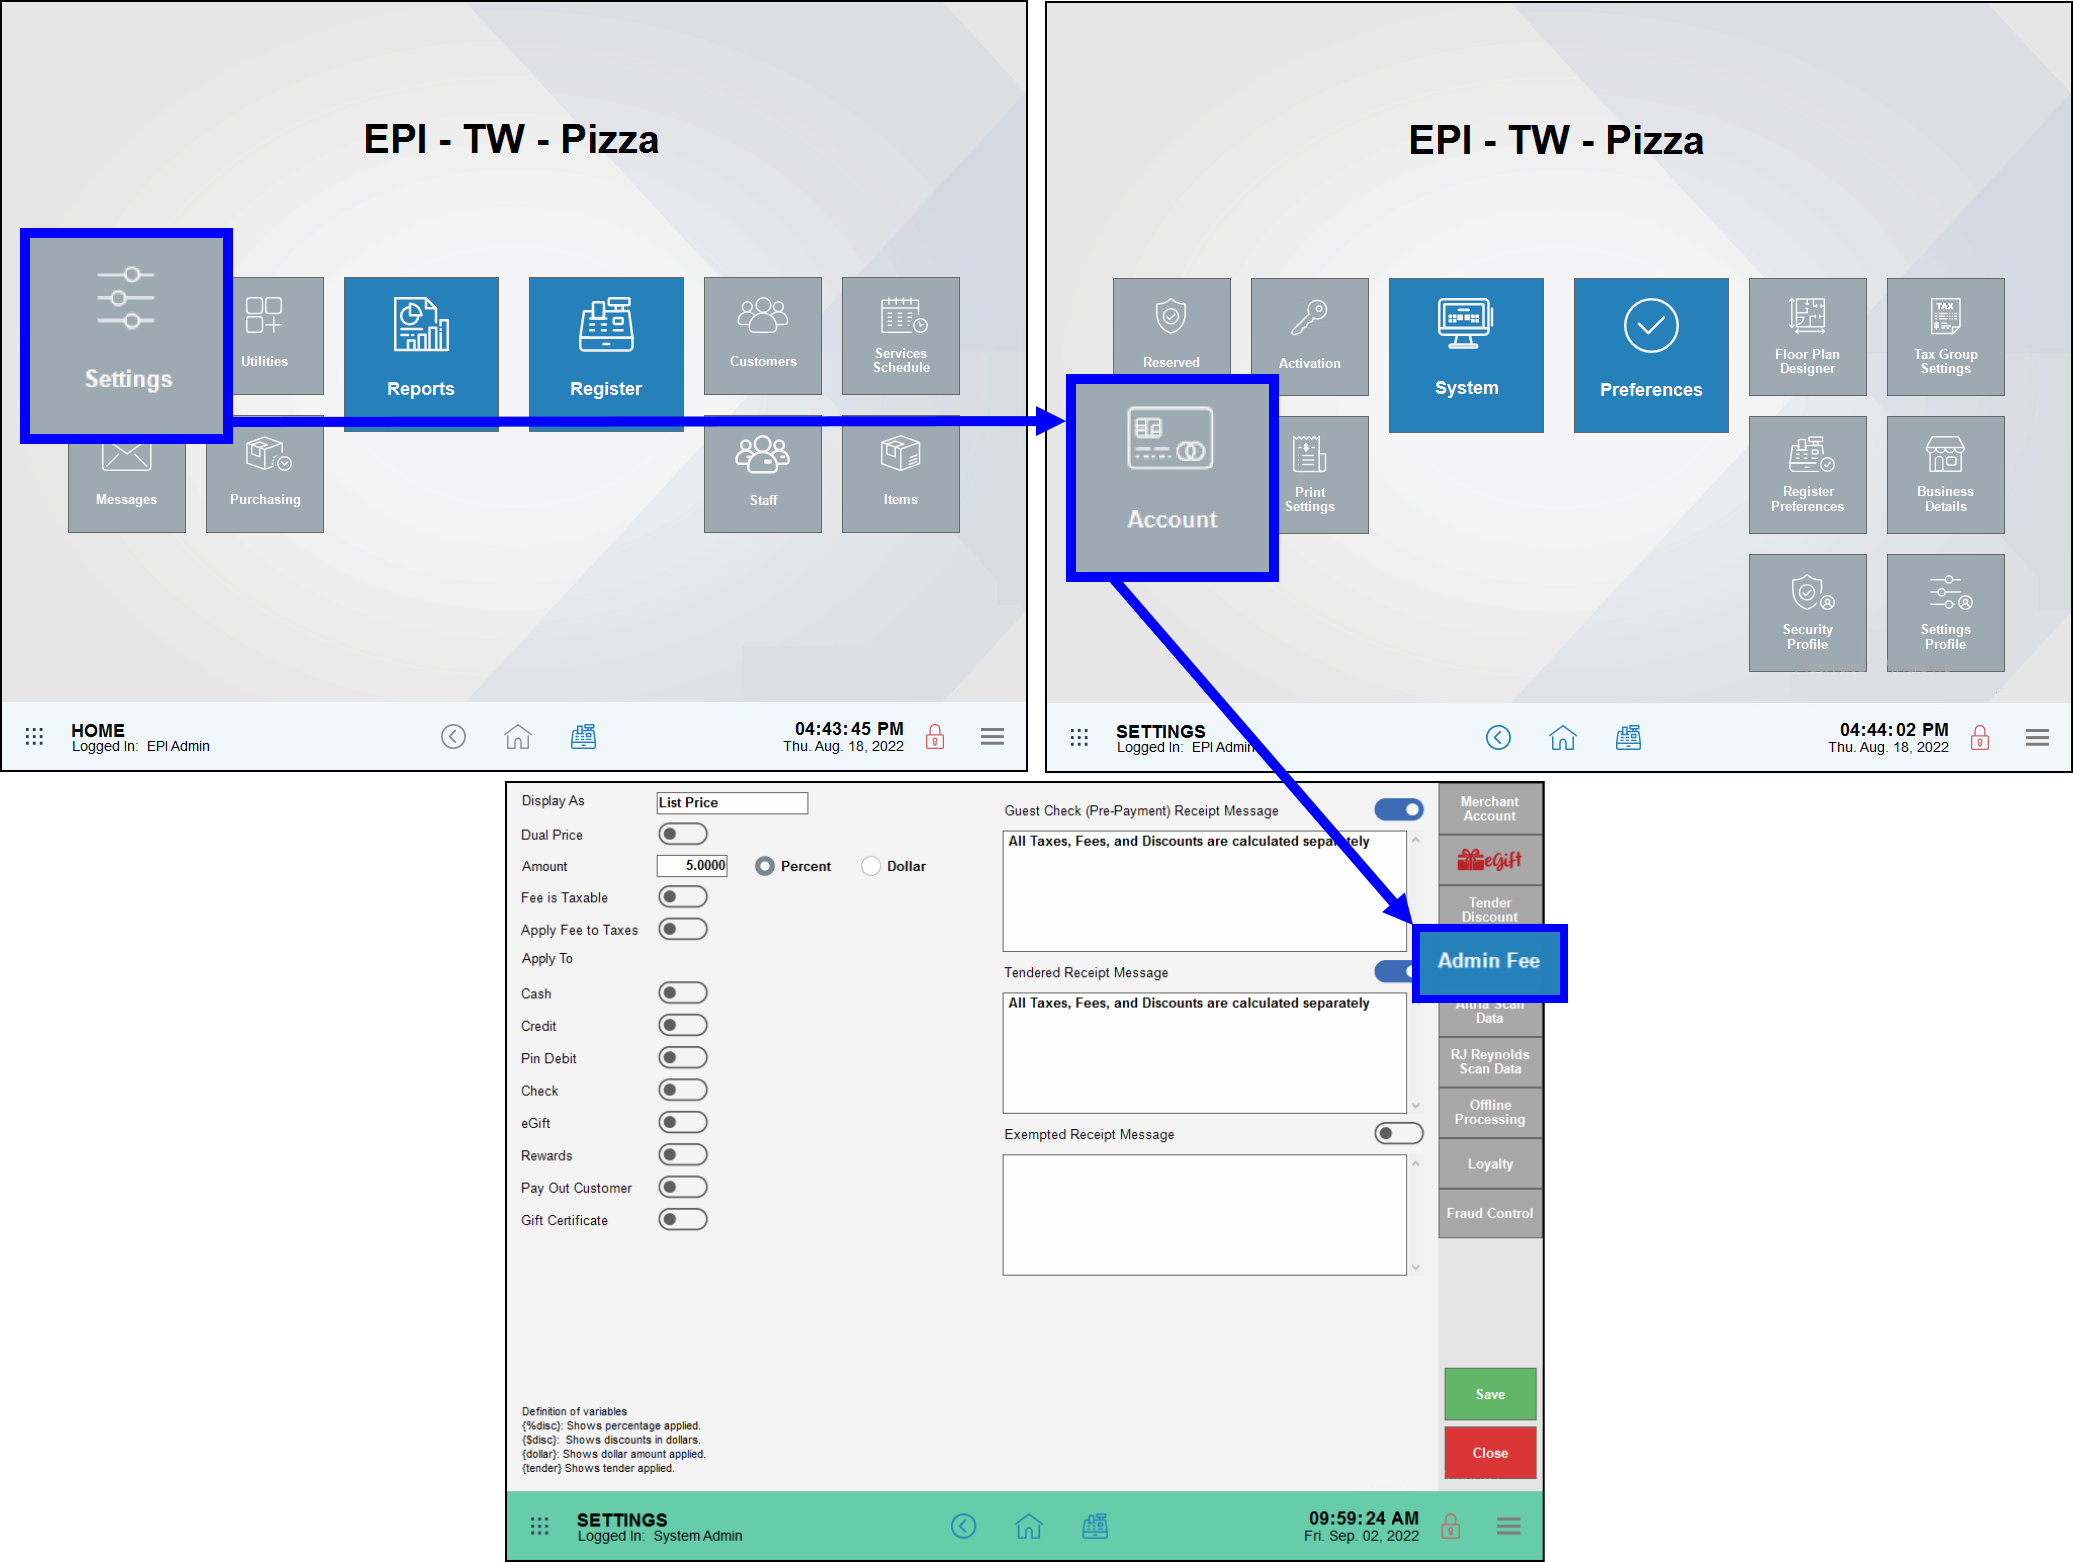
- Enable the appropriate tax settings. You cannot enable both Fee is Taxable and Apply Fee to Taxes. You can disable both.
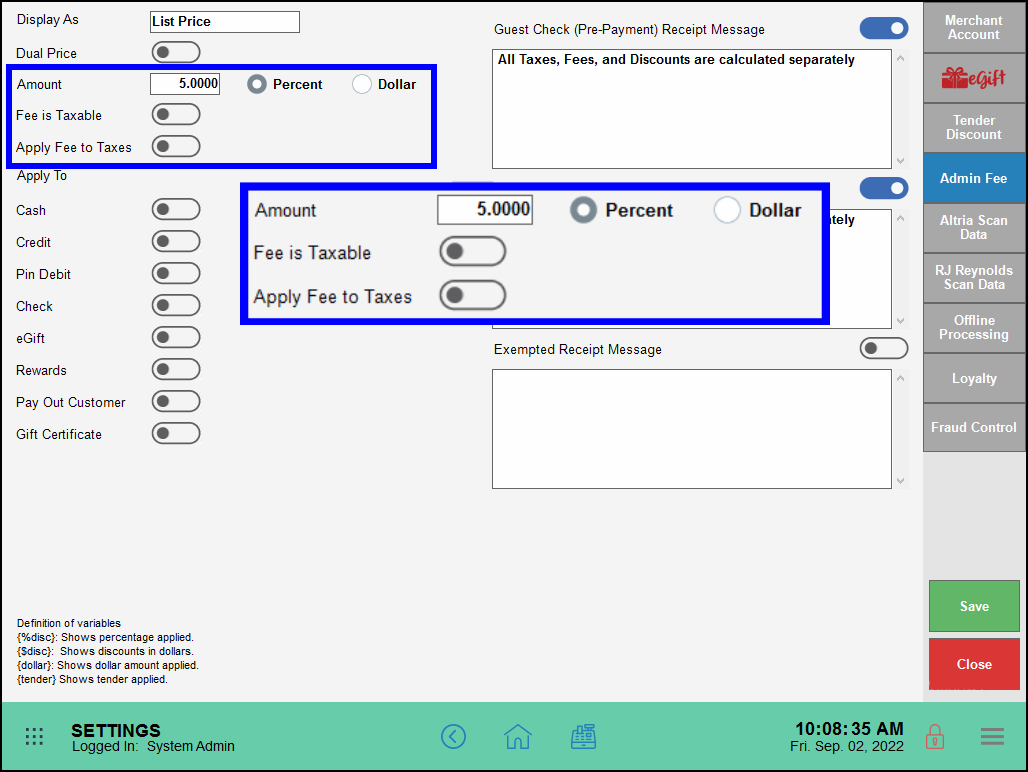
- Tap or click Save to save your changes.
- Note: To calculate taxes on any Admin Fees, you must also enable Admin Fees in the appropriate tax groups. From Home, navigate to Settings > Tax Group Settings > and enable Admin Fee in the appropriate Tax Groups.
- Ready to Upgrade?: Contact Technical Support at 800-966-5520 – Option 3.
- Note: Please note that changes in federal banking regulations may result in adjustments to the EBT, dual pricing, cash discount features.
Release Notes 8.310
With this release, you now have the option to offer DeliverMe online ordering to your customers. We’ve also expanded Delivery and Pickup options, making management of to-go orders easier. Increase your payment acceptance flexibility with Scan To Pay — add a QR code to payment receipts and customers can complete payment using their own smart device. And finally, we’ve updated our inventory export to include new fields to match the updates made to inventory import in version 8.309.
Simplify your inventory updates by exporting and importing data directly into Exatouch! We’ve expanded our export capability to include new fields, including Vendor fields used to link items and vendors. Fields included in your inventory item export CSV file:
- Item Name (Description) [Required for Import]
- Detailed Description (DescLong)
- Button Label (DescButton)
- Receipt Description (DescReceipt)
- Remote Print Description (DescRemote)
- Price (Price) [Required for Import]
- Suggested Retail Price (PriceSuggest)
- SKU/Barcode (SKU)
- Alternate SKU (AltSKU)
- Tag Along/DRV (TagAlong)
- Cost Index (CostIndex) [CostEntered=0, CostRecent=1, CostAvg=2, CostLow=3]
- Average Cost (CostAvg)
- Recent Cost (CostRecent)
- Entered Cost (CostEntered) [Required for Import]
- Lowest Cost (CostLow)
- Quantity In Stock (QtyOnHand) [Required for Import]
- Minimum Quantity Alert (MinQty)
- Reorder Quantity (QtyReorder)
- Minimum Order Quantity (OrderMin)
- Category (Category)
- Subcategory (SubCategory)
- Manufacturer (Mfg)
- Manufacturer Part Number (MfgPart)
- Color (Color)
- Size (Size)
- Sales By (SBF) [SoldbyUnit=0, [SoldbyFraction=1] [Required for Import if using Unit and ChargeUnit fields]
- Pack Size (PackSize)
- Pack Unit (PackUnit)
- Unit (Unit) [lb, kg, gl, hr] [Required for Import if using SBF]
- Charge Unit (ChargeUnit) [lb, kg, gl, hr] [Required for Import if using SBF]
- Custom Field 1 (CustomField1)
- Custom Field 2 (CustomField2)
- Custom Field 3 (CustomField3)
- Primary Vendor (Vendor)
- Vendor Buy Quantity (VendorBuyQty)
- Vendor Cost (VendorCost)
- Vendor Part Number (VendorPart)
- Vendor Suggested Retail Price (VendorSRP)
- Vendor Lead Time (VendorLeadTime)
- Note: Contact Technical Support at 800-966-5520 – Option 3 for assistance in using your inventory item export CSV file.
- Tip! Not sure what version of Exatouch you’re running? Click here to learn how to find out.
Your customers have a new way to browse your offerings and order their favorites: your DeliverMe online ordering site. This release includes the foundational technology we can use to help you add DeliverMe online ordering seamlessly to your existing Exatouch Point of Sale system. We’ve also expanded the delivery and pickup workflows in the Register app. Set separate hours for pickup and delivery, manage the flow of orders, and temporarily pause order acceptance as needed.
DeliverMe Online Ordering
If you add DeliverMe online ordering to your pickup and delivery offerings, set up is easy. We’ll help you set up your site, help you prepare your menu and inventory items, and support you every set up the way.
Your customers will find their orders easy and convenient to place on their smartphone, tablet, or desktop computer. They can place their orders for immediate or future pickup or delivery—and you can manage it all from your Exatouch Register app.
Expanded Pickup and Delivery Options
Pickup and Delivery orders, whether placed directly by staff in Exatouch or submitted online, can all be managed in your Exatouch Register app. View orders in each stage of preparation, preview future orders, and temporarily halt orders in the event of an unexpected surge in orders.
- Tip! Not sure what version of Exatouch you’re running? Click here to learn how to find out.
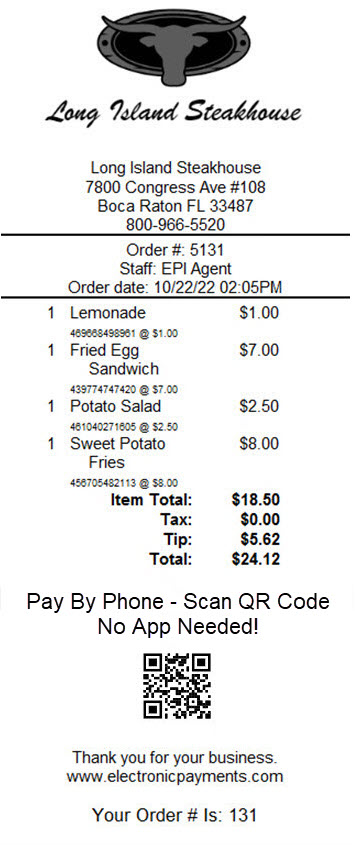
Increase your payment acceptance flexibility with Scan to Pay! Add a QR code to payment receipts, and customers can complete payment using their own smart device.
When you offer Scan to Pay as a payment option, customers have more touchless pay options with the flexibility to complete a transaction in their own time. Use Scan to Pay for customers who phoned-in pickup order, placed a to-go order at your counter, or enjoyed a sit-down pick me up at a table.
- Ready to Upgrade?: Contact Technical Support at 800-966-5520 – Option 3.
Release Notes 8.309
Simplify your inventory updates by importing the data directly into Exatouch! We’ve expanded our import capability to include new fields, including Vendor fields you can use to connect existing vendors or create new vendors.
Fields you can include in your inventory item import CSV file:
- Item Name (Description) [Required for Import]
- Detailed Description (DescLong)
- Button Label (DescButton)
- Receipt Description (DescReceipt)
- Remote Print Description (DescRemote)
- Price (Price) [Required for Import]
- Suggested Retail Price (PriceSuggest)
- SKU/Barcode (SKU)
- Alternate SKU (AltSKU)
- Tag Along/DRV (TagAlong)
- Cost Index (CostIndex) [CostEntered=0, CostRecent=1, CostAvg=2, CostLow=3]
- Average Cost (CostAvg)
- Recent Cost (CostRecent)
- Entered Cost (CostEntered) [Required for Import]
- Lowest Cost (CostLow)
- Quantity In Stock (QtyOnHand) [Required for Import]
- Minimum Quantity Alert (MinQty)
- Reorder Quantity (QtyReorder)
- Minimum Order Quantity (OrderMin)
- Category (Category)
- Subcategory (SubCategory)
- Manufacturer (Mfg)
- Manufacturer Part Number (MfgPart)
- Color (Color)
- Size (Size)
- Sales By (SBF) [SoldbyUnit=0, [SoldbyFraction=1] [Required for Import if using Unit and ChargeUnit fields]
- Pack Size (PackSize)
- Pack Unit (PackUnit)
- Unit (Unit) [lb, kg, gl, hr] [Required for Import if using SBF]
- Charge Unit (ChargeUnit) [lb, kg, gl, hr] [Required for Import if using SBF]
- Custom Field 1 (CustomField1)
- Custom Field 2 (CustomField2)
- Custom Field 3 (CustomField3)
- Primary Vendor (Vendor)
- Vendor Buy Quantity (VendorBuyQty)
- Vendor Cost (VendorCost)
- Vendor Part Number (VendorPart)
- Vendor Suggested Retail Price (VendorSRP)
- Vendor Lead Time (VendorLeadTime)
- Note: Contact Technical Support at 800-966-5520 – Option 3 for assistance in creating your inventory item import CSV file.
- Ready to Upgrade?: Contact Technical Support at 800-966-5520 – Option 3.
Release Notes 8.307
In this release, we’ve added a new setting to Security Profiles: Register, Access All Open Orders. Enable to allow your staff to access all Open orders to perform Edit, Join, Print, Complete, and Void actions.
Register, Access All Open Orders replaces the setting Open Floor Plan Section (Restaurant tab, Register Preferences). It is enabled by default for Admin Security Profiles only. Enable on other security profiles as needed.
This option alters the functionality of the Staff, Staff Maintenance setting (Security Profiles). Enabling Staff, Staff Maintenance now only grants access to Staff Details functions. It is enabled by default for Admin Security Profiles only. Enable on other security profiles, if needed, to allow staff access to Staff, Staff Maintenance.
Use Staff Details to add, maintain, and delete staff members. Additionally, time clock entry maintenance and work schedule creation tasks are performed by users with access Staff Details.
- Ready to Upgrade?: Contact Technical Support at 800-966-5520 – Option 3.
Release Notes 8.305
In this release, we’ve added a mechanism for Manual Credit Card acceptance, updated features for Checkout Fees, added support for Alternate SKUs for non-inventory items, improved Factor 4 API support, and more!
- Warning: Exatouch versions 8.367 and earlier may not fully comply with recently implemented card brand requirements. Electronic Payments, Inc. strongly recommends you update to the latest version of Exatouch to meet these requirements.
- Tip! Not sure what version of Exatouch you’re running? Click here to learn how to find out.
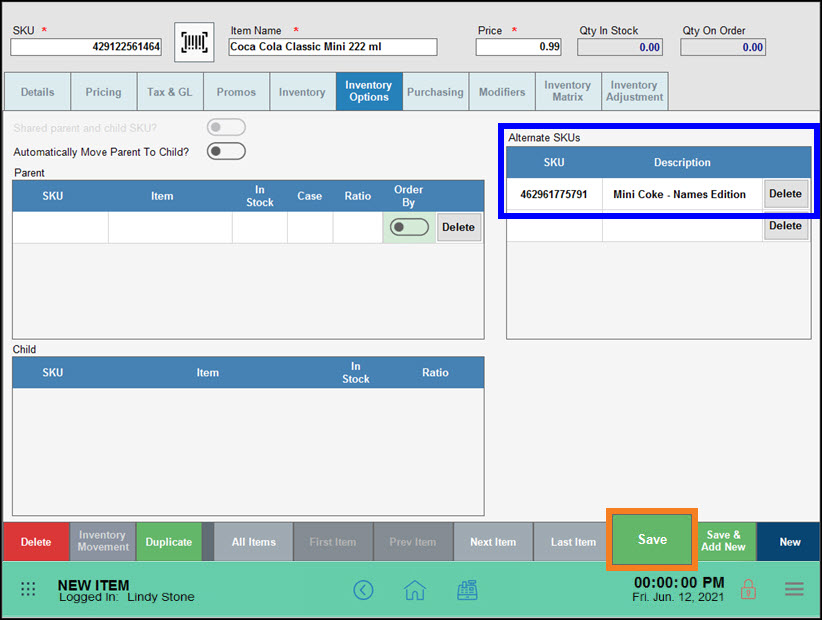
Define multiple Alternate SKUs for non-inventory items using the Inventory Options tab.
To define Alternate SKUs for inventory and non-inventory items, perform the following:
- Navigate to the Item Details Inventory Options tab for an item.
- Tap an empty SKU field in the Alternate SKU work area and enter an alternate SKU.
- Tap the Description field and enter the description of the alternate SKU.
- Tap Save after completing all changes on the Inventory Options tab.
- Ready to Upgrade?: Contact Technical Support at 800-966-5520 – Option 3.
- Warning: Exatouch versions 8.367 and earlier may not fully comply with recently implemented card brand requirements. Electronic Payments, Inc. strongly recommends you update to the latest version of Exatouch to meet these requirements.
All reports, receipts, and Register app labels reflect this change. The functionality of this feature has not changed.
If you elected to edit the name of this field in Settings > Account > Checkout Fee tab, your label is not changed by this update.
- Ready to Upgrade?: Contact Technical Support at 800-966-5520 – Option 3.
We’re always working to make Exatouch better for you and your teams. This release, we’ve made two user interface updates for occasional and frequent users.
Hide Scale View: Running multiple Exatouch Point of Sale systems with and without scales? Now the scale interface is hidden by default if a scale is not attached to a specific unit, simplifying users’ workflow.
Preference Settings: We’ve tweaked the look and feel of various preference work areas for ease of use and navigation.
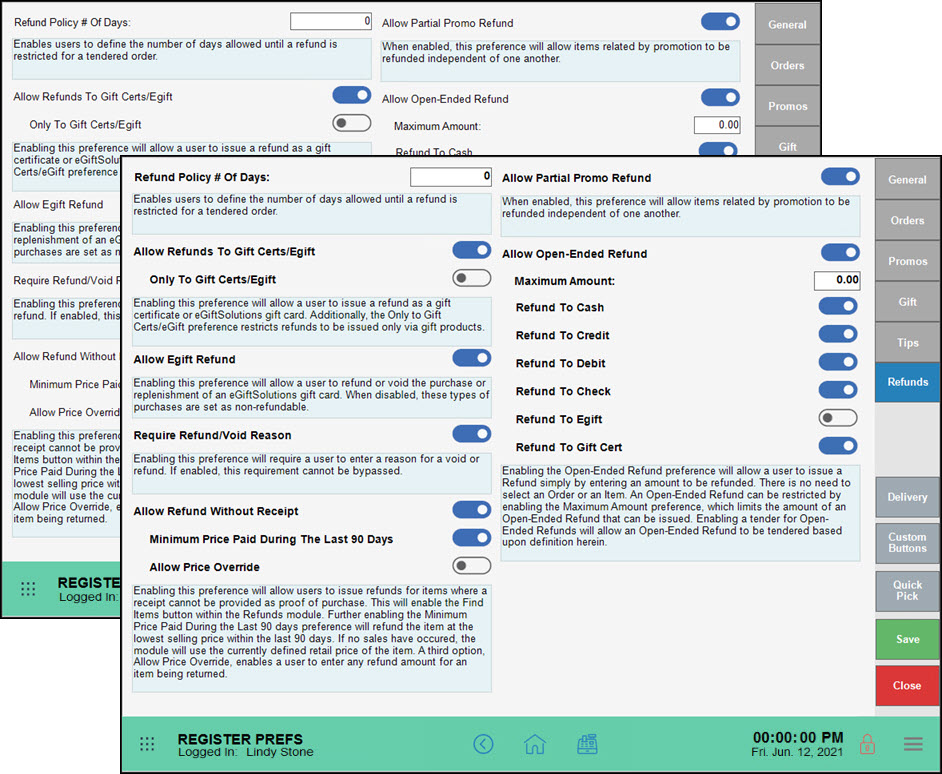
- Note: Only administrative users can change settings in your Exatouch system.
- Ready to Upgrade?: Contact Technical Support at 800-966-5520 – Option 3.
Credit card payments may be entered manually using Exatouch in addition to your existing payment devices. Simply tap the Manual CC Entry button in the payment work area, tap Pay, then enter required and optional information to process the transaction.
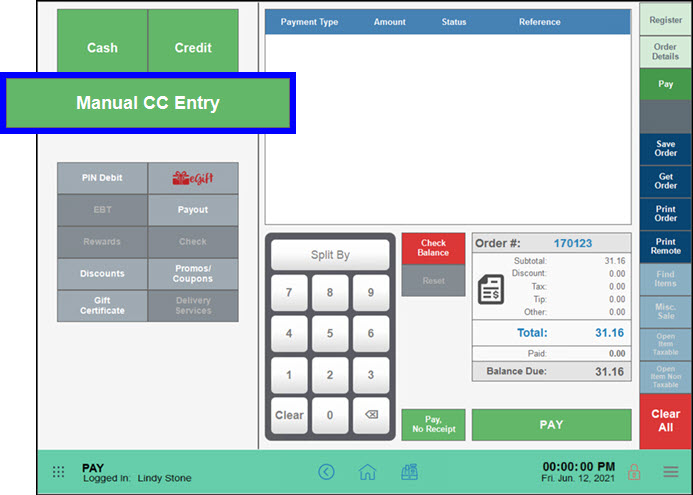 Manual CC Entry simplifies order processing for pickup and delivery. Take and enter card information swiftly, complete transactions easily directly in the Exatouch Register app. Required fields are indicated by a red asterisk.
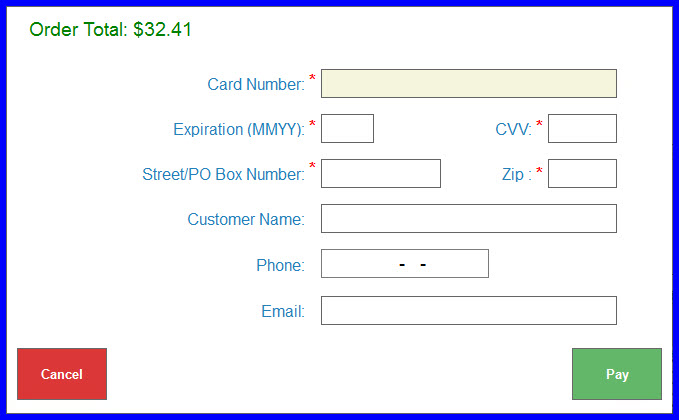
Enter a customer’s email address to email a copy of the receipt automatically.
Refunds are easy, too: quickly process full, partial, or open ended refunds using manually entered credit card information.
If your restaurant is set up for tipping, payment receipts for customers and merchants include a tip line, as do your no signature required receipts.
- Ready to Upgrade?: Contact Technical Support at 800-966-5520 – Option 3.
We’ve updated the Estimated Cash Deposit field, and added it to several reports and snapshots. The total for Est. Cash Deposit reflects the net cash for deposit minus all non-cash tips. If a negative number, it is displayed as a negative number, such as – $42.73.
- Ready to Upgrade?: Contact Technical Support at 800-966-5520 – Option 3.
Working in Offline Processing mode? Exatouch now checks for internet access while stations are in offline mode, once every minute until access is restored. When a check restores internet access, the Register app returns to online processing of credit card transactions automatically.
- Ready to Upgrade?: Contact Technical Support at 800-966-5520 – Option 3.
Updating customer data? Make all the changes you need in the Customer Detail work area, then tap Save to save your changes to Exatouch and update the information via API to Factor4. A timestamp added to the Customer Detail work area updates when the Factor4 update is complete.
- Ready to Upgrade?: Contact Technical Support at 800-966-5520 – Option 3.
Updated the message for the EULA acceptance prompt for Merchants who have not accepted the Exatouch EULA: Your license is expiring in XX days, please contact support.
- Ready to Upgrade?: Contact Technical Support at 800-966-5520 – Option 3.
Release Notes 8.286
The Exatouch Altria AGDC file format has been updated to meet the format guidelines in effect as of 03/29/2020. To implement this change, upgrade to the current version of Exatouch. Once you upgrade, you can continue to send files the way you have in the past.
File Format Changes
- Field 38: Sends the last six digits of the customer phone number or member number on file in Exatouch, or the phone number captured at the time of sale.
- Field 39: Sends the Age Validation method used.
- Scanned Manual Entry – the ID was barcode scanned or magnetic stripe swiped.
- Other – the acceptable form of Government ID was used and properly overridden in Exatouch.
- Fields 40-45: Not in use. These fields are placeholders for future Altria reporting requirements.
After an Exatouch Upgrade:
- Any files generated after 03/29/2020 are sent in the new format.
- Files for dates before 03/29/2020 that are generated and sent after 03/29/2020 are sent in the new format.
- You can continue to send files the way you have in the past.
- Ready to Upgrade?: Contact Technical Support at 800-966-5520 – Option 3.
If you’ve transitioned to eGiftSolutions from another provider, we’ve simplified manual entry and made it easier to scan and accept cards that use extended serial numbers ranging between 10 and 20 alphanumeric characters.
- Ready to Upgrade?: Contact Technical Support at 800-966-5520 – Option 3.
The first time you upgrade or activate our software to versions 2.0.8.291 or higher, you, the Merchant, or your duly designated employee must accept the End User License Agreement (EULA) for each licensed copy of the Exatouch software your business runs.
You may be prompted to accept this agreement again in the future if:
- Your hardware must undergo a factory reset.
- Electronic Payments, Inc. updates the End User License Agreement.
- Ready to Upgrade?: Contact Technical Support at 800-966-5520 – Option 3.
Keep track of your stock and back stock by adding location information quickly and easily.
Organize and locate your items by adding up to three Stock Locations for each item. A supporting Stock Location report helps you locate items, and summarizes pricing, cost, and margin information.
- Navigate to an item’s Details tab to add Stock Locations information.
- Add up to three Stock Locations in provided fields (10 character maximum).
- Tap Cancel, if needed, to remove a specific location.
- Save your changes.
- Ready to Upgrade?: Contact Technical Support at 800-966-5520 – Option 3.
Several inactive items have been added to the Promos tab, including Exclude From Discounts and Exclude From Promotions.
- Ready to Upgrade?: Contact Technical Support at 800-966-5520 – Option 3.
Receipt descriptions for items can be different for your customer and your back of house staff.
Your customer wants to know their order will be just as they requested, spelled out in detail. Your staff just needs a summary to get it done right. Set up what each audience needs on an item’s Details tab.
- Short desc: Now Receipt Description. Prints on payment receipts for your customer. Edit as needed to describe your item, briefly.
- Remote Print Description: Prints on order receipts and other remote receipts to remote printers for your staff. Edit as needed to inform staff.
- Ready to Upgrade?: Contact Technical Support at 800-966-5520 – Option 3.
Several Item Details work areas have been revamped to make it easier for you to navigate, add, and update your inventory items. Features you use day in and day out are now grouped together in an existing work area, or moved out to a whole new work area that give you more flexibility and visibility into your inventory cycle.
We’ve updated all tabs related to working directly with Items—tap the buttons below to navigate through the articles in this series.
- Ready to Upgrade?: Contact Technical Support at 800-966-5520 – Option 3.
Inventory adjustments happen. We’ve tweaked the behavior of this work area just a bit so you can double check your changes before you save them.
Adjust Inventory for one item:
- Navigate to the Inventory Adjustment tab for a specific item.
- Enter a quantity in either the Qty To Add or Qty to Remove fields.
- Tap Adjustment Reason to add information to support this inventory change – it’s included when you run the Inventory Movement Report. Exatouch uses the existing inventory count to show what the quantity will be adjusted to in the New Qty field.
- Enter your Adjustment Reason. If you are satisfied with the Qty Adjusted and New Qty, tap Save to commit your changes.
The Qty In Stock field at the top of the work area will reflect the updated in stock quantity after you Save your changes.
- Ready to Upgrade?: Contact Technical Support at 800-966-5520 – Option 3.
We’ve consolidated your inventory matrix information into one work area, the Inventory Matrix tab.
- Tap Group to view existing members, and Add Member to add a new member to the Group. Save your changes.
- Tap Member to see what group the item is a member of.
- Ready to Upgrade?: Contact Technical Support at 800-966-5520 – Option 3.
Define multiple Alternate SKUs for one item using the Inventory Options tab.
To define Alternate SKUs for items:
- Navigate to the Inventory Options tab for an item.
- Tap an empty SKU field in the Alternate SKU work area to enter a SKU.
- Tap the Description field to enter the description for the added SKU.
- Tap Save after completing all changes on the Inventory Options tab.
- Ready to Upgrade?: Contact Technical Support at 800-966-5520 – Option 3.
The inventory you’ve linked in a Parent and Child relationship can share and be broken down as needed to fulfill orders.
Set up inventory breakdown between designated Parent and Child items:
- Navigate to the Inventory Options tab for the Parent item.
- Tap to enable Automatically Move Parent To Child?.
- Tap Save after completing all changes in the Inventory Options tab.
- Ready to Upgrade?: Contact Technical Support at 800-966-5520 – Option 3.
We’ve consolidated several common features in Inventory Options to expand how you manage your inventory.
Use Inventory Options (was: Bulk tab) to establish Parent and Child relationships between items, and to set up Alternate SKUs as needed.
We’ve streamlined your inventory management by implementing two stock types: Inventory Item and Non-Inventory item.
- Any items that were a Not an inventory item (such as prepared foods or other menu items) are now listed as a Non-Inventory item. These items can’t have a negative quantity.
- All items that were a Regular inventory item or an Allow negative qty (such as bottled drinks or other retail items) item are now simply an Inventory Item. These items can have a negative quantity.
If you need to change an item from Non-Inventory item to Inventory Item:
- Navigate to the item’s Inventory tab and tap Inventory Item under Stock Type. Save your changes.
If you need to change an item from Inventory Item to Non-Inventory item:
- Navigate to the item’s Inventory Adjustment tab.
- Adjust the quantity of the item to zero (0) if it is not zero. Save your changes.
- Navigate to the item’s Inventory tab and tap Inventory Item under Stock Type. Save your changes.
- Ready to Upgrade?: Contact Technical Support at 800-966-5520 – Option 3.
Navigation buttons and a selection of task options have moved to the bottom of Item work areas.
Looking for the Upcharge for a modifier on a specific item? This information is conveniently listed on the Modifiers tab for each item.
- Example: If you run a restaurant that uses an Extra Chicken modifier, you can set it up as a $3.00 add-on for a to-go lunch salad, or a $6.00 add-on for a dinner entrée.
- Ready to Upgrade?: Contact Technical Support at 800-966-5520 – Option 3.
Need to edit Price and Cost of an item? Change these on an item’s Pricing tab.
While Price and Cost are now visible on all work areas in Item Details, you can use the Pricing tab to edit these fields.
Sold By Unit of Measure is now Sold By Weight.
- Ready to Upgrade?: Contact Technical Support at 800-966-5520 – Option 3.
Does your new promo run every day of the week? Simply enable Every Day as you build your promotion on the Item Details Promos tab to run it with one tap every day between your start and end dates and times.
- Ready to Upgrade?: Contact Technical Support at 800-966-5520 – Option 3.
Several inactive items have been added to the Promos tab, including Exclude From Discounts and Exclude From Promotions.
- Ready to Upgrade?: Contact Technical Support at 800-966-5520 – Option 3.
Our new price reduction option lets you mark down prepackaged items created using your un-integrated scale. Quickly and easily discount deli, meat, or produce.
Define a Group, PLU, and Price in the Price reduction work area for each item; print a new label using your label printer as needed.
- Ready to Upgrade?: Contact Technical Support at 800-966-5520 – Option 3.
We’ve consolidated several groups of information on an item’s Purchasing tab to give you more visibility into your item activity and vendor information.
- Current Year and Previous Year activity for Sales and Purchases lets you see sales and purchase patterns in a simple grid layout.
- More information about vendors linked to this item is included, giving you visibility into Vendor Part Number, Vendor SRP, Vendor Cost, Buy Qty, and Lead time for each item.
- Easily add or delete vendors by tapping an empty line to add a vendor, or tapping Delete to remove a linked vendor.
- Tap Default Vendor to select a preferred default vendor for an item. Save your work after completing all changes here.
- Ready to Upgrade?: Contact Technical Support at 800-966-5520 – Option 3.
Tax Group Codes, Revenue Class, and Revenue Center selections are now on the Tax & GL (General Ledger) tab.
- Ready to Upgrade?: Contact Technical Support at 800-966-5520 – Option 3.
Several fields are now at the top of the work area; you’ll have handy information available as you adjust, update, and modify items.
These fields include:
- SKU and Item Name, editable on the Details tab.
- Price, editable on the Pricing tab.
- Qty In Stock and Qty On Order, not editable. This information is fed from current inventory and purchase order data.
- Ready to Upgrade?: Contact Technical Support at 800-966-5520 – Option 3.
Do your customers love your mix & match promotions? We’ve made creating them easier–search for and add items by category and subcategory to speed promotion creation.
- Start a new Mix & Match promotion: From Home, navigate to Items > Promos > Mix & Match tab > and tap New.
- Name your Promotion and tap Add Items. An items search work area opens.
- Use Category and Subcategory in several ways to help you select items for your promo:
- Search for items by name, then use the Category and Subcategory drop-down lists to narrow the results. Tap individual items to add, or tap Insert All to add all returned items to the promo. Tap Close to return to the promo work area and continue building your promo.
- You can also add an entire category or subcategory easily. Select a Category, and optionally a Subcategory. Tap individual items to add, or tap Insert All to add all items from the category or subcategory returned to the promo. Tap Close to return to the promo work area and continue building your promo.
- When your promo is fully built, tap Save to your changes.
- Ready to Upgrade?: Contact Technical Support at 800-966-5520 – Option 3.
With this change, your staff and customers can more easily track and match orders.
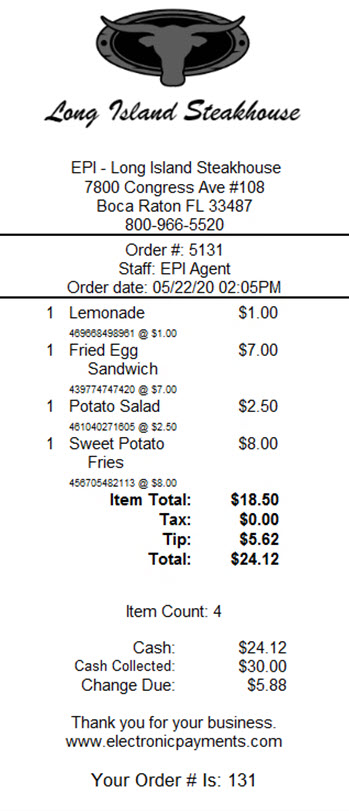
Enable Print Last 3 Digit Order # to include the last three digits of an order number on payment and order receipts. This is disabled by default.
- Note: Only administrative users can change settings in your Exatouch system.
- To enable: From Home, navigate to Settings > Print Settings > Remote Options tab > and tap Print Last 3 Digit Order #.
- Save your changes.
- Ready to Upgrade?: Contact Technical Support at 800-966-5520 – Option 3.
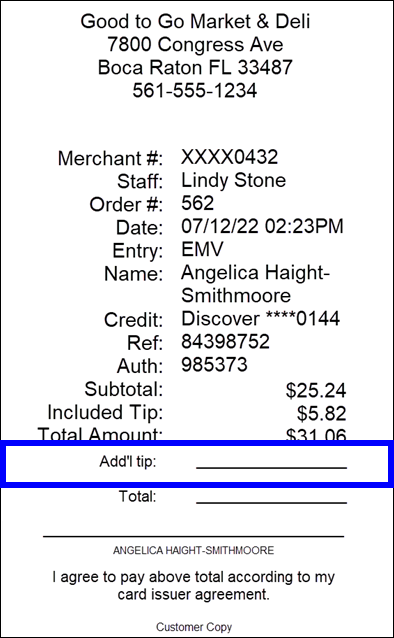
We’ve added a new label, Included Tip:, to payment receipts.
The Included Tip: line replaces the staff member’s name next to the included tip amount. This tip line is positioned between the Subtotal and Total Amount sections.
- Ready to Upgrade?: Contact Technical Support at 800-966-5520 – Option 3.
You now have the option to print receipts without signature lines. One less step in your payment processing facilitates a quick turnaround of payment acceptance.
When enabled, the message Chip Card Used, No Signature Required is added in place of the signature line on the receipt for all card transactions.
When enabled, Signature Copy Only, Print Receipt for Each Tender, and Receipt Prompt are disabled.
- Note: Only administrative users can change settings in your Exatouch system.
- To enable: From Home, navigate to Settings > Print Settings > Receipt Options > and tap No Signature Required Receipts; enable Print Customer Receipt if needed.
- Save your changes.
- Ready to Upgrade?: Contact Technical Support at 800-966-5520 – Option 3.
Remote receipt printing now supports faster, more visible change reprints.
After an initial order has printed to the kitchen, bar, or other remote order printer, any reprints issued after a change indicate the changes on the on a per-item basis.
Item labels used are:
- *C* – Items printed with *C* have been changed from the initial order to the present request.
- *N* – Items printed with *N* have been newly added to the order.
- *V* – Items printed with *V* have been voided and removed from the order.
- Order changes will no longer print indicators with a shaded background, improving visibility and printing speed.
- Ready to Upgrade?: Contact Technical Support at 800-966-5520 – Option 3.
Along with the stock type simplification, we’ve updated the inventory preference settings for default stock type. Set your default Stock Type if you expect to add new inventory or non-inventory items and define cost requirements as needed.
- To set the default Stock Type:
- From Home, navigate to Settings > Preferences > Inventory tab > Stock Type.
- Select a default Stock Type, Inventory or Non-Inventory.
- Tap Update All Items to save this selection.
- Adjust any other preferences, as needed.
- Tap Save after completing all changes in this work area.
- You can optionally require cost information for all Inventory items. Cost Required is disabled by default, and is never applicable to Non-Inventory items.
- From Home, navigate to Settings > Preferences > Inventory tab > and tap Cost Required to enable.
- Adjust any other preferences, as needed.
- Tap Save after completing all changes in this work area.
- Ready to Upgrade?: Contact Technical Support at 800-966-5520 – Option 3.
Additional columns have been added to the Staff Shift Reports: Owed to House and Owed to Staff. Pay Out Non-Cash Tips, disabled by default, controls the amounts shown in these columns.
If you enable Pay Out Non-Cash Tips, run this report to determine how much cash to pull for staff and the house at the end of a shift.
- Note: Only administrative users can change settings in your Exatouch system.
To enable, navigate from Home to Settings > Register Preferences > Tips and tap Pay Out Non-Cash Tips.
- Owed to House shows the total funds to pull from all cash drawers for all tender types. If run for one station, the report applies to that station only.
- Owed to Staff shows the total funds to pull from all cash drawers for all tender types. If run for one station, the report applies to that station only.
- Owed to Staff amounts are deducted from the Owed to House total.
If you do not enable Pay Out Non-Cash Tips, the Owed columns are blank. This setting is disabled by default.
The Net Cash column in the summary report is calculated using the settings for Owed to House and Owed to Staff. Net Cash indicates the total cash to pull from the drawers. Use as a quick reference when performing drawer counts or audits.
- Ready to Upgrade?: Contact Technical Support at 800-966-5520 – Option 3.
The Stock Location report to helps you locate items, and summarizes pricing, cost, and margin information.
- To run the report, from Home, navigate to Reports > Items > and tap Stock Location.
- All locations, if provided, print on the report, up to all three locations.
- If no locations are provided, a blank space is shown; write in item locations as you walk around with the report to enter into Exatouch later.
- Ready to Upgrade?: Contact Technical Support at 800-966-5520 – Option 3.

How can we improve this information for you?
Registered internal users can comment. Merchants, have a suggestion? Tell us more.